After installing and configuring MySQL 8.0.30, I installed the Apache Web Server, PHP and the MySQLi packages. Here are the step-by-step instructions after installing and configuring the MySQL Server and provisioning a student user and studentdb database (blog for those steps).
The installation steps are:
- Install the Apache packages as the sudoer user with this command:
sudo dnf install -y httpd
- Enable Apache as the sudoer user with this command:
chkconfig httpd on
This returns the following completion message:
Note: Forwarding request to 'systemctl enable httpd.service'.
Created symlink /etc/systemd/system/multi-user.target.wants/httpd.service → /usr/lib/systemd/system/httpd.service.
A quick Linux syntax note in the event you want to confirm the link or link target later. You can use the following syntax as a sudoer user to find the link:
ls `find /etc -type l | grep httpd.service 2>/dev/null`
and the following syntax as a sudoer user to find the link’s target:
readlink `find /etc -type l | grep httpd.service 2>/dev/null`
- You still need to start the Apache service unless you reboot the operating system as the sudoer user with this command:
apachectl start
- At this point, you need to check the firewall settings because Apache can’t even read localhost at this point. If you’re new to these firewall commands, you should consider reviewing Korbin Brown’s tutorial. As the sudoer user check the Apache available services with this command:
firewall-cmd --zone=public --list-services
It should return:
cockpit dhcpv6-client ssh
Add the following services and ports with these commands:
firewall-cmd --zone=public --add-port 80/tcp --permanent
firewall-cmd --zone=public --add-port 443/tcp --permanent
firewall-cmd --zone=public --add-port 8080/tcp --permanent
firewall-cmd --zone=public --add-service=http --permanent
firewall-cmd --zone=public --add-service=https --permanent
Check the open ports with the following command:
firewall-cmd --zone=public --list-ports
It should return:
80/tcp 443/tcp 8080/tcp
Check the open services with the following command:
firewall-cmd --zone=public --list-services
It should return:
cockpit dhcpv6-client http https ssh
- Create the hello.htm file in the /var/www/html directory as the root user:
Restart the Apache service as the sudoer user:
apache restart
Hello World!
Then, you can launch the Firefox browser and type the following:
localhost/hello.htm
It should print “Hello World!” in the browser.
- Install the php package as the sudoer user with the following command:
sudo dnf install -y php
Create the info.php file in the /var/www/html directory as the root user:
apache restart
Then, you can launch the Firefox browser and type the following:
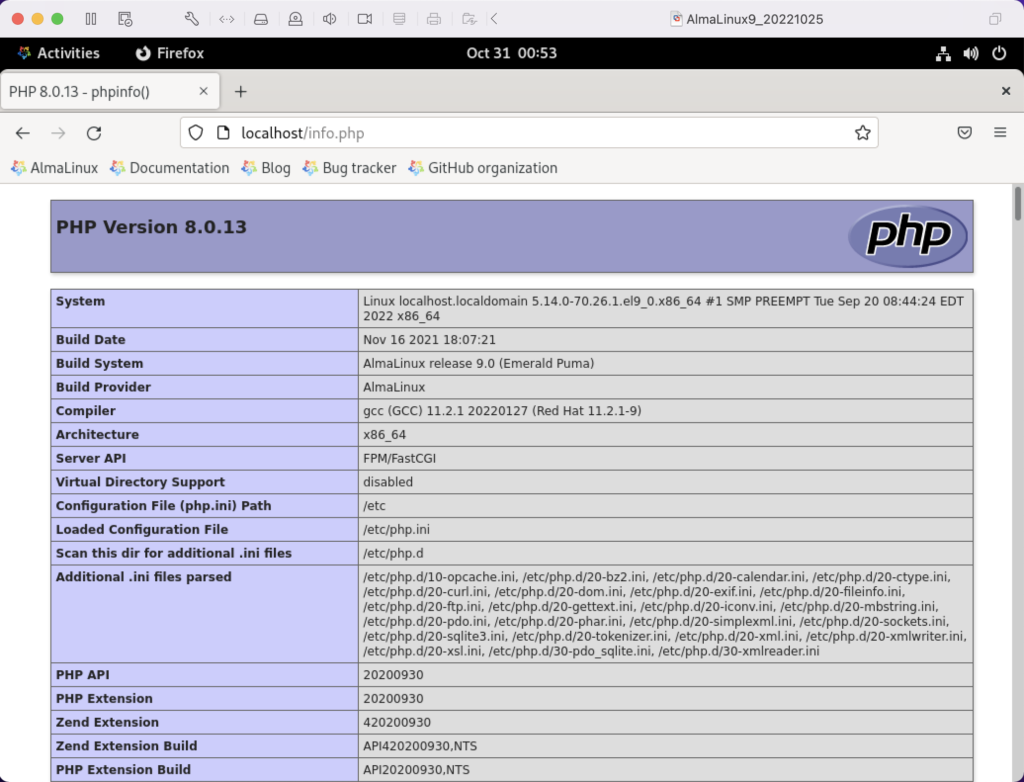
localhost/info.php
It should return the following in the browser.
![]()
- Install the php_mysqli package as the sudoer user with the following command:
dnf install -y php-mysqli
Create the mysqli_check.php file in the /var/www/html directory as the root user:
Static Query Object Sample pdo installed.
'; } ?>apache restart
Then, you can launch the Firefox browser and type the following:
localhost/mysqli_check.php
It should print the following in the browser.
mysqli installed.

pdo installed.
As always, I hope this helps those looking to install MySQL, PHP, on AlmaLinux.