Quantcast
Channel: Planet MySQL
Viewing all 18786 articles
Browse latest View live

Introducing the Power of Notifications

$
0
0

Since VividCortex launched its database monitoring platform, many users have requested some type of notification system. To address this, we took particular care in building a feature that proactively warns users of potential problems without sending multiple false alerts.

We are excited to announce notifications via email, PagerDuty and VictorOps. This post addresses basic functionalities, but please explore the feature and provide feedback to support@vividcortex.com.

What triggers a notification? Our events dashboard records behaviors such as high swap activity, disc faults, replication stopping, mysql server restarts and more. These events are grouped into incidents based on host and type. Depending on your systems, one or more of these may signal that you need to investigate further.

Do I have control over notifications? Of course. The last thing we want is an endless flow of useless notifications, which is why the feature allows you to filter based on host, event, type and level. The notification is based on defined rule filters so you are only notified for the events that you choose.

Notifications

How do I receive notifications? You will receive notifications through the adaptor of your choice: email, PagerDuty, VictorOps. If you would like to be notified by all three, choose all three, and if you would like an adaptor that we do not currently offer, please let us know. We will do what we can to make it happen!

How often am I notified? You can be notified only once when the incident occurs or at regular intervals until the incident has been closed. The intervals can be between one minute and two hours.

How do I close an incident? The incident will provide a link to the events that caused it as well as a link to close the incident.

Where do I adjust notification settings? Navigate to the settings page –> environment configuration. You will find a tab for incidents subscriptions. This is currently an opt-in feature, so choose your incidents and know even more about what is happening on your production servers.

If you have been thinking about trying the product, this new proactive feature is another step to make your life easier. Sign up for a free trial today!


PlanetMySQL Voting: Vote UP / Vote DOWN

OurSQL Episode 207: Looking Forward

$
0
0

In this penultimate episode, we talk about what's coming in MySQL 5.7 and MariaDB 10.1. Ear Candy is about a new MySQL 5.7 utility to generate the SSL RSA keys to encrypt MySQL communications, and At the Movies is about MySQL's new features.


PlanetMySQL Voting: Vote UP / Vote DOWN

Optimizer hints in MySQL 5.7.7 – The missed manual

$
0
0

In version MySQL 5.7.7 Oracle presented a new promising feature: optimizer hints. However it did not publish any documentation about the hints. The only note which I found in the user manual about the hints is:

  • It is now possible to provide hints to the optimizer by including /*+ ... */ comments following the SELECT, INSERT, REPLACE, UPDATE, or DELETE keyword of SQL statements. Such statements can also be used with EXPLAIN. Examples:
    SELECT /*+ NO_RANGE_OPTIMIZATION(t3 PRIMARY, f2_idx) */ f1
    FROM t3 WHERE f1 > 30 AND f1 < 33;
    SELECT /*+ BKA(t1, t2) */ * FROM t1 INNER JOIN t2 WHERE ...;
    SELECT /*+ NO_ICP(t1) */ * FROM t1 WHERE ...;

There are also three worklogs: WL #3996, WL #8016 and WL #8017. But they describe the general concept and do not have much information about which optimizations can be used and how. More light on this provided by slide 59 from Øystein Grøvlen’s session at Percona Live. But that’s all: no “official” full list of possible optimizations, no use cases… nothing.

I tried to sort it out myself.

My first finding is the fact that slide #59 really lists six of seven possible index hints. Confirmation for this exists in one of two new files under sql directory of MySQL source tree, created for this new feature.

$cat sql/opt_hints.h
...
/**
  Hint types, MAX_HINT_ENUM should be always last.
  This enum should be synchronized with opt_hint_info
  array(see opt_hints.cc).
*/
enum opt_hints_enum
{
  BKA_HINT_ENUM= 0,
  BNL_HINT_ENUM,
  ICP_HINT_ENUM,
  MRR_HINT_ENUM,
  NO_RANGE_HINT_ENUM,
  MAX_EXEC_TIME_HINT_ENUM,
  QB_NAME_HINT_ENUM,
  MAX_HINT_ENUM
};

Looking into file sql/opt_hints.cc we can find out what these optimizations give not much choice: either enable or disable.

$cat sql/opt_hints.cc
...
struct st_opt_hint_info opt_hint_info[]=
{
  {"BKA", true, true},
  {"BNL", true, true},
  {"ICP", true, true},
  {"MRR", true, true},
  {"NO_RANGE_OPTIMIZATION", true, true},
  {"MAX_EXECUTION_TIME", false, false},
  {"QB_NAME", false, false},
  {0, 0, 0}
};

A choice for the way to include hints into SQL statements: inside comments with sign “+”

/*+ NO_RANGE_OPTIMIZATION(t3 PRIMARY, f2_idx) */
, – is compatible with style of optimizer hints which Oracle uses.

We actually had access to these hints before: they were accessible via variable optimizer_switch. At least such optimizations like BKA, BNL, ICP, MRR. But with new syntax we cannot only modify this access globally or per session, but can turn on or off particular optimization for a single table and column in the query. I can demonstrate it on this quite artificial but always accessible example:

mysql> use mysql
Database changed
mysql> explain select * from user where host in ('%', '127.0.0.1');
+----+-------------+-------+------------+-------+---------------+---------+---------+------+------+----------+-----------------------+
| id | select_type | table | partitions | type  | possible_keys | key     | key_len | ref  | rows | filtered | Extra                 |
+----+-------------+-------+------------+-------+---------------+---------+---------+------+------+----------+-----------------------+
|  1 | SIMPLE      | user  | NULL       | range | PRIMARY       | PRIMARY | 180     | NULL |    2 |   100.00 | Using index condition |
+----+-------------+-------+------------+-------+---------------+---------+---------+------+------+----------+-----------------------+
1 row in set, 1 warning (0.01 sec)
mysql> explain select /*+ NO_RANGE_OPTIMIZATION(user PRIMARY) */ * from user where host in ('%', '127.0.0.1');
+----+-------------+-------+------------+------+---------------+------+---------+------+------+----------+-------------+
| id | select_type | table | partitions | type | possible_keys | key  | key_len | ref  | rows | filtered | Extra       |
+----+-------------+-------+------------+------+---------------+------+---------+------+------+----------+-------------+
|  1 | SIMPLE      | user  | NULL       | ALL  | PRIMARY       | NULL | NULL    | NULL |    5 |    40.00 | Using where |
+----+-------------+-------+------------+------+---------------+------+---------+------+------+----------+-------------+
1 row in set, 1 warning (0.00 sec)

I used one more hint, which we could not turn on or off directly earlier: range optimization.

One more “intuitively” documented feature is the ability to turn on or off a particular optimization. This works only for BKA, BNL, ICP and MRR: you can specify NO_BKA(table[[, table]…]), NO_BNL(table[[, table]…]), NO_ICP(table indexes[[, table indexes]…]) and NO_MRR(table indexes[[, table indexes]…]) to avoid using these algorithms for particular table or index in the JOIN.

MAX_EXECUTION_TIME does not require any table or key name inside. Instead you need to specify maximum time in milliseconds which query should run:

mysql> select /*+ MAX_EXECUTION_TIME(1000) */  sleep(1) from user;
ERROR 3024 (HY000): Query execution was interrupted, max_statement_time exceeded
mysql> select /*+ MAX_EXECUTION_TIME(10000) */  sleep(1) from user;
+----------+
| sleep(1) |
+----------+
|        0 |
|        0 |
|        0 |
|        0 |
|        0 |
+----------+
5 rows in set (5.00 sec)

QB_NAME is more complicated. WL #8017 tells us this is custom context. But what is this? The answer is in the MySQL test suite! Tests for optimizer hints exist in file t/opt_hints.test For QB_NAME very first entry is query:

EXPLAIN SELECT /*+ NO_ICP(t3@qb1 f3_idx) */ f2 FROM
  (SELECT /*+ QB_NAME(QB1) */ f2, f3, f1 FROM t3 WHERE f1 > 2 AND f3 = 'poiu') AS TD
    WHERE TD.f1 > 2 AND TD.f3 = 'poiu';

So we can specify custom QB_NAME for any subquery and specify optimizer hint only for this context.

To conclude this quick overview I want to show a practical example of when query hints are really needed. Last week I worked on an issue where a customer upgraded from MySQL version 5.5 to 5.6 and found some of their queries started to work slower than before. I wrote an answer which could sound funny, but still remains correct: “One of the reasons for such behavior is optimizer  improvements. While they all are made for better performance, some queries – optimized for older versions – can start working slower than before.”

To demonstrate a public example of such a query I will use my favorite source of information: MySQL Community Bugs Database. In a search for Optimizer regression bugs that are still not fixed we can find bug #68919 demonstrating regression in case the MRR algorithm is used for queries with LIMIT. In run queries, shown in the bug report, we will see a huge difference:

mysql> SELECT * FROM t1 WHERE i1>=42 AND i2<=42 LIMIT 1;
+----+----+----+----+
| pk | i1 | i2 | i3 |
+----+----+----+----+
| 42 | 42 | 42 | 42 |
+----+----+----+----+
1 row in set (6.88 sec)
mysql> explain SELECT * FROM t1 WHERE i1>=42 AND i2<=42 LIMIT 1;
+----+-------------+-------+------------+-------+---------------+------+---------+------+---------+----------+----------------------------------+
| id | select_type | table | partitions | type  | possible_keys | key  | key_len | ref  | rows    | filtered | Extra                            |
+----+-------------+-------+------------+-------+---------------+------+---------+------+---------+----------+----------------------------------+
|  1 | SIMPLE      | t1    | NULL       | range | idx           | idx  | 4       | NULL | 9999958 |    33.33 | Using index condition; Using MRR |
+----+-------------+-------+------------+-------+---------------+------+---------+------+---------+----------+----------------------------------+
1 row in set, 1 warning (0.00 sec)
mysql> SELECT /*+ NO_MRR(t1) */ *  FROM t1  WHERE i1>=42 AND i2<=42 LIMIT 1;
+----+----+----+----+
| pk | i1 | i2 | i3 |
+----+----+----+----+
| 42 | 42 | 42 | 42 |
+----+----+----+----+
1 row in set (0.00 sec)

With MRR query execution takes 6.88 seconds and 0 if MRR is not used! But the bug report itself suggests using

optimizer_switch="mrr=off";
as a workaround. And this will work perfectly well if you are OK to run
SET optimizer_switch="mrr=off";
every time you are running a query which will take advantage of having it OFF. With optimizer hints you can have one or another algorithm to be ON for particular table in the query and OFF for another one. I, again, took quite an artificial example, but it demonstrates the method:
mysql> explain select /*+ MRR(dept_emp) */ * from dept_emp where to_date in  (select /*+ NO_MRR(salaries)*/ to_date from salaries where salary >40000 and salary <45000) and emp_no >10100 and emp_no < 30200 and dept_no in ('d005', 'd006','d007');
+----+--------------+-------------+------------+--------+------------------------+------------+---------+----------------------------+---------+----------+-----------------------------------------------+
| id | select_type  | table       | partitions | type   | possible_keys          | key        | key_len | ref                        | rows    | filtered | Extra                                         |
+----+--------------+-------------+------------+--------+------------------------+------------+---------+----------------------------+---------+----------+-----------------------------------------------+
|  1 | SIMPLE       | dept_emp    | NULL       | range  | PRIMARY,emp_no,dept_no | dept_no    | 8       | NULL                       |   10578 |   100.00 | Using index condition; Using where; Using MRR |
|  1 | SIMPLE       | <subquery2> | NULL       | eq_ref | <auto_key>             | <auto_key> | 3       | employees.dept_emp.to_date |       1 |   100.00 | NULL                                          |
|  2 | MATERIALIZED | salaries    | NULL       | ALL    | salary                 | NULL       | NULL    | NULL                       | 2838533 |    17.88 | Using where                                   |
+----+--------------+-------------+------------+--------+------------------------+------------+---------+----------------------------+---------+----------+-----------------------------------------------+
3 rows in set, 1 warning (0.00 sec)


The post Optimizer hints in MySQL 5.7.7 – The missed manual appeared first on MySQL Performance Blog.


PlanetMySQL Voting: Vote UP / Vote DOWN

MySQL, Percona, MariaDB long running processes clean up one liner

$
0
0

There are tools like pt-kill from the percona tool kit that may print/kill the long running transactions at MariaDB, MySQL or at Percona data instances, but a lot of backup scripts are just some simple bash lines.
So checking for long running transactions before the backup to be executed seems to be a step that is missed a lot.

Here is one line that might be just added in every bash script before the backup to be executed
Variant 1. Just log all the processlist entries and calculate which ones were running longer than TIMELIMIT:

$ export TIMELIMIT=70 && echo "$(date) : check for long runnig queries start:" >> /tmp/processlist.list.to.kill && mysql -BN -e 'show processlist;' | tee -a /tmp/processlist.list.to.kill | awk -vlongtime=${TIMELIMIT} '($6>longtime){print "kill "$1";"}' | tee -a /tmp/processlist.list.to.kill

Variant 2: Log all the processlist, calculate the calculate which processes are running longer than TIMELIMIT, and kill them before to execute the backup:

$ export TIMELIMIT=70 && echo "$(date) : check for long runnig queries start:" >> /tmp/processlist.list.to.kill && mysql -BN -e 'show processlist;' | tee -a /tmp/processlist.list.to.kill | awk -vlongtime=${TIMELIMIT} '($6>longtime){print "kill "$1";"}' | tee -a /tmp/processlist.list.to.kill | mysql >> /tmp/processlist.list.to.kill 2>&1


PlanetMySQL Voting: Vote UP / Vote DOWN

Testing MySQL with “read-only” filesystem

$
0
0

From previous articles about “disk full” conditions, you have some taste of testing MySQL with such approach:
1. Testing Disk Full Conditions
2. Using GDB, investigating segmentation fault in MySQL

But there is still untouched topic, about read-only mounted file system and how MySQL will act in such condition.
In real life, i have encountered such situation that something happened with Linux server and file system suddenly goes to read-only mode.

Buffer I/O error on device sdb1, logical block 1769961
lost page write due to I/O error on sdb1
sd 0:0:1:0: timing out command, waited 360s
sd 0:0:1:0: Unhandled error code
sd 0:0:1:0: SCSI error: return code = 0x06000008
Result: hostbyte=DID_OK driverbyte=DRIVER_TIMEOUT,SUGGEST_OK
mptscsih: ioc0: attempting task abort! (sc=ffff8100b629a6c0)
sd 0:0:1:0:
        command: Write(10): 2a 00 00 d8 15 17 00 04 00 00
mptscsih: ioc0: task abort: SUCCESS (rv=2002) (sc=ffff8100b629a6c0)
Aborting journal on device sdb1.
ext3_abort called.
EXT3-fs error (device sdb1): ext3_journal_start_sb: Detected aborted journal
Remounting filesystem read-only
__journal_remove_journal_head: freeing b_committed_data
EXT3-fs error (device sdb1) in ext3_new_inode: Journal has aborted
ext3_abort called.
EXT3-fs error (device sdb1): ext3_remount: Abort forced by user
ext3_abort called.
EXT3-fs error (device sdb1): ext3_remount: Abort forced by user

There was no error message of course because of read-only partition.
That’s why we have no chance to detect why MySQL did not start, until we examine OS level issues.

In contrast Oracle handles this condition:

[root@bsnew home]# su - oracle
-bash-3.2$ sqlplus / as sysdba

SQL*Plus: Release 11.2.0.4.0 Production on Mon Apr 7 11:35:10 2014

Copyright (c) 1982, 2013, Oracle.  All rights reserved.

ERROR:
ORA-09925: Unable to create audit trail file
Linux-x86_64 Error: 30: Read-only file system
Additional information: 9925
ORA-09925: Unable to create audit trail file
Linux-x86_64 Error: 30: Read-only file system
Additional information: 9925

Of course if you change error log file path to working path there will be messages:

2015-04-28 08:04:16 7f27a6c847e0  InnoDB: Operating system error number 30 in a file operation.
InnoDB: Error number 30 means 'Read-only file system'.
InnoDB: Some operating system error numbers are described at
InnoDB: http://dev.mysql.com/doc/refman/5.6/en/operating-system-error-codes.html
2015-04-28 08:04:16 1486 [ERROR] InnoDB: File ./ibdata1: 'create' returned OS error 130. Cannot continue operation
150428 08:04:17 mysqld_safe mysqld from pid file /home/error_log_dir/mysqld-new.pid ended

But it is not useful at this moment, instead, there should be some message while trying starting MySQL directly to STDOUT.
If you have more test paths check related feature request and add them: #72259

The post Testing MySQL with “read-only” filesystem appeared first on Azerbaijan MySQL UG.


PlanetMySQL Voting: Vote UP / Vote DOWN

MariaDB 5.5.43 now available

$
0
0

Download MariaDB 5.5.43 beta

Release Notes Changelog What is MariaDB 5.5?

MariaDB APT and YUM Repository Configuration Generator

mariadb-seal-shaded-browntext-altThe MariaDB project is pleased to announce the immediate availability of MariaDB 5.5.43. This is a Stable (GA) release.

See the Release Notes and Changelog for detailed information on this release and the What is MariaDB 5.5? page in the MariaDB Knowledge Base for general information about the MariaDB 5.5 series.

Thanks, and enjoy MariaDB!


PlanetMySQL Voting: Vote UP / Vote DOWN

LinkBenchX: benchmark based on arrival request rate

$
0
0

An idea for a benchmark based on the “arrival request” rate that I wrote about in a post headlined “Introducing new type of benchmark” back in 2012 was implemented in Sysbench. However, Sysbench provides only a simple workload, so to be able to compare InnoDB with TokuDB, and later MongoDB with Percona TokuMX, I wanted to use more complicated scenarios. (Both TokuDB and TokuMX are part of Percona’s product line, in the case you missed Tokutek now part of the Percona family.)

Thanks to Facebook – they provide LinkBench, a benchmark that emulates the social graph database workload. I made modifications to LinkBench, which are available here: https://github.com/vadimtk/linkbenchX. The summary of modifications is

  • Instead of generating events in a loop, we generate events with requestrate and send the event for execution to one of available Requester thread.
  • At the start, we establish N (requesters) connections to database, which are idle by default, and just waiting for an incoming event to execute.
  • The main output of the benchmark is 99% response time for ADD_LINK (INSERT + UPDATE request) and GET_LINKS_LIST (range SELECT request) operations.
  • The related output is Concurrency, that is how many Requester threads are active during the time period.
  • Ability to report stats frequently (5-10 sec interval); so we can see a trend and a stability of the result.

Also, I provide a Java package, ready to execute, so you do not need to compile from source code. It is available on the release page at https://github.com/vadimtk/linkbenchX/releases

So the main focus of the benchmark is the response time and its stability over time.

For an example, let’s see how TokuDB performs under different request rates (this was a quick run to demonstrate the benchmark abilities, not to provide numbers for TokuDB).

First graph is the 99% response time (in milliseconds), measured each 10 sec, for arrival rate 5000, 10000 and 15000 operations/sec:

resp1

or, to smooth spikes, the same graph, but with Log 10 scale for axe Y:
resp-log

So there are two observations: the response time increases with an increase in the arrival rate (as it supposed to be), and there are periodical spikes in the response time.

And now we can graph Concurrency (how many Threads are busy working on requests)…
conc

…with an explainable observation that more threads are needed to handle bigger arrival rates, and also during spikes all available 200 threads (it is configurable) become busy.

I am looking to adopt LinkBenchX to run an identical workload against MongoDB.
The current schema is simple

CREATE TABLE `linktable` (
  `id1` bigint(20) unsigned NOT NULL DEFAULT '0',
  `id2` bigint(20) unsigned NOT NULL DEFAULT '0',
  `link_type` bigint(20) unsigned NOT NULL DEFAULT '0',
  `visibility` tinyint(3) NOT NULL DEFAULT '0',
  `data` varchar(255) NOT NULL DEFAULT '',
  `time` bigint(20) unsigned NOT NULL DEFAULT '0',
  `version` int(11) unsigned NOT NULL DEFAULT '0',
  PRIMARY KEY (link_type, `id1`,`id2`),
  KEY `id1_type` (`id1`,`link_type`,`visibility`,`time`,`id2`,`version`,`data`)
) ENGINE=TokuDB DEFAULT CHARSET=latin1;
CREATE TABLE `counttable` (
  `id` bigint(20) unsigned NOT NULL DEFAULT '0',
  `link_type` bigint(20) unsigned NOT NULL DEFAULT '0',
  `count` int(10) unsigned NOT NULL DEFAULT '0',
  `time` bigint(20) unsigned NOT NULL DEFAULT '0',
  `version` bigint(20) unsigned NOT NULL DEFAULT '0',
  PRIMARY KEY (`id`,`link_type`)
) ENGINE=TokuDB DEFAULT CHARSET=latin1;
CREATE TABLE `nodetable` (
  `id` bigint(20) unsigned NOT NULL AUTO_INCREMENT,
  `type` int(10) unsigned NOT NULL,
  `version` bigint(20) unsigned NOT NULL,
  `time` int(10) unsigned NOT NULL,
  `data` mediumtext NOT NULL,
  PRIMARY KEY(`id`)
) ENGINE=TokuDB DEFAULT CHARSET=latin1;

I am open for suggestions as to what is the proper design of documents for MongoDB – please leave your recommendations in the comments.

The post LinkBenchX: benchmark based on arrival request rate appeared first on MySQL Performance Blog.


PlanetMySQL Voting: Vote UP / Vote DOWN

Error reading GTIDs from binary log: -1

$
0
0

Wonder how MySQL Slave server will act, when disk full condition occurs?
Before in our articles we use only single MySQL server.
Now think about replication topology, where slave server has problem with full partition.
Firstly we will enable Binary Log/GTID on Slave side and will ensure that the changes also applied to binary log on Slave side:

# BINARY LOGGING #
#
server_id                      = 2
log_bin                        = /opt/mysql/datadir/mysql-bin
log_bin_index                  = /opt/mysql/datadir/mysql-bin
expire_logs_days               = 14
sync_binlog                    = 1
binlog_format                  = row
relay_log                      = /opt/mysql/datadir/mysql-relay-bin
log_slave_updates              = 1
read_only                      = 1
gtid-mode                      = on
enforce-gtid-consistency       = true
master-info-repository         = TABLE
relay-log-info-repository      = TABLE
slave-parallel-workers         = 15
binlog-checksum                = CRC32
master-verify-checksum         = 1
slave-sql-verify-checksum      = 1
binlog-rows-query-log_events   = 1

When disk full condition comes up, error log will be filled as follows:

2015-05-01 04:42:10 2033 [Note] Slave SQL thread initialized, starting replication in log 'mysql-bin.000002' at position 557, relay log '/opt/mysql/datadir/mysql-relay-bin.000001' position: 4
2015-05-01 04:50:50 7f3b79865700 InnoDB: Error: Write to file ./test1/sales.ibd failed at offset 184549376.
InnoDB: 1048576 bytes should have been written, only 688128 were written.
InnoDB: Operating system error number 0.
InnoDB: Check that your OS and file system support files of this size.
InnoDB: Check also that the disk is not full or a disk quota exceeded.
InnoDB: Error number 0 means 'Success'.
InnoDB: Some operating system error numbers are described at
InnoDB: http://dev.mysql.com/doc/refman/5.6/en/operating-system-error-codes.html
2015-05-01 04:50:51 2033 [ERROR] /opt/mysql/bin/mysqld: The table 'sales' is full
2015-05-01 04:50:51 2033 [ERROR] Slave SQL: Worker 14 failed executing transaction '328e26e9-ea51-11e4-8023-080027745404:242' at master log mysql-bin.000002, end_log_pos 275717680; Could not execute Write_rows event on table test1.sales; The table 'sales' is full, Error_code: 1114; handler error HA_ERR_RECORD_FILE_FULL; the event's master log mysql-bin.000002, end_log_pos 275717680, Error_code: 1114
2015-05-01 04:50:51 2033 [Warning] Slave SQL: ... The slave coordinator and worker threads are stopped, possibly leaving data in inconsistent state. A restart should restore consistency automatically, although using non-transactional storage for data or info tables or DDL queries could lead to problems. In such cases you have to examine your data (see documentation for details). Error_code: 1756
2015-05-01 04:50:51 2033 [Note] Error reading relay log event: slave SQL thread was killed
2015-05-01 04:50:51 2033 [Warning] Slave SQL: ... The slave coordinator and worker threads are stopped, possibly leaving data in inconsistent state. A restart should restore consistency automatically, although using non-transactional storage for data or info tables or DDL queries could lead to problems. In such cases you have to examine your data (see documentation for details). Error_code: 1756
2015-05-01 04:50:52 2033 [Warning] Disk is full writing '/opt/mysql/datadir/mysql-relay-bin.000003' (Errcode: 28 - No space left on device). Waiting for someone to free space...

Interesting thing is OS error number which is equal to 0. And 0 equals to “success”.

After if you try disable binary log/GTID and store only relay-log information in my.cnf as follows:

# BINARY LOGGING #
#
server_id                      = 2
#log_bin                        = /opt/mysql/datadir/mysql-bin
#log_bin_index                  = /opt/mysql/datadir/mysql-bin
#expire_logs_days               = 14
#sync_binlog                    = 1
#binlog_format                  = row
relay_log                      = /opt/mysql/datadir/mysql-relay-bin
#log_slave_updates              = 1
read_only                      = 1
#gtid-mode                      = on
#enforce-gtid-consistency       = true
master-info-repository         = TABLE
relay-log-info-repository      = TABLE
#slave-parallel-workers         = 15
#binlog-checksum                = CRC32
#master-verify-checksum         = 1
#slave-sql-verify-checksum      = 1
#binlog-rows-query-log_events   = 1

If you try to start there will be some interesting errors in error log:

2015-05-01 05:05:09 2698 [ERROR] /opt/mysql/bin/mysqld: Found a Gtid_log_event or Previous_gtids_log_event when @@GLOBAL.GTID_MODE = OFF.
2015-05-01 05:05:14 2698 [ERROR] Error in Log_event::read_log_event(): 'read error', data_len: 8178, event_type: 30
2015-05-01 05:05:14 2698 [Warning] Error reading GTIDs from binary log: -1
2015-05-01 05:05:15 2698 [Warning] Storing MySQL user name or password information in the master info repository is not secure and is therefore not recommended. Please consider using the USER and PASSWORD connection options for START SLAVE; see the 'START SLAVE Syntax' in the MySQL Manual for more information.
2015-05-01 05:05:15 2698 [Note] Slave I/O thread: connected to master 'repl@192.168.1.164:3307',replication started in log 'mysql-bin.000002' at position 204643802
2015-05-01 05:05:16 2698 [ERROR] Slave I/O: The slave IO thread stops because the master has @@GLOBAL.GTID_MODE ON and this server has @@GLOBAL.GTID_MODE OFF, Error_code: 1593
2015-05-01 05:05:16 2698 [Note] Slave I/O thread exiting, read up to log 'mysql-bin.000002', position 204643802
2015-05-01 05:05:16 2698 [Note] Event Scheduler: Loaded 0 events
2015-05-01 05:05:16 2698 [Note] /opt/mysql/bin/mysqld: ready for connections.
Version: '5.6.24-debug'  socket: '/opt/mysql/datadir/mysqld-new.sock'  port: 3307  Shahriyar Rzayev's MySQL
2015-05-01 05:05:16 2698 [Note] Slave SQL thread initialized, starting replication in log 'mysql-bin.000002' at position 274388137, relay log '/opt/mysql/datadir/mysql-relay-bin.000003' position: 274387894
2015-05-01 05:05:16 2698 [ERROR] Slave SQL: @@SESSION.GTID_NEXT cannot be set to UUID:NUMBER when @@GLOBAL.GTID_MODE = OFF. Error_code: 1781
2015-05-01 05:05:16 2698 [Warning] Slave: @@SESSION.GTID_NEXT cannot be set to UUID:NUMBER when @@GLOBAL.GTID_MODE = OFF. Error_code: 1781
2015-05-01 05:05:16 2698 [ERROR] Error running query, slave SQL thread aborted. Fix the problem, and restart the slave SQL thread with "SLAVE START". We stopped at log 'mysql-bin.000002' position 274388137

Errors about disabled GTID is normal and it must be here as usual.
But must interesting is:

[ERROR] Error in Log_event::read_log_event(): 'read error', data_len: 8178, event_type: 30
[Warning] Error reading GTIDs from binary log: -1

[Warning] Error reading GTIDs from binary log: -1.
Related BUG report -> #72437

If you have another issue path related to slave server’s disk usage, will be interesting to hear from you.

The post Error reading GTIDs from binary log: -1 appeared first on Azerbaijan MySQL UG.


PlanetMySQL Voting: Vote UP / Vote DOWN

SQL Developer – Fedora

$
0
0

This is the continuation of my efforts to stage an awesome Fedora developer’s instance. It shows you how to install Java 1.8 software development kit, which is nice to have. Though you can’t use Java 1.8 officially with Oracle SQL Developer 4.0.3 it is required for Oracle SQL Developer 4.1. Fortunately, the Oracle Product Manager, Jeff Smith has advised us that you can use Java 1.8 JDK with Oracle SQL Developer 4.0.3, and he’s written a comment to the blog post that it runs better with the Java 1.8 SDK.

After you install Oracle SQL Developer 4.0.3 or Oracle SQL Developer 4.1, you can watch Jeff Smith’s YouTube Video on SQL Developer 3.1 to learn how to use the basics of SQL Developer. I couldn’t find an updated version of the video for SQL Developer 4 but I didn’t try too hard.

You use yum as the root user to install Java SDK 1.8, much like my earlier Installing the Java SDK 1.7 and Java-MySQL Sample Program. The following command installs Java 8:

yum install -y java-1.8*

It produces the following output:

Loaded plugins: langpacks, refresh-packagekit
fedora/20/x86_64/metalink                                   |  18 kB  00:00     
mysql-connectors-community                                  | 2.5 kB  00:00     
mysql-tools-community                                       | 2.5 kB  00:00     
mysql56-community                                           | 2.5 kB  00:00     
pgdg93                                                      | 3.6 kB  00:00     
updates/20/x86_64/metalink                                  |  16 kB  00:00     
updates                                                     | 4.9 kB  00:00     
(1/2): mysql-tools-community/20/x86_64/primary_db           |  21 kB  00:00     
(2/2): updates/20/x86_64/primary_db                         |  13 MB  00:09     
updates/20/x86_64/pkgtags
updates
(1/2): updates/20/x86_64/pkgtags                            | 1.4 MB  00:02     
(2/2): updates/20/x86_64/updateinfo                         | 1.9 MB  00:04     
Package 1:java-1.8.0-openjdk-headless-1.8.0.31-1.b13.fc20.x86_64 already installed and latest version
Package 1:java-1.8.0-openjdk-javadoc-1.8.0.31-1.b13.fc20.noarch already installed and latest version
Resolving Dependencies
--> Running transaction check
---> Package java-1.8.0-openjdk.x86_64 1:1.8.0.31-1.b13.fc20 will be installed
---> Package java-1.8.0-openjdk-accessibility.x86_64 1:1.8.0.31-1.b13.fc20 will be installed
---> Package java-1.8.0-openjdk-demo.x86_64 1:1.8.0.31-1.b13.fc20 will be installed
---> Package java-1.8.0-openjdk-devel.x86_64 1:1.8.0.31-1.b13.fc20 will be installed
---> Package java-1.8.0-openjdk-src.x86_64 1:1.8.0.31-1.b13.fc20 will be installed
--> Finished Dependency Resolution
 
Dependencies Resolved
 
================================================================================
 Package                          Arch   Version                  Repository
                                                                           Size
================================================================================
Installing:
 java-1.8.0-openjdk               x86_64 1:1.8.0.31-1.b13.fc20    updates 201 k
 java-1.8.0-openjdk-accessibility x86_64 1:1.8.0.31-1.b13.fc20    updates  12 k
 java-1.8.0-openjdk-demo          x86_64 1:1.8.0.31-1.b13.fc20    updates 1.9 M
 java-1.8.0-openjdk-devel         x86_64 1:1.8.0.31-1.b13.fc20    updates 9.2 M
 java-1.8.0-openjdk-src           x86_64 1:1.8.0.31-1.b13.fc20    updates  45 M
 
Transaction Summary
================================================================================
Install  5 Packages
 
Total download size: 56 M
Installed size: 92 M
Downloading packages:
(1/5): java-1.8.0-openjdk-accessibility-1.8.0.31-1.b13.fc20 |  12 kB  00:00     
(2/5): java-1.8.0-openjdk-1.8.0.31-1.b13.fc20.x86_64.rpm    | 201 kB  00:02     
(3/5): java-1.8.0-openjdk-demo-1.8.0.31-1.b13.fc20.x86_64.r | 1.9 MB  00:03     
(4/5): java-1.8.0-openjdk-devel-1.8.0.31-1.b13.fc20.x86_64. | 9.2 MB  00:07     
(5/5): java-1.8.0-openjdk-src-1.8.0.31-1.b13.fc20.x86_64.rp |  45 MB  05:05     
--------------------------------------------------------------------------------
Total                                              187 kB/s |  56 MB  05:05     
Running transaction check
Running transaction test
Transaction test succeeded
Running transaction (shutdown inhibited)
  Installing : 1:java-1.8.0-openjdk-1.8.0.31-1.b13.fc20.x86_64              1/5 
  Installing : 1:java-1.8.0-openjdk-devel-1.8.0.31-1.b13.fc20.x86_64        2/5 
  Installing : 1:java-1.8.0-openjdk-demo-1.8.0.31-1.b13.fc20.x86_64         3/5 
  Installing : 1:java-1.8.0-openjdk-accessibility-1.8.0.31-1.b13.fc20.x86   4/5 
  Installing : 1:java-1.8.0-openjdk-src-1.8.0.31-1.b13.fc20.x86_64          5/5 
  Verifying  : 1:java-1.8.0-openjdk-devel-1.8.0.31-1.b13.fc20.x86_64        1/5 
  Verifying  : 1:java-1.8.0-openjdk-demo-1.8.0.31-1.b13.fc20.x86_64         2/5 
  Verifying  : 1:java-1.8.0-openjdk-1.8.0.31-1.b13.fc20.x86_64              3/5 
  Verifying  : 1:java-1.8.0-openjdk-accessibility-1.8.0.31-1.b13.fc20.x86   4/5 
  Verifying  : 1:java-1.8.0-openjdk-src-1.8.0.31-1.b13.fc20.x86_64          5/5 
 
Installed:
  java-1.8.0-openjdk.x86_64 1:1.8.0.31-1.b13.fc20                               
  java-1.8.0-openjdk-accessibility.x86_64 1:1.8.0.31-1.b13.fc20                 
  java-1.8.0-openjdk-demo.x86_64 1:1.8.0.31-1.b13.fc20                          
  java-1.8.0-openjdk-devel.x86_64 1:1.8.0.31-1.b13.fc20                         
  java-1.8.0-openjdk-src.x86_64 1:1.8.0.31-1.b13.fc20                           
 
Complete!

Then, you go to Oracle’s SQL Developer 4.0.3 web page or Oracle’s Beta SQL Developer 4.1 web page and download the SQL Developer RPM. At the time of writing, you download the following SQL Developer 4.0.3 RPM:

sqldeveloper-4.0.3.16.84-1.noarch.rpm

Assuming you download the sqldeveloper-4.0.3.16.84-1.noarch.rpm file to the student user’s account. It will download into the /home/student/Downloads directory. You run the SQL Developer RPM file with the following syntax as the root user:

rpm -Uhv /home/student/Downloads/sqldeveloper-4.0.3.16.84-1.noarch.rpm

Running the SQL Developer RPM produces the following output:

Preparing...                          ################################# [100%]
Updating / installing...
   1:sqldeveloper-4.0.3.16.84-1       ################################# [100%]

You can now run the sqldeveloper.sh file as the root user with the following syntax:

/opt/sqldeveloper/sqldeveloper.sh

At this point, it’s important to note that my download from the Oracle SQL Developer 4.1 page turned out to be SQL Developer 4.0.3. It prompts you for the correct Java JDK, as shown below. You may opt to enter the path to the Java JDK 1.8 for SQL Developer 4.1 because until today you downloaded the Oracle SQL Developer 4.0.3 version from the Oracle SQL Developer 4.1 page. Naturally, the Oracle SQL Developer 4.1 instructions say to use the Java 1.8 JDK on the RPM for Linux Installation Notes web page, as shown below:

SQLDevRPMLinuxNotes

If you assume from the instructions on the Oracle instruction page above that Oracle SQL Developer 4.0.3 and Oracle SQL Developer 4.1 support Java 1.8 JDK, you may enter the location for the Java JDK 1.8 when prompted. Jeff Smith, the Product Manager wrote this blog post on Oracle SQL Developer 4: Windows and the JDK. Unfortunately, you’ll see the following message if you attempt to run Oracle SQL Developer 4.0.3 with the Java 1.8 SDK at the command-line:

 Oracle SQL Developer
 Copyright (c) 1997, 2014, Oracle and/or its affiliates. All rights reserved.
 
Type the full pathname of a JDK installation (or Ctrl-C to quit), the path will be stored in /root/.sqldeveloper/4.0.0/product.conf
/usr/lib/jvm/java-1.8.0-openjdk-1.8.0.31.x86_64
OpenJDK 64-Bit Server VM warning: ignoring option MaxPermSize=256M; support was removed in 8.0

It also raises the following error message dialog:

SQLDev_JVMErrorMsg

Text version of Unsupported JDK Version error message:

You are attempting to run with Java 1.8.0_31.

Running this product is supported with a minimum Java version of 1.7.0_51 and a maximum version less than 1.8.

Update the SetJavaHome in “/root/.sqldeveloper/4.0.0/product.conf” to point to another Java.

This produce will not be supported, and may not run correctly if you proceed. Continue anyway?

The error dialog message tells us that the instructions on the RPM for Linux Installation Notes web page can be misleading. You really need to use the Java JDK 1.7 to be supported officially, but you can safely ignore the error.

If you want a certified component, leave the “Skip This Message Next Time” checkbox unchecked and click the “No” button to continue. At this point, there’s no automatic recovery. You need to open the following file:

/root/.sqldeveloper/4.0.0/product.conf

You need to change the SetJavaHome parameter in the file to the following:

# SetJavaHome /path/jdk
SetJavaHome /usr/lib/jvm/java-1.7.0-openjdk-1.7.0.79-2.5.5.0.fc20.x86_64

After making the change, you can re-run the sqldeveloper.sh shell as follows:

/opt/sqldeveloper/sqldeveloper.sh

It launches the following dialog message:

SQLDeveloperInstall01

The installation pauses to ask you if you want to transfer an existing SQL Developer configuration by raising the following dialog. Assuming this is a new installation, the installer won’t find a prior configuration file. You need to click the “No” button to proceed.

SQLDevInstallPreferences

The installation continues and launches SQL Developer. The first time launch shows you the following Oracle Usage Tracking dialog. If you don’t want your use monitored, uncheck the “Allow automated usage reporting to Oracle” checkbox. Click the “OK” button to continue.

SQLDevUsageTracking

After dismissing the Oracle Usage Tracking dialog, you see the SQL Developer environment:

SQLDeveloper

After installing SQL Developer in the root account, you can install it as the student user. You use this command as the student user:

/opt/sqldeveloper/sqldeveloper.sh

It returns the following error because it’s the second installation and SQL Developer doesn’t prompt you to configure the user’s product.conf file with the working JDK location:

 Oracle SQL Developer
 Copyright (c) 1997, 2014, Oracle and/or its affiliates. All rights reserved.
 
Type the full pathname of a JDK installation (or Ctrl-C to quit), the path will be stored in /home/student/.sqldeveloper/4.0.0/product.conf
Error:  Unable to get APP_JAVA_HOME input from stdin after 10 tries

You need to edit the /home/student/.sqldeveloper/4.0.0/product.conf file, and add the following line to the file:

# SetJavaHome /path/jdk
SetJavaHome /usr/lib/jvm/java-1.7.0-openjdk-1.7.0.79-2.5.5.0.fc20.x86_64

Now, you can launch SQL Developer with the following command:

/opt/sqldeveloper/sqldeveloper.sh

Alternatively, you can add the following alias to the student user’s .bashrc file:

# Set alias for SQL Developer tool.
alias sqldeveloper="/opt/sqldeveloper/sqldeveloper.sh"

You can now launch the SQL Developer tool, like this as the student user:

sqldeveloper

You see the following when SQL Developer launches:

SQLDevInterface

As always, I hope this helps those trying to sort out installing SQL Developer on a Fedora server.


PlanetMySQL Voting: Vote UP / Vote DOWN

Netbeans 8 – Fedora

$
0
0

Some of my students want to use the Fedora image that I built for my database classes in my Java software development life cycle course. As a result, they wanted a Java development environment installed. I examined JDeveloper 11g (11.1.1.7.0) and 12c (12.1.3) but resolved on the more generic Netbeans 8 (8.0.2) IDE.

JDK 7 with Netbeans 8 Download

You can download the generic Netbeans 8 IDE, the JDK 7 with Netbeans, or the JDK 8 with Netbeans for the Linux installation. After you download the executable program, you should follow these instructions to install the Netbeans 8 IDE on Fedora.

As the student user, you can download the file to your ~student/Downloads directory and then run these two commands:

chmod +x ./jdk-7u80-nb-8_0_2-linux-x64.sh
sudo ./jdk-7u80-nb-8_0_2-linux-x64.sh

It produces the following output log:

Configuring the installer...
Searching for JVM on the system...
Preparing bundled JVM ...
Extracting installation data...
Running the installer wizard...

Then, it launches the installer. These screens show you how to install and create your first Java project.

JDK 7 with Netbeans 8 Installation

JDK7Netbeans8_01

  1. The first installation dialog welcomes you to the JDK 7 Update and NetBeans 8 Installer. Click the Next button to proceed.

JDK7Netbeans8_02

  1. The second installation dialog asks you to accept the terms in the license agreement. Click the Next button to proceed.

JDK7Netbeans8_03

  1. The third installation dialog asks you to install Netbeans 8. Click the Browse button if you would like to install it in a different area. Click the Next button to proceed.

JDK7Netbeans8_04

  1. The fourth installation dialog asks you to install another Java JDK 7 that supports the current release of Netbeans 8. Click the Browse button if you would like to install it in a different area. Click the Next button to proceed.

JDK7Netbeans8_05

  1. The fifth installation dialog shows you the progress bar for installing Java JDK 7 that supports the current release of Netbeans 8. You may not need to click the Next button to proceed because it should progress to the Netbeans progress dialog. Click the Next button to proceed when it doesn’t do it automatically.

JDK7Netbeans8_06

  1. The sixth installation dialog shows you the progress bar for installing Netbeans 8. Click the Next button to proceed when it doesn’t do it automatically.

JDK7Netbeans8_08

  1. The next screen is the final screen of the Java SE Development Kit and NetBeans IDE Installer. Click the Finish button to complete the installation.

After the installation, you need to check if the netbeans program can be found by users. It shouldn’t be found at this point because it isn’t in the default $PATH environment variable.

Configuring the student user

You can set the $PATH variable dynamically like this:

export PATH=$PATH:/usr/local/netbeans-8.0.2/bin

The netbeans program location was set in Step #4 of the Netbeans installation. After setting the $PATH environment variable, you can run netbeans with this syntax:

./netbeans &

However, the better approach is to put the following lines in your .bashrc file. This change ensures that you can access the netbeans program anytime you launch a Terminal session.

# Add netbeans to the user's PATH variable.
export PATH=$PATH:/usr/local/netbeans-8.0.2/bin

After you have configured the student user’s .bashrc file, you can now use Netbeans to create a Java project.

Create a new Netbeans project

JDK7Netbeans8_07

  1. The next screen is the Netbeans 8 Start Page. This is where you can create your first Java development project.

JDK7Netbeans8_09

  1. You click the File menu and then the New Project menu option to open a new project.

JDK7Netbeans8_10

  1. It launches the New Project dialog at Step #1 – Choose Project, where you choose Java from your Categories list and Java Application from the Projects list. You click the Next button to continue.

JDK7Netbeans8_11

  1. It launches the New Project dialog at Step #2 – Name and Location, where you enter a Project Name. The example uses MySQLJava as the project name. You click the Next button to continue.

JDK7Netbeans8_12

  1. It launches the MySQLJava.java tab in the Netbeans 8 application. This is where you can enter your code.

After you successfully download the Java 7 SE and Netbeans 8, you should download JDK 8 with Netbeans 8 because Java 7 EOL (End-of-Life) is April 30th, 2015. You may think that you need to uninstall the JDK 7 with Netbeans 8 before you install the JDK 8 with Netbeans 8, but you don’t have to do so. When you install JDK 8 with Netbeans 8 into an environment with a preinstalled JDK 7 with Netbeans 8, the installer only adds the JDK 8.

The following segments of the post show you how to download and install JDK 8 with Netbeans 8, and how to configure Netbeans to work with the JDK 7 and JDK 8 as interchangeable libraries.

JDK 8 with Netbeans 8 Download

You can now download the JDK 8 with Netbeans for the Linux installation. After you download the executable program, you should follow these instructions to install it on Fedora.

As the student user, you can download the file to your ~student/Downloads directory and then run these two commands:

chmod +x ./jdk-8u45-nb-8_0_2-linux-x64.sh
sudo ./jdk-8u45-nb-8_0_2-linux-x64.sh

It produces the following output log:

Configuring the installer...
Searching for JVM on the system...
Preparing bundled JVM ...
Extracting installation data...
Running the installer wizard...

Then, it launches the installer, which will be very similar to the steps you went through earlier. There are differences. There are only five screens that you navigate as opposed to the seven from the earlier JDK 7 with Netbeans 8 installation, as you’ll see below.

JDK 8 with Netbeans 8 Installation

JDK8Netbeans_01

  1. The first installation dialog welcomes you to the JDK 8 Update and NetBeans 8 Installer. Click the Next button to proceed.

JDK8Netbeans_02

  1. The second installation dialog installs the JDK 8. Click the Next button to proceed.

JDK8Netbeans_03

  1. The third installation dialog is a summary of what you’ll install. Click the Install button to proceed.

JDK8Netbeans_04

  1. The fourth installation dialog shows you a progress bar. You don’t need to do anything but watch the progress.

JDK8Netbeans_05

  1. The fifth installation dialog shows you the installation is complete. Click the Finish button to proceed when it doesn’t do it automatically.

After you have installed the JDK 8 SE, you can use Netbeans to add the JDK 8 platform.

Add the JDK 8 Platform to Netbeans 8

JDK8Platform_01

  1. After you open Netbeans 8, you choose the Tools menu choice. Then, you select the Java Platforms menu option.

JDK8Platform_02

  1. It launches the Java Platform Manager dialog. You click the Add Platform button to add the JDK 8 platform.

JDK8Platform_03

  1. It launches the Add Java Platform dialog. Leave the Java Standard Edition radio button checked. You click the Next button to proceed.

JDK8Platform_04

  1. It launches the Add Java Platform file chooser dialog. Here you navigate to find the JDK 8 software, which is located in /usr/local/jdk1.8.0_45 directory.

JDK8Platform_05

  1. After selecting the /usr/local/jdk1.8.0_45 directory as the platform folder, click the Next button to proceed.

JDK8Platform_06

  1. After setting the directory, you’re asked to verify the Java Platform information. If it’s correct, click the Finish button to proceed.

JDK8Platform_07

  1. After finishing the installation, you’ll see that you have two installed Java Platforms. Unfortunately, the first one installed is the default unless you modify the netbeans.conf file. You click the Close button to complete the process.

Set JDK 8 Platform as the Default Java Platform for Netbeans 8

After adding the JDK 8 Java Platform, you can change the default setting my manually editing the /usr/local/netbeans-8.0.2/etc/netbeans.conf file. You simply remark out the line for JDK 7 and replace it with one for JDK 8, as shown below. The next time you boot the Netbeans application it uses Java 1.8.

# netbeans_jdkhome="/usr/local/jdk1.7.0_80"
netbeans_jdkhome="/usr/local/jdk1.8.0_45"

The next time you launch Netbeans 8, it will use JDK 8 because you set that as the default Java Platform

As always, I hope this helps those looking for information like this.


PlanetMySQL Voting: Vote UP / Vote DOWN

HeidiSQL 9.2 released

$
0
0
This is a new release with some new features and many bugfixes and enhancements.

Get it from the download page.


Changelog:
* New feature: Add support for JSON grid export
* New feature: Add support for Markdown Here grid export
* New feature: Support new command line parameter "n", or "nettype", which takes an integer, representing the protocol number (0=mysql tcpip, ...).
* New feature: Add support for connecting to Microsoft Azure Servers
* New feature: Add edit box + updown buttons for limiting the size of exported INSERT queries in bytes.
* New feature: Display creation time, last alter time, comment and start time of scheduled events.
* New feature: Online help document available. Various "Help" buttons in relevant dialogs link to this document.
* Bugfix: Dropping functions and procedures on PostgreSQL now with required parameters list
* Bugfix: Size bars in "Database" tab on PostgreSQL now with correct values
* Bugfix: Loading full grid data on PostgreSQL did not work on text columns
* Bugfix: Fix microseconds in MSSQL date/time data types, hidden in data and query grids.
* Bugfix: Use ISO 8601 date/time format on MSSQL
* Bugfix: PostgreSQL: Fix wrong order of columns shown in indexes, and show normal indexes also
* Bugfix: Do not uppercase ENUM values in procedure parameter datatypes
* Bugfix: Fix crash when right-clicking a database, following by a click on "Drop"
* Bugfix: Version conditional disabling for "Create new" menu items in MySQL mode only
* Bugfix: TEXT data type has a maximum length of 65k for MySQL only. Introduce other values for MSSQL and PostgreSQL.
* Bugfix: Fix memory leak in TfrmTableTools.SaveSettings
* Bugfix: Let longer data type matches win over shorter ones, especially important on PostgreSQL
* Bugfix: Make TPGConnection.FetchDbObjects compatible to pre-9.0 servers on PostgreSQL
* Bugfix: Fix non working addition of new columns in MySQL
* Bugfix: Detect xid type (oid 28) as integer.
* Bugfix: Detect character type (oid 1042) as char, not varchar.
* Bugfix: Detect aclitem[] type (oid 1034) as unknown, not text.
* Bugfix: Fix detection of PostgreSQL data type INTERVAL as VARCHAR.
* Enhancement: Automatic storing of settings in portable mode
* Enhancement: Optimize query for getting total row count on PostgreSQL
* Enhancement: Add support for microsecond precision of MSSQL date/time types in table editor, show these in "Length/Set" column
* Enhancement: Add a help button to the quite non-intuitive controls on the export dialog
* Enhancement: Add support for JSON data type on PostgreSQL
* Enhancement: Add support for HIERARCHYID data type on MSSQL
* Enhancement: Increase various default values for window dimensions, for reasonable look and feel for new users
* Enhancement: Add "Rename" context menu item in session tree.
* Enhancement: Use local number formatting in grids by default
* Enhancement: Use transparent background for NULL cells by default
* Enhancement: Support columns with a string literal as default value plus an ON UPDATE CURRENT_TIMESTAMP clause.
* Enhancement: Increase compatibility when getting procedure body on MSSQL.
* Enhancement: Remove duplicates from recent file list pulldown.
* Enhancement: Translate connected/disconnected words in status bar
* Enhancement: Set focus on filter box when SQL help dialog opens.
* Enhancement: Update gettext unit
* Enhancement: Make search/replace dialog resizable
* Enhancement: Activate "Clear filter" button after applying text to filter memo.
* Enhancement: Gracefully remove superfluous WHERE keyword from data grid filter, so other places like the previously modified "More filters" menu do not add a second WHERE.
* Enhancement: Use existing data grid WHERE filter to filter values from quick filter > "More values".
* Enhancement: Remove outdated details in readme file, and redirect to official help page instead.
* Enhancement: Detect all array style types on PostgreSQL as unknown type, e.g. TEXT[].
* Enhancement: Pass column or argument name to NativeToNamedColumnType(), as a hint for the user.
* Enhancement: Support quoted datatypes in TDBConnection.GetDatatypeByName, coming from TDBConnection.ParseTableStructure

PlanetMySQL Voting: Vote UP / Vote DOWN

2015 In Progress: Infographic

$
0
0

The VividCortex brainiacs continue taking strides toward better database monitoring, one feature at a time. See our 2015 highlights here and contact us to see how we can improve your IT efficiency.

Features


PlanetMySQL Voting: Vote UP / Vote DOWN

Keep your MySQL data in sync when using Tungsten Replicator

$
0
0

MySQL replication isn’t perfect and sometimes our data gets out of sync, either by a failure in replication or human intervention. We are all familiar with Percona Toolkit’s pt-table-checksum and pt-table-sync to help us check and fix data inconsistencies – but imagine the following scenario where we mix regular replication with the Tungsten Replicator:

Tungsten

We have regular replication going from master (db1) to 4 slaves (db2, db3, db4 and db5), but also we find that db3 is also master of db4 and db5 using Tungsten replication for 1 database called test. This setup is currently working this way because it was deployed some time ago when multi-source replication was not possible using regular MySQL replication. This is now a working feature in MariaDB 10 and also a feature coming with the new MySQL 5.7 (not released yet)… in our case it is what it is :)

So how do we checksum and sync data when we have this scenario? Well we can still achieve it with these tools but we need to consider some extra actions:

pt-table-checksum  

First of all we need to understand that this tool was designed to checksum tables against a regular MySQL replication environment, so we need to take special care on how to avoid checksum errors by considering replication lag (yes Tungsten replication may still suffer replication lag). We also need to instruct the tool to discover slaves via dsn because the tool is designed to discover replicas using regular replication. This can be done by using the –plugin function.

My colleague Kenny already wrote an article about this some time ago but let’s revisit it to put some graphics around our case. In order to make pt-table-checksum work properly within Tungsten replicator environment we need to:
– Configure the –plugin flag using this plugin to check replication lag.
– Use –recursion-method=dsn to avoid auto-discover of slaves.

[root@db3]$ pt-table-checksum --replicate=percona.cksums 
            --create-replicate-table
            --no-check-replication-filters 
            --no-check-binlog-format
            --recursion-method=dsn=h=db1,D=percona,t=dsns 
            --plugin=/home/mysql/bin/pt-plugin-tungsten_replicator.pl
            --check-interval=5 
            --max-lag=10 
            -d test
Created plugin from /home/mysql/bin/pt-plugin-tungsten_replicator.pl.
PLUGIN get_slave_lag: Using Tungsten Replicator to check replication lag
Checksumming test.table1: 2% 18:14 remain
Checksumming test.table1: 5% 16:25 remain
Checksumming test.table1: 9% 15:06 remain
Checksumming test.table1: 12% 14:25 remain
Replica lag is 2823 seconds on db5 Waiting.
Checksumming test.table1: 99% 14:25 remain
TS ERRORS DIFFS ROWS CHUNKS SKIPPED TIME TABLE
04-28T14:17:19 0 13 279560873 4178 0 9604.892 test.table1

So far so good. We have implemented a good plugin that allows us to perform checksums considering replication lag, and we found differences that we need to take care of, let’s see how to do it.

pt-table-sync

pt-table-sync is the tool we need to fix data differences but in this case we 2 problems:
1- pt-table-sync doesn’t support –recursion-method=dsn, so we need to pass hostnames to be synced as parameter. A feature request to add this recursion method can be found here (hopefully it will be added soon). This means we will need to sync each slave separately.
2- Because of 1 we can’t use –replicate flags so pt-table-sync will need to re run checksums again to find and fix differences. If checksum found differences in more than 1 table I’d recommend running the sync in separate steps, pt-table-sync modifies data. We don’t want to blindly ask it to fix our servers, right?

That being said I’d recommend running pt-table-sync with –print flag first just to make sure the sync process is going to do what we want it to do, as follows:

[root@db3]$ pt-table-sync
           --print
           --verbose
           --databases test -t table1
           --no-foreign-key-checks h=db3 h=db4
# Syncing h=db4
# DELETE REPLACE INSERT UPDATE ALGORITHM START END EXIT DATABASE.TABLE
....
UPDATE `test`.`table1` SET `id`='2677', `status`='open', `created`='2015-04-27 02:22:33', `created_by`='8', `updated`='2015-04-27 02:22:33', WHERE `ix_id`='9585' LIMIT 1 /*percona-toolkit src_db:test src_tbl:table1 src_dsn:h=db3 dst_db:test dst_tbl:table1 dst_dsn:h=db4 lock:0 transaction:1 changing_src:0 replicate:0 bidirectional:0 pid:16135 user:mysql host:db3*/;
UPDATE `test`.`table1` SET `id`='10528', `status`='open', `created`='2015-04-27 08:22:21', `created_by`='8', `updated`='2015-04-28 10:22:55', WHERE `ix_id`='9586' LIMIT 1 /*percona-toolkit src_db:test src_tbl:table1 src_dsn:h=db3 dst_db:test dst_tbl:table1 dst_dsn:h=db4 lock:0 transaction:1 changing_src:0 replicate:0 bidirectional:0 pid:16135 user:mysql host:db3*/;
UPDATE `test`.`table1` SET `id`='8118', `status`='open', `created`='2015-04-27 18:22:20', `created_by`='8', `updated`='2015-04-28 10:22:55', WHERE `ix_id`='9587' LIMIT 1 /*percona-toolkit src_db:test src_tbl:table1 src_dsn:h=db3 dst_db:test dst_tbl:table1 dst_dsn:h=db4 lock:0 transaction:1 changing_src:0 replicate:0 bidirectional:0 pid:16135 user:mysql host:db3*/;
UPDATE `test`.`table1` SET `id`='1279', `status`='open', `created`='2015-04-28 06:22:16', `created_by`='8', `updated`='2015-04-28 10:22:55', WHERE `ix_id`='9588' LIMIT 1 /*percona-toolkit src_db:test src_tbl:table1 src_dsn:h=db3 dst_db:test dst_tbl:table1 dst_dsn:h=db4 lock:0 transaction:1 changing_src:0 replicate:0 bidirectional:0 pid:16135 user:mysql host:db3*/;
....
# 0 0 0 31195 Chunk 11:11:11 11:11:12 2 test.table1

Now that we are good to go, we will switch –print to –execute

[root@db3]$ pt-table-sync
           --execute
           --verbose
           --databases test -t table1
           --no-foreign-key-checks h=db3 h=db4
# Syncing h=db4
# DELETE REPLACE INSERT UPDATE ALGORITHM START END EXIT DATABASE.TABLE
# 0 0 0 31195 Nibble 13:26:19 14:48:54 2 test.table1

And voila: data is in sync now.

Conclusions

Tungsten Replicator is a useful tool to deploy these kind of scenarios, with no need to upgrade/change MySQL version – but it still has some tricks to avoid data inconsistencies. General recommendations on good replication practices still applies here, i.e. not allowing users to run write commands on slaves and so on.

Having this in mind we can still have issues with our data but now with an extra small effort we can keep things in good health without much pain.

The post Keep your MySQL data in sync when using Tungsten Replicator appeared first on MySQL Performance Blog.


PlanetMySQL Voting: Vote UP / Vote DOWN

Monitoring Galera Cluster for MySQL or MariaDB - Understanding and Optimizing IO-related InnoDB metrics

$
0
0

This blog post is a follow up to our previous post on monitoring CPU-related InnoDB metrics in Galera Cluster

One of the main issues in terms of scalability of MySQL (and thereby also Galera) is the ability to handle large amounts of I/O activity. MySQL, historically, was not very good in this area - flushing caused bumps and spikes in the workload, and kernel mutex was wrecking havoc in the overall stability. I/O handling changed in MySQL 5.5 and has been improved even further in MySQL 5.6. Multiple background threads for I/O, adaptive approach to flushing data, splitting the kernel mutex into a number of new mutexes and rw-locks. Even with all those changes, checking MySQL I/O metrics is a very important part of the daily routine.


How InnoDB saves data modifications?

So, how does InnoDB handle writes? It’s a long story, but necessary to be told in order to give you some background in regards to the metrics we’ll be discussing later.  We will try to make it short and concise, so please expect some simplifications.

Once a DML is committed, the cogwheels start to spin. To ensure durability, the change is written into the InnoDB log buffer and then flushed to InnoDB log files, known also as InnoDB redo log. The way things work here is governed by the innodb_flush_log_at_trx_commit variable. By default (innodb_flush_log_at_trx_commit = 1), data is flushed to both log buffer in memory and redo log on disk at the transaction commit. This ensures durability (data is on disk) but it puts stress on the I/O subsystem (each commit requires a disk write). In some cases it’s acceptable to live with less strict durability rules. In such case we have two more options available.

First (innodb_flush_log_at_trx_commit = 2) is very similar to the default one. The change is written to in-memory InnoDB log buffer and to the InnoDB redo log, but it is not flushed to disk immediately but rather, once per second (approximately). This is a significant change. Flushing forces data to be written to disk. Writing without a flush does not force the disk write - data can be (and in fact, it is) stored in the operating system’s disk buffers and flushed to disk later. This change is crucial - we don’t have a flush per transaction commit but a flush per second. It brings some danger too - if the whole instance went down between the moment of committing and the moment of data flush, those transactions may get lost.

Second option (innodb_flush_log_at_trx_commit=0) is the most risky one but also the fastest. With such setting there are no writes to InnoDB redo log after commit - data is stored only in InnoDB’s log buffer and flushed to disk every second. As a result, we have even less disk operations but now, even a MySQL crash may cause data loss.

The result? Please check this screenshot. At first innodb_flush_log_at_trx_commit = 2 was used, then innodb_flush_log_at_trx_commit = 1 and finally innodb_flush_log_at_trx_commit = 0. As you can see, the difference between the most durable mode and the less safe ones is significant.

What is the InnoDB redo log? This is a file or a set of files used by InnoDB to store data about modifications before they’re pushed further to tablespaces. InnoDB performs writes in a sequential manner, starting from the first byte of the first file and ending at the last byte in the last file. After it reaches that place, the next write will hit the first byte of the first file and the whole process repeats.

Another bit that plays an important part in InnoDB’s I/O workload is the InnoDB buffer pool. It is used to cache reads but it also takes part in caching writes. If we modify the data that’s already stored in the buffer pool, such modifications are applied and the relevant pages are marked as dirty. If not all of the needed pages are in the memory, those missing pages will be read from disk and, again, marked as dirty in the buffer pool. At some later point, those changes will be flushed to tablespaces.

Both redo logs and InnoDB buffer pool work together - buffer pool stores data that was actually modified while redo logs stores information that describe the kind of modifications that were applied - this combines in-memory write cache with durable storage that allows to recreate modifications should memory be erased by a MySQL restart.

This mechanism was designed in the time when spindles ruled the world of databases. Magnetic hard disks have a well known pattern - they are nice and fast for sequential reads or writes but much worse when the access pattern is random. Pushing changes directly to InnoDB tables would be, in most cases, random access. That’s why changes are written in a sequential manner to the redo log and random writes hit the memory first (buffer pool). Then write aggregation is performed and data is pushed to tablespaces in the most efficient way possible - as sequential as it’s doable under current workload. Once data is flushed, it can be removed from both the InnoDB buffer pool and the InnoDB redo log.

Now many use solid state drives, where random writes are not that expensive. But we still have those mechanisms in place and we need to know about them in order to understand InnoDB behavior.

To sum this up, InnoDB needs I/O capacity for:

  • flush modifications from buffer pool to disk (tablespaces) to make sure the InnoDB buffer pool won’t run out of space to store more dirty pages
  • flush modifications from InnoDB buffer pool to make sure there’ll be enough space in the InnoDB redo log to store data about modifications

There’s still some more to it. What is described above is flushing caused by some factors like high number of the dirty pages or InnoDB error logs getting full but there’s also some more “regular” flushing. InnoDB manages it’s buffer pool as a list using a modified version of LRU algorithm. It simply means that frequently used pages stay in the buffer pool and least frequently used pages are removed from it. If such a page is a ‘dirty’ page (contains modifications), it needs to be flushed to disk before it can be discarded.


Checking dirty pages’ status

Enough theory for now, let’s see how we can monitor these mechanisms. First, check what data we have regarding buffer pool and dirty pages. There are couple of status variables. We have innodb_buffer_pool_pages_data which tells us how many pages we used in the buffer pool. We have also innodb_buffer_pool_pages_free which tells us how many free pages we have. Combined, this gives us a total size of the buffer pool. Another status counter that we have is innodb_buffer_pool_pages_dirty which tells us how many dirty buffer pool pages are stored in memory and eventually will have to be flushed. Finally, there’s a configuration variable, innodb_max_dirty_pages_pct, which defines how many dirty pages we can have compared to the buffer pool size before InnoDB starts to flush them more aggressively. By default, in MySQL 5.6 at least, it is set to 75%.

If you are using ClusterControl, you can see those values by going to the ‘Overview -> Galera - InnoDB/Flow’ graphs.

As you can see in the screenshot, we can check if the dirty pages are on a stable level and how large it is when compared to the used part of the buffer pool (which is, for probably most of the cases, same as the total size of the buffer pool - datasets tend to be larger than memory and eventually the whole buffer pool will be filled with data).

In the graph above, there’s nothing really concerning - dirty pages are on a stable level, not even close to the 75% of the total buffer pool’s size.


Checking redo logs’ status

We took a look at the state of the buffer pool, let’s now check the other side of the equation and see if we are facing any issues with InnoDB redo logs.

The main place we’ll be looking at is the output of SHOW ENGINE INNODB STATUS. It is available in ClusterControl under Performance -> InnoDB Status section. If you use Percona or MariaDB flavours of MySQL, you’ll want to look for something as below:

---
LOG
---
Log sequence number 512674741
Log flushed up to 508337304
Pages flushed up to 428250285
Last checkpoint at 427908090
Max checkpoint age 430379460
Checkpoint age target 416930102
Modified age 84424456
Checkpoint age 84766651

Interesting for us are “Checkpoint age”, which shows us how much data (in bytes) was not flushed out to tablespaces, and “Max checkpoint age” which tells us how much data can be stored in the InnoDB redo logs. 

If you use vanilla MySQL from Oracle, this section will look like:

---
LOG
---
Log sequence number 17052114386863
Log flushed up to   17052114357422
Pages flushed up to 17050224411023
Last checkpoint at  17050187452119

You can still calculate the checkpoint age by subtracting ‘Log sequence number’ from the ‘Last checkpoint at’ value.

Basically, the closer checkpoint age is to the max checkpoint age, the more filled are the logs and InnoDB will be doing more I/O in order to maintain some free space in the logs. We are not going into details here - the checkpointing mechanism differs in subtle details between Percona XtraDB-based flavours, MariaDB and Oracle’s version, you can also find differences in it’s implementation between MySQL versions.


Checking InnoDB I/O activity

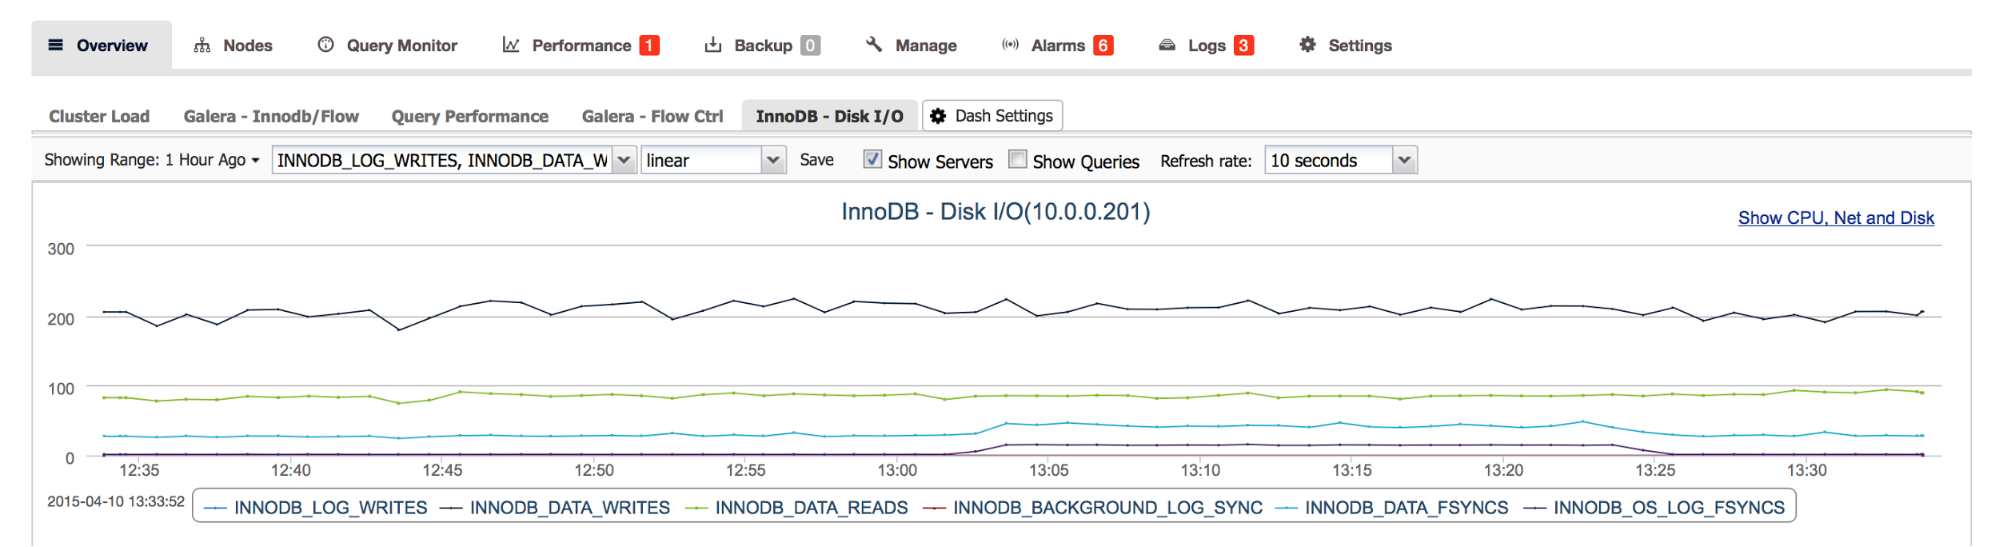
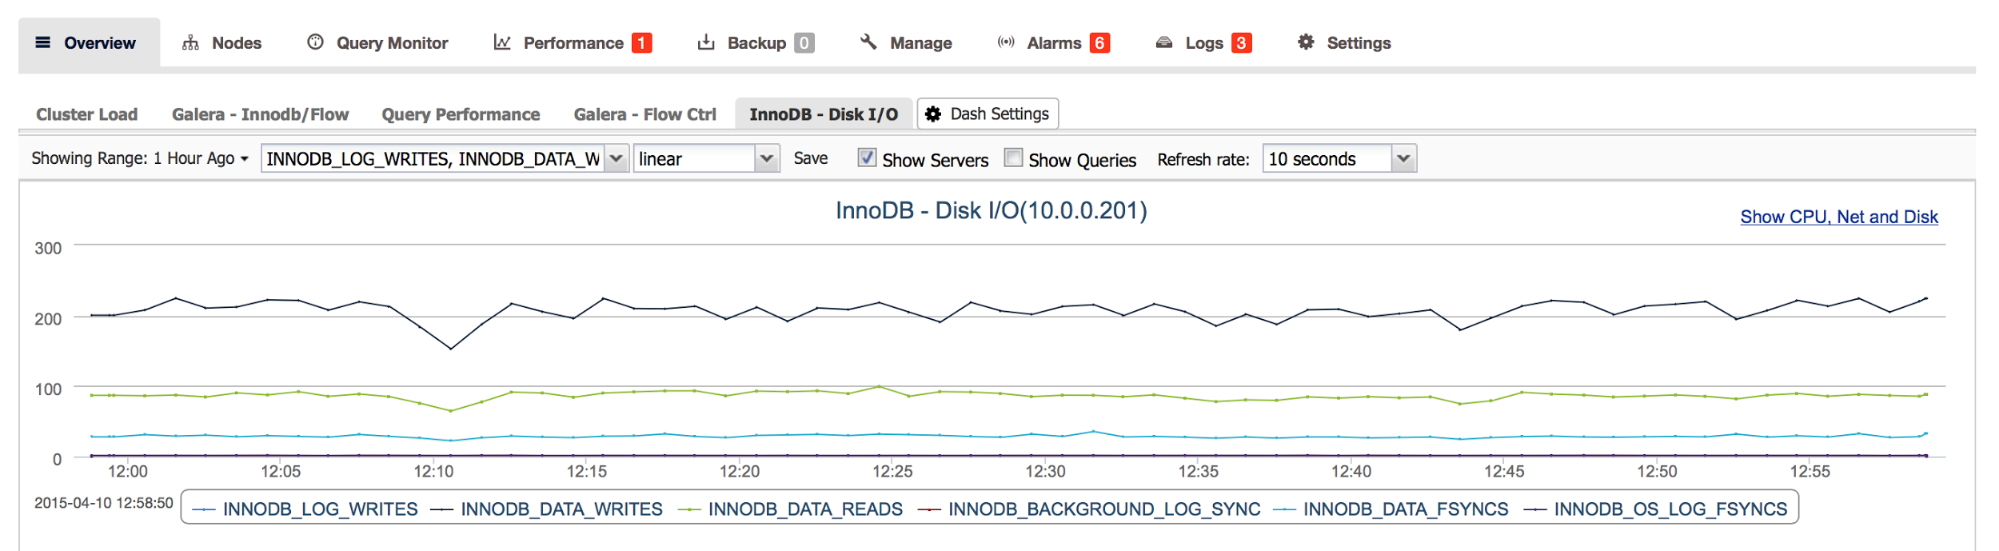
In ClusterControl we can check the current level of InnoDB’s I/O activity by looking at the Overview -> InnoDB Disk I/O tab. Those graphs are not really meaningful without putting them in the context of your hardware’s limitations - this is why proper benchmarking of the server before putting it into production is so important. It’s true also in the cloud - you may have an option to “buy” disk volume with some number of IOPS but at the end you have to check what’s the maximum level of performance you can get from it under your exact workload.

If you are familiar with your I/O subsystem capacity, you can derive some more information from this graph. Do I have spiky workload or is it stable? What’s the maximum number of reads and writes per second? How does it compare to my hardware capacity? Should I be concerned about my I/O subsystem getting close to being fully saturated?


What kind of flushing InnoDB does?

Another good place to look for are the status counters called innodb_buffer_pool_pages_flushed and innodb_buffer_pool_pages_lru_flushed. Reads and writes mentioned previously contain all I/O InnoDB does. It’s not only flushing but also writes to InnoDB redo log, double-write buffer and some other internal structures.

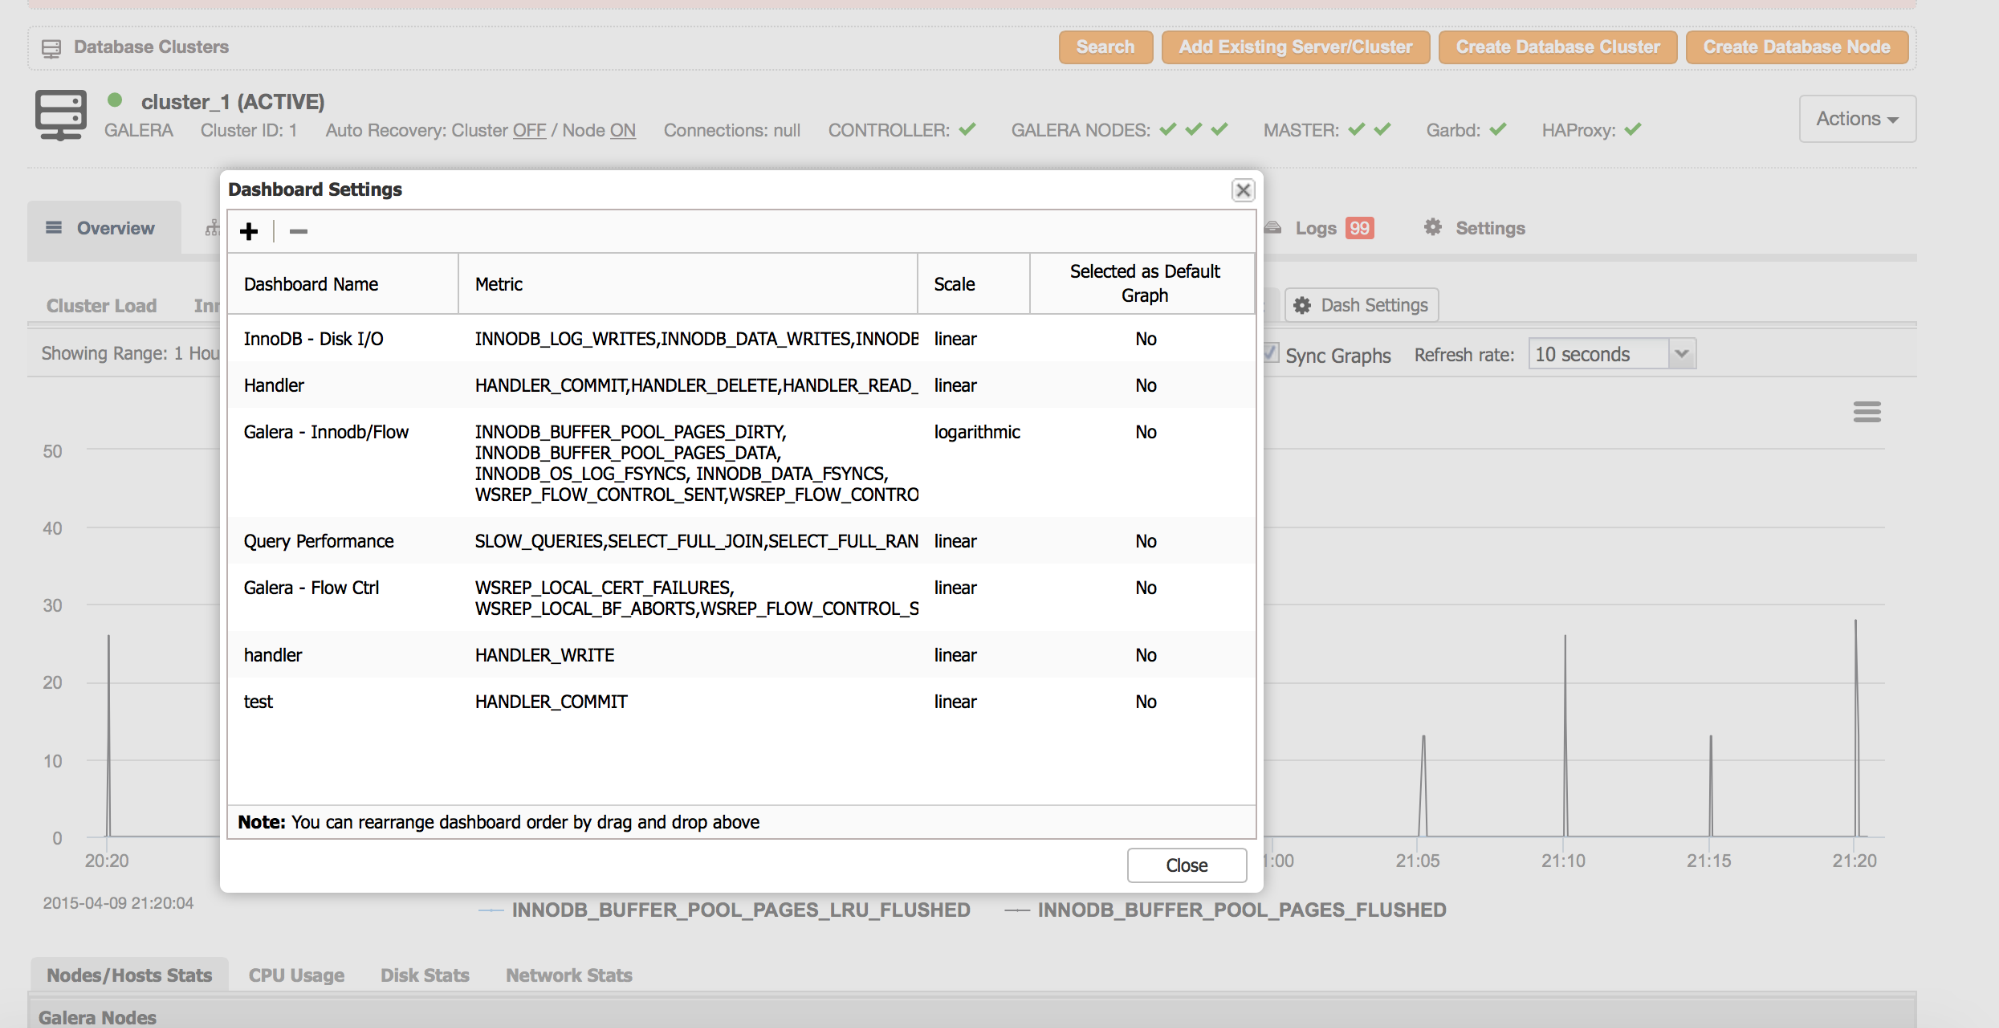
The two status counters mentioned above are showing us only the flushing part of the I/O. They are not graphed by default in ClusterControl but it is very easy to add a new graph to the Overview section:


  1. Click on the Dashboard Settings tab
  2. In the dialog window that opens, click on the ‘+’ icon to add a new graph
  3. Fill the dashboard name
  4. Pick innodb_buffer_pool_pages_flushed and innodb_buffer_pool_pages_lru_flushed from the ‘Metric’ list
  5. Save the graph

You should see the new tab in the “Overview” section.

This data should help you to determine what kind of flushing is the most common under your workload. If we see mainly thousands of ‘innodb_buffer_pool_pages_flushed’ per second and the graph seems to be spiky, you may then want to create a bit of room for InnoDB by increasing InnoDB redo log’s size - this can be done by changing innodb_log_file_size.

In general, a good way to calculate redo log size is to see how much data InnoDB writes to the log. A rule of thumb is that the redo log should be able to accommodate one hour worth of writes. This should be enough data to benefit from write aggregation when redo log is flushed to the tablespaces. You can do some estimation regarding log size required by running the following SQL:

\P grep "Log sequence number"
show engine innodb status\G select sleep(60) ; show engine innodb status\G

Result could look like below:

mysql> \P grep "Log sequence number"
PAGER set to 'grep "Log sequence number"'
mysql> show engine innodb status\G select sleep(60) ; show engine innodb status\G
Log sequence number 18887290448024
1 row in set (0.00 sec)

1 row in set (1 min 0.00 sec)

Log sequence number 18887419437674
1 row in set (0.00 sec)

Then we need to subtract the first result from the second one:

mysql> \P
Default pager wasn't set, using stdout.

mysql> select (18887419437674 - 18887290448024) * 60 / 1024/1024 as "MB/h";
+---------------+
| MB/h          |
+---------------+
| 7380.84697723 |
+---------------+
1 row in set (0.00 sec)

As a result we estimated that based on current sample from the last minute, this particular server writes 7.3GB/hour of data so we should aim at around 8GB of the total redo log size. Of course, the longer sampling time, the better approximation. We also have to take under the consideration spikyness of the workload - if there are periods of increased writes, we need to do sampling to cover them.

As stated at the beginning, we did not cover all of the details in this post - for example we did not mention InnoDB’s change buffer, we did not explain how double-write buffer works. What we did in this post is to put together some basic information about how InnoDB handles I/O traffic and what metrics are available to users to understand InnoDB’s I/O-related behavior. Hopefully it will be enough to help you find your way when handling I/O-related issues in your production MySQL environments.

Blog category:


PlanetMySQL Voting: Vote UP / Vote DOWN

Query and Password Filtering with the MariaDB Audit Plugin

$
0
0
Mon, 2015-05-04 10:58
ralfgebhardt

The MariaDB Audit Plugin has been included in MariaDB Server by default since version 5.5.37 and 10.0.9. It's also pre-loaded in MariaDB Enterprise. The Audit Plugin as of version 1.2.0 includes new filtering options which are very useful. This article explains some aspects of them. However, if you haven't installed and used the plugin, you may want to read first a few other documents:

Filtering by Event Type

To appreciate the new features in the MariaDB Audit Plugin, you'll need to understand how this plugin handles filtering in general. The filtering options in version 1.1.x are based on defining the type of an event. Which event type that's used for logging can be configured using the global server variable, server_audit_events. There are three event types: a CONNECT; a TABLE, which is available in MariaDB only; and a QUERY.

The CONNECT event type handles connecting to a server or disconnecting from it. If this event type is defined in server_audit_events, connects, disconnects, and failed connects, including the related error code, are logged in an audit log file or system log.

Using the TABLE event type, the Audit Plugin will log several activities related to tables: when table objects are opened for read or write, and when table objects are created, altered, renamed, or dropped. It will log these actions without having to do complex parsing of the queries. To use this event type, you'll have to make some changes on the server itself. This feature is available only with version 5.5.31 or a newer version of MariaDB Server.

An audit at the table level will allow you to log access to real table objects used by a queries even when the queries themselves do not directly include table objects. This includes, for example, queries that use views or stored procedures.

The QUERY event type is used to log the queries themselves. All queries sent to the server are handled by this event type and logged. The full queries are always logged, together with any error codes. The query statements aren't parsed, though. This keeps the overhead of the audit plugin to a minimum.

If you don't want to log all of these long queries, or if you're only interested in the creation, change, or removal of objects but want to log DDL (Data Definition Language) statements, you can use the Audit Plugin to do just that to some extent. You can get what you want by just logging the TABLE and CONNECT events. In this way, any CREATE, ALTER, and RENAME statements for table objects are logged. If you are also interested in DDL (e.g., CREATE DATABASE), or if you're using the Audit Plugin with MySQL and not MariaDB Server, you'll need to use MariaDB Audit Plugin Version 1.2.0. Just remember that only the MariaDB Server can provide the TABLE events.

New Filtering Options for Queries

The MariaDB Audit Plugin has two new options for the server_audit_events server variable: QUERY_DML and QUERY_DDL. These options can be used, instead of using the QUERY option, to log only DML (Data Manipulation Language) or DDL statements in the audit log or system log. Using one of these options will result in parsing of query strings. This does requires a small overhead for the audit plugin.

The option QUERY still can be used. It's not equivalent, though, to using both QUERY_DML and QUERY_DDL. There are many queries that are neither DDL nor DML (e.g., GRANT statements). By using the old option, QUERY, you can avoid parsing and thereby reduce some overhead.

Password Filtering

As already mentioned, version 1.1 of the MariaDB Audit Plugin logs queries without any parsing of the queries. This means that passwords included in queries are logged as plain text in the audit log or system log. That's a security vulnerability. This has been changed, though, in version 1.2.0. Passwords are now replaced by asterisks (i.e., "*****") in the logs.

Be aware, though, that passwords given with functions PASSWORD() or OLD_PASSWORD() in DML statements will still be logged as plain text in queries. Key strings used with encrypt functions like ENCODE() and AES_ENCRYPT() are also still logged in plain text.

Download and Install

You can download and install the MariaDB Audit Plugin from mariadb.com/resources/downloads. If you're using the newest version of MariaDB Server, you won't have to download MariaDB Audit Plugin 1.2.0 separately, as it is included in MariaDB Server already. With MariaDB Enterprise the Audit-Plugin is pre-loaded and auditing just has to be activated.

For more information about the Audit Plugin refer to https://mariadb.com/kb/en/mariadb/about-the-mariadb-audit-plugin/


PlanetMySQL Voting: Vote UP / Vote DOWN

Spider for MySQL – Implementation

$
0
0

In a previous post, I wrote an overview about Spider for MySQL with its advantages and disadvantages. Now I’ll go through a simple example demonstrating how to implement Spider for MySQL.

System information:

MySQL instances information (shards):

Spider instance information:

Note:

More information on how to install tar-ball binaries can be checked out here.

Testing steps:

  1. Install MySQL server (Oracle binaries) on the instances mysqla, mysqlb and mysqlc.
  2. Install MySQL server (Spider binaries) on the spider_node.
  3. Load the spider plugin on the spider_node by the following SQL command:
    shell> mysql < /$mysql_basedir/share/install_spider.sql"
  4. Check if the spider SE is now available or not:
    SQL> SHOW ENGINES;
    +--------------------+---------+---------------------------------------------
    | Engine | Support | Comment | Transactions | XA | Savepoints |
    +--------------------+---------+---------------------------------------------
    | SPIDER | YES | Spider storage engine | YES | YES | NO |
    | InnoDB | DEFAULT | Supports transactions, row-level locking, and foreign keys | YES | YES | YES |
    | MRG_MYISAM | YES | Collection of identical MyISAM tables | NO | NO | NO |
    | CSV | YES | CSV storage engine | NO | NO | NO |
    | MyISAM | YES | MyISAM storage engine | NO | NO | NO |
    | MEMORY | YES | Hash based, stored in memory, useful for temporary tables | NO | NO | NO |
    | PERFORMANCE_SCHEMA | YES | Performance Schema | NO | NO | NO |
    +--------------------+---------+---------------------------------------------
  5. Create database called “spider_db” on the 4 MySQL instances (shards and spider):
    SQL> CREATE DATABASE spider_db;
  6. Create a testing table called – let’s say – sp_test in the spider_db database as follows (on the shards):
    On mysqla:
    SQL> CREATE TABLE spider_db.sp_test
    (id INT PRIMARY KEY,name CHAR(5) DEFAULT 'MySQL')
    PARTITION BY RANGE (id)
    (
    PARTITION p0 VALUES LESS THAN (200000),
    PARTITION p1 VALUES LESS THAN(400000),
    PARTITION p2 VALUES LESS THAN(600000),
    PARTITION p3 VALUES LESS THAN(800000),
    PARTITION p4 VALUES LESS THAN(MAXVALUE)
    );

    On mysqlb:
    SQL> CREATE TABLE spider_db.sp_test
    (id INT PRIMARY KEY,name CHAR(5) DEFAULT 'MySQL')
    PARTITION BY RANGE (id)
    (
    PARTITION p0 VALUES LESS THAN (1200000),
    PARTITION p1 VALUES LESS THAN(1400000),
    PARTITION p2 VALUES LESS THAN(1600000),
    PARTITION p3 VALUES LESS THAN(1800000),
    PARTITION p4 VALUES LESS THAN(MAXVALUE)
    );

    On mysqlc:
    SQL> CREATE TABLE spider_db.sp_test
    (id INT PRIMARY KEY,name CHAR(5) DEFAULT 'MySQL')
    PARTITION BY RANGE (id)
    (
    PARTITION p0 VALUES LESS THAN (2200000),
    PARTITION p1 VALUES LESS THAN(2400000),
    PARTITION p2 VALUES LESS THAN(2600000),
    PARTITION p3 VALUES LESS THAN(2800000),
    PARTITION p4 VALUES LESS THAN(MAXVALUE)
    );
  7. Create a MySQL user to be used by the spider storage engine on the shards:
    SQL> GRANT ALL ON *.* TO 'sp_user'@'192.168.56.50' IDENTIFIED BY 'T3$T';
  8. Create the same table on the spider_node using the Spider SE as follows:
    SQL> CREATE TABLE spider_db.sp_test
    (id INT PRIMARY KEY,name CHAR(5) DEFAULT 'MySQL')
    ENGINE=Spider
    connection 'table"sp_test",database"spider_db",user"sp_user",password"T3$T",port"3306"'
    PARTITION BY RANGE (id)
    (
    PARTITION p0 VALUES LESS THAN(1000000)COMMENT 'host "192.168.56.51"',
    PARTITION p1 VALUES LESS THAN(2000000)COMMENT 'host "192.168.56.52"',
    PARTITION p2 VALUES LESS THAN(MAXVALUE)COMMENT 'host "192.168.56.53"'
    );

Now, you can manage the tables (select, insert, update, … etc) on the shards through the spider node.
Give it a try and have fun with Spider!

Note:

Although some companies use Spider for MySQL in production systems but – at the time of writing this post – it is NOT production ready yet.


PlanetMySQL Voting: Vote UP / Vote DOWN

Percona Acquires Tokutek : My Thoughts #3 : Fractal Tree Indexes

$
0
0
Last week I wrote up my thoughts about the Percona acquisition of Tokutek from the perspective of TokuDB and TokuMX[se]. In this third blog of the trilogy I'll cover the acquisition and the future of the Fractal Tree Index. The Fractal Tree Index is the foundational technology upon which all Tokutek products are built.

 So what is a Fractal Tree Index? To quote the Wikipedia page:
"a Fractal Tree index is a tree data structure that keeps data sorted and allows searches and sequential access in the same time as a B-tree but with insertions and deletions that are asymptotically faster than a B-tree."
Fractal Tree Indexes are really cool, they enable the following capabilities in TokuDB and TokuMX[se]:
  • Great compression
  • High performance index maintenance
  • ACID, MVCC
Lastly, I think it's important to disclose that I worked at Tokutek for 3.5 years (08/2011 - 01/2015) as VP/Engineering and I do not have any equity in Tokutek or Percona.


Thoughts on Percona + Fractal Tree Indexes
 
Files, Files, Files
  • Currently, each Fractal Tree Index is stored in it's own file. The benefit of this approach is that dropping an index instantly returns all space used by the index to the filesystem and the execution of the drop-index operation is very fast. The downside is the number of files on a server can become overwhelming with a large number of tables/collections.
  • I think it would be a great feature to allow users the choice of file-per-index, file-per-table, and tablespaces.
  • There is a Jira ticket for the effort.
Competition
Online Backup
  • Tokutek's "hot backup" functionality is closed source and only provided with enterprise editions of TokuDB and TokuMX.
  • The other backup solution is file system snapshots.
  • I'm curious to see if Percona "open sources" hot backup or creates a different open source hot backup technology.
Compression
  • As far as I know, the Fractal Tree Index currently supports quicklz, zlib, and lzma compression libraries.
  • There are likely benefits to be had with Snappy, especially on fast storage.
    • BohuTANG from the community seems to have a it working.
  • It might be interesting to experiment with index-prefix-compression, as WiredTiger has done. WiredTiger claims both on-disk and in-memory space savings using this technique.
Checkpointing
  • Simply put, a checkpoint is a process by which a database gets to a known state on disk. Should the database server crash (or lose power) the recovery process requires starting from the checkpoint and playing forward all subsequent committed transactions.
  • By default Fractal Tree Indexes checkpoint every 60 seconds.
  • A checkpoint affects the server's performance in that it requires CPU, RAM, and IO.
  • I assume some effort will go toward reducing the impact of a checkpoint on the running system.
Code Complexity
  • I don't have specific numbers but I suspect that the Fractal Tree Index code base is more complicated than the other open source write-optimized storage engines.
  • I'm happy to be proven wrong about this if anyone wants to present their findings based on lines of code or other accepted code metrics.
  • On a side note WiredTiger has some very nice developer documentation, I'm not sure about the RocksDB documentation.
License
Tokutek’s patented Fractal Tree indexing technology is a result of ten years of research and development by experts in cache-oblivious algorithmics and is protected by multiple patents.
  • The Fractal Tree Index is licensed as GNU GPL v2 plus a "Patent Rights Grant".
  • Does the modified GPLv2 license affects potential users or developers?
Anti-use-cases
  • I'd like to highlight a three "soft spots" in Fractal Tree Indexing, as in areas where there is room for improvement or simply things to be aware of.
  • Leftmost deletion patterns
    • Fractal Tree Indexes contain large message buffers in the upper levels. These buffers provide much allow for IO "avoidance" of certain operations.
    • Consider a workload where 100 million rows are inserted using an auto-incrementing primary key, then 50 million rows are deleted.
    • At this point the Fractal Tree Index will likely have "buffered" the deletes (deletes are just small messages), the inserted data is still in the leaf nodes.
    • Queries against this deleted data will perform poorly, the extreme case is to restart your server and "select min(pk) from foo;" 
    • Partitioning is one way to deal with this pattern, rather than deleting the rows you'd merely drop them one partition at a time.
  • Random primary key inserts
    • Fractal Tree Indexes have a huge advantage, from an IO perspective, when maintaining non-unique indexes. Insert, update, and delete operations can be buffered.
    • However, unique indexes must be checked for uniqueness, and thus an IO is required unless the node holding the key is in memory.
    • Primary key indexes are always unique.
    • So Fractal Tree Indexes perform much like a standard B-tree when randomly inserting into a primary key index. When the data set is larger than RAM, each insert will require an IO to check for uniqueness.
  • Latency
    • Fractal Tree Indexes employ two techniques to achieve high compression
      • Large block size - The default is 64KB, and can be set higher.
      • Algorithms - LZMA > zlib > quicklz (and Snappy is likely coming soon)
    • Compression comes at a cost, latency.
    • The larger the node size, the longer the decompress operation.
    • The higher the compression, the longer the decompress operation.
    • Users are purchasing SSD/Flash for their IO performance, but they also want high compression because these devices are expensive.
    • At the moment it's complicated to determine the best combination of node size and compression algorithm, creating user-facing metrics will be helpful.
Human Resources
  • As with TokuDB and TokuMX[se], I'm curious to see how much Percona is  looking to grow the team. They've already posted on their jobs page for "C/C++ Developers for TokuDB, TokuMX, and Tokutek Products".
  • Prioritizing resources between Fractal Tree Indexes, TokuDB, TokuMX, and TokuMXse will be tricky.
 Please asks questions or comment below.
PlanetMySQL Voting: Vote UP / Vote DOWN

lower_case_table_names option to lose databases and tables

$
0
0

To lose your data or make it unavailable there is an excellent option in MySQL, rather than drop or delete :)

Option name is lower_case_table_names.
Default value of this setting is 0:

mysql> select @@lower_case_table_names;
+--------------------------+
| @@lower_case_table_names |
+--------------------------+
|                        0 |
+--------------------------+
1 row in set (0.00 sec)

Due to documentation value=0:

Table and database names are stored on disk using the lettercase specified in the CREATE TABLE or CREATE DATABASE statement. Name comparisons are case sensitive. You should not set this variable to 0 if you are running MySQL on a system that has case-insensitive file names (such as Windows or OS X). If you force this variable to 0 with –lower-case-table-names=0 on a case-insensitive file system and access MyISAM tablenames using different lettercases, index corruption may result.

So related to documentation, tables T1 and t1 will be different, as well as database DB1 and db1.

Let’s create sample table and databases:

mysql> create database DB1;
Query OK, 1 row affected (0.06 sec)

mysql> create database db3;
Query OK, 1 row affected (0.03 sec)

mysql> use db3;
Database changed
mysql> create table TABLE1(id int not null);
Query OK, 0 rows affected (0.04 sec)
mysql> insert into TABLE1(id) values(1),(2),(3),(4),(5);
Query OK, 5 rows affected (0.01 sec)
Records: 5  Duplicates: 0  Warnings: 0

You are happy with your tables and databases, but then suddenly somebody with best practice brain says that, it is general rule to change this option equal to 1.

Table names are stored in lowercase on disk and name comparisons are not case sensitive. MySQL converts all table names to lowercase on storage and lookup. This behavior also applies to database names and table aliases.

You read documentation identifier-case-sensitivity, and there was no caution.
Decided to change this option, edit my.cnf file and add following under [mysqld]:

lower_case_table_names = 1 , then restarted MySQL.

From now, you will not able to access to your UPPERCASE created database and tables.

mysql> use DB1;
ERROR 1049 (42000): Unknown database 'db1'
mysql> drop database DB1;
ERROR 1008 (HY000): Can't drop database 'db1'; database doesn't exist

mysql> use db3;
Reading table information for completion of table and column names
You can turn off this feature to get a quicker startup with -A

Database changed
mysql> show tables;
+---------------+
| Tables_in_db3 |
+---------------+
| TABLE1        |
+---------------+
1 row in set (0.00 sec)

mysql> select * from TABLE1;
ERROR 1146 (42S02): Table 'db3.table1' doesn't exist

There is no WARNING/Caution in documentation related to this issue.
It maybe critical for many applications, because many developers create database and table names using CamelCase pattern or they just begin everything with Uppercase.
So be careful while changing this option. In documentation 2 steps provided for this purpose:

1. For individual tables you can rename it as -> RENAME TABLE TABLE1 to table1;

2. Or you can take backup of all databases, then drop all databases, change option and restart MySQL and then import taken backup.

The best way is everytime you have a fresh install of MySQL change this option to 1.

The post lower_case_table_names option to lose databases and tables appeared first on Azerbaijan MySQL UG.


PlanetMySQL Voting: Vote UP / Vote DOWN

Log Buffer #421: A Carnival of the Vanities for DBAs

$
0
0

As always, this fresh Log Buffer Edition shares some of the unusual yet innovative and information-rich blog posts from across the realms of Oracle, SQL Server and MySQL.

Oracle:

A developer reported problems when running a CREATE OR REPLACE TYPE statement in a development database. It was failing with an ORA-00604 followed by an ORA-00001. These messages could be seen again and again in the alert log.

  • Few Random Solaris Commands : intrstat, croinfo, dlstat, fmstat for Oracle DBA
  • When to use Oracle Database In-Memory?
  • Oracle Linux and Oracle VM at EMCWorld 2015
  • SQLcl connections – Lazy mans SQL*Net completion

SQL Server:

  • SQL Server expert Wayne Sheffield looks into the new T-SQL analytic functions coming in SQL Server 2012.
  • The difference between the CONCAT function and the STUFF function lies in the fact that CONCAT allows you to append a string value at the end of another string value, whereas STUFF allows you insert or replace a string value into or in between another string value.
  • After examining the SQLServerCentral servers using the sp_Blitz™ script, Steve Jones now looks at how we will use the script moving forward.
  • Big data applications are not usually considered mission-critical: while they support sales and marketing decisions, they do not significantly affect core operations such as customer accounts, orders, inventory, and shipping. Why, then, are major IT organizations moving quickly to incorporating big data in their disaster recovery plans?
  • There are no more excuses for not having baseline data. This article introduces a comprehensive Free Baseline Collector Solution.

MySQL:

  • MariaDB 5.5.43 now available
  • Testing MySQL with “read-only” filesystem
  • There are tools like pt-kill from the percona tool kit that may print/kill the long running transactions at MariaDB, MySQL or at Percona data instances, but a lot of backup scripts are just some simple bash lines.
  • Optimizer hints in MySQL 5.7.7 – The missed manual
  • Going beyond 1.3 MILLION SQL Queries/second

PlanetMySQL Voting: Vote UP / Vote DOWN

Information on the SSL connection vulnerability of MySQL and MariaDB

$
0
0

Last  week, a SSL connection security vulnerability was reported for MySQL and MariaDB. The vulnerability states that since MariaDB and MySQL do not enforce SSL when SSL support is enabled, it’s possible to launch Man In The Middle attacks (MITM). MITM attacks can capture the secure connection and turn it into an insecure one, revealing data going back and forth to the server.

Issue resolution in MariaDB is visible through the corresponding ticket in MariaDB’s tracking system (JIRA): https://mariadb.atlassian.net/browse/MDEV-7937

The vulnerability affects the client library of the database server in both MariaDB and MySQL. But, the vulnerability does not affect all the libraries, drivers or connectors for establishing SSL connections with the server.

The vulnerability exists when the connection to the server is done through the client library libmysqlclient. This client library is provided with the database server and is a fork of the corresponding client library in MySQL. The client library is used by probably the most used tool, the MySQL Command-Line tool of which a forked version is shipped with MariaDB.

In addition to libmysqlclient, the MariaDB project provides the following connectors:

These connectors also support SSL connections to the database server and make use of the similar parameters etc. to establish secure connections. Here is an update on whether the connectors are affected or not:

  • Affected – MariaDB Connector/C is vulnerable in the same way as libmysqlclient
  • Not affected – MariaDB Connector/J does the right thing and aborts any unsecure connections if SSL is in use
  • Not affected – MariaDB Connector/ODBC does not currently support SSL

For MySQL’s Connector/J it is worth mentioning that it has two properties, “useSSL” and “requireSSL”. If “requireSSL” is selected, then unsecure connections are aborted.

Many of the tools that are used to connect to MariaDB or MySQL make use of libmysqlclient. Thus, when using these tools over an untrusted network, it’s highly recommended that you restrict network access as much as possible with normal means, even if you’re using SSL to connect to MariaDB or MySQL. Some best practices that are easy to put in place for decreasing the risk of MITM attacks include:

Finally, since we’re in the middle of fixing the vulnerability in MariaDB, we appreciate your input regarding which versions of MariaDB that should get the fix backported. For background, the SSL support in MySQL (up until 5.7) and MariaDB is not enforceable. This is the intended MySQL behavior, implemented back in 2000, and clearly documented in the MySQL reference manual as:

“For the server, this option specifies that the server permits but does not require SSL connections.

For a client program, this option permits but does not require the client to connect to the server using SSL. Therefore, this option is not sufficient in itself to cause an SSL connection to be used. For example, if you specify this option for a client program but the server has not been configured to permit SSL connections, an unencrypted connection is used.”

MariaDB 5.5 and 10.0 are stable versions and behave as documented – they permit SSL, but do not require it. To enforce SSL, when the appropriate options are given, will change the behavior and might break existing applications where a mix of SSL and non-SSL connections are used. In MariaDB 10.1 this is not a problem since MariaDB 10.1 is still in beta, although it is very close to release candidate status. There we will introduce the fix. As for MariaDB 5.5 and 10.0, we are collecting input to determine whether we should change the behavior of 5.5 and 10.0. Please visit our website for more details, and share your feedback at: http://info.mariadb.com/ssl-vulnerability-mysql-mariadb

The initial reports on the vulnerability can be found through these sources:


PlanetMySQL Voting: Vote UP / Vote DOWN
Viewing all 18786 articles
Browse latest View live


<script src="https://jsc.adskeeper.com/r/s/rssing.com.1596347.js" async> </script>