Quantcast
Channel: Planet MySQL
Viewing all 18840 articles
Browse latest View live

MySQL 8.0.17 Release and The Clone Plugin

$
0
0
MySQL 8.0.17 is officially released Yesterday. The most talked feature is the clone plugin, which enables the automatic node provisioning from an existing node (a Donor). This also closes the gap between MySQL Group Replication and Galera Cluster on usability.

Congrats to MySQL engineering team on the excellent work! Specially expose the visibility of the operations:

mysql> SELECT STATE FROM performance_schema.clone_status;
+-----------+
| STATE     |
+-----------+
| Completed |
+-----------+
1 row in set (0.02 sec)

mysql> SELECT STAGE, STATE, END_TIME FROM performance_schema.clone_progress;
+-----------+-------------+----------------------------+
| STAGE     | STATE       | END_TIME                   |
+-----------+-------------+----------------------------+
| DROP DATA | Completed   | 2019-07-23 12:27:36.059325 |
| FILE COPY | Completed   | 2019-07-23 12:27:36.258573 |
| PAGE COPY | Completed   | 2019-07-23 12:27:36.265563 |
| REDO COPY | Completed   | 2019-07-23 12:27:36.270240 |
| FILE SYNC | Completed   | 2019-07-23 12:27:36.377404 |
| RESTART   | Not Started | NULL                       |
| RECOVERY  | Not Started | NULL                       |
+-----------+-------------+----------------------------+
7 rows in set (0.02 sec)

There is an excellent blog by Miguel Araújo - A Breakthrough in Usability – Automatic Node Provisioning! The article describes why the clone plugin is needed; and the difference between the binlog-based incremental recovery and the clone-based recovery. 

Other articles on the same subject are:
If you like to learn the design and how does it work internally, suggest to read the related worklogs:
    • WL#9209: InnoDB: Clone local replica
    • WL#9210: InnoDB: Clone remote replica
    • WL#9211: InnoDB: Clone Replication Coordinates
    • WL#9682: InnoDB: Support cloning encrypted and compressed database
    • WL#11636: InnoDB: Clone Remote provisioning
    Most of other features in MySQL 8.0.17 are discussed in my previous blog. The more accurate list of changes are in Geir's blog, and 8.0.17 release notes.

    Overview on MySQL Shell 8.0.17 Extensions & Plugins and how to write yours !

    $
    0
    0

    With MySQL Shell 8.0.17, a super cool new feature was released: the MySQL Shell Extensions & Plugins !

    You will be able to write your own extensions for the MySQL Shell. You may already saw that I’ve written some modules like Innotop or mydba for MySQL Shell.

    However those plugins were written in Python and only accessible in Python mode. With the new Shell Extensions Infrastructure, this is not the case anymore.

    Also, this allows you to populate the help automatically.

    Extensions are available from the extglobal object.

    Currently we wrote some public extensions available on github and if you look at them, you will see that we tried to sort them in some categories.

    Those categories are:

    • async_replica_sets
    • audit
    • configuration
    • demo
    • innodb
    • innodb_cluster
    • performance
    • router
    • schema
    • security
    • support

    I will recommend to follow those categories to write your own extensions.

    To write your own extension, you will have to write your code under the right folder in its own file. For example demo/oracle8ball.py

    from random import randrange
    
    def tell_me():
        """Function that prints the so expected answer
        Returns:
            Nothing
        """
    
        answers = ["It is certain.", "It is decidedly so.","Without a doubt.",
                   "Yes - definitely.", "You may rely on it.",
                   "As I see it, yes.","Most likely.","Outlook good.",
                   "Yes.","Signs point to yes.","Reply hazy, try again.","Ask again later.",
                   "Better not tell you now.","Cannot predict now.",
                   "Concentrate and ask again.", "Don't count on it.",
                   "My reply is no.","My sources say no.",
                   "Outlook not so good.","Very doubtful."]
    
        print answers[randrange(20)

    If the folder where you add your extension file doesn’t have any __init__.py file, you just need to create an empty one.

    Then in the existing init.py, you need to register your new extension. So to register demo/oracle8ball.py, I need to edit demo/init.py and add the following lines:

    from ext.mysqlsh_plugins_common import register_plugin
    from ext.demo import oracle8ball as oracle_8_ball
    
    [...]
    
    try:
        register_plugin("oracle8ball", oracle_8_ball.tell_me,
            {
              "brief": "Get the answer from the Oracle 8 Black Ball",
              "parameters": []
            },
            "demo"
        )
    except Exception as e:
        shell.log("ERROR", "Failed to register ext.demo.oracle8ball ({0}).".
            format(str(e).rstrip())
    

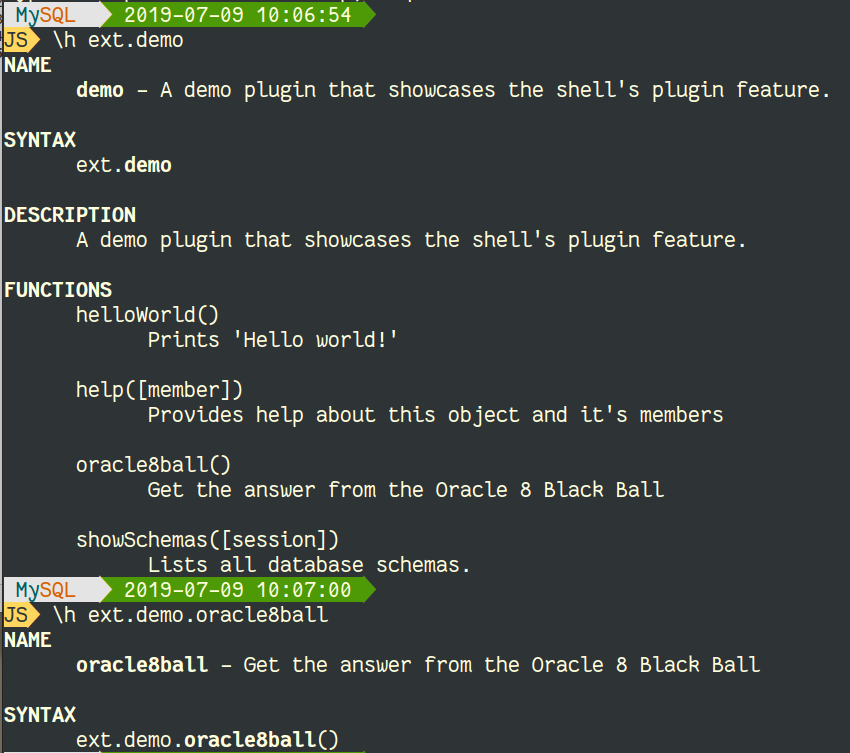
    And now you can start MySQL Shell, and first check the help:

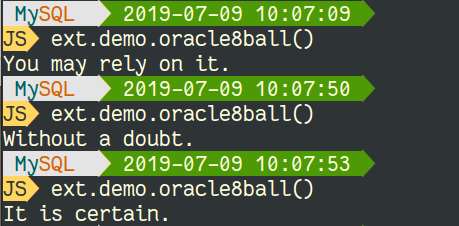
    As you can see ext.demo global object contains oracle8ball() method!

    Now can use it in JS:

    Or in Python:

    As you can see, it’s very easy and very cool to extend the MySQL Shell. In my next post related to the awesome MySQL Shell, I will show you in action some mydba modules migrated to the new extension framework.

    Don’t forget to share your own modules, we accept Pull Requests too !

    For more details, I also invite you to read this post from my colleague Rennox: MySQL Shell Plugins – Introduction

    Connector/Python C Extension Prepared Statement Support

    $
    0
    0

    MySQL Connector/Python 8 made the C Extension the default for the platform/Python version combinations supporting it. One thing that was missing from the C Extension implementation (unless you used the _mysql_connector module) was support for prepared statements. That has been taken care of with the release of version 8.0.17.

    The two main advantages of using prepared statements are security and performance. The security comes in as you can pass query parameters and have them applied server-side, so you are sure they are quoted and escaped correctly taking the data type into consideration. The performance benefit happens, when you execute the same query (except for the parameters) several times as MySQL will prepare it only for the first execution and then reuse the prepared statement – that is where the name comes from.

    You use the prepared statements with the C Extension in the same way as for the pure Python implementation – by setting the prepared argument to True when creating a cursor. The simplest way to explain is to show an example.

    import mysql.connector
    
    connect_args = {
        "user": "root",
        "host": "localhost",
        "port": 3306,
        "password": "password",
        "use_pure": False,
    }
    
    db = mysql.connector.connect(**connect_args)
    cursor = db.cursor(prepared=True)
    print(cursor)
    print("")
    
    sql = "SELECT * FROM world.city WHERE ID = %s"
    city_ids = [130, 456, 3805]
    
    print("  ID  Name            Country  District         Popluation")
    print("-" * 58)
    fmt = "{0:4d}  {1:14s}  {2:^7s}  {3:15s}  {4:10d}"
    for city_id in city_ids:
        cursor.execute(sql, (city_id,))
        city = cursor.fetchone()
        print(fmt.format(*city))
    
    cursor.close()
    db.close()
    

    In the connection arguments, use_pure is set to False. Since that is the default, it is not needed, but it has been added here to make it explicit that the C Extension is used.

    Avoid

    Do not hardcode the connection arguments in your programs. It is done here to keep the example simple, but it is both insecure and inflexible to do in real programs.

    When the cursor is created in line 12, prepared is set to True making it a prepared statement cursor. To verify that, the cursor is printed in the next line.

    You create the statement by adding the string %s as a placeholder where you want to add the parameters to the query. You can then keep executing the query. In the example, the query is executed for three different IDs. (Yes, for this example, all three cities could have been fetched in one query, but imagine this query is used as part of a larger application where the three cities are not required at the same time. This could for example be for three independent user requests.) The parameter is provided as a tuple to the execute() method of the cursor. The output of the program is:

    CMySQLCursorPrepared: (Nothing executed yet)
    
      ID  Name            Country  District         Popluation
    ----------------------------------------------------------
     130  Sydney            AUS    New South Wales     3276207
     456  London            GBR    England             7285000
    3805  San Francisco     USA    California           776733
    

    Notice that the cursor uses the class CMySQLCursorPrepared, which is the prepared statement cursor class for the C Extension.

    MySQL Connector/Python Revealed

    Book

    If you want to learn more about MySQL Connector/Python, then I have written MySQL Connector/Python Revealed published by Apress. The book both covers the traditional Python Database API (PEP 249) and the X DevAPI which is new as of MySQL 8.

    The book is available from Apress (print and DRM free ePub+PDF), Amazon (print and Kindle), Barnes & Noble (print), and others.

    Have fun coding.

    How to Test MySQL Server Hostname with ProxySQL Multiplexing

    $
    0
    0

    Overview

    While working on a MySQL Galera cluster with ProxySQL, I was in the process of testing traffic going to the MySQL nodes by using the @@hostname command to ensure which MySQL host behind the proxy the query ran on. This was important as my client is using query rules to route traffic according to the rule to either the master or the slave.  But to my surprise, I didn’t always get the result that I was expecting.  This is where ProxySQL multiplexing comes into play.

    Scenario

    In my scenario, I was on a test server connecting to ProxySQL which was then routing my queries to the MySQL Galera nodes.  I would connect into ProxySQL using the MySQL client.

    Important note: When testing query routing with ProxySQL using comments and the MySQL client, you have to use the “-c” command line option in order for the comment to not be stripped away when running queries.  You want to preserve the comment so ProxySQL can apply the appropriate query rule to the query.

    -c, --comments Preserve comments. Send comments to the server. The
    default is --skip-comments (discard comments), enable
    with --comments.

    These are the query rules that I have in place – where 10 is my Writer hostgroup and 20 is my reader hostgroup.

    +---------+--------+--------------+-----------------------------+-----------------------+-----------+
    | rule_id | active | match_digest | match_pattern               | destination_hostgroup | multiplex |
    +---------+--------+--------------+-----------------------------+-----------------------+-----------+
    | 10      | 1      | NULL         | ^SELECT .* FOR UPDATE$      | 10                    | NULL      |
    | 20      | 1      | NULL         | -- route to master          | 10                    | NULL      |
    | 30      | 1      | NULL         | -- route to slave           | 20                    | NULL      |
    | 40      | 1      | NULL         | ^SELECT                     | 20                    | NULL      |
    +---------+--------+--------------+-----------------------------+-----------------------+-----------+

    Here are the MySQL Galera hosts.  We have a dedicated server for write traffic, MARIADB-001, that is the only ONLINE server in hostgroup 10.  And the other servers are for read traffic, MARIADB-002 and MARIADB-003, they are set to ONLINE in hostgroup 20.

    mysql> SELECT hostgroup_id, hostname, status, weight FROM runtime_mysql_servers ORDER BY hostgroup_id, weight DESC;
    +--------------+-------------+--------------+--------+
    | hostgroup_id | hostname    | status       | weight |
    +--------------+-------------+--------------+--------+
    | 10           | MARIADB-001 | ONLINE       | 100    |
    | 10           | MARIADB-002 | OFFLINE_SOFT | 90     |
    | 10           | MARIADB-003 | OFFLINE_SOFT | 80     |
    | 20           | MARIADB-001 | OFFLINE_SOFT | 100    |
    | 20           | MARIADB-002 | ONLINE       | 90     |
    | 20           | MARIADB-003 | ONLINE       | 80     |
    +--------------+-------------+--------------+--------+

    Next I test the rules to make sure they are working correctly.  We can see the query with the comment “– route to master” goes to the primary writer server and the query with the comment “– route to slave” goes to the read-only server.

    MySQL [(none)]> select @@hostname; -- route to master
    +-----------------------------------------+
    | @@hostname                              |
    +-----------------------------------------+
    | MARIADB-001.us-west-2                   |
    +-----------------------------------------+
    MySQL [(none)]> select @@hostname; -- route to slave
    +-----------------------------------------+
    | @@hostname                              |
    +-----------------------------------------+
    | MARIADB-003.us-west-2                   |
    +-----------------------------------------+

    Next, I moved traffic from the current master by setting it to OFFLINE_SOFT, and then enabled one of the other MySQL Galera masters to be the new primary writer by setting it to ONLINE.

    UPDATE mysql_servers SET status = 'OFFLINE_SOFT' WHERE hostname = 'MARIADB-001' AND hostgroup_id = 10;
    UPDATE mysql_servers SET status = 'ONLINE' WHERE hostname = 'MARIADB-002' AND hostgroup_id = 10;
    UPDATE mysql_servers SET status = 'OFFLINE_SOFT' WHERE hostname = 'MARIADB-002' AND hostgroup_id = 20;
    LOAD MYSQL SERVERS TO RUNTIME;
    SELECT hostgroup_id, hostname, status, weight FROM runtime_mysql_servers ORDER BY hostgroup_id, weight DESC;
    +--------------+-------------+--------------+--------+
    | hostgroup_id | hostname    | status       | weight |
    +--------------+-------------+--------------+--------+
    | 10           | MARIADB-001 | OFFLINE_SOFT | 100    |
    | 10           | MARIADB-002 | ONLINE       | 90     |
    | 10           | MARIADB-003 | OFFLINE_SOFT | 80     |
    | 20           | MARIADB-001 | OFFLINE_SOFT | 100    |
    | 20           | MARIADB-002 | OFFLINE_SOFT | 90     |
    | 20           | MARIADB-003 | ONLINE       | 80     |
    +--------------+-------------+--------------+--------+

    I used the MySQL client and the same session by never disconnecting the client.  I expected the write traffic to go to the new write master MARIADB-002 server but I was a little surprised when it did not.  It continued to go to the MARIADB-001 server.

    MySQL [(none)]> select @@hostname; -- route to master
    +-----------------------------------------+
    | @@hostname                              |
    +-----------------------------------------+
    | MARIADB-001.us-west-2                   |
    +-----------------------------------------+

    Resolution

    I opened a bug with ProxySQL and come to find out about Multiplexing (https://github.com/sysown/proxysql/wiki/Multiplexing).  The key item that was affecting me is the following:

    All queries that have @ in their query_digest will disable multiplexing, and will never be enabled again.

    Handling of switchovers from nodes gaining OFFLINE_SOFT status
    When multiplexing is disabled due to any of the reasons described here, an active connection will remain connected to a node that has gone the OFFLINE_SOFT status. Queries will also remain to be routed to this node. If you use a connection pool mechanism in the application, make sure you recycle your connections often enough in a Galera cluster. If an active transaction was the reason for multiplexing to be disabled, the connection is moved after the transaction has finished.

    They provide remediation to this by creating a new query rule to allow this behavior if you want it:

    mysql_query_rules.multiplexing allows to enable or disable multiplexing based on matching criteria.
    The field currently accepts these values:
    
    0 : disable multiplex
    1 : enable multiplex
    2 : do not disable multiplex for this specific query containing @

    So I created the following rule and, magically, all of my concerns have washed away and the query routing was working exactly the way that I was expecting it to.

    INSERT INTO mysql_query_rules (rule_id,active,match_digest,multiplex) VALUES(1,'1','^SELECT @@hostname',2);
    LOAD MYSQL QUERY RULES TO RUNTIME;

    Then I tested again and after the failover, my queries with the “– route to master” comment now route to the correct primary write MySQL server.

    MySQL [(none)]> select @@hostname; -- route to master
    +-----------------------------------------+
    | @@hostname                              |
    +-----------------------------------------+
    | MARIADB-002.us-west-2                   |
    +-----------------------------------------+


    My New Mac Setup and Why I Switched

    $
    0
    0

    I want to start this article by saying that I'm not here to start or take part in any brand war between Microsoft and Apple. I like both companies and have switched between operating systems occasionally over the years. Also, really hard to go back to Macs when the MacBook Pro keyboards are the way they are. I'm a big mechanical keyboard fan and need more travel in my keys.

    Microsoft has been making some good moves in recent years:

    I tweeted about this move a bunch over the past week. Thanks to everyone that got in the replies and helped me out!

    https://twitter.com/chrisoncode/status/1153377071504080896

    https://twitter.com/chrisoncode/status/1153389755511394305

    Why am I moving?

    Windows Subsystem for Linux (WSL) is Windows way of bringing Linux to Windows. We now have the ability to develop like we would on any UNIX system. apt get and all!

    WSL has been great for me for the past few years, Microsoft Announced WSL 2 which greatly improves speed. I tried out WSL 2 and found out it's WAY faster!

    This made me realize that the system I was using on WSL 1 was a bit slower than it could have been. I also noticed that WSL would slow down after developing for a while and many many hot reloads.

    Mac is faster than WSL 1 for web dev tasks like npm.

    The speed improvements that Mac and WSL 2 have over WSL 1 are enough to make me think about how much time I've lost. I'm a big believer in slowing down and spending time on tools that will make me faster in the long run (Vim, new VS Code tools/extensions, etc).

    WSL 2 is more on par with the speed of UNIX systems for web dev tasks like npm things.

    Will I go back?

    Time will tell. So far, I'm enjoying the new setup. Loving how easy it was to switch my entire development environment between platforms. I think that's a testament to the strength of development tools these days:

    I'll be switching to Mac. Checking back in on Windows when WSL 2 drops in 2020.

    The Setup

    Here's the quick rundown. I built my own super computer about three years ago that was pretty tank-ish. It's got three 4k screens and is a setup I'm very happy with.

    I wanted to reuse all my current hardware like monitors, mics, keyboards, desk. Mac Mini was the best solution.

    I went with:

    Mac Mini i7 8GB RAM (Upgraded to 32GB)

    I went with the lowest RAM here because Apple allows us to upgrade the RAM ourselves. I opted to take that approach and replaced the RAM immediately using this RAM from Amazon. I used the iFixit guide to replace the RAM+Replacement/115309). Got it done in about 20 minutes.

    https://twitter.com/chrisoncode/status/1153408455077535744

    I am a little bummed that the i7 in the Mac Mini is the same i7 that was in my previous desktop computer. Was hoping for a jump there but it seems that the new Intel chips aren't in the Mac Minis yet.

    External GPU

    This was the big upgrade to make the Mac Mini a viable computer for me. I'm rocking three 4k monitors. While the Mac Mini says it can power three 4k monitors, the graphics card in the Mac is the built in Intel one. I wanted to upgrade this as I do a lot of video/photo editing work.

    Using an external GPU: The only way to add a GPU to the Mac Mini is to use an external GPU. This is a graphics card that sits outside of your computer. It connects to your computer via Thunderbolt 3. This is awesome stuff! We can upgrade our computers (including MacBook Pros) using a little cable!

    https://twitter.com/chrisoncode/status/1153411917035102208

    https://twitter.com/chrisoncode/status/1153436937522315264

    Initial Impressions

    Overall I'm very happy with the Mac Mini's ability to power the three screens. The eGPU is doing a great job so far with Photoshop and Premiere. I'll put it through the ringer in the coming weeks.

    Getting a dev environment is simpler on Mac since everything is already built in, especially Terminal and bash.

    Homebrew is amazing. Homebrew Cask is even more amazing. The ability to install everything through the command line including things like Chrome and Spotify is amazing. I had all the apps I needed in a ridiculously low amount of time.

    Thanks to Duncan McClean for his dotfiles [setup.sh](http://setup.sh) that I was able to see how cool setup files can be!

    # install normal packages ----------------
    homebrew_packages=(
      "git"
      "mysql"
      "php"
      "sqlite"
      "node"
    )
    
    for homebrew_package in "${homebrew_packages[@]}"; do
      brew install "$homebrew_package"
    done
    
    # install bigger packages with cask ------------
    homebrew_cask_packages=(
      "google-chrome"
      "iterm2"
      "rocket"
      "slack"
      "spotify"
      "visual-studio-code"
    )
    
    for homebrew_cask_package in "${homebrew_cask_packages[@]}"; do
      brew cask install "$homebrew_cask_package"
    done

    Mac has fantastic graphics. Something about how Mac handles displaying fonts makes them so pleasing to the eye.

    Mac 3rd party apps are so good. I'm still exploring options and would love any ideas you have for best Mac apps. Found Setapp and there's so many cool apps in the Mac ecosystem. So far I'm liking:

    • Paste: Clipboard manager
    • Focus: Avoid distractions
    • Be Focused: Pomodoro style time tracking
    • Screenflow: Screencasting! Really excited to work with this one
    • Keynote: I've used slides.com but when I saw Kim Maida's incredible ng-conf slides, she got me hooked on trying Keynote
    • Sequel Pro: Database connections
    • Day One: For daily reflections, something I've been trying to do more often
    • Looking for a screenshot tool that automatically copies a link to the clipboard
    • Anything I missed? I'm sure there's more

    Conclusion

    I'll have a write-up on how my switch goes. So far, I'm really liking things. I find joy in breaking down an entire setup and trying to start it from scratch. I'll be back on Windows some time next year to give WSL 2 a try.

    For now I'm greatly enjoying devving on a Mac again! Thanks for reading!

    Create an Asynchronous MySQL Replica in 5 minutes

    $
    0
    0

    I have already posted some time ago a post related to the same topic (see here).

    Today, I want to explain the easiest way to create an asynchronous replica from an existing MySQL instance, that this time has already data !

    The Existing Situation and the Plan

    Currently we have a MySQL server using 8.0.17 and GTID enabled on mysql1. mysql2is a single fresh installed instance without any data.

    The plan is to create a replica very quickly and using only a SQL connection.

    Preliminary Checks

    First we verify that mysql1 has GTID enabled. If not we will enable them:

    mysql> select @@server_id,@@gtid_mode,@@enforce_gtid_consistency;
    +-------------+-------------+----------------------------+
    | @@server_id | @@gtid_mode | @@enforce_gtid_consistency |
    +-------------+-------------+----------------------------+
    |           1 | OFF         | OFF                        |
    +-------------+-------------+----------------------------+
    1 row in set (0.00 sec)

    If you can restart the server:

    mysql1> SET PERSIST_ONLY gtid_mode=on;
    mysql1> SET PERSIST_ONLY enforce_gtid_consistency=true;
    mysql1> RESTART;

    If you prefer to not restart the server (if you have others replica already attached to the server, you need to also enable GTID on those replicas):

    mysql1> SET PERSIST enforce_gtid_consistency=true;
    mysql1> SET PERSIST gtid_mode=off_permissive;
    mysql1> SET PERSIST gtid_mode=on_permissive;
    mysql1> SET PERSIST gtid_mode=on;
    mysql1> INSTALL PLUGIN clone SONAME 'mysql_clone.so'

    Since MySQL 8.0.17, we have the possibility to use the amazing CLONE Plugin, that’s why we installed it.

    Replication User

    It’s time now to create a user we will use to replicate:

    mysql1> CREATE USER 'repl'@'%' IDENTIFIED BY 'password' REQUIRE SSL;
    mysql1> GRANT REPLICATION SLAVE, BACKUP_ADMIN, CLONE_ADMIN ON *.* TO 'repl'@'%';

    You may have noticed two new privileges, BACKUP_ADMINand CLONE_ADMIN, these are required to provision our replica without using any external tool.

    Provision the Replica

    We can now provision the replica and configure it to replicate from mysql1 but we also need to specify which server can be considered as a potential donor by setting the clone_valid_donor_list variable:

    mysql2> SET GLOBAL clone_valid_donor_list='mysql1:3306';
    mysql2> CLONE INSTANCE FROM repl@mysql1:3306 IDENTIFIED BY 'password';

    Please note that if you want to install the CLONE Plugin on server running with sql_require_primary_key enabled, you won’t be able to install the plugin. See bug #96281 and at the end of this post.

    The data has been transferred from the existing MySQL Server (mysql1) , the clone process restarted mysqld and now we can configure the server and start replication:

    mysql2> SET PERSIST enforce_gtid_consistency=true;
    mysql2> SET PERSIST gtid_mode=off_permissive;
    mysql2> SET PERSIST gtid_mode=on_permissive;
    mysql2> SET PERSIST gtid_mode=on;
    mysql2> SET PERSIST server_id=2;
    
    mysql2> CHANGE MASTER TO MASTER_HOST='mysql1',MASTER_PORT=3306, 
            MASTER_USER='repl', MASTER_PASSWORD='password',     
            MASTER_AUTO_POSITION=1, MASTER_SSL=1;

    Conclusion

    As you can see, asynchronous replication also benefits from the new CLONE plugin and never made so easy to setup replicas from existing servers with data.

    More blog posts about the Clone Plugins:


    Bug #96281

    I’m adding the description of this problem in this post, so if you search the Internet for the same error, you might find this solution 😉

    So, if you server is running with sql_require_primary_key = ON, when you will try to install the CLONE Plugin, it will fail with the following error:

    mysql> INSTALL PLUGIN clone SONAME 'mysql_clone.so';
    ERROR 1123 (HY000): Can't initialize function 'clone'; 
    Plugin initialization function failed.

    In the error log, you can see:

    2019-07-23T14:58:42.452398Z 8 [ERROR] [MY-013272] [Clone] Plugin Clone reported: 
                                  'Client: PFS table creation failed.'
    2019-07-23T14:58:42.465800Z 8 [ERROR] [MY-010202] [Server] 
                                  Plugin 'clone' init function returned error.

    The solution to fix this problem is simple:

    mysql> SET sql_require_primary_key=off;
    Query OK, 0 rows affected (0.00 sec)
    
    mysql> INSTALL PLUGIN clone SONAME 'mysql_clone.so';
    Query OK, 0 rows affected (0.19 sec)

    Binary Log Encryption: Encryption of Temporary Capture Files

    $
    0
    0

    In MySQL 8.0.14 we introduced binary log encryption at rest. When enabled, this feature makes sure that binary log files  generated by the server are encrypted as soon as they hit persistent storage.

    As of MySQL 8.0.17 transient files created by the server for capturing the changes that end up in the binary log stream are also encrypted.…

    How to Run PHP 5 Applications with MySQL 8.0 on CentOS 7

    $
    0
    0

    Despite the fact that PHP 5 has reached end-of-life, there are still legacy applications built on top of it that need to run in production or test environments. If you are installing PHP packages via operating system repository, there is still a chance you will end up with PHP 5 packages, e.g. CentOS 7 operating system. Having said that, there is always a way to make your legacy applications run with the newer database versions, and thus take advantage of new features.

    In this blog post, we’ll walk you through how we can run PHP 5 applications with the latest version of MySQL 8.0 on CentOS 7 operating system. This blog is based on actual experience with an internal project that required PHP 5 application to be running alongside our new MySQL 8.0 in a new environment. Note that it would work best to run the latest version of PHP 7 alongside MySQL 8.0 to take advantage of all of the significant improvements introduced in the newer versions.

    PHP and MySQL on CentOS 7

    First of all, let's see what files are being provided by php-mysql package:

    $ cat /etc/redhat-release
    CentOS Linux release 7.6.1810 (Core)
    $ repoquery -q -l --plugins php-mysql
    /etc/php.d/mysql.ini
    /etc/php.d/mysqli.ini
    /etc/php.d/pdo_mysql.ini
    /usr/lib64/php/modules/mysql.so
    /usr/lib64/php/modules/mysqli.so
    /usr/lib64/php/modules/pdo_mysql.so

    By default, if we installed the standard LAMP stack components come with CentOS 7, for example:

    $ yum install -y httpd php php-mysql php-gd php-curl mod_ssl

    You would get the following related packages installed:

    $ rpm -qa | egrep 'php-mysql|mysql|maria'
    php-mysql-5.4.16-46.el7.x86_64
    mariadb-5.5.60-1.el7_5.x86_64
    mariadb-libs-5.5.60-1.el7_5.x86_64
    mariadb-server-5.5.60-1.el7_5.x86_64

    The following MySQL-related modules will then be loaded into PHP:

    $ php -m | grep mysql
    mysql
    mysqli
    pdo_mysql

    When looking at the API version reported by phpinfo() for MySQL-related clients, they are all matched to the MariaDB version that we have installed:

    $ php -i | egrep -i 'client.*version'
    Client API version => 5.5.60-MariaDB
    Client API library version => 5.5.60-MariaDB
    Client API header version => 5.5.60-MariaDB
    Client API version => 5.5.60-MariaDB

    At this point, we can conclude that the installed php-mysql module is built and compatible with MariaDB 5.5.60.

    Installing MySQL 8.0

    However, in this project, we are required to run on MySQL 8.0 so we chose Percona Server 8.0 to replace the default existing MariaDB installation we have on that server. To do that, we have to install Percona Repository and enable the Percona Server 8.0 repository:

    $ yum install https://repo.percona.com/yum/percona-release-latest.noarch.rpm
    $ percona-release setup ps80
    $ yum install percona-server-server

    However, we got the following error after running the very last command:

    --> Finished Dependency Resolution
    Error: Package: 1:mariadb-5.5.60-1.el7_5.x86_64 (@base)
               Requires: mariadb-libs(x86-64) = 1:5.5.60-1.el7_5
               Removing: 1:mariadb-libs-5.5.60-1.el7_5.x86_64 (@anaconda)
                   mariadb-libs(x86-64) = 1:5.5.60-1.el7_5
               Obsoleted By: percona-server-shared-compat-8.0.15-6.1.el7.x86_64 (ps-80-release-x86_64)
                   Not found
    Error: Package: 1:mariadb-server-5.5.60-1.el7_5.x86_64 (@base)
               Requires: mariadb-libs(x86-64) = 1:5.5.60-1.el7_5
               Removing: 1:mariadb-libs-5.5.60-1.el7_5.x86_64 (@anaconda)
                   mariadb-libs(x86-64) = 1:5.5.60-1.el7_5
               Obsoleted By: percona-server-shared-compat-8.0.15-6.1.el7.x86_64 (ps-80-release-x86_64)
                   Not found
     You could try using --skip-broken to work around the problem
     You could try running: rpm -Va --nofiles --nodigest

    The above simply means that the Percona Server shared compat package shall obsolete the mariadb-libs-5.5.60, which is required by the already installed mariadb-server packages. Since this is a plain new server, removing the existing MariaDB packages is not a big issue. Let's remove them first and then try to install the Percona Server 8.0 once more:

    $ yum remove mariadb mariadb-libs
    ...
    Resolving Dependencies
    --> Running transaction check
    ---> Package mariadb-libs.x86_64 1:5.5.60-1.el7_5 will be erased
    --> Processing Dependency: libmysqlclient.so.18()(64bit) for package: perl-DBD-MySQL-4.023-6.el7.x86_64
    --> Processing Dependency: libmysqlclient.so.18()(64bit) for package: 2:postfix-2.10.1-7.el7.x86_64
    --> Processing Dependency: libmysqlclient.so.18()(64bit) for package: php-mysql-5.4.16-46.el7.x86_64
    --> Processing Dependency: libmysqlclient.so.18(libmysqlclient_18)(64bit) for package: perl-DBD-MySQL-4.023-6.el7.x86_64
    --> Processing Dependency: libmysqlclient.so.18(libmysqlclient_18)(64bit) for package: 2:postfix-2.10.1-7.el7.x86_64
    --> Processing Dependency: libmysqlclient.so.18(libmysqlclient_18)(64bit) for package: php-mysql-5.4.16-46.el7.x86_64
    --> Processing Dependency: mariadb-libs(x86-64) = 1:5.5.60-1.el7_5 for package: 1:mariadb-5.5.60-1.el7_5.x86_64
    ---> Package mariadb-server.x86_64 1:5.5.60-1.el7_5 will be erased
    --> Running transaction check
    ---> Package mariadb.x86_64 1:5.5.60-1.el7_5 will be erased
    ---> Package perl-DBD-MySQL.x86_64 0:4.023-6.el7 will be erased
    ---> Package php-mysql.x86_64 0:5.4.16-46.el7 will be erased
    ---> Package postfix.x86_64 2:2.10.1-7.el7 will be erased

    Removing mariadb-libs will also remove other packages that depend on this from the system. Our primary concern is the php-mysql packages which will be removed because of the dependency on libmysqlclient.so.18 provided by mariadb-libs. We will fix that later.

    After that, we should be able to install Percona Server 8.0 without error:

    $ yum install percona-server-server

    At this point, here are MySQL related packages that we have in the server:

    $ rpm -qa | egrep 'php-mysql|mysql|maria|percona'
    percona-server-client-8.0.15-6.1.el7.x86_64
    percona-server-shared-8.0.15-6.1.el7.x86_64
    percona-server-server-8.0.15-6.1.el7.x86_64
    percona-release-1.0-11.noarch
    percona-server-shared-compat-8.0.15-6.1.el7.x86_64

    Notice that we don't have php-mysql packages that provide modules to connect our PHP application with our freshly installed Percona Server 8.0 server. We can confirm this by checking the loaded PHP module. You should get empty output with the following command:

    $ php -m | grep mysql

    Let's install it again:

    $ yum install php-mysql
    $ systemctl restart httpd

    Now we do have them and are loaded into PHP:

    $ php -m | grep mysql
    mysql
    mysqli
    pdo_mysql

    And we can also confirm that by looking at the PHP info via command line:

    $ php -i | egrep -i 'client.*version'
    Client API version => 5.6.28-76.1
    Client API library version => 5.6.28-76.1
    Client API header version => 5.5.60-MariaDB
    Client API version => 5.6.28-76.1

    Notice the difference on the Client API library version and the API header version. We will see the after affect of that later during the test.

    Let's start our MySQL 8.0 server to test out our PHP5 application. Since we had MariaDB use the datadir in /var/lib/mysql, we have to wipe it out first, re-initialize the datadir, assign proper ownership and start it up:

    $ rm -Rf /var/lib/mysql
    $ mysqld --initialize
    $ chown -Rf mysql:mysql /var/lib/mysql
    $ systemctl start mysql

    Grab the temporary MySQL root password generated by Percona Server from the MySQL error log file:

    $ grep root /var/log/mysqld.log
    2019-07-22T06:54:39.250241Z 5 [Note] [MY-010454] [Server] A temporary password is generated for root@localhost: 1wAXsGrISh-D

    Use it to login during the first time login of user root@localhost. We have to change the temporary password to something else before we can perform any further action on the server:

    $ mysql -uroot -p
    mysql> ALTER USER root@localhost IDENTIFIED BY 'myP455w0rD##';

    Then, proceed to create our database resources required by our application:

    mysql> CREATE SCHEMA testdb;
    mysql> CREATE USER testuser@localhost IDENTIFIED BY 'password';
    mysql> GRANT ALL PRIVILEGES ON testdb.* TO testuser@localhost;

    Once done, import the existing data from backup into the database, or create your database objects manually. Our database is now ready to be used by our application.

    Errors and Warnings

    In our application, we had a simple test file to make sure the application is able to connect via socket, or in other words, localhost on port 3306 to eliminate all database connections via network. Immediately, we would get the version mismatch warning:

    $ php -e test_mysql.php
    PHP Warning:  mysqli::mysqli(): Headers and client library minor version mismatch. Headers:50560 Library:50628 in /root/test_mysql.php on line 9

    At the same time, you would also encounter the authentication error with php-mysql module:

    $ php -e test_mysql.php
    PHP Warning:  mysqli::mysqli(): (HY000/2059): Authentication plugin 'caching_sha2_password' cannot be loaded: /usr/lib64/mysql/plugin/caching_sha2_password.so: cannot open shared object file: No such file or directory in /root/test_mysql.php on line 9

    Or, if you were running with MySQL native driver library (php-mysqlnd), you would get the following error:

    $ php -e test_mysql.php
    PHP Warning:  mysqli::mysqli(): The server requested authentication method unknown to the client [caching_sha2_password] in /root/test_mysql.php on line 9

    Plus, there would be also another issue you would see regarding charset:

    PHP Warning:  mysqli::mysqli(): Server sent charset (255) unknown to the client. Please, report to the developers in /root/test_mysql.php on line 9

    Solutions and Workarounds

    Authentication plugin

    Neither php-mysqlnd nor php-mysql library for PHP5 supports the new authentication method for MySQL 8.0. Starting from MySQL 8.0.4 authentication method has been changed to 'caching_sha2_password', which offers a more secure password hashing if compare to 'mysql_native_password' which default in the previous versions.

    To allow backward compatibility on our MySQL 8.0. Inside MySQL configuration file, add the following line under [mysqld] section:

    default-authentication-plugin=mysql_native_password

    Restart MySQL server and you should be good. If the database user has been created before the above changes e.g, via backup and restore, re-create the user by using DROP USER and CREATE USER statements. MySQL will follow the new default authentication plugin when creating a new user.

    Minor version mismatch

    With php-mysql package, if we check the library version installed, we would notice the difference:

    $ php -i | egrep -i 'client.*version'
    Client API version => 5.6.28-76.1
    Client API library version => 5.6.28-76.1
    Client API header version => 5.5.60-MariaDB
    Client API version => 5.6.28-76.1

    The PHP library is compiled with MariaDB 5.5.60 libmysqlclient, while the client API version is on version 5.6.28, provided by percona-server-shared-compat package. Despite the warning, you can still get a correct response from the server.

    To suppress this warning on library version mismatch, use php-mysqlnd package, which does not depend on MySQL Client Server library (libmysqlclient). This is the recommended way, as stated in MySQL documentation.

    To replace php-mysql library with php-mysqlnd, simply run:

    $ yum remove php-mysql
    $ yum install php-mysqlnd
    $ systemctl restart httpd

    If replacing php-mysql is not an option, the last resort is to compile PHP with MySQL 8.0 Client Server library (libmysqlclient) manually and copy the compiled library files into /usr/lib64/php/modules/ directory, replacing the old mysqli.so, mysql.so and pdo_mysql.so. This is a bit of a hassle with small chance of success rate, mostly due to deprecated dependencies of header files in the current MySQL version. Knowledge of programming is required to work around that.

    Incompatible Charset

    Starting from MySQL 8.0.1, MySQL has changed the default character set from latin1 to utf8mb4. The utf8mb4 character set is useful because nowadays the database has to store not only language characters but also symbols, newly introduced emojis, and so on. Charset utf8mb4 is UTF-8 encoding of the Unicode character set using one to four bytes per character, if compared to the standard utf8 (a.k.a utf8mb3) which using one to three bytes per character.

    Many legacy applications were not built on top of utf8mb4 character set. So it would be good if we change the character setting for MySQL server to something understandable by our legacy PHP driver. Add the following two lines into MySQL configuration under [mysqld] section:

    collation-server = utf8_unicode_ci
    character-set-server = utf8

    Optionally, you can also add the following lines into MySQL configuration file to streamline all client access to use utf8:

    [client]
    default-character-set=utf8
    
    [mysql]
    default-character-set=utf8

    Don't forget to restart the MySQL server for the changes to take effect. At this point, our application should be getting along with MySQL 8.0.

    That's it for now. Do share any feedback with us in the comments section if you have any other issues moving legacy applications to MySQL 8.0.


    MySQL 8.0.17 and Drupal 8.7

    $
    0
    0

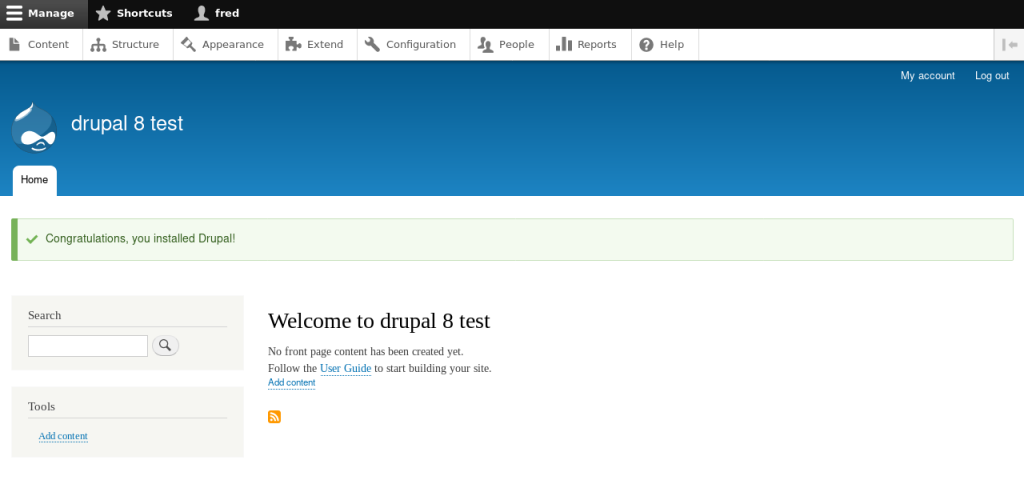
    From Drupal’s website, we can see that now the support of MySQL 8 is ready.

    I just tested it and it works great !

    The only restriction is related to PHP and the support for the new authentication method in php-mysqlnd.

    In this previous post, I was happy because it was included in PHP 7.2.8, but this has been reverted back since then. Currently none of the latest version of PHP 7.x is supporting this authentication method.

    We can easily verify this, first with the PHP version provided by default in Oracle Linux 8:

    # php -i | grep "Loaded plugins\|PHP Version " | tail -n2
    PHP Version => 7.2.11
    Loaded plugins => mysqlnd,debug_trace,auth_plugin_mysql_native_password,
                      auth_plugin_mysql_clear_password,auth_plugin_sha256_password

    And it’s the same with the PHP versions available in Remi’s repositories:

    # php71 -i | grep "Loaded plugins\|PHP Version " | tail -n2
    PHP Version => 7.1.30
    Loaded plugins => mysqlnd,debug_trace,auth_plugin_mysql_native_password,
                      auth_plugin_mysql_clear_password,auth_plugin_sha256_password
    # php72 -i | grep "Loaded plugins\|PHP Version " | tail -n2
    PHP Version => 7.2.20
    Loaded plugins => mysqlnd,debug_trace,auth_plugin_mysql_native_password,
                      auth_plugin_mysql_clear_password,auth_plugin_sha256_password
    # php73 -i | grep "Loaded plugins\|PHP Version " | tail -n2
    PHP Version => 7.3.7
    Loaded plugins => mysqlnd,debug_trace,auth_plugin_mysql_native_password,
                      auth_plugin_mysql_clear_password,auth_plugin_sha256_password

    In comparison, with PHP 7.2.9, and PHP 7.2.10 we could see this:

    # php -i | grep "Loaded plugins\|PHP Version " | tail -n2
    PHP Version => 7.2.9
    Loaded plugins => mysqlnd,debug_trace,auth_plugin_mysql_native_password,
                      auth_plugin_mysql_clear_password,
                      auth_plugin_caching_sha2_password,auth_plugin_sha256_password
    
    # php -i | grep "Loaded plugins|PHP Version " | tail -n2
    PHP Version => 7.2.10
    Loaded plugins => mysqlnd,debug_trace,auth_plugin_mysql_native_password,
                      auth_plugin_mysql_clear_password,
                      auth_plugin_caching_sha2_password,auth_plugin_sha256_password

    You can note that auth_plugin_caching_sha2_passwordis present. It has been removed since PHP 7.2.11. (I was not able to find anything in the release notes)

    This means that if you are using MySQL 8.0 and Drupal 8.7 with the lastest PHP, you just need to make sure to not forgot when you create the user used by drupal to connect to your database to specify the authentication method like this:

    mysql> create user drupal_web identified with 'mysql_native_password' by 'password';

    Conclusion

    So, yes, kudos to the Drupal team to support MySQL 8.0 ! No patch or change needed anymore (like it was before, see this post).

    Unfortunately, PHP mysqlnd doesn’t support yet caching_sha2_password. You can follow the discussions about this in the links below:

    How to move the Relay role to another node in a Composite Tungsten Cluster

    $
    0
    0

    The Question

    Recently, a customer asked us:

    How would we manually move the relay role from a failing node to a slave in a Composite Tungsten Cluster passive site?


    The Answer

    The Long and the Short of It

    There are two ways to handle this procedure. One is short and reasonably automated, and the other is much more detailed and manual.

    SHORT

    Below is the list of cctrl commands that would be run for the basic, short version, which (aside from handling policy changes) is really only three key commands:

    use west
    set policy maintenance
    
    datasource db4 fail
    failover
    recover
    
    set policy automatic

    LONG

    Below is the list of cctrl commands that would be run for the extended, manual version:

    use west
    set policy maintenance
    
    datasource db6 shun
    
    datasource db4 offline
    datasource db4 relay
    
    replicator db5 offline
    replicator db5 slave db4
    replicator db5 online
    
    replicator db6 offline
    replicator db6 slave db4
    replicator db6 online
    
    datasource db6 slave
    datasource db6 welcome
    datasource db6 online
    
    set policy automatic

    Full Procedure for SHORT (Automatic)

    First, enable Maintenance mode to keep the Manager from interfering:

    shell> cctrl
    [LOGICAL] /west > set policy maintenance 
    policy mode is now MAINTENANCE

    Tell the cluster that node db4 is failed using the datasource {node} fail command:

    [LOGICAL] /west > datasource db4 fail    
    
    WARNING: This is an expert-level command:
    Incorrect use may cause data corruption
    or make the cluster unavailable.
    
    Do you want to continue? (y/n)> y
    DataSource 'db4@west' set to FAILED

    Here is the state of all nodes after failing node db4:

    [LOGICAL] /west > ls
    
    DATASOURCES:
    +---------------------------------------------------------------------------------+
    |db4(relay:FAILED(MANUALLY-FAILED), progress=243050, latency=0.523)               |
    |STATUS [CRITICAL] [2019/07/12 02:57:50 PM UTC]                                   |
    |REASON[MANUALLY-FAILED]                                                          |
    +---------------------------------------------------------------------------------+
    |  MANAGER(state=ONLINE)                                                          |
    |  REPLICATOR(role=relay, master=db1, state=ONLINE)                               |
    |  DATASERVER(state=ONLINE)                                                       |
    |  CONNECTIONS(created=2, active=0)                                               |
    +---------------------------------------------------------------------------------+
    +---------------------------------------------------------------------------------+
    |db5(slave:ONLINE, progress=242883, latency=0.191)                                |
    |STATUS [OK] [2019/07/12 02:57:01 PM UTC]                                         |
    +---------------------------------------------------------------------------------+
    |  MANAGER(state=ONLINE)                                                          |
    |  REPLICATOR(role=slave, master=db4, state=ONLINE)                               |
    |  DATASERVER(state=ONLINE)                                                       |
    |  CONNECTIONS(created=2, active=0)                                               |
    +---------------------------------------------------------------------------------+
    +---------------------------------------------------------------------------------+
    |db6(slave:ONLINE, progress=242889, latency=0.309)                                |
    |STATUS [OK] [2019/07/12 02:57:01 PM UTC]                                         |
    +---------------------------------------------------------------------------------+
    |  MANAGER(state=ONLINE)                                                          |
    |  REPLICATOR(role=slave, master=db4, state=ONLINE)                               |
    |  DATASERVER(state=ONLINE)                                                       |
    |  CONNECTIONS(created=0, active=0)                                               |
    +---------------------------------------------------------------------------------+

    Next, tell the cluster to pick a new relay automatically using the failover command:

    [LOGICAL] /west > failover
    SELECTED SLAVE: db5@west
    SET POLICY: MAINTENANCE => MAINTENANCE
    Savepoint failover_0(cluster=west, source=db4.continuent.com, created=2019/07/12 14:58:56 UTC) created
    PRIMARY IS REMOTE. USING 'thls://db1:2112/' for the MASTER URI
    SHUNNING PREVIOUS MASTER 'db4@west'
    PUT THE NEW RELAY 'db5@west' ONLINE
    FAILOVER TO 'db5' WAS COMPLETED

    Here is the state of all nodes after performing the failover:

    [LOGICAL] /west > ls
    
    DATASOURCES:
    +---------------------------------------------------------------------------------+
    |db4(relay:SHUNNED(FAILED-OVER-TO-db5), progress=249356, latency=0.698)           |
    |STATUS [SHUNNED] [2019/07/12 02:58:56 PM UTC]                                    |
    +---------------------------------------------------------------------------------+
    |  MANAGER(state=ONLINE)                                                          |
    |  REPLICATOR(role=relay, master=db1, state=ONLINE)                               |
    |  DATASERVER(state=ONLINE)                                                       |
    |  CONNECTIONS(created=2, active=0)                                               |
    +---------------------------------------------------------------------------------+
    +---------------------------------------------------------------------------------+
    |db5(relay:ONLINE, progress=249404, latency=0.326)                                |
    |STATUS [OK] [2019/07/12 02:59:01 PM UTC]                                         |
    +---------------------------------------------------------------------------------+
    |  MANAGER(state=ONLINE)                                                          |
    |  REPLICATOR(role=relay, master=db1, state=ONLINE)                               |
    |  DATASERVER(state=ONLINE)                                                       |
    |  CONNECTIONS(created=2, active=0)                                               |
    +---------------------------------------------------------------------------------+
    +---------------------------------------------------------------------------------+
    |db6(slave:ONLINE, progress=249422, latency=0.584)                                |
    |STATUS [OK] [2019/07/12 02:59:01 PM UTC]                                         |
    +---------------------------------------------------------------------------------+
    |  MANAGER(state=ONLINE)                                                          |
    |  REPLICATOR(role=slave, master=db5, state=ONLINE)                               |
    |  DATASERVER(state=ONLINE)                                                       |
    |  CONNECTIONS(created=0, active=0)                                               |
    +---------------------------------------------------------------------------------+

    Now “fix” the db4 node and welcome it back into the cluster using the recover command:

    [LOGICAL] /west > recover
    RECOVERING DATASERVICE 'west
    FOUND PHYSICAL DATASOURCE TO RECOVER: 'db4@west'
    RECOVERING DATASOURCE 'db4@west'
    VERIFYING THAT WE CAN CONNECT TO DATA SERVER 'db4'
    Verified that DB server notification 'db4' is in state 'ONLINE'
    DATA SERVER 'db4' IS NOW AVAILABLE FOR CONNECTIONS
    RECOVERING 'db4@west' TO A SLAVE USING 'db5@west' AS THE MASTER
    SETTING THE ROLE OF DATASOURCE 'db4@west' FROM 'relay' TO 'slave'
    RECOVERY OF DATA SERVICE 'west' SUCCEEDED
    RECOVERED 1 DATA SOURCES IN SERVICE 'west'

    Here is the state of all nodes after performing the recover command:

    [LOGICAL] /west > ls
    
    DATASOURCES:
    +---------------------------------------------------------------------------------+
    |db5(relay:ONLINE, progress=252074, latency=0.365)                                |
    |STATUS [OK] [2019/07/12 02:59:01 PM UTC]                                         |
    +---------------------------------------------------------------------------------+
    |  MANAGER(state=ONLINE)                                                          |
    |  REPLICATOR(role=relay, master=db1, state=ONLINE)                               |
    |  DATASERVER(state=ONLINE)                                                       |
    |  CONNECTIONS(created=2, active=0)                                               |
    +---------------------------------------------------------------------------------+
    +---------------------------------------------------------------------------------+
    |db4(slave:ONLINE, progress=252249, latency=0.726)                                |
    |STATUS [OK] [2019/07/12 02:59:57 PM UTC]                                         |
    +---------------------------------------------------------------------------------+
    |  MANAGER(state=ONLINE)                                                          |
    |  REPLICATOR(role=slave, master=db5, state=ONLINE)                               |
    |  DATASERVER(state=ONLINE)                                                       |
    |  CONNECTIONS(created=2, active=0)                                               |
    +---------------------------------------------------------------------------------+
    +---------------------------------------------------------------------------------+
    |db6(slave:ONLINE, progress=252093, latency=0.639)                                |
    |STATUS [OK] [2019/07/12 02:59:01 PM UTC]                                         |
    +---------------------------------------------------------------------------------+
    |  MANAGER(state=ONLINE)                                                          |
    |  REPLICATOR(role=slave, master=db5, state=ONLINE)                               |
    |  DATASERVER(state=ONLINE)                                                       |
    |  CONNECTIONS(created=0, active=0)                                               |
    +---------------------------------------------------------------------------------+

    Finally, return the cluster to Automatic mode so the Manager will detect problems and react automatically.

    [LOGICAL] /west > set policy automatic 
    policy mode is now AUTOMATIC

    Full Procedure for LONG (Manual)

    In the below example, node db6 is the current relay with db4 and db5 as slaves.

    To force a current slave (i.e. db4) to become a relay to take over from db6 manually, follow the below example:

    [LOGICAL] /west >set policy maintenance

    STEP 1. Shun node db6, the current relay

    Tell the cluster to shun the current relay node db6 using the datasource {node} shun command:

    [LOGICAL] /west > datasource db6 shun
    
    WARNING: This is an expert-level command:
    Incorrect use may cause data corruption
    or make the cluster unavailable.
    
    Do you want to continue? (y/n)> y
    DataSource 'db6@west' set to SHUNNED

    Here is the state of all nodes after performing the shun command:

    [LOGICAL] /west > ls
    DATASOURCES:
    +---------------------------------------------------------------------------------+
    |db6(relay:SHUNNED(MANUALLY-SHUNNED), progress=28973, latency=0.649)              |
    |STATUS [SHUNNED] [2019/07/12 02:06:08 PM UTC]                                    |
    +---------------------------------------------------------------------------------+
    |  MANAGER(state=ONLINE)                                                          |
    |  REPLICATOR(role=relay, master=db1, state=ONLINE)                               |
    |  DATASERVER(state=ONLINE)                                                       |
    |  CONNECTIONS(created=0, active=0)                                               |
    +---------------------------------------------------------------------------------+
    +---------------------------------------------------------------------------------+
    |db4(slave:ONLINE, progress=28909, latency=0.707)                                 |
    |STATUS [OK] [2019/07/08 12:54:37 PM UTC]                                         |
    +---------------------------------------------------------------------------------+
    |  MANAGER(state=ONLINE)                                                          |
    |  REPLICATOR(role=slave, master=db6, state=ONLINE)                               |
    |  DATASERVER(state=ONLINE)                                                       |
    |  CONNECTIONS(created=2, active=0)                                               |
    +---------------------------------------------------------------------------------+
    +---------------------------------------------------------------------------------+
    |db5(slave:ONLINE, progress=28965, latency=0.570)                                 |
    |STATUS [OK] [2019/07/08 12:54:43 PM UTC]                                         |
    +---------------------------------------------------------------------------------+
    |  MANAGER(state=ONLINE)                                                          |
    |  REPLICATOR(role=slave, master=db6, state=ONLINE)                               |
    |  DATASERVER(state=ONLINE)                                                       |
    |  CONNECTIONS(created=2, active=0)                                               |
    +---------------------------------------------------------------------------------+

    STEP 2. Process node db4, the new relay

    Take datasource db4 offline and change the role to relay:

    [LOGICAL] /west > datasource db4 offline
    DataSource 'db4@west' is now OFFLINE
    
    [LOGICAL] /west > datasource db4 relay  
    WARNING: This is an expert-level command:
    Incorrect use may cause data corruption
    or make the cluster unavailable.
    
    Do you want to continue? (y/n)> y
    VERIFYING THAT WE CAN CONNECT TO DATA SERVER 'db4'
    Verified that DB server notification 'db4' is in state 'ONLINE'
    DATA SERVER 'db4' IS NOW AVAILABLE FOR CONNECTIONS
    PRIMARY IS REMOTE. USING 'thls://db1:2112/' for the MASTER URI
    REPLICATOR 'db4' IS NOW USING MASTER CONNECT URI 'thls://db1:2112/'
    Replicator 'db4@west' is now ONLINE
    DataSource 'db4@west' is now OFFLINE
    DATASOURCE 'db4@west' IS NOW A RELAY

    Here is the state of all nodes after performing the offline and relay commands:

    [LOGICAL] /west > ls
    
    DATASOURCES:
    +---------------------------------------------------------------------------------+
    |db4(relay:ONLINE, progress=34071, latency=0.869)                                 |
    |STATUS [OK] [2019/07/12 02:06:55 PM UTC]                                         |
    +---------------------------------------------------------------------------------+
    |  MANAGER(state=ONLINE)                                                          |
    |  REPLICATOR(role=relay, master=db1, state=ONLINE)                               |
    |  DATASERVER(state=ONLINE)                                                       |
    |  CONNECTIONS(created=2, active=0)                                               |
    +---------------------------------------------------------------------------------+
    +---------------------------------------------------------------------------------+
    |db6(relay:SHUNNED(MANUALLY-SHUNNED), progress=34133, latency=0.708)              |
    |STATUS [SHUNNED] [2019/07/12 02:06:08 PM UTC]                                    |
    +---------------------------------------------------------------------------------+
    |  MANAGER(state=ONLINE)                                                          |
    |  REPLICATOR(role=relay, master=db1, state=ONLINE)                               |
    |  DATASERVER(state=ONLINE)                                                       |
    |  CONNECTIONS(created=0, active=0)                                               |
    +---------------------------------------------------------------------------------+
    +---------------------------------------------------------------------------------+
    |db5(slave:ONLINE, progress=34125, latency=0.649)                                 |
    |STATUS [OK] [2019/07/08 12:54:43 PM UTC]                                         |
    +---------------------------------------------------------------------------------+
    |  MANAGER(state=ONLINE)                                                          |
    |  REPLICATOR(role=slave, master=db6, state=ONLINE)                               |
    |  DATASERVER(state=ONLINE)                                                       |
    |  CONNECTIONS(created=2, active=0)                                               |
    +---------------------------------------------------------------------------------+

    STEP 3. Process node db5, a slave

    Tell the replicator on db5 to go offline, then configure it to be a slave of new relay node db4, and then bring it right back online:

    [LOGICAL] /west > replicator db5 offline
    Replicator 'db5' is now OFFLINE
    
    
    [LOGICAL] /west > replicator db5 slave db4     
    
    WARNING: This is an expert-level command:
    Incorrect use may cause data corruption
    or make the cluster unavailable.
    
    Do you want to continue? (y/n)> y
    Replicator 'db5' is now a slave of replicator 'db4'
    
    
    [LOGICAL] /west > replicator db5 online   
    Replicator 'db5@west' set to go ONLINE

    Here is the state of all nodes after performing the commands:

    [LOGICAL] /west > ls
    
    DATASOURCES:
    +---------------------------------------------------------------------------------+
    |db4(relay:ONLINE, progress=70120, latency=0.637)                                 |
    |STATUS [OK] [2019/07/12 02:06:55 PM UTC]                                         |
    +---------------------------------------------------------------------------------+
    |  MANAGER(state=ONLINE)                                                          |
    |  REPLICATOR(role=relay, master=db1, state=ONLINE)                               |
    |  DATASERVER(state=ONLINE)                                                       |
    |  CONNECTIONS(created=2, active=0)                                               |
    +---------------------------------------------------------------------------------+
    +---------------------------------------------------------------------------------+
    |db6(relay:SHUNNED(MANUALLY-SHUNNED), progress=70189, latency=0.557)              |
    |STATUS [SHUNNED] [2019/07/12 02:06:08 PM UTC]                                    |
    +---------------------------------------------------------------------------------+
    |  MANAGER(state=ONLINE)                                                          |
    |  REPLICATOR(role=relay, master=db1, state=ONLINE)                               |
    |  DATASERVER(state=ONLINE)                                                       |
    |  CONNECTIONS(created=0, active=0)                                               |
    +---------------------------------------------------------------------------------+
    +---------------------------------------------------------------------------------+
    |db5(slave:ONLINE, progress=70177, latency=0.456)                                 |
    |STATUS [OK] [2019/07/08 12:54:43 PM UTC]                                         |
    +---------------------------------------------------------------------------------+
    |  MANAGER(state=ONLINE)                                                          |
    |  REPLICATOR(role=slave, master=db4, state=ONLINE)                               |
    |  DATASERVER(state=ONLINE)                                                       |
    |  CONNECTIONS(created=2, active=0)                                               |
    +---------------------------------------------------------------------------------+

    STEP 4. Process node db6, the OLD relay and configure it to be a slave of db4, the NEW relay

    Bring the replicator on node db6 offline:

    [LOGICAL] /west > replicator db6 offline
    Replicator 'db6' is now OFFLINE

    Change the role of the replicator on node db6 to a slave of node db4 (the new relay):

    [LOGICAL] /west > replicator db6 slave db4     
    
    WARNING: This is an expert-level command:
    Incorrect use may cause data corruption
    or make the cluster unavailable.
    
    Do you want to continue? (y/n)> y
    Replicator 'db6' is now a slave of replicator 'db4'

    Bring the replicator on node db6 online:

    [LOGICAL] /west > replicator db6 online        
    Replicator 'db6@west' set to go ONLINE

    Change the role of datasource db6 to a slave:

    [LOGICAL] /west > datasource db6 slave  
    
    WARNING: This is an expert-level command:
    Incorrect use may cause data corruption
    or make the cluster unavailable.
    
    Do you want to continue? (y/n)> y
    Datasource 'db6' now has role 'slave'

    Welcome datasource db6 back into the cluster. Once welcomed, it will be in the OFFLINE state.

    [LOGICAL] /west > datasource db6 welcome
    
    WARNING: This is an expert-level command:
    Incorrect use may cause data corruption
    or make the cluster unavailable.
    
    Do you want to continue? (y/n)> y
    DataSource 'db6@west' is now OFFLINE

    Bring datasource db6 online:

    [LOGICAL] /west > datasource db6 online 
    Setting server for data source 'db6' to READ-ONLY
    +---------------------------------------------------------------------------------+
    |db6                                                                              |
    +---------------------------------------------------------------------------------+
    |Variable_name  Value                                                             |
    |read_only  ON                                                                    |
    +---------------------------------------------------------------------------------+
    DataSource 'db6@west' is now ONLINE

    At this point the cluster is completely back to healthy and in the desired configuration:

    [LOGICAL] /west > ls
    
    DATASOURCES:
    +---------------------------------------------------------------------------------+
    |db4(relay:ONLINE, progress=104957, latency=0.440)                                |
    |STATUS [OK] [2019/07/12 02:06:55 PM UTC]                                         |
    +---------------------------------------------------------------------------------+
    |  MANAGER(state=ONLINE)                                                          |
    |  REPLICATOR(role=relay, master=db1, state=ONLINE)                               |
    |  DATASERVER(state=ONLINE)                                                       |
    |  CONNECTIONS(created=2, active=0)                                               |
    +---------------------------------------------------------------------------------+
    +---------------------------------------------------------------------------------+
    |db5(slave:ONLINE, progress=105014, latency=0.242)                                |
    |STATUS [OK] [2019/07/08 12:54:43 PM UTC]                                         |
    +---------------------------------------------------------------------------------+
    |  MANAGER(state=ONLINE)                                                          |
    |  REPLICATOR(role=slave, master=db4, state=ONLINE)                               |
    |  DATASERVER(state=ONLINE)                                                       |
    |  CONNECTIONS(created=2, active=0)                                               |
    +---------------------------------------------------------------------------------+
    +---------------------------------------------------------------------------------+
    |db6(slave:ONLINE, progress=105018, latency=0.300)                                |
    |STATUS [OK] [2019/07/12 02:20:10 PM UTC]                                         |
    +---------------------------------------------------------------------------------+
    |  MANAGER(state=ONLINE)                                                          |
    |  REPLICATOR(role=slave, master=db4, state=ONLINE)                               |
    |  DATASERVER(state=ONLINE)                                                       |
    |  CONNECTIONS(created=0, active=0)                                               |
    +---------------------------------------------------------------------------------+

    Finally, return the cluster to Automatic mode so the Manager will detect problems and react automatically.

    [LOGICAL] /west > set policy automatic
    policy mode is now AUTOMATIC


    The Library

    Please read the docs!

    For more information about using various cctrl commands, please visit the docs page at https://docs.continuent.com/tungsten-clustering-6.0/cmdline-tools-cctrl-commands.html

    For more information about Tungsten clusters, please visit https://docs.continuent.com.


    Summary

    The Wrap-Up

    In this blog post we discussed two ways to move the relay role to another node in a Composite Tungsten Cluster.

    Tungsten Clustering is the most flexible, performant global database layer available today – use it underlying your SaaS offering as a strong base upon which to grow your worldwide business!

    For more information, please visit https://www.continuent.com/solutions

    Want to learn more or run a POC? Contact us.

    MySQL Router 8.0.17’s REST API & MySQL Shell Extensions

    $
    0
    0

    You have seen in this previous post, that since 8.0.17, it’s now possible to query the MySQL Router using its REST API.

    Additionally, we also saw in this post, that since 8.0.17, we are now able to write extensions to MySQL Shell using the Extension Framework.

    Let’s combine both and see how we can integrate the MySQL Router’s REST API in the Shell.

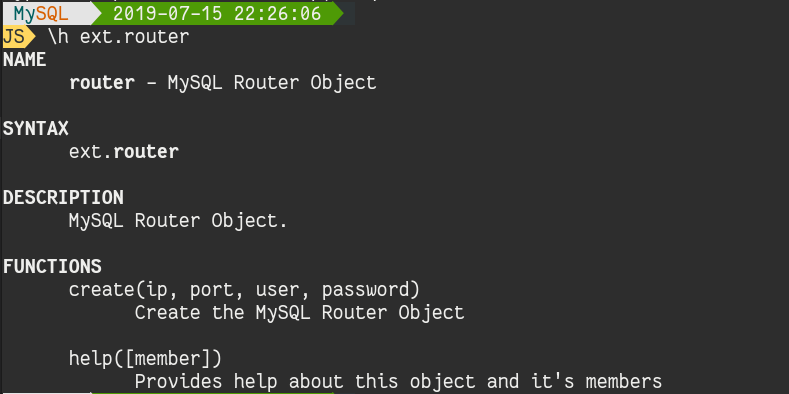
    I’ve created an extension in ext.router that creates a MySQL Router Object.

    The new extension, as a method to create the object:

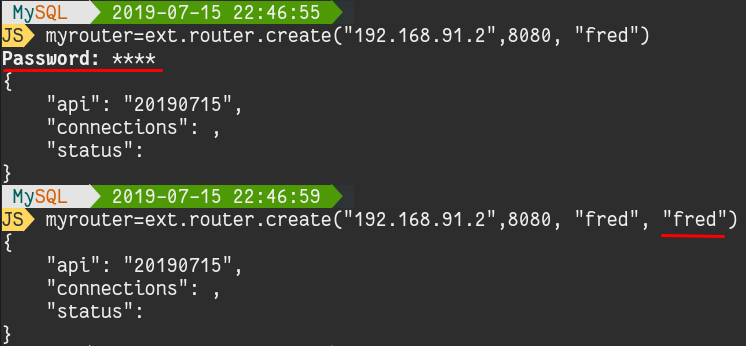
    This is an example that illustrates how to create a MySQL Router Object, as you can see you can pass the password directly as parameter but it’s not recommended in interactive mode. It’s recommended the enter it at the prompt:

    Now that the object is created, you can see that it has two available methods: status()and connections().

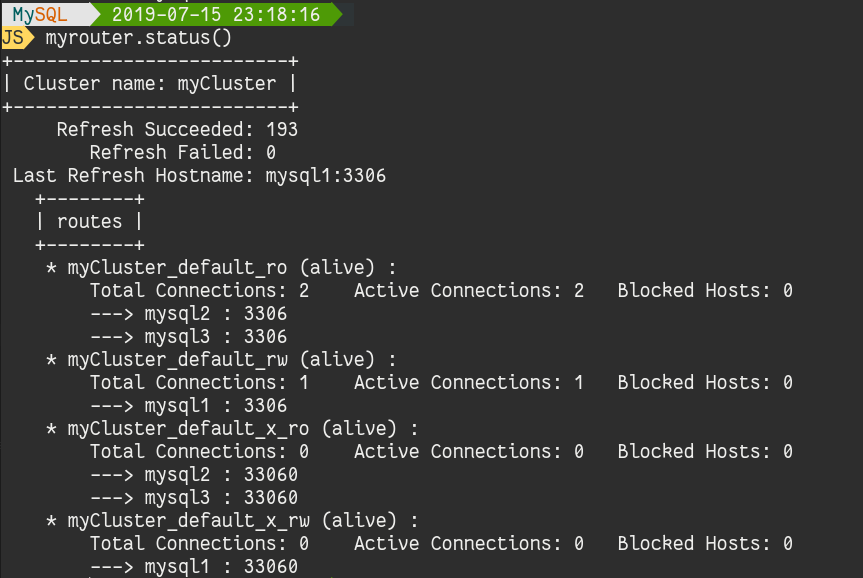
    Router Status

    With the status() method, we can get information about a MySQL Router.

    Let’s see it in action:

    In this example above, we can see that the router is connected to a cluster called myCluster.

    The 4 routes are configured and they are all active. We can see some statistics and more interesting, the final destinations for each routes.

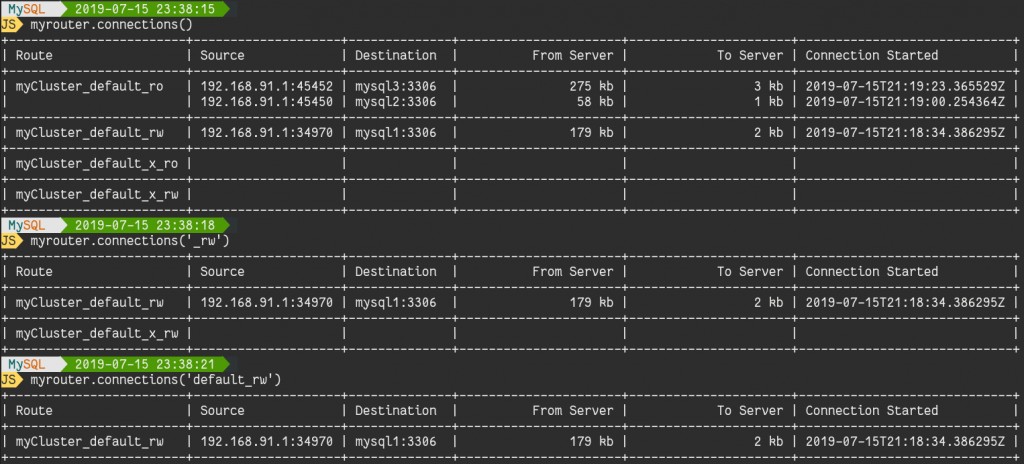
    Router Connections

    The second method is connections().

    We can see it in action below:

    This method returns all the connections that are made to the MySQL Router for each routes (or some if specified) and what it’s the final destination. It also shows some traffic statistics.

    Conclusion

    This is another great example on how to use together some of the new features that the MySQL teams released in MySQL 8.0.17.

    This extension is a bit more complicated as it creates an object that we can use with its methods.

    The code is currently available in this branch on github.

    There are infinite possibilities to extend the MySQL Shell. Don’t hesitate to share your ideas and contributions !

    Improved handling of different member versions in Group Replication

    $
    0
    0

    For optimal compatibility and performance, all members of a group should run the same version of MySQL Server and therefore of Group Replication. However, in some situations, it may be required to that a group contains servers running different versions. For example, during a rolling upgrade.…

    MySQL Server 8.0.17: Thanks for the Contributions

    $
    0
    0

    MySQL 8.0.17 was released Monday and it includes great features such as the Clone feature and multi-valued indexes. There are also several nice contributions from the community. These are the changes that this blog is about.

    The contributions to MySQL Server 8.0.17 include patches from Facebook, Daniël van Eeden and Simon Mudd (both from Booking.com), Daniel Black, Yibo Cai (from Arm Technology), Josh Braden, and Zhou Mengkang. The larger contributions are:

    • The mysql client program now sends os_user and os_sudouser connection attributes, when available, to indicate the name of the operating system user running the program and the value of the SUDO_USER environment variable, respectively. For general information about connection attributes, see Performance Schema Connection Attribute Tables. Thanks to Daniël van Eeden for the contribution on which this feature was based. (Bug #29210935, Bug #93916)
    • The mysqldump option –set-gtid-purged controls whether or not a SET @@GLOBAL.gtid_purged statement is added to the mysqldump output. The statement updates the value of gtid_purged on a server where the dump file is reloaded, to add the GTID set from the source server’s gtid_executed system variable. A new choice –set-gtid-purged=COMMENTED is now available. When this value is set, if GTIDs are enabled on the server you are backing up, SET @@GLOBAL.gtid_purged is added to the output (unless gtid_executed is empty), but it is commented out. This means that the value of gtid_executed is available in the output, but no action is taken automatically when the dump file is reloaded. With COMMENTED, you can control the use of the gtid_executed set manually or through automation. For example, you might prefer to do this if you are migrating data to another server that already has different active databases. Thanks to Facebook for this contribution. (Bug #94332, Bug #29357665)
    • MySQL now uses open(O_TMPFILE) whenever applicable when creating a temporary file that is immediately unlinked. This is more efficient than previously and avoids the small possibility of a race condition. Thanks to Daniel Black for the contribution. (Bug #29215177, Bug #93937)
    • InnoDB: Insufficient memory barriers in the rw-lock implementation caused deadlocks on ARM. Thanks to Yibo Cai from Arm Technology for the contribution. (Bug #29508001, Bug #94699)
    • Replication: When events generated by one MySQL server instance were written to the binary log of another instance, the second server implicitly assumed that the first server supported the same number of binary log event types as itself. Where this was not the case, the event header was handled incorrectly. The issue has now been fixed. Thanks to Facebook for the contribution. (Bug #29417234)
    • Replication: When binary logging is enabled on a replication slave, the combination of the –replicate-same-server-id and –log-slave-updates options on the slave can cause infinite loops in replication if the server is part of a circular replication topology. (In MySQL 8.0, binary logging is enabled by default, and slave update logging is the default when binary logging is enabled.) However, the use of global transaction identifiers (GTIDs) prevents this situation by skipping the execution of transactions that have already been applied. The restriction on this combination of options has therefore now been removed when gtid_mode=ON is set. With any other GTID mode, the server still does not start with this combination of options. As a safeguard against creating the problem situation after the server has started, you now cannot change the GTID mode to anything other than ON on a running server that has this combination of options set. Thanks to Facebook for the contribution. (Bug #28782370, Bug #92754)
    • Replication: When a MEMORY table is implicitly deleted on a master following a server restart, the master writes a DELETE statement to the binary log so that slaves also empty the table. This generated event now includes a comment in the binary log so that the reason for the DELETE statement is easy to identify. Thanks to Daniël van Eeden for the contribution. (Bug #29157796, Bug #93771)

    There are also a number of smaller patches that has helped improve the comments and messages in the MySQL source code. These are:

    • Bug 29403708 – CONTRIBUTION: FIX TYPO IN AUTHENTICATION METHODS DOCUMENTATION
      Thanks to Daniël van Eeden.
    • Bug 29428435 – CONTRIBUTION: FIX TYPOS IN MYSQLDUMP.CC
      Thanks to Josh Braden.
    • Bug 29262200 – CONTRIBUTION: FIX TYPOS IN COMMENTS FOR COM_XXX COMMANDS
      Thanks to Simon Mudd.
    • Bug 29468128 – CONTRIBUTION: UPDATE HANDLER.CC
      Thanks to Zhou Mengkang.

    Thank you for your contributions. Feel free to keep submitting ideas to the MySQL bugs database with ideas how to improve MySQL.

    MySQL InnoDB Cluster, automatic provisioning, firewall and SELinux

    $
    0
    0

    You may have noticed that in many of my demos, I disable firewall and SELinux (I even use --initialize-insecure sometimes 😉 ). This is just to make things easier… But in fact enabling iptables and SELinux are not complicated.

    Firewall

    These examples are compatible with Oracle Linux, RedHat and CentOS. If you use another distro, the principle is the same.

    For the firewall, we need first to allow incoming traffic to MySQL and MySQL X ports: 3306 and 33060:

    # firewall-cmd --zone=public --add-port=3306/tcp --permanent
    # firewall-cmd --zone=public --add-port=33060/tcp --permanent

    If you don’t plan to restart the firewall, you just need to run the same commands without --permanent to make then immediately active.

    Then we need to allow the Group Replication’s communication port. This is usually 33061 but it can be configured in group_replication_local_address:

    # firewall-cmd --zone=public --add-port=33061/tcp --permanent

    Now that the firewalls rules are setup, we can restart firewalld and check it:

    # systemctl restart firewalld.service
    # iptables -L -n | grep 'dpt:3306'
     ACCEPT     tcp  --  0.0.0.0/0            0.0.0.0/0            tcp dpt:3306 ctstate NEW
     ACCEPT     tcp  --  0.0.0.0/0            0.0.0.0/0            tcp dpt:33060 ctstate NEW
     ACCEPT     tcp  --  0.0.0.0/0            0.0.0.0/0            tcp dpt:33061 ctstate NEW

    SELinux

    When SELinux is enabled, if you don’t allow some ports to be accessed, adding a server to a group will fail.

    To see which ports are allowed for mysqld, the following command can be executed:

    # semanage port -l | grep -w mysqld_port_t
    mysqld_port_t                  tcp      1186, 3306, 63132-63164

    With MySQL 8.0.16 and 8.0.17, we need more ports to be accessible. GCS seems to use a port from 30,000 to 50,000:

    # semanage port -a -t mysqld_port_t -p tcp 30000-50000

    If you have already added the access for MySQL X (33060), XCOM (33061), and admin port (33062), you have to remove them before adding the required range:

    # semanage port -d -t mysqld_port_t -p tcp 33060
    # semanage port -d -t mysqld_port_t -p tcp 33061
    # semanage port -d -t mysqld_port_t -p tcp 33062

    If you prefer, you can instead use the following rule:

    setsebool -P mysql_connect_any 1

    This problem is fixed in our next release.

    Conclusion

    Using firewall and SELinux is really not complicated even with MySQL InnoDB Cluster.

    If you want to setup the MySQL Router on system with iptables and SELinux, you will have to do the same for the ports you will use. The defaults ones are 6446, 6447, 64460 and 64470.

    Database Systems and Indexes – What you should know about Indexes for Performance Optimization ?

    $
    0
    0

    Optimal Indexing for Performance – How to plan Index Ops. ? 


    An index or database index is a data structure which is used to quickly locate and access the data in a database table. Indexes are created on columns which will be the Search key that contains a copy of the primary key or candidate key of the table. These values are stored in sorted order so that the corresponding data can be accessed quickly (Note that the data may or may not be stored in sorted order). They are also Data Reference Pointers holding the address of the disk block where that particular key value can be found. Indexing in database systems is similar to what we see in books. There are complex design trade-offs involving lookup performance, index size, and index-update performance. Many index designs exhibit logarithmic (O(log(N))) lookup performance and in some applications it is possible to achieve flat (O(1)) performance. Indices can be implemented using a variety of data structures. Popular indices include balanced trees, B+ trees and hashes.The order that the index definition defines the columns in is important. It is possible to retrieve a set of row identifiers using only the first indexed column. However, it is not possible or efficient (on most databases) to retrieve the set of row identifiers using only the second or greater indexed column.

    At a very high-level, There are only two kinds of Indexes:

    1. Ordered indices: Indices are based on a sorted ordering of the values.
    2. Hash indices: Indices are based on the values being distributed uniformly across a range of buckets. The buckets to which a value is assigned is determined by function called a hash function.

    B+Tree indexing is a method of accessing and maintaining data. It should be used for large files that have unusual, unknown, or changing distributions because it reduces I/O processing when files are read. Also consider B+Tree indexing for files with long overflow chains. The prime block of the B+Tree index file (also called the root node) is pointed to by the header in the prime block of the B+Tree data file.

    Indexing Attributes

    Indexes are categorized on indexing attributes:

    • Primary Key Index

      Primary Keys are unique and are stored in sorted manner, the performance of searching operation is quite efficient. The primary index is classified into two types : Dense Index and Sparse Index.

    • Dense Index

      • For every search key value in the data file, there is an index record, This makes searching faster but requires more space to store index records itself.
      • Index records contain search key value and a pointer to the actual record on the disk with that search key value.

    • Sparse Index

      • In Sparse Index, An index record here contains a search key and an actual pointer to the data on the disk. To search a record, we first proceed by index record and reach at the actual location of the data.
      • Starts at that record pointed to by the index record, and proceed along the pointers in the file (that is, sequentially) until we find the desired record.
      • If the data we are looking for is not where we directly reach by following the index, then the system starts sequential search until the desired data is found.
      • Dense indices are faster in general, but sparse indices require less space and impose less maintenance for insertions and deletions so best suited for very large-scale high volume SORT / SEARCH queries

    • Secondary Index

      • Secondary index may be generated from a field which is a candidate key and has a unique value in every record, or a non-key with duplicate values. Secondary indexes are on a non-primary key, which allows you to model one-to-many relationships. Secondary Index does not have any impact on how the rows are actually organized in data blocks. They can be in any order. The only ordering is w.r.t the index key in index blocks. Because secondary index does not have any control over the organization of rows, So there will be more I/O and thus queries can be less efficient with secondary index.

    • Clustered Index

      •  Clustered indexes sort and store the data rows in the table or view based on their key values. These are the columns included in the index definition. There can be only one clustered index per table, because the data rows themselves can be sorted in only one order. Clustered indexes are efficient on columns that are searched for a range of values. After the row with first value is found using a clustered index, rows with subsequent index values are guaranteed to be physically adjacent, thus providing faster access for a user query or an application. So the clustered index is about the way data is physically sorted on disk, which means it’s a good all-round choice for most situations.

    • Non-Clustered Index

      • Nonclustered indexes have a structure separate from the data rows. A non-clustered index contains the non-clustered index key values and each key value entry has a pointer to the data row that contains the key value. The pointer from an index row in a non-clustered index to a data row is called a row locator. The structure of the row locator depends on whether the data pages are stored in a heap or a clustered table. For a heap, a row locator is a pointer to the row. For a clustered table, the row locator is the clustered index key. You can add non-key columns to the leaf level of the non-clustered index to by-pass existing index key limits, and execute fully covered, indexed, queries. The non-clustered index is created to improve the performance of frequently used queries not covered by clustered index. It’s like a textbook, the index page is created separately at the beginning of that book. When a query is issued against a column on which the index is created, the database will first go to the index and look for the address of the corresponding row in the table. It will then go to that row address and fetch other column values. It is due to this additional step that non-clustered indexes are slower than clustered indexes.

    Why there is not standardization implemented for Index creation and operations management ?

    There is no standard defines how to create indexes, because the ISO SQL Standard does not cover physical aspects. Indexes are one of the physical parts of database conception among others like storage (tablespace or filegroups). RDBMS vendors all give a CREATE INDEX syntax with some specific options that depend on their software’s capabilities.

    The post Database Systems and Indexes – What you should know about Indexes for Performance Optimization ? appeared first on MySQL Consulting, Support and Remote DBA Services.


    SQL Subqueries Example | Subqueries In SQL Tutorial

    $
    0
    0
    SQL Subqueries Example | Subqueries In SQL Tutorial

    SQL Subqueries Example | Subqueries In SQL Tutorial is today’s topic. A subquery is known as a nested query within another SQL query and is embedded within the where clause. It is usually added within the where clause of another SQL SELECT statement. It is used to return data, which will further be used in the main query as a condition to restrict the data also to be retrieved. It can be used with the SELECT, INSERT, UPDATE and DELETE statements along with the operators like =, <, >, >=, <=, IN, BETWEEN, etc.

    IMPORTANT RULES:

    1. SQL Subqueries must be enclosed within parentheses.
    2. We can place the Subquery in the number of SQL clauses such as Where, Having, and From Clause.
    3.  A subquery has only one column in the SELECT clause if and only if multiple columns are in the main query for a subquery to compare its selected columns.
    4. The ORDER BY command cannot be used with a subquery, and a GROUP BY command can perform the same operation that can be performed by ORDER BY clause in the particular subquery.
    5.  The List generated by a SELECT statement cannot include any references to values that evaluate to BLOB, ARRAY, CLOB, or NCLOB.
    6. They cannot be immediately enclosed in a set function.
    7. BETWEEN operator can be used within subquery but not with the subquery.

    Let’s clear the above statements with proper queries and examples.

    #SUBQUERY WITH SELECT STATEMENT:

    Subqueries are most frequently used with Select statement.

    SYNTAX:

    SELECT columns FROM table 
    where column OPERATOR 
    (SELECT columns from table where);

    EXAMPLE:

    Let’s consider a table CUSTOMERS:

    ID NAME AGE ADDRESS SALARY 
    1 Tom 21 Kolkata 500
    2 Karan 22 Allahabad 600
    3 Hardik 23 Dhanbad 700
    4 Komal 24 Mumbai 800


    QUERY:

    Select * from Customers 
    where ID 
    IN 
    (Select ID from Customers 
    where salary >=600);

    OUTPUT:

    ID NAME AGE ADDRESS SALARY
    2 Karan 22 Allahabad 600
    3 Hardik 23 Dhanbad 700
    4 Komal 24 Mumbai 800


    In the above query, the details of customer have been displayed whose salary was greater than 600 or equal to it. Here IN operator is used which checks whether there is any value returned by the inner query.

    #SUBQUERY WITH INSERT STATEMENT:

    INSERT statement is used to insert the values in a table which are returned by the subquery.

    The selected data in the subquery can also be modified with any character, date, or number functions.

    SYNTAX:

    INSERT INTO new_table(columns) 
    Select columns from old_table 
    [where value operator]

    QUERY:

    INSERT INTO New_Customers 
    SELECT * FROM CUSTOMERS 
    WHERE ID 
    IN 
    (SELECT ID FROM CUSTOMERS);

    So, here in the above query New_Customers table will be created which will be having the same details of the customer as that of Customers table.

    #SUBQUERY WITH UPDATE STATEMENT:

    We can also update subquery using update statement as conjunction. We can either update single or multiple columns in a table.

    SYNTAX:

    UPDATE TABLE 
    SET column_name = new_value 
    [Where operator [VALUE] 
    (SELECT COLUMN_NAME 
    FROM TABLE_NAME 
    [where]);

    QUERY:

    UPDATE CUSTOMERS 
    SET SALARY = SALARY +500 
    WHERE AGE 
    IN 
    (SELECT AGE FROM New_Customers 
    WHERE AGE>=23);

    OUTPUT:

    ID NAME AGE ADDRESS SALARY
    3 Hardik 23 Dhanbad 1200
    4 Komal 24 Mumbai 1300


    So, here in the above query salary of the customers were incremented by 500 whose age was checked as per the given condition and the details of those customers was fetched from New_customers were previously we entered values using INSERT statement. Here IN operator was used to check whether there were any values returned by the inner subquery.

    #SUBQUERY WITH DELETE STATEMENT:

    The subquery can be used as a conjunction with a DELETE statement to delete some of the values from the database table.

    SYNTAX:

    DELETE FROM TABLE_NAME 
    [ WHERE OPERATOR [ VALUE] 
    (SELECT COLUMN_NAME 
    FROM TABLE_NAME 
    [WHERE]);

    QUERY:

    DELETE FROM CUSTOMERS 
    WHERE AGE 
    IN 
    (SELECT AGE FROM New_Customers 
    WHERE AGE>=23);

    OUTPUT:

    ID NAME AGE ADDRESS SALARY 
    1 Tom 21 Kolkata 500
    2 Karan 22 Allahabad 600


    So, here in the above query, the details of the customers were deleted by CUSTOMERS table whose age was checked as per the given condition. The details of those customers were fetched from New_Customers table, which is a backup of the CUSTOMERS table. Here IN operator was used to check whether there were any values returned by the inner subquery.

    Finally, SQL Subqueries Example | Subqueries In SQL Tutorial is over.

    The post SQL Subqueries Example | Subqueries In SQL Tutorial appeared first on AppDividend.

    MySQL TIMESTAMP with Simple Examples

    $
    0
    0

    This tutorial explains MySQL TIMESTAMP and TIMESTAMP field characteristics such as automated initialization and updating. We’ll describe their usages with the help of simple examples. 1. TIMESTAMP Syntax 2. TIMESTAMP Simple Examples 3. Set Timezone and Use Timestamp 4. Auto Init and Update Timestamp Let’s now go through each of the section one by one. MySQL TIMESTAMP The MySQL TIMESTAMP is a transient data type that contains a mixture of date and time. It is exactly 19 characters long. The structure of a TIMESTAMP field is as follows: Syntax # MySQL Timestamp YYYY-MM-DD HH:MM:SS The TIMESTAMP value shows in UTC

    The post MySQL TIMESTAMP with Simple Examples appeared first on Learn Programming and Software Testing.

    MySQL Data Types Explained

    $
    0
    0

    This tutorial explains all MySQL data types, their characteristics, and min, max as well as possible default values. We’ll describe their usages so that you can use them efficiently for creating schemas and tables. A MySQL table can have one or more fields with specific data types such as a string or date. However, there are more available in MySQL to ease up your job of collecting and storing data. It is also crucial that you understand which data type should you use and when. Here are some standard goals that define them what do they represent: 1. The data,

    The post MySQL Data Types Explained appeared first on Learn Programming and Software Testing.

    My first impression on Mariadb 10.4.x with Galera4

    $
    0
    0

    MariaDB 10.4 has being declared GA, and few presentations on Galera4 in the last conferences were hold.

    So, I thought, it is time to give it a try and see what is going on.

    It is not a secret that I consider the Codership guys my heroes, and that I have push for Galera as solid and very flexible HA solution, for many years.

    Given that my first comment is that it was a shame to have Galera4 available only in MariaDB, I would have preferred to test the MySQL vanilla version for many reasons, but mainly because the MySQL/Oracle is and remain the official and main line of the MySQL software, you like it or not, and as such I want to see how the Galera4 behave with that. Anyhow Codership state that the other versions will be out AFTER the summer, and I hope this will be true.

    To test the new version given I do not have the vanilla MySQL, I decide to use the other distribution coming from Percona. At the end the test where done comparing MariaDB 10.4.x with PXC 5.7.x. In short Galera4 Vs Galera3.

    I setup on the same machines the two different software, and I configure as close as possible. Said that I did 2 main set of tests: Data ingest and OLTP, both running for 90 minutes, not pushing like hell, but gently simulate some traffic. Configuration files can be found here.

    Galera4 stream replication was disable, following the Codership instruction (wsrep_trx_fragment_size=0).

    Test1 Ingest

    For the ingest test I had use my stresstool application (here) with only 10 threads and 50 batch inserts each thread, the schema definition is in the windmills.json file.

    As always, an image says more than many words:

    ingest execution by thread

    In general terms, PXC was able to execute same load in less than MariaDB.

    ingest events thread

    And PXC was able to deal with a higher number of events per thread as well.

    The average galera latency was around 9ms in the writer and around 5ms for the receivers in PXC. With same load, same machines, same configuration:

    Screen Shot 2019 07 24 at 21658 PM

    The latency in MariaDB was significantly higher around 19ms for the writer, and between 9 and 5 ms for the receivers.

    Screen Shot 2019 07 24 at 13350 PM

    In short overall PXC 5.7 with galera3 was performing better than MariaDB 10.4 with galera4.

    The amount of data on transmitted and received on PXC was higher (good) than Mariadb:

    PXC:

    Screen Shot 2019 07 24 at 22127 PM

    MariaDB:

    Screen Shot 2019 07 24 at 14453 PM

    OLTP

    For oltp test I have sysbenc with oltp r/w tests, 180 threads (90 from two different application nodes), 200K rows for table, 40 tables and 90 minutes run.

    Let see what happened:

    oltp evens write

    PXC was performing better than MariaDB, executing more writes/s and and more events_thread/sec.

    Checking the latency, we can see:

    oltp latency

    Also in this case PXC was having less average latency than MariaDB in the execution.

    What about galera?

    For PXC/Galera3, the average galera latency was around 3.5ms in the writer and less in the receivers:

    Screen Shot 2019 07 26 at 124919 PM

    In this case the latency in Galera4 was same or less of the one in Galera3:

    Screen Shot 2019 07 26 at 51341 PM

    Also analyzing the MAX latency:

    Galera3

    Screen Shot 2019 07 26 at 124936 PM

    Galera4

    Screen Shot 2019 07 26 at 51354 PM

    We can see that Galera4 was dealing with it much better than the version3.


    I have done many other checks and it seems to me that in the OLTP, but I do not exclude this is valid for ingest as well, Galera4 is in some way penalize by the MariaDB platform.

    I am just at the start of my investigation and I may be wrong, but I cannot confirm or deny until Codership will release the code for MySQL.

    Conclusions

    Galera4 seems to come with some very good new feature, please review Seppo presentation, and one thing I noticed it comes with optimized node communication, reducing the latency fluctuation.

    Just this for me is great, plus we will have stream replication that can be very useful but I have not tested it yet.

    Nevertheless, I would not move to it just yet. I would wait to have the other MySQL distribution supported, do some tests, and see where the performance problem is.

    Because at the moment also with not heavy load, current version of PXC 5.7/Galera3 runs better than MariaDB/Galera4, so why I should migrate to a platform that locks me in like MariaDB, and do not give me benefit (yet)? Also considering that once Galera4 will be available for the standard MySQL versions, we can have all the good coming from Galera4, without being lock in by MariaDB.

    A small note about MariaDB, while I was playing with it, I noticed that by default MariaDB comes with the plugin level BETA, which means potentially run in production code that is still in beta stage, no comment!surprise emo

    References

    https://github.com/Tusamarco/blogs/tree/master/Galera4

    https://galeracluster.com/

    Seppo presentation https://www.slideshare.net/SakariKeskitalo/galera-cluster-4-presentation-in-percona-live-austin-2019

    https://mariadb.org/mariadb-10-4-4-now-available/

    Viewing all 18840 articles
    Browse latest View live


    <script src="https://jsc.adskeeper.com/r/s/rssing.com.1596347.js" async> </script>