Quantcast
Channel: Planet MySQL
Viewing all 18842 articles
Browse latest View live

How to Solve Replication lag? quick solution

$
0
0

This topic is not for all situations but in my situation it helps.
The problem is with Slave is lagging behind master in very large numbers and the relay logs are continously growing.

Slave is using:

Relay_Log_File: mysql-relay-bin.000031

But in folder where relay log resides, was created up to:

mysql-relay-bin.000135

And it is continously growing.
So what i decide to do, again step-by-step i edited my.cnf file as follows:

1. I have 13 database so give to slave paralel workers 13:
slave-parallel-workers = 13

2. Disabled sync_binlog:
sync_binlog = 0

3. Changed at_trx_commit from 1 to 0:
innodb_flush_log_at_trx_commit = 0

4. Gave log_at_timeout (only from 5.6.6>) to 10:
innodb_flush_log_at_timeout = 10

5. Disabled slow query log( or commented out)

So Slave lag was somewhat:
Seconds_Behind_Master: 250350

And it was continously increasing but now it is dicreasing:

Seconds_Behind_Master: 178860

Again be carefull with this options. And After Slave catchs up Master undo these changes.

The post How to Solve Replication lag? quick solution appeared first on Azerbaijan MySQL UG.


PlanetMySQL Voting: Vote UP / Vote DOWN

Activate validate_password Plugin

$
0
0

Recently i encounter an uprising among PHP Developers that , they must write a script additionally checking the strength of MySQL user password at creation time.
So, just for note that there is ready to use plugin in MySQL named: validate_password.so

The file location is default in plugin_dir in Linux:

mysql> select @@plugin_dir;
+--------------------------+
| @@plugin_dir             |
+--------------------------+
| /usr/lib64/mysql/plugin/ |
+--------------------------+
1 row in set (0,00 sec)

List this directory:

[root@linuxsrv3 plugin]# ls
adt_null.so     auth_test_plugin.so  innodb_engine.so      mypluglib.so          qa_auth_server.so   validate_password.so
auth.so         daemon_example.ini   libdaemon_example.so  qa_auth_client.so     semisync_master.so
auth_socket.so  debug                libmemcached.so       qa_auth_interface.so  semisync_slave.so

As you see there is a validate_password.so.
So what is the defaults of this plugin and how it works?
In General if this plugin activated,
User will only be able to create passwords with following specifications:
1. Greater or equal to 8 char length.
2. At least 1 number
3. At least 1 non-letter non-number (eg. #, % ,!)
4. At least 1 Upper case letter

So the sample password will be: “Sh@rkp45!” or something similar.
All weak passwords such as “12345” , “acbsg54″ will not allowed to create:

mysql> create user "nc"@"%" identified by '12345';
ERROR 1819 (HY000): Your password does not satisfy the current policy requirements 

Question is, will i be able to connect with already created user before activating plugin?
Answer is: YES.

So how to activate plugin. Simply add this to my.cnf file under [mysqld] catalog:

# Password Validation #
plugin-load=validate_password.so
validate-password=FORCE_PLUS_PERMANENT

Restart Server. And that’s all.

Force + Permanent will guarantee that plugin can not be disabled at run time or while running MySQL.
If you want to change default values for this plugin Read documentation:
Validate Password Plugin

The post Activate validate_password Plugin appeared first on Azerbaijan MySQL UG.


PlanetMySQL Voting: Vote UP / Vote DOWN

Activate SSL connection in MySQL

$
0
0

Secure connection? Today we will explore an interesting task about activating and using SSL connection in MySQL.
We will provide all necessary scripts and commands to re-play all steps.

So assume that we have CentOS 6.5 with OpenSSL and MySQL already installed:

[root@linuxsrv3 ~]# mysql --version
mysql  Ver 14.14 Distrib 5.6.17, for Linux (x86_64) using  EditLine wrapper

[root@linuxsrv3 ~]# mysql -u root -p
Enter password: 
Welcome to the MySQL monitor.  Commands end with ; or \g.
Your MySQL connection id is 2
Server version: 5.6.17-log MySQL Community Server (GPL)

[root@linuxsrv3 ~]# openssl version
OpenSSL 1.0.1e-fips 11 Feb 2013

[root@linuxsrv3 ~]# rpm -qf `which openssl`
openssl-1.0.1e-16.el6_5.7.x86_64

Our test host is a Virtual Machine with static ip address: 192.168.1.77.

The rest of contents of this article is quite straight just follow commands:

###  Create Environment ###
[root@linuxsrv3 ~]# cd /etc/
[root@linuxsrv3 etc]# mkdir mysql_ssl_certs
[root@linuxsrv3 etc]# ls -ld mysql_ssl_certs/
drwxr-xr-x. 2 root root 4096 2014-05-27 17:33 mysql_ssl_certs/

###  Create CA certificates ###
[root@linuxsrv3 etc]# cd mysql_ssl_certs/

# 1 
[root@linuxsrv3 mysql_ssl_certs]# openssl genrsa 2048 > ca-key.pem
Generating RSA private key, 2048 bit long modulus
..............+++
.......................+++
e is 65537 (0x10001)

# 2

[root@linuxsrv3 mysql_ssl_certs]# openssl req -new -x509 -nodes -days 3600 -key ca-key.pem -out ca-cert.pem
You are about to be asked to enter information that will be incorporated
into your certificate request.
What you are about to enter is what is called a Distinguished Name or a DN.
There are quite a few fields but you can leave some blank
For some fields there will be a default value,
If you enter '.', the field will be left blank.
-----
Country Name (2 letter code) [XX]:AZ
State or Province Name (full name) []:BAKU
Locality Name (eg, city) [Default City]:BAKU
Organization Name (eg, company) [Default Company Ltd]:Student
Organizational Unit Name (eg, section) []:Student
Common Name (eg, your name or your server's hostname) []:shahriyar
Email Address []:rzayev.sehriyar@gmail.com

# 3
### Create server certificate
# server-cert.pem = public key, server-key.pem = private key

[root@linuxsrv3 mysql_ssl_certs]# openssl req -newkey rsa:2048 -days 3600 -nodes -keyout server-key.pem -out server-req.pem
Generating a 2048 bit RSA private key
...+++
..........................+++
writing new private key to 'server-key.pem'
-----
You are about to be asked to enter information that will be incorporated
into your certificate request.
What you are about to enter is what is called a Distinguished Name or a DN.
There are quite a few fields but you can leave some blank
For some fields there will be a default value,
If you enter '.', the field will be left blank.
-----
Country Name (2 letter code) [XX]:AZ
State or Province Name (full name) []:BAKU
Locality Name (eg, city) [Default City]:BAKU
Organization Name (eg, company) [Default Company Ltd]:Student
Organizational Unit Name (eg, section) []:Student
Common Name (eg, your name or your server's hostname) []:shahriyar
Email Address []:rzayev.sehriyar@gmail.com

Please enter the following 'extra' attributes
to be sent with your certificate request
A challenge password []:Sh@rzstt01
An optional company name []:Student

# 4

[root@linuxsrv3 mysql_ssl_certs]# openssl rsa -in server-key.pem -out server-key.pem
writing RSA key

# 5

[root@linuxsrv3 mysql_ssl_certs]# openssl x509 -req -in server-req.pem -days 3600 -CA ca-cert.pem -CAkey ca-key.pem -set_serial 01 -out server-cert.pem
Signature ok
subject=/C=AZ/ST=BAKU/L=BAKU/O=Student/OU=Student/CN=shahriyar/emailAddress=rzayev.sehriyar@gmail.com
Getting CA Private Key

# 6
### Create client certificate ###
# client-cert.pem = public key, client-key.pem = private key

[root@linuxsrv3 mysql_ssl_certs]# openssl req -newkey rsa:2048 -days 3600 -nodes -keyout client-key.pem -out client-req.pem
Generating a 2048 bit RSA private key
.............................................................+++
......................+++
writing new private key to 'client-key.pem'
-----
You are about to be asked to enter information that will be incorporated
into your certificate request.
What you are about to enter is what is called a Distinguished Name or a DN.
There are quite a few fields but you can leave some blank
For some fields there will be a default value,
If you enter '.', the field will be left blank.
-----
Country Name (2 letter code) [XX]:AZ
State or Province Name (full name) []:BAKU
Locality Name (eg, city) [Default City]:BAKU
Organization Name (eg, company) [Default Company Ltd]:Student
Organizational Unit Name (eg, section) []:Student
Common Name (eg, your name or your server's hostname) []:shahriyar
Email Address []:rzayev.sehriyar@gmail.com

Please enter the following 'extra' attributes
to be sent with your certificate request
A challenge password []:Sh@rzstt01
An optional company name []:Student

# 7
[root@linuxsrv3 mysql_ssl_certs]# openssl rsa -in client-key.pem -out client-key.pem
writing RSA key

# 8
[root@linuxsrv3 mysql_ssl_certs]# openssl x509 -req -in client-req.pem -days 3600 -CA ca-cert.pem -CAkey ca-key.pem -set_serial 01 -out client-cert.pem
Signature ok
subject=/C=AZ/ST=BAKU/L=BAKU/O=Student/OU=Student/CN=shahriyar/emailAddress=rzayev.sehriyar@gmail.com
Getting CA Private Key

The last step is to verifying certificates:

[root@linuxsrv3 mysql_ssl_certs]# openssl verify -CAfile ca-cert.pem server-cert.pem client-cert.pem
server-cert.pem: OK
client-cert.pem: OK

So let’s summurize that our certificates are stored in /etc/mysql_ssl_certs:

[root@linuxsrv3 mysql_ssl_certs]# ls -l /etc/mysql_ssl_certs/
total 32
-rw-r--r--. 1 root root 1424 2014-05-27 17:37 ca-cert.pem
-rw-r--r--. 1 root root 1679 2014-05-27 17:36 ca-key.pem
-rw-r--r--. 1 root root 1298 2014-05-27 17:46 client-cert.pem
-rw-r--r--. 1 root root 1675 2014-05-27 17:45 client-key.pem
-rw-r--r--. 1 root root 1127 2014-05-27 17:45 client-req.pem
-rw-r--r--. 1 root root 1298 2014-05-27 17:41 server-cert.pem
-rw-r--r--. 1 root root 1679 2014-05-27 17:41 server-key.pem
-rw-r--r--. 1 root root 1127 2014-05-27 17:40 server-req.pem

Going on we must modify MySQL Configuration file(my.cnf) to reflect our generated certificates. In my case my.cnf located in /etc
But Before this check if MySQL installation supports SSL:

mysql> SHOW VARIABLES LIKE 'have_ssl';
+---------------+-------+
| Variable_name | Value |
+---------------+-------+
| have_ssl      | YES   |
+---------------+-------+
1 row in set (0,10 sec)

If you get “YES” open my.cnf and type under the [mysqld] catalog following:

[mysqld]
# SSL
ssl-ca=/etc/mysql_ssl_certs/ca-cert.pem
ssl-cert=/etc/mysql_ssl_certs/server-cert.pem
ssl-key=/etc/mysql_ssl_certs/server-key.pem

Just NOTE that, this on server side (our virtual machine).

Restart MySQL and create user and force it to only SSL connection:

create user 'ssluser'@'%' IDENTIFIED BY 'Pass@123#';
GRANT ALL PRIVILEGES ON *.* TO 'ssluser'@'%' IDENTIFIED BY 'Pass@123#' REQUIRE SSL;

And let’s try to connect:

[root@linuxsrv3 ~]# mysql -u ssluser -p
Enter password: 
ERROR 1045 (28000): Access denied for user 'ssluser'@'localhost' (using password: YES)

Now, by logic we have a user that reuquires SSL, but our mysql client which we used to connect does not know about this. So we must again edit my.cnf but now under [client] catalog:

[client]
ssl-cert=/etc/mysql_ssl_certs/client-cert.pem
ssl-key=/etc/mysql_ssl_certs/client-key.pem

Restart MySQL and test again:

[root@linuxsrv3 ~]# mysql -u ssluser -p
Enter password: 
Welcome to the MySQL monitor.  Commands end with ; or \g.
Your MySQL connection id is 2
Server version: 5.6.17-log MySQL Community Server (GPL)

mysql> SHOW STATUS LIKE 'Ssl_cipher';
+---------------+--------------------+
| Variable_name | Value              |
+---------------+--------------------+
| Ssl_cipher    | DHE-RSA-AES256-SHA |
+---------------+--------------------+
1 row in set (0,08 sec)

That’s all. As you see our client Connection over ssluser is using SSL connection.
In Final stage of our article o want to show some coding examples for developers.
I use Python 2.7.6 with official mysql-connector package installed.

To make article little i paste this codes on gist.
So here is the first file is mysql_connection_without_ssl.py:
mysql_connection_without_ssl.py

Note: There is an infinite loop inside code just for showing what is unsecured connection like.

Run this Python script(it will select from country table) and on another terminal run ngrep to read packages:

sh@sh-work:~$ sudo ngrep

649.San Miguel.SLV.San Miguel.127696-....650.Nueva San Salvado
  r.SLV.La Libertad.98400!....651.Apopa.SLV.San Salvador.88800.....652.Asmara
  .ERI.Maekel.431000.....653.Madrid.ESP.Madrid.2879052$....654.Barcelona.ESP.
  Katalonia.1503451!....655.Valencia.ESP.Valencia.739412!....656.Sevilla.ESP.
  Andalusia.701927!....657.Zaragoza.ESP.Aragonia.603367!....658.M..laga.ESP.A
  ndalusia.530553.....659.Bilbao.ESP.Baskimaa.3575899....660.Las Palmas de Gr
  an Canaria.ESP.Canary Islands.354757.....661.Murcia.ESP.Murcia.353504)....6
  62.Palma de Mallorca.ESP.Balears.326993-....663.Valladolid.ESP.Castilla and
   Le..n.319998"....664.C..rdoba.ESP.Andalusia.311708.....665.Vigo.ESP.Galici

As you see we can see what is retrieved from our select statement.

And know lets try The another script which uses SSL:

mysql_connection_with_ssl.py

Run This Python script. To do this you will have to copy certificates from remote server to local and ofcourse edit my.cnf on local machine to reflect to new certificates. So as you see from Python code we specify paths where certificates reside on our local machine.

root@sh-work:/home/sh/mysql-ssl# ls -l
total 32
-rw-r--r-- 1 root root 1424 May 27 18:39 ca-cert.pem
-rw-r--r-- 1 root root 1679 May 27 18:39 ca-key.pem
-rw-r--r-- 1 root root 1298 May 27 18:39 client-cert.pem
-rw-r--r-- 1 root root 1675 May 27 18:39 client-key.pem
-rw-r--r-- 1 root root 1127 May 27 18:39 client-req.pem
-rw-r--r-- 1 root root 1298 May 27 18:39 server-cert.pem
-rw-r--r-- 1 root root 1679 May 27 18:39 server-key.pem
-rw-r--r-- 1 root root 1127 May 27 18:39 server-req.pem

Run Python script and on another terminal run ngrep again to read packages:

sh@sh-work:~$ sudo ngrep
.OV.*z.S..~8j6.`.. W..j...f.X......0...S....#..d...E%.R.7..?3...<..d..C..T.....D...T.....=_......V..UI+.0s...-
  .....-.P...B.N,.&.....EF.t..E.e....im.P.....v.A.H...d.h..T..,.H..h.+..........(....F.....K.^.Y..).R.g.........Lh.Zq.0..........|S.......4z
  .-X.LWN.......q....N.D....^8r...p..x+si.e..`.,P.t..7...i.{c...>)...~...7..X..EC.E...,..W+..ik.58.\..%r.K..lwG8t'../..(A.A...u...'.VygP&..o
  ...(!..)..RH....B.Y.[..nD~S....~.*kUC.1....'.g.........k.......\D.......^%4.^u....!U.gY.@.hGK&.-..Z8N.\"./..........1....5.g..N.........2t
  ..c.U.....W{.&g'...m...........<5d.x.=..$@..0x#.Y.%.......M.........!.....V,.k.2...,.r..:..1..CU.4.y.._.4#.z=.R..t....F......'z~....Lf.ks5
  .tX..I...Z...]....)|Q.(.]$....v.P.U.bS..9..l...*].AY...K..o..* .C.%..q...}[.>..3.[..D....v.s.....$..q_.f...E...P8.Sg.Y..~)N..j#.$A..j.[Gm(
  ....A..`..._.]+.....S....&.k....v...}.f.....4...H.`..%.....$K.....=.V..^.A..ck......_>.s.[XE....:.O.!.S.k..J<..r....Y%..ZU....A...or.....D
  |l.^[.......H?.........._.NO.m..i.2*Kl

I think you see the difference :)

Thank you for reading if you have any questions feel free to ask.

The post Activate SSL connection in MySQL appeared first on Azerbaijan MySQL UG.


PlanetMySQL Voting: Vote UP / Vote DOWN

Install MySQL from source with debugging option in Linux

$
0
0

Dear all, our today’s topic is about finding out the cause of MySQL crash and in depth examining issue for BUG reporting.
So what is exact mean of this article?
While i reported BUGs for MySQL, developers(experts) every time ask for a core dump (with gdb) and full stack-trace. Yeap they are right, finding an issue is only one step. You must also provide all necessary information to MySQL developers if you really interested in fixing bugs in open source. You have to help to find the core of problem.
For this purpose you must have a DEBUG MySQL edition on your hand to generate core dump and to see full stack-trace. Yes as you think, we will install MySQL from source with DEBUG option and will create core dump.

But first of all let to tell a few theory:
* There are several kinds of logging in MySQL:
1. General Log -> will log all kind of database activity. Surely you will not enable it in production because off heavy load, Maybe for a few minutes for auditing will be sufficient to your needs.

2. Slow Quer Log -> will log all queries which is default running more than 10 seconds. Ofcourse you can change default time to less value.

3. Error Log
->
From start of MySQL it will log all warnings, errors and events to this log file. It is the first file where you must watch for any kind of problem. There will be somewhat stack-trace looking something like:

Thread pointer: 0x0
Attempting backtrace. You can use the following information to find out
where mysqld died. If you see no messages after this, something went
terribly wrong...
stack_bottom = 0 thread_stack 0x40000
/usr/local/mysql/bin/mysqld(my_print_stacktrace+0x35)[0xab6ead]
/usr/local/mysql/bin/mysqld(handle_fatal_signal+0x404)[0x736ee0]
/lib64/libpthread.so.0[0x35df20f710]
/usr/local/mysql/bin/mysqld[0xd27e2e]
/usr/local/mysql/bin/mysqld[0xd1cc5e]
/usr/local/mysql/bin/mysqld[0xc5d5f6]
/usr/local/mysql/bin/mysqld[0xc5dca7]
/usr/local/mysql/bin/mysqld[0xc5e152]
/lib64/libpthread.so.0[0x35df2079d1]
/lib64/libc.so.6(clone+0x6d)[0x35deee8b5d]

Appending trace to BUG report will be valuable, but most of times developers want core dump.
Now it is time to install MySQL from source with DEBUG option.
Go through every step:

Install Dependencies:

[root@localhost ~]# yum groupinstall "Development Tools"
[root@localhost ~]# yum install cmake
[root@localhost ~]# yum install ncurses ncurses-devel
[root@localhost ~]# yum install wget

Download tar archive from:

mysql-5.6.19.tar.gz

Then:

1. [root@localhost ~]# wget http://dev.mysql.com/get/Downloads/MySQL-5.6/mysql-5.6.19.tar.gz
2. [root@localhost ~]# tar -xvf mysql-5.6.19.tar.gz
3. 
[root@localhost ~]# groupadd mysql
[root@localhost ~]# useradd -r -g mysql mysql
4. [root@localhost ~]# cd mysql-5.6.19
5. [root@localhost mysql-5.6.19]# cmake  -DWITH_DEBUG=1
6. [root@localhost mysql-5.6.19]# make
7. [root@localhost mysql-5.6.19]# make install

After install finished:

8.  [root@localhost mysql-5.6.19]# cd /usr/local/mysql
9.  [root@localhost mysql]# chown -R mysql .
10. [root@localhost mysql]# chgrp -R mysql .
11. [root@localhost mysql]# scripts/mysql_install_db --user=mysql
2014-07-21 03:52:05 14280 [Note] InnoDB: Using atomics to ref count buffer pool pages
2014-07-21 03:52:05 7f6e8f793720 InnoDB: !!!!!!!! UNIV_DEBUG switched on !!!!!!!!!
2014-07-21 03:52:05 7f6e8f793720 InnoDB: !!!!!!!! UNIV_SYNC_DEBUG switched on !!!!!!!!!

You will see difference in error log too.
After all:

12. [root@localhost mysql]# chown -R root .
13. [root@localhost mysql]# chown -R mysql data
14. [root@localhost mysql]# bin/mysqld_safe --user=mysql &
[root@localhost mysql]# bin/mysqld_safe --user=mysql &
[1] 14525
[root@localhost mysql]# 140721 03:55:41 mysqld_safe Logging to '/var/log/mysqld.log'.
140721 03:55:41 mysqld_safe Starting mysqld daemon with databases from /var/lib/mysql

AS you see MySQL is started and at this point you can begin to test whatever you want.
When you connect you will see difference:

[root@localhost bin]# ./mysql -u root --socket=/usr/local/mysql/data/mysql.sock
Welcome to the MySQL monitor.  Commands end with ; or \g.
Your MySQL connection id is 1
Server version: 5.6.19-debug-log Source distribution

Now we have a DEBUG MySQL , we can try to create a core dump:
Add this line under [mysqld] catalog:
[mysqld]
core-file

And also append this to the end of my.cnf file:
[mysqld_safe]
core_file_size=unlimited

And restart MySQL. If some crash happens you will see :

bin/mysqld_safe: line 166: 27247 Segmentation fault      (core dumped) 

Core Dumped indicates that, core file is created. Default core file will reside in MySQL datadir.
Thank You!.

The post Install MySQL from source with debugging option in Linux appeared first on Azerbaijan MySQL UG.


PlanetMySQL Voting: Vote UP / Vote DOWN

Copying Tablespaces to Another Server (Transportable Tablespaces)

$
0
0

If you want take several actions on tables? It is really very exciting :P
Start MySQL 5.6.17(as we have) with:

[mysqld]
innodb_file_per_table          = 1
lower_case_table_names         = 1

Then create a huge table or find one from friend’s database to testing.
First off all let’s to rename table which is nearly 2.4 gigs.

[root@linuxsrv3 xxx]# ls -lthr
total 2,4G
-rw-rw----. 1 mysql mysql   65 2014-05-07 11:05 db.opt
-rw-rw----. 1 mysql mysql  20K 2014-05-12 12:07 test_table.frm
-rw-rw----. 1 mysql mysql 2,4G 2014-05-12 14:05 test_table.ibd

We renamed test_table to test_table2.:

[root@linuxsrv3 xxx]# time mysql -u root -p -e 'rename table xxx.test_table to xxx.test_table2'
Enter password: 

real	0m1.973s
user	0m0.002s
sys	0m0.004s

It takes only 1.9 second.

So what if we want to move table from one database to another. There is no need to backup this table and then import. Use Rename.

[root@linuxsrv3 xxx]# time mysql -u root -p -e 'rename table xxx.test_table2 to test.test_table2'
Enter password: 

real	0m1.876s
user	0m0.005s
sys	0m0.003s

And very mysteriously our table is in test database now:

[root@linuxsrv3 test]# ls -lthr
total 2,4G
-rw-rw----. 1 mysql mysql 8,4K 2014-05-12 11:32 ff.frm
-rw-rw----. 1 mysql mysql  96K 2014-05-12 11:33 ff.ibd
-rw-rw----. 1 mysql mysql   65 2014-05-12 11:34 db.opt
-rw-rw----. 1 mysql mysql  20K 2014-05-12 12:07 test_table2.frm
-rw-rw----. 1 mysql mysql 2,4G 2014-05-12 14:05 test_table2.ibd

So quite fast way to move tables.
But what about moving one table from one server to another server?
Here is a show of transportable tablespaces begin.
If you want to use this features you must have a MySQL 5.6.x a good one the latest GA.
and it must be started as innodb_file_per_table = 1.

Ofcourse you must have identical database names and table names on both side.
We have already test_table2 table in test database on linuxsrv3.
Created on linuxsrv4 same database and table.

Our source server is: linuxsrv3
Destination server is: linuxsrv4

On destination server discard existing tablespace:

mysql> use test;
Reading table information for completion of table and column names
You can turn off this feature to get a quicker startup with -A

Database changed
mysql> alter table test_table2 discard tablespace;
Query OK, 0 rows affected (0,05 sec)

If you check you will see no .ibd file on database directory:

[root@linuxsrv4 test]# ls
db.opt  test_table2.frm

On source server:

mysql> use test;
Database changed
mysql> FLUSH TABLES test_table2 FOR EXPORT;
Query OK, 0 rows affected (0,00 sec)

Copy .ibd file to destination server:

[root@linuxsrv3 test]# scp test_table2.ibd root@192.168.1.88:/var/lib/mysql/test
root@192.168.1.88's password: 
test_table2.ibd                       100% 2444MB  15.4MB/s   02:39 

On source server:

mysql> use test;
Reading table information for completion of table and column names
You can turn off this feature to get a quicker startup with -A
Database changed

mysql> UNLOCK TABLES;
Query OK, 0 rows affected (0,00 sec)

On destination server:

[root@linuxsrv4 test]# ls
db.opt  test_table2.frm  test_table2.ibd

mysql> use test;
Reading table information for completion of table and column names
You can turn off this feature to get a quicker startup with -A

Database changed
mysql> alter table test_table2 IMPORT TABLESPACE;
ERROR 1146 (42S02): Table 'test.test_table2' doesn't exist

If you see such error it indicates that there is an owner issue:

[root@linuxsrv4 test]# ls -l
total 2502684
-rw-rw----. 1 mysql mysql         65 2014-05-12 15:03 db.opt
-rw-rw----. 1 mysql mysql      20166 2014-05-12 15:05 test_table2.frm
-rw-r-----. 1 root  root  2562719744 2014-05-12 15:16 test_table2.ibd

Change file owner to mysql:

[root@linuxsrv4 test]# chown mysql:mysql test_table2.ibd
[root@linuxsrv4 test]# ls -l
total 2502684
-rw-rw----. 1 mysql mysql         65 2014-05-12 15:03 db.opt
-rw-rw----. 1 mysql mysql      20166 2014-05-12 15:05 test_table2.frm
-rw-r-----. 1 mysql mysql 2562719744 2014-05-12 15:16 test_table2.ibd

And now try again:

mysql> use test;
Reading table information for completion of table and column names
You can turn off this feature to get a quicker startup with -A
Database changed

mysql> alter table test_table2 IMPORT TABLESPACE;
Query OK, 0 rows affected, 1 warning (2 min 29,38 sec)

And checking :

mysql> select idvisit from test_table2 order by idvisit desc limit 1;
+---------+
| idvisit |
+---------+
| 7016951 |
+---------+
1 row in set (0,04 sec)

That’s all in such manner you can move one or more tables to another server for testing or just for what you need.

The post Copying Tablespaces to Another Server (Transportable Tablespaces) appeared first on Azerbaijan MySQL UG.


PlanetMySQL Voting: Vote UP / Vote DOWN

Change binary log and relay log location to /home? SELinux issue

$
0
0

Recently in my slave server there was a full disk error because of the huge size of binary logs.Which is lead to critical error and BUG report which is still stays as open:

http://bugs.mysql.com/bug.php?id=72437

So the issue was a partition problem which in partitioning stage haven’t been specified for “/” (root) filesystem. But in “/home” there were left enough space.
The quick decision was to change binary and relay log location(path) to “/home”.
But there was a great challenge to get real working slave again.

Now we will explore all steps in our test virtual machine.
Test conditions for me:

1. CentOS 6.5 (x86_64) (both master and slave)
2. MySQL 5.6.19 GA (from official yum repo) (both master and slave)

Master my.cnf:

# BINARY LOGGING #
server_id                      = 1
log_bin                        = /var/lib/mysql/data/mysql-bin
log_bin_index                  = /var/lib/mysql/data/mysql-bin
expire_logs_days               = 14
sync_binlog                    = 1
binlog_format                  = row
gtid-mode                      = on                             
enforce-gtid-consistency       = true           
master-info-repository         = TABLE            
relay-log-info-repository      = TABLE         
slave-parallel-workers         = 2               
binlog-checksum                = CRC32                  
master-verify-checksum         = 1                
slave-sql-verify-checksum      = 1             
binlog-rows-query-log_events   = 1
log_slave_updates              = 1

Slave original my.cnf:

# BINARY LOGGING #

server_id                      = 2
log_bin                         = /var/lib/mysql/data/mysql-bin
log_bin_index                  = /var/lib/mysql/data/mysql-bin
expire_logs_days               = 14
sync_binlog                    = 1
binlog_format                  = row
relay_log                      = /var/lib/mysql/data/mysql-relay-bin
log_slave_updates              = 1
read_only                      = 1
gtid-mode                      = on
enforce-gtid-consistency       = true
master-info-repository         = TABLE
relay-log-info-repository      = TABLE
#slave-parallel-workers         = 2
binlog-checksum                = CRC32
master-verify-checksum         = 1
slave-sql-verify-checksum      = 1
binlog-rows-query-log_events   = 1

So we assume that we have already working master->slave topology.
Let’s examine Slave Host for further explanation:

[root@linuxsrv2 home]# df -h
Filesystem            Size  Used Avail Use% Mounted on
/dev/mapper/vg_linuxsrv1-lv_root
                       48G  2,3G   43G   6% /
tmpfs                 246M     0  246M   0% /dev/shm
/dev/sda1             485M   57M  403M  13% /boot
/dev/mapper/new_lv_linuxsrv1-lv_home
                      7,4G  145M  6,9G   3% /home

So we have seperate free space on /home directory and now we want to change slave’s binary log and reloy log files into this directory. Step-by-step:

1. Create directory:

[root@linuxsrv2 ~]# mkdir /home/binlogs
[root@linuxsrv2 ~]# ls -ld /home/binlogs/
drwxr-xr-x. 2 root root 4096 2014-06-13 15:39 /home/binlogs/

2. Change Slave’s my.cnf to reflect new location. So the new my.cnf of slave must be something like this:

# BINARY LOGGING #

server_id                      = 2
log_bin                        = /home/binlogs/mysql-bin
log_bin_index                  = /home/binlogs/mysql-bin
expire_logs_days               = 14
sync_binlog                    = 1
binlog_format                  = row
relay_log                      = /home/binlogs/mysql-relay-bin
log_slave_updates              = 1
read_only                      = 1
gtid-mode                      = on
enforce-gtid-consistency       = true
master-info-repository         = TABLE
relay-log-info-repository      = TABLE
#slave-parallel-workers        = 2
binlog-checksum                = CRC32
master-verify-checksum         = 1
slave-sql-verify-checksum      = 1
binlog-rows-query-log_events   = 1

3. Stop MySQL slave server:

[root@linuxsrv2 ~]# service mysqld stop
Stopping mysqld:                                           [  OK  ]

4. Move all binary log and relay log files to new directory “/home/binlogs”:

[root@linuxsrv2 ~]# cd /var/lib/mysql/data/
[root@linuxsrv2 data]# ls
mysql-bin.000001  mysql-bin.index  mysql-relay-bin.000003  mysql-relay-bin.000004  mysql-relay-bin.index  mysql-slow.log
[root@linuxsrv2 data]# mv mysql-bin.* /home/binlogs/
[root@linuxsrv2 data]# ls
mysql-relay-bin.000003  mysql-relay-bin.000004  mysql-relay-bin.index  mysql-slow.log
[root@linuxsrv2 data]# mv mysql-relay-bin.* /home/binlogs/
[root@linuxsrv2 data]# ls
mysql-slow.log
[root@linuxsrv2 data]# ls -l /home/binlogs/
total 20
-rw-rw----. 1 mysql mysql 1320 2014-06-13 15:46 mysql-bin.000001
-rw-rw----. 1 mysql mysql   37 2014-06-13 15:28 mysql-bin.index
-rw-rw----. 1 mysql mysql  741 2014-06-13 15:31 mysql-relay-bin.000003
-rw-rw----. 1 mysql mysql  471 2014-06-13 15:46 mysql-relay-bin.000004
-rw-rw----. 1 mysql mysql   86 2014-06-13 15:31 mysql-relay-bin.index

5. Change owner of /home/binlogs to mysql:mysql:

[root@linuxsrv2 data]# cd /home
[root@linuxsrv2 home]# ls
binlogs  lost+found  my_changed.cnf  my_original.cnf
[root@linuxsrv2 home]# chown -R mysql:mysql binlogs

6. Go to new directory edit *.index file of both binary logs and relay logs. Why?
Open these files and you will see that, the old path is still there:

[root@linuxsrv2 binlogs]# cat mysql-bin.index
/var/lib/mysql/data/mysql-bin.000001
[root@linuxsrv2 binlogs]# cat mysql-relay-bin.index
/var/lib/mysql/data/mysql-relay-bin.000003
/var/lib/mysql/data/mysql-relay-bin.000004

So after editing it must be something like:

[root@linuxsrv2 binlogs]# cat mysql-bin.index
/home/binlogs/mysql-bin.000001
[root@linuxsrv2 binlogs]# cat mysql-relay-bin.index
/home/binlogs/mysql-relay-bin.000003
/home/binlogs/mysql-relay-bin.000004

7. Now try to start MySQL:

[root@linuxsrv2 binlogs]# service mysqld start
MySQL Daemon failed to start.
Starting mysqld:                                           [FAILED]

See error log:

140613 15:46:19 mysqld_safe mysqld from pid file /var/run/mysqld/mysqld.pid ended
140613 16:01:50 mysqld_safe Starting mysqld daemon with databases from /var/lib/mysql
2014-06-13 16:02:15 0 [Warning] TIMESTAMP with implicit DEFAULT value is deprecated. Please use --explicit_defaults_for_timestamp server option (see documentation for more details).
2014-06-13 16:02:16 12358 [Warning] Buffered warning: Performance schema disabled (reason: init failed).

^G/usr/sbin/mysqld: File '/home/binlogs/mysql-bin.index' not found (Errcode: 13 - Permission denied)
2014-06-13 16:02:16 12358 [ERROR] Aborting

2014-06-13 16:02:16 12358 [Note] Binlog end
2014-06-13 16:02:16 12358 [Note] /usr/sbin/mysqld: Shutdown complete

But as you see we changed owner of this directory to mysql user, still error occured.

SELinux come ups with it’s blocking functionalty here to prevent mysql to use other directories rather than, /var/lib/mysql.

Simply you can disable SELinux at all, but it is not a best practice.
So going further again step-by-step:

8. Install “policycoreutils-python” on Linux:

[root@linuxsrv2 ~]# yum install policycoreutils-python
Loaded plugins: fastestmirror, security
Loading mirror speeds from cached hostfile
 * base: mirror.logol.ru
 * extras: mirror.logol.ru
 * updates: mirror.logol.ru
Setting up Install Process
Package policycoreutils-python-2.0.83-19.39.el6.x86_64 already installed and latest version

[root@linuxsrv2 ~]# rpm -qa | grep policy*
selinux-policy-3.7.19-231.el6_5.3.noarch
policycoreutils-python-2.0.83-19.39.el6.x86_64
checkpolicy-2.0.22-1.el6.x86_64
policycoreutils-2.0.83-19.39.el6.x86_64
selinux-policy-targeted-3.7.19-231.el6_5.3.noarch

9. Configuring SELinux:

##1##

[root@linuxsrv2 home]# audit2allow -w -a
type=AVC msg=audit(1402659916.941:291): avc:  denied  { search } for  pid=14356 comm="mysqld" name="/" dev=dm-2 ino=2 scontext=unconfined_u:system_r:mysqld_t:s0 tcontext=system_u:object_r:file_t:s0 tclass=dir
	Was caused by:
		Missing type enforcement (TE) allow rule.

		You can use audit2allow to generate a loadable module to allow this access.

##2##

[root@linuxsrv2 home]# audit2allow -a


#============= mysqld_t ==============
#!!!! The source type 'mysqld_t' can write to a 'dir' of the following types:
# var_log_t, mysqld_var_run_t, mysqld_db_t, tmp_t, mysqld_tmp_t, var_lib_t, var_run_t, cluster_var_lib_t, cluster_var_run_t, root_t, cluster_conf_t

allow mysqld_t file_t:dir { write search read remove_name open add_name };
#!!!! The source type 'mysqld_t' can write to a 'file' of the following types:
# mysqld_var_run_t, mysqld_db_t, mysqld_tmp_t, mysqld_log_t, cluster_var_lib_t, cluster_var_run_t, root_t, cluster_conf_t

allow mysqld_t file_t:file { rename read create write getattr unlink open append };

##3##

[root@linuxsrv2 home]# audit2allow -a -M mymysqlallow
******************** IMPORTANT ***********************
To make this policy package active, execute:

semodule -i mymysqlallow.pp

##4##

[root@linuxsrv2 home]# ls
binlogs  lost+found  my_changed.cnf  mymysqlallow.pp  mymysqlallow.te  my_original.cnf
[root@linuxsrv2 home]# semodule -i mymysqlallow.pp

10. Try again to start MySQL:

[root@linuxsrv2 ~]# service mysqld start
Starting mysqld:                                  [  OK  ]

But actually Slave does not work now:
From slave status:

Slave_IO_Running: No
Slave_SQL_Running: No

And from error log:

2014-06-13 17:03:36 15360 [ERROR] Failed to open the relay log '/var/lib/mysql/data/mysql-relay-bin.000004' (relay_log_pos 448).
2014-06-13 17:03:36 15360 [ERROR] Could not find target log file mentioned in relay log info in the index file '/home/binlogs/mysql-relay-bin.index' during relay log initialization.
2014-06-13 17:03:36 15360 [ERROR] Failed to initialize the master info structure
2014-06-13 17:03:36 15360 [Note] Check error log for additional messages. You will not be able to start replication until the issue is resolved and the server restarted.

Here is another issue, in fact we defined path correctly in mysql-relay-bin.index file but it shows the old path. So Why?

As examining mysql database you will see some tables like:

mysql> show tables like 'slave%'; 
+--------------------------+
| Tables_in_mysql (slave%) |
+--------------------------+
| slave_master_info        |
| slave_relay_log_info     |
| slave_worker_info        |
+--------------------------+
3 rows in set (0,00 sec)

Select from slave_relay_log_info table:

mysql> select * from slave_relay_log_info\G
*************************** 1. row ***************************
  Number_of_lines: 7
   Relay_log_name: /var/lib/mysql/data/mysql-relay-bin.000004
    Relay_log_pos: 448
  Master_log_name: mysql-bin.000002
   Master_log_pos: 478
        Sql_delay: 0
Number_of_workers: 0
               Id: 1
1 row in set (0,00 sec)

Yes as you see , although, we have defined new path it is not updated in this table. So quite straight option is manually updating this table to new path:

mysql> update slave_relay_log_info set relay_log_name='/home/binlogs/mysql-relay-bin.000004' where id=1;
Query OK, 1 row affected (0,05 sec)
Rows matched: 1  Changed: 1  Warnings: 0

11. Restart MySQL again:

[root@linuxsrv2 ~]# service mysqld restart
Stopping mysqld:                                  [  OK  ]
Starting mysqld:                                  [  OK  ]

Check Slave if it is working properly now?

Slave_IO_Running: Yes
Slave_SQL_Running: Yes

Yes now the binary logs and relay logs of slave server is located in /home directory:

[root@linuxsrv2 ~]# ls -l /home/binlogs/
total 28
-rw-rw----. 1 mysql mysql 1320 2014-06-13 15:46 mysql-bin.000001
-rw-rw----. 1 mysql mysql  214 2014-06-13 17:21 mysql-bin.000002
-rw-rw----. 1 mysql mysql  333 2014-06-13 17:26 mysql-bin.000003
-rw-rw----. 1 mysql mysql   93 2014-06-13 17:22 mysql-bin.index
-rw-rw----. 1 mysql mysql  173 2014-06-13 17:22 mysql-relay-bin.000006
-rw-rw----. 1 mysql mysql  590 2014-06-13 17:26 mysql-relay-bin.000007
-rw-rw----. 1 mysql mysql   74 2014-06-13 17:22 mysql-relay-bin.index

Thanks for reading ;)

The post Change binary log and relay log location to /home? SELinux issue appeared first on Azerbaijan MySQL UG.


PlanetMySQL Voting: Vote UP / Vote DOWN

Add Patch to MySQL source code in Linux

$
0
0

Due to reported BUG report(BUG 73365) i am testing full disk error conditions with MySQL 5.6.19-debug-log.

There were some interesting error messages in error log:

2014-07-23 08:09:59 7f44500f0700 InnoDB: Error: Write to file ./xxx/news.ibd failed at offset 218103808.
InnoDB: 1048576 bytes should have been written, only -1 were written.
InnoDB: Operating system error number 28.
InnoDB: Check that your OS and file system support files of this size.
InnoDB: Check also that the disk is not full or a disk quota exceeded.
InnoDB: Error number 28 means 'No space left on device'.

InnoDB: 1048576 bytes should have been written, only -1 were written.
So what is “-1″ here?

The answer from:

[24 Jul 16:02] David Bennett

The -1 value is an error return from the os_file_pwrite() function in storage/innobase/os/os0file.c. This only occurs on non-Windows platforms. On Windows the WriteFile functions _Out_opt_ lpNumberOfBytesWritten is used which will return 0 on error. A patch is attached which will correct the error message.

David Bennett attached an patch to my report.
There is no such terrible situation with patches.Patch is simply a text file which describe code difference and etc.
So content of attached patch file:

=== modified file 'storage/innobase/os/os0file.c'
--- storage/innobase/os/os0file.c       2014-02-06 10:25:06 +0000
+++ storage/innobase/os/os0file.c       2014-07-24 15:56:14 +0000
@@ -3045,6 +3045,8 @@

        if (!os_has_said_disk_full) {

+               if (ret == -1) ret++;
+
                ut_print_timestamp(stderr);

                fprintf(stderr,

It is clear that at line 3045 or nearby you must add if (ret == -1) ret++; line to os0file.c file which is in storage/innobase/os/.

Let’s try:

[root@localhost ~]# cd mysql-5.6.19/storage/innobase/os/
[root@localhost os]# ls
os0file.cc  os0proc.cc  os0sync.cc  os0thread.cc

Open this file with option to go to 3045’s line:

[root@localhost os]# nano +3045 os0file.cc
*
*
*
if (!os_has_said_disk_full) {
                // Added New Line 
                if (ret == -1) ret++;

                ut_print_timestamp(stderr);

                fprintf(stderr,
                        " InnoDB: Error: Write to file %s failed"
                        " at offset " UINT64PF ".\n"
                        "InnoDB: %lu bytes should have been written,"
                        " only %ld were written.\n"
                        "InnoDB: Operating system error number %lu.\n"
                        "InnoDB: Check that your OS and file system"
                        " support files of this size.\n"
                        "InnoDB: Check also that the disk is not full"
                        " or a disk quota exceeded.\n",
                        name, offset, n, (lint) ret,
                        (ulint) errno);
                if (strerror(errno) != NULL) {
                        fprintf(stderr,
                                "InnoDB: Error number %d means '%s'.\n",
                                errno, strerror(errno));
                }

                fprintf(stderr,
                        "InnoDB: Some operating system error numbers"
                        " are described at\n"
                        "InnoDB: "
                        REFMAN "operating-system-error-codes.html\n");

                os_has_said_disk_full = TRUE;
        }

As you see, error messages is provided by this code lines and we added new line from patch.
Save this file and build/compile MySQL again. (See: Install MySQL from source with debugging option in Linux)

And again i create a full disk error condition but now the “-1″ dissappears from error log, it is fixed:

InnoDB: 1048576 bytes should have been written, only 0 were written.
InnoDB: Operating system error number 28.
InnoDB: Check that your OS and file system support files of this size.
InnoDB: Check also that the disk is not full or a disk quota exceeded.
InnoDB: Error number 28 means 'No space left on device'.
InnoDB: Some operating system error numbers are described at

Thank you.

The post Add Patch to MySQL source code in Linux appeared first on Azerbaijan MySQL UG.


PlanetMySQL Voting: Vote UP / Vote DOWN

Fun with Bugs #35 - Bugs fixed in MySQL 5.6.24

$
0
0
I had not reviewed bug fixes in MySQL 5.6 for quite a some time, so I decided to check what bugs reported by MySQL Community were fixed in recently released MySQL 5.6.24. I'll mention both a bug reporter and engineer who verified the bug in the list below, because I still think that in MySQL world names should matter.

So, MySQL 5.6.24 includes fixes for the following bugs from http://bugs.mysql.com. I'd start with InnoDB and memcached-related fixes:
  • Bug #72080 - truncate temporary table crash: !DICT_TF2_FLAG_IS_SET(table, DICT_TF2_TEMPORARY). Reported by Doug Warner and verified by Shane Bester after a lot of testing. Note how fast it was fixed after verification!
  • Bug #75755 - Fulltext search behaviour with MyISAM vs. InnoDB (wrong result with InnoDB). Reported by Elena Stepanova from MariaDB and confirmed by my former boss Miguel Solorzano, this wrong results bug was also promptly fixed.
  • Bug #70055 - Expiration time ignored. This memcached-related bug was reported by Miljenko Brkic and verified by Umesh
  • Bug #74956 - Can not stop mysql with memcached plugin. This regression bug was reported by my colleague Nilnandan Joshi and verified by Umesh
  • Bug #75200 - MySQL crashed because of append operation. Reported by
    by already famous bug reporter (and developer) Zhai Weixiang, it was verified by Umesh and fixed fast enough.
    As you can see MySQL 5.6.24 fixed several more memcached-related bugs (reported internally), so if you use memcached it really makes sense to upgrade.
  • Bug #73361 - mutex contention caused by dummy table/index creation/free. Reported by Zhai Weixiang (who also suggested a patch) and verified by my dear friend and teacher Sinisa Milivojevic.  
Let's move on to partitioning. Just a couple of fixes there that fixed a long list of bugs reported by Percona QA engineers:
  •  Bug #74841 - handle_fatal_signal (sig=11) in cmp_rec_and_tuple | sql/sql_partition.cc:7610. This was reported by Percona's recent QA super star, Ramesh Sivaraman, and verified by Miguel Solorzano.
  • Bug #74860 - handle_fatal_signal (sig=11) in generate_partition_syntax. This was reported by Percona's all times QA superstar, Roel Van de Paar, and verified by Umesh.
  • Bug #74869 - handle_fatal_signal (sig=11) in ha_partition::handle_opt_partitions. It was reported by Ramesh Sivaraman, and verified by Miguel Solorzano.
  • Bug #74288 - Assertion `part_share->partitions_share_refs->num_parts >= m_tot_parts' failed. Reported by Roel Van de Paar and verified by Umesh.
  • Several other bugs mentioned remain private and not visible to us: Bug #74451, Bug #74478, Bug #74491, Bug #74560, Bug #74746, Bug #74634. I am not sure why they are private (or why the previous ones are still public, and for how long). Let's assume they were reported as private (and/or security ones) by my colleagues.
Now, only one replication bug reported at http://bugs.mysql.com was fixed, but serious one:
  • Bug #74607 - slave io_thread may get stuck when using GTID and low slave_net_timeouts. This bug was reported by Santosh Praneeth Banda and verified by Umesh.
There were several other bugs fixed in several categories:
  • Bug #74037 - group_concat_max_len=18446744073709547520 not accepted in my.cnf. It was reported by Leandro Morgado from Oracle and verified by himself probably. I am always to happy to see Oracle engineers reporting bugs in public.
  • Bug #73373 - Warning message shows old variable name. This was reported by Tsubasa Tanaka and verified by Miguel Solorzano.
  • Bug #71634 - P_S digest looks wrong for system variables, shown as @ @ variable... Reported by Simon Mudd and verified by the author of PERFORMANCE_SCHEMA, Marc Alff.
  • Bug #69744 - ssl.cmake silently chooses bundled yassl instead of erroring for old openssl ver. Good old build problem reported and verified by Shane Bester.
  • Bug #69423 - Double close() on the same file descriptor inside mysql_real_connect(). Reported by Yao Deng and verified by Igor Solodovnikov.
  • Bug #60782 - Audit plugin API: no MYSQL_AUDIT_GENERAL_LOG notifications with general log off. This one was reported by Olle Nilsson and verified (as a feature request) by ...yours truly almost 4 years ago.
A couple of issues were also fixed by introducing new server behavior:
  • Bug #74917 - Failed restarts contain no version details. Reported by my Oracle colleague Shawn Green and probably verified by him as well. Now server version is mentioned in the new error log file with the first message.
  • Bug #72997 - "fast" ALTER TABLE CHANGE on enum column triggers full table rebuild. Reported by famous Oracle customer Simon Mudd and verified by even more famous Shane Bester. The (temporary?) fix introduced two new variables, avoid_temporal_upgrade to control conversion to new "temporal" columns format (and rebuilding the table for any ALTER as a result), and show_old_temporals to control adding comments about old format of "temporal" column in SHOW CREATE TABLE output and corresponding INFORMATION_SCHEMA.COLUMNS.COLUMN value. Both variables are immediately declared as deprecated, so they may disappear in 5.7 (or 5.8? I am a bit lost with recent deprecation practices of Oracle).
That's all fixes for bugs reported at http://bugs.mysql.com in 5.6.24. Stay tuned, maybe one day we'll discuss MySQL 5.7.7 as well.
PlanetMySQL Voting: Vote UP / Vote DOWN

MySQLdb Manage Columns

$
0
0

Sometimes trying to keep a post short and to the point raises other questions. Clearly, my Python-MySQL Program post over the weekend did raise a question. They were extending the query example and encountered this error:

TypeError: range() integer end argument expected, got tuple.

That should be a straight forward error message because of two things. First, the Python built-in range() function manages a range of numbers. Second, the row returned from a cursor is actually a tuple (from relational algebra), and it may contain non-numeric data like strings and dates.

The reader was trying to dynamically navigate the number of columns in a row by using the range() function like this (where row was a row from the cursor or result set):

    for j in range(row):

Naturally, it threw the type mismatch error noted above. As promised, the following Python program fixes that problem. It also builds on the prior example by navigatung an unknown list of columns. Lines 16 through 31 contain the verbose comments and programming logic to dynamically navigate the columns of a row.

1
2
3
4
5
6
7
8
9
10
11
12
13
14
15
16
17
18
19
20
21
22
23
24
25
26
27
28
29
30
31
32
33
34
35
36
37
38
39
40
41
#!/usr/bin/python
 
# Import sys library.
import MySQLdb
import sys
 
try:
  # Create new database connection.
  db = MySQLdb.connect('localhost','student','student','studentdb')
  # Create a result set cursor.
  rs = db.cursor()
  rs.execute("SELECT item_title, item_subtitle, item_rating FROM item")
  # Assign the query results to a local variable.
  for i in range(rs.rowcount):
    row = rs.fetchone()
    # Initialize variable for printing row as a string.
    data = ""
    # Address an indefinite number of columns.
    count = 0
    for j in range(len(row)):
      # Initialize column value as an empty string.
      datum = ""
      # Replace column values when they exist.
      if str(row[count]) != 'None':
        datum = str(row[count])
      # Append a comma when another column follows.
      if count == len(row) - 1:
        data += datum
      else:
        data += datum + ", "
      count += 1
    # Print the formatted row as a string.
    print data
except MySQLdb.Error, e:
  # Print the error.
  print "ERROR %d: %s" % (e.args[0], e.args[1])
  sys.exit(1)
finally:
  # Close the connection when it is open.
  if db:
    db.close()

There are a couple Python programming techniques that could be perceived as tricks. Line 24 checks for a not null value by explicitly casting the column’s value to a string and then comparing its value against the string equivalent for a null. The MySQLdb returns a 'None' string for null values by default. The if-block on lines 27 through 30 ensure commas aren’t appended at the end of a row.

While the for-loop with a range works, I’d recommend you write it as a while-loop because its easier to read for most new Python programmers. You only need to replace line 20 with the following to make the change:

20
    while (count < len(row)):

Either approach generates output like:

The Hunt for Red October, Special Collectornulls Edition, PG
Star Wars I, Phantom Menace, PG
Star Wars II, Attack of the Clones, PG
Star Wars III, Revenge of the Sith, PG-13
The Chronicles of Narnia, The Lion, the Witch and the Wardrobe, PG
RoboCop, , Mature
Pirates of the Caribbean, , Teen
The Chronicles of Narnia, The Lion, the Witch and the Wardrobe, Everyone
MarioKart, Double Dash, Everyone
Splinter Cell, Chaos Theory, Teen
Need for Speed, Most Wanted, Everyone
The DaVinci Code, , Teen
Cars, , Everyone
Beau Geste, , PG
I Remember Mama, , NR
Tora! Tora! Tora!, The Attack on Pearl Harbor, G
A Man for All Seasons, , G
Hook, , PG
Around the World in 80 Days, , G
Harry Potter and the Sorcerer's Stone, , PG
Camelot, , G

As always, I hope this helps those looking for clarity.


PlanetMySQL Voting: Vote UP / Vote DOWN

MariaDB 10.1.4 now available

$
0
0

Download MariaDB 10.1.4 beta

Release Notes Changelog What is MariaDB 10.1?

MariaDB APT and YUM Repository Configuration Generator

mariadb-seal-shaded-browntext-altThe MariaDB project is pleased to announce the immediate availability of MariaDB 10.1.4. This is a Beta release.

See the Release Notes and Changelog for detailed information on this release and the What is MariaDB 10.1? page in the MariaDB Knowledge Base for general information about the MariaDB 10.1 series.

Thanks, and enjoy MariaDB!


PlanetMySQL Voting: Vote UP / Vote DOWN

Galera Cluster presentations at Percona Live on Tuesday 14th (Time Warner Cable, Yahoo, Galera on OpenStack, Galera on Kubernetes)

$
0
0

MySQL and Openstack deep dive, 14 April 11:30AM – 12:20PM @ Room 204

Peter Boros, Principal Architect, Percona

Most folks know that there are a number of different flavors of MySQL — standard MySQL, MariaDb, Percona XtraDb, MySQL Galera, Percona XtraDb Cluster, etc. In this talk, we hope to dispel some of these myths and give some clear information on what are the strengths and weaknesses of each of these flavors, what pitfalls to avoid when migrating between them, and what architectural information to take into account when planning your OpenStack MySQL database deployments. We will discuss replication topologies and techniques, and explain how the Galera Cluster variants differ from standard MySQL replication.


15 tips to boost your Galera Cluster,  14 April 1:20PM – 2:10PM @ Ballroom B

Frederic Descamps, Senior Architect, Percona

During this presentation, I will show how to implement several stuff that will improve your day-to-day workload. The points will cover topics like Point in Time Recovery, WAN replication with group segments, Avoiding SST when adding new Percona XtraDB Cluster node, … the tips will be briefly explained to the audience and then show how to implement them. The tips covered must be known by every administrator of a Galera Cluster.


Deploying a OpenStack Cloud at Scale at Time Warner Cable, 14 April 1:20PM – 2:10PM @ Room 203

Matthew Fisher, Principle Software Engineer, Time Warner Cable

Time Warner Cable has been designing, building, and operating an OpenStack cloud. Over the past 18 months, we’ve grown the team and tripled our original deployment as we’ve offered more capacity and services to internal customers. During this time we made some good decisions, but also some mistakes. We’d like to share the journey, good and bad, and show you what parts of the process you should focus on for your stand-up. Our talk will cover technologies and best practices used when deploying an OpenStack cluster to production, ranging from infrastructure tools like (Ansible, Puppet, git, Jenkins, Gerrit) to tools needed to run and monitor a production system (MySQL/Galera, rabbitmq, Icinga, Monasca)


Yahoo: Experiences with Percona Cluster, 14 April 1:20PM – 2:10PM @ Ballroom H

Tray Raymond, Yashada Jadhav, Yahoo

Yahoo runs one of its mission critical OLTP and OLAP system on Percona MySQL Cluster. In this presentation, we’ll run through the architecture, setup, challenges and tweaks that we’ve performed to enable running mission critical applications on Percona Cluster.


Running a Galera Cluster on Kubernetes , 14 April 2:20PM – 3:10PM @ Ballroom B

Patrick Calbraith, Senior Systems Engineer, Hewlett Packard

Kubernetes is a popular and rapidly-developing open source project from Google that provides (Docker) container cluster-management. Kubernetes can provide HA scheduling for any type of application, and in the case of this talk, a Galera cluster. This talk will explain to the user what exactly Kubernetes is, how it works, how the user can run Kubernetes, and importantly, how one can run a Galera cluster on Kubernetes.


 Is PXC right for my application? 14 April 5:15PM – 5:40PM @ Ballroom G

Stephane Cambaudon, Peter Boros Percona


MySQL Galera Cluster, Percona XtraDB Cluster, and MariaDB Galera Cluster, 14 April 6:00PM – 7:00PM @ Ballroom B

Jay Jansen, Percona


PlanetMySQL Voting: Vote UP / Vote DOWN

What’s New in MySQL 5.7? (First Release Candidate)

$
0
0

Last week we proudly announced the first Release Candidate (RC) of MySQL 5.7. MySQL 5.7.7 includes additional enhancements and aggregates the Development Milestones Releases (DMRs) the MySQL team at Oracle previously delivered to the MySQL community. With the first Release Candidate, it’s more important than ever that we hear your feedback on the pre-GA version in order to help ensure very high quality for the GA release.

MySQL 5.7 is an extremely exciting new version of the world’s most popular open source database that is 2x faster than MySQL 5.6, while also improving usability, manageability, and security. Some key enhancements include:

  1. Performance & Scalability: Improved InnoDB scalability and temporary table performance, enabling faster online and bulk load operations, and more.
  2. JSON Support: Native JSON support (JSON Labs Release).
  3. Replication improvements for increased availability and performance. They include multi-source replication, multi-threaded slave enhancements, online GTIDs, and enhanced semi-sync replication.
  4. Performance Schema delivering much better insights. We’ve added numerous new monitoring capabilities, reduced the footprint and overhead, and significantly improved ease of use with the new SYS Schema.
  5. Security: We are fulfilling “secure by default” requirements and many new MySQL 5.7 features will help users keep their database secure.
  6. Optimizer: We have rewritten large parts of the parser, optimizer, and cost model. This has improved maintainability, extendability, and performance.
  7. GIS: Completely new in MySQL 5.7 and including InnoDB spatial indexes, use of Boost.Geometry, along with increased completeness and standard compliance.

The above represents some of the highlights and I encourage you to further drill into the complete series of Milestone blog posts—5.7.1, 5.7.2, 5.7.3, 5.7.4, 5.7.5, 5.7.6, 5.7.7—and even further down in to the individual worklogs with their specifications and implementation details. Or perhaps you prefer to just look at the source code at github.com/mysql. We have implemented 317 worklogs, added 816 MTR tests, and fixed 1476 5.7-specific bugs in 5.7. It might all be a bit overwhelming, so this “little” guide might be useful.

A big THANK YOU to everyone in the development team that made this happen! By development I mean everyone: requirements, design, coding, reviewing, testing, bug fixing, documentation, release, and lab support.  A real team effort.

Performance & Scalability

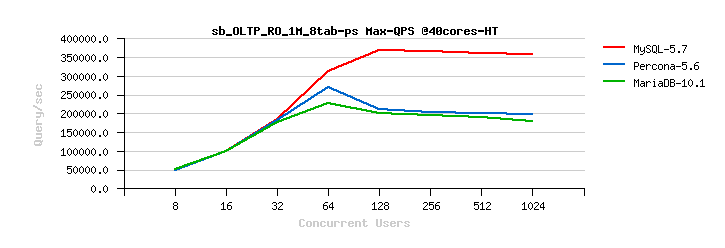
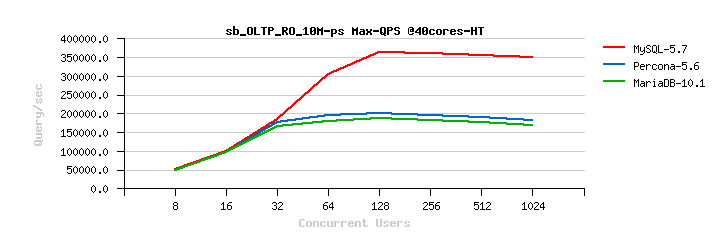
Performance and scalability is a priority for MySQL, learning from community feedback and taking into account trends and developments in computer hardware and its architecture. So far in 5.7 we have delivered impressive read-only (RO) scalability results with InnoDB and significantly sped up the connection handling in the server layer. We are also making good progress on InnoDB read-write (RW) scalability, improved internal operations (faster and more stable flushing/purging), and fast bulk data loads.

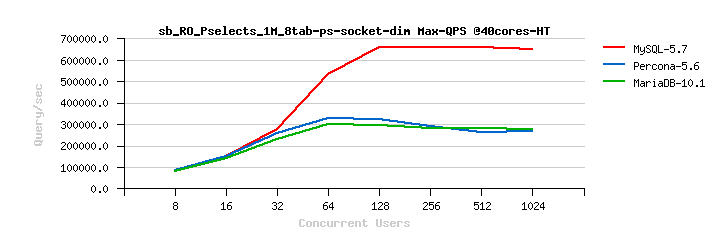
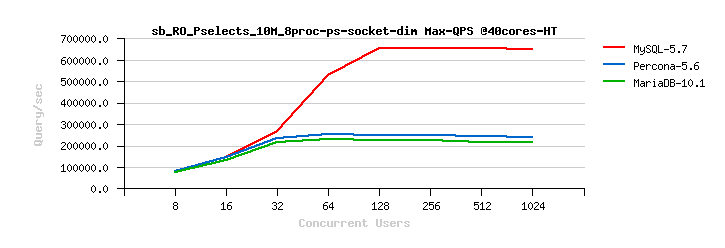
InnoDB Read-Only Scalability. We have improved the performance for Read-Only (RO) and Read-Mostly workloads. We have significantly improved how InnoDB handles RO transactions (WL#6047, WL#6899, WL#6906, WL#6578). We have also removed server layer contentions related to Meta Data Locking (MDL) and removed the use of THR_LOCK locks for InnoDB (WL#7304, WL#7305, WL#7306, WL#6671). After WL#6671, the LOCK_grant lock then became more visible as the next scalability bottleneck in some workloads; for example, the single table InnoDB POINT_SELECT Sysbench tests (see also Bug#72829). This has now been fixed by partitioning the LOCK_grant lock (see WL#8355). Finally we have  removed bottlenecks around LOCK_plugin and THR_LOCK_lock in workloads which involve the creation of internal memory based temporary tables; for example, like Sysbench’s SELECT_DISTINCT test for InnoDB. There is no real reason why we should acquire these locks for internal temporary tables, so we removed this unnecessary overhead (see WL#8356). See also Dimitri Kravtchuk’s articles “MySQL Performance: reaching 500K QPS with MySQL 5.7“,  “MySQL 5.7 : Over 1M QPS with InnoDB Memcached Plugin“,  Sunny Bains’ article “Transaction life cycle improvements in 5.7.3“, and Jimmy Yang’s article “MySQL 5.7.3: Deep dive into 1mil QPS with InnoDB Memcached“.

InnoDB Read-Write Scalability. We have also improved the performance of Read-Write (RW) workloads. We have removed the “index lock contention” in InnoDB (WL#6363, WL#6326). The index lock that was used to protect the entire index tree structure is now replaced by more fine grained “block locks” in the tree. See Yasufumi Kinoshita’s article “MySQL-5.7 improves DML oriented workloads“.

InnoDB Faster & Parallel Flushing. We have reduced the number of pages scanned when doing flush list batches, speeding up page flushing (WL#7047). The time complexity of a scan is reduced from O(n*n) to O(n). We have also implemented parallel flushing by having multiple page_cleaner threads (WL#6642). This gives improved scalability and throughput on multi-core systems and avoids flushing becoming the bottleneck. Finally, we have improved the adaptive flushing algorithm and related mechanisms in order to achieve more consistent or smooth throughput (see WL#7868).

Speeding up Connection Handling. In some application scenarios (e.g. PHP applications) client connections have very short life spans, perhaps only executing a single query. This means that the time spent processing connects and disconnects can have a large impact on the overall performance. In 5.7 we have offloaded thread initialization and network initialization to a worker thread (WL#6606) and more than doubled MySQL’s ability to do high frequency connect/disconnect cycles, from 26K to 56K connect/disconnect cycles per second. See also Jon Olav Hauglid’s article “Improving connect/disconnect performance“.

Bulk Data Load Improvements.  Bulk Load for Create Index (WL#7277). This work implements bulk sorted index builds, thus making CREATE INDEX operations much faster. Prior to this work InnoDB looped through the base table and created one index record at a time for each record in the base table. After this work InnoDB reads many records from the base table, sorts the records using the index key, and then creates a chunked set of index records in one single bulk operation.

Online Operations

“Always ON” properties are essential to state of the art web solutions. It is important for DBAs or DevOps to be able to tune and extend their production systems without interrupting service. Thus, we continue to ensure that MySQL is leading in this area. So far in 5.7 we have delivered the following:

We have provided a way to enable GTIDs online (WL#7083), so that reads and writes are allowed during the procedure, servers do not need to synchronize, and no restarts are necessary. Prior to this work, the user had to stop all updates, synchronize all servers, and then restart all of them simultaneously. This previously meant that enabling GTIDs implied several minutes of planned downtime. See Sven Sandberg’s article “Enabling Global Transaction Identifiers Without Downtime in MySQL 5.7.6“.

We have added the capability to change the value of innodb_buffer_pool_size dynamically (WL#6117). This provides the ability to tune the buffer pool size—without incurring any downtime—as your database usage patterns evolve over time. See Yasufumi Kinoshita’s article “Resizing the InnoDB Buffer Pool Online“.

We have implemented automatic truncation of UNDO logs when separate UNDO tablespaces have been configured (WL#6965). InnoDB operates with several UNDO tablespaces that are periodically truncated, one at a time. While one UNDO tablespace is being truncated, the other UNDO tablespaces will still be available to service transaction management and ensure minimal impact on transaction processing. The purpose of this work is to avoid ever growing UNDO log file sizes that could occur in some usage scenarios. See also Bug#1287 reported by Scott Ellsworth.

We have added support for online ALTER TABLE RENAME INDEX (WL#6752, WL#6555) and enlarge VARCHAR column size operations (WL#6554).

We have made the slave options --replicate-* settable via the new CHANGE REPLICATION FILTER command (WL#7057). These options can now be changed dynamically while the server is running, enabling users to modify replication filtering rules without requiring a server stop and restart. This work originates in a contribution from Davi Arnaut (Bug#67362). See also Venkatesh Duggirala’s article “Making MySQL Slave Replication Filters Dynamic“.

And we have made it possible to issue CHANGE MASTER without stopping replication (WL#6120). In order to add/alter an option using the CANGE MASTER TO command, it was previously necessary to issue a STOP SLAVE command before the CHANGE MASTER TO command. This work relaxes that constraint. See also Shivji Jha’s article “Change master without stopping slave altogether“.

Optimizer Improvements

Many exciting things are going on in the optimizer area, such as the new Cost Model work, a new and improved parser, a layered optimizer architecture, and a new GIS implementation. In addition we have implemented the following set of feature requests:

Generated Columns (WL#411) : We have implemented Generated Columns. The values for such columns, unlike a regular field’s value, aren’t set by the user but instead computed by the server when the row is created or updated, using the expression specified by the user as part of the table definition. See Evgeny Potemkin’s article “Generated Columns in MySQL 5.7.5“.

Query Rewrite Plugins (WL#7589) : We have implemented a Query Rewrite Plugin, as well as a framework (APIs) for people to write their own custom query rewrite plugins. A query rewrite plugin specifies how certain queries that arrive at the server should be rewritten before they are processed and executed by the server. One usage is to enforce/prevent a certain query plan by adding hints to a query. Our query rewrite plugin is a superb tool for handling such problematic queries when users cannot rewrite the query within the application itself, e.g. because it originates from an external tool (like an Object Relational Mapping tool such as Hibernate) or from some other 3rd party application. See also Martin Hansson’s article  “Write Yourself a Query Rewrite Plugin: Part 1” and “Part 2“.

Process subqueries in FROM clause in the same way as view (WL#5275) : We have to a large extent unified the handling of derived tables and views. Until now, subqueries in the FROM clause (derived tables) were unconditionally materialized, while views created from the same query expressions were sometimes materialized and sometimes merged into the outer query. This behavior, beside being inconsistent, can lead to a serious performance penalty. This work fixes Bug#59203, Bug#67631, and Bug#1275.

Make switching of index due to small limit cost-based (WL#6986) : We have made the decision in make_join_select() of whether to switch to a new index in order to support "ORDER BY ... LIMIT N" cost-based. This work fixes Bug#73837.

Improved “IN queries” With Row Value Expressions to Be Executed Using Range Scans (WL#7019) : We removed the previous requirement on rewriting the WHERE condition into its equivalent AND/OR form. See Bug#31188 reported by Mark Callaghan and Bug#16247 reported by Domas Mituzas. See also Martin Hansson’s article “Range access: now in an IN predicate near you“.

“UNION ALL” No Longer Creates a Temporary Table (WL#1763) : In 5.7 the optimizer avoids creating a temporary table for the result of UNION ALL queries when there is no need for it, i.e. when there is no top-level ORDER BY clause. This reduces the need for disk space and disk I/O when executing large unions, and perhaps even more important, the client will get the first rows immediately. See Bug#50674 reported by Mark Callaghan. See also Norvald H. Ryeng’s article “State of the UNION“.

Non-Sorted Fields in the Sort Buffer are Now Compacted (WL#1509) : This optimization is about better utilizing the sort buffer, thus avoiding/reducing the need to go to disk while sorting. The user benefit is increased query performance.

EXPLAIN for Running Queries (WL#6369) : This feature is useful if you are running a statement in one session that is taking a long time to complete; using EXPLAIN FOR CONNECTION in another session may yield useful information about the cause of the delay and thus help you optimize your schema and statements.

JSON EXPLAIN (WL#6510) : We have enhanced the JSON EXPLAIN output by printing the total query cost, the cost per table, and the amount of data processed. This will make it easier for a user to see the difference between good and bad execution plans. See also Øystein Grøvlen’s article “MySQL EXPLAIN Explained“.

Make Use of Condition Filtering in the Optimizer (WL#6635) : This work improves join ordering. It provides a much better prefix rows estimate by taking into account not only conditions that are used by the chosen access method, but all other relevant conditions as well. See Jørgen Løland’s articles “A New Dimension to MySQL Query Optimization” part 1 and part 2.

Improved ONLY_FULL_GROUP_BY SQL Mode (WL#2489) : We have improved the behavior of the ONLY_FULL_GROUP_BY SQL mode and also enabled it by default in 5.7.5+. This work makes the SQL mode far less strict about selected/order expressions because the server now properly recognizes functional dependencies. This work addresses many user complaints, such as those described in Roland Bouman’s article “Debunking GROUP BY myths” and Bug#51058. See also Guilhem Bichot’s article “MySQL 5.7: only_full_group_by Improved, Recognizing Functional Dependencies, Enabled by Default!“.

Parser Refactoring

We are in the process of refactoring the SQL parser in an incremental way. The old parser had critical limitations because of its grammar complexity and top-down parsing style which lead to poor maintainability and extensibility. So far we have done a lot of preparatory work (WL#5967, WL#7199), refactored the SELECT statement (WL#7200), the SET statement (WL#7203), the INSERT/REPLACE statement (WL#7201),  the DELETE statement (WL#7202), and the UPDATE statement (WL#8062). We plan to rewrite the entire parser. See the article by Gleb Shchepa “SQL parser refactoring in 5.7.4 LAB release“.

Optimizer Hints

We have added parser rules to support a new hint syntax for optimizer hints (WL#8016). Hints can now be specified directly after the SELECT|INSERT|REPLACE|UPDATE|DELETE keywords in an SQL statement, and they must be enclosed in /*+ */ style comments. Not only does this provide the end-user with a more consistent and easy to use method of managing hints, but the internal refactoring done makes it far easier to add Server side support for additional hints moving forward (see WL#8241 and WL#8243 below). We have also implemented the general infrastructure (WL#8017) common to all hints given the new syntax (see WL#8016). This includes: 1. a data structure for associating hints with the relevant query block during parsing 2. utility functions for resolving the names of database objects (e.g. table names, index names, etc.) and associating the hints with the relevant objects 3. a data structure that the Optimizer can use to look up hints within the current query.

We have added new “index level hints” that allow the user to control which indexes should be candidates for index condition pushdown (ICP), multi-range read (MMR), and range optimization (WL#8243). We have also added new hints that allow the user to influence the Optimizer as it decides whether to use join buffering or batched key access during the execution of the query against the given set of tables (WL#8241).

Optimizer Refactoring

Previously the phases of parsing, optimizing, and execution were all intermixed. Almost every module was spread over different parts and sections of the optimizer. As a consequence, the cost of maintaining the codebase was high and extensibility poor. We started out on an optimizer refactoring project with the goal of a clear separation of these phases. With a refactored code base, the optimizer will be able to evolve much faster. For example, we see this as a prerequisite for improving our Prepared Statements.  See WL#6016,  WL#6042,  WL#7082, WL#7540, and WL#7870. See also Guilhem Bichot’s article “Re-factoring some internals of prepared statements in 5.7“.

Work towards a New Cost Model

We want to improve the cost based optimizer and replace existing heuristics with cost based decisions. We want to produce better cost estimates which also take into account new hardware architectures (larger buffers, caches, SSDs, etc.). Better cost estimates will lead to better decisions by the optimizer and thus to better query performance. We have started to refactor the existing cost model code and to remove hard-coded constants. This will make the code more maintainable and make it possible to tune and configure the cost model for your particular hardware configuration, as well as laying the groundwork for storage engines to provide costs that factor in whether the data requested resides in memory or on disk. So far we have done preparatory infrastructure work and removed hard coded cost constants. These are now replaced by configurable cost values that can be changed by the user, without touching the source code, and that can be adjusted by the server administrator. (WL#7182, WL#7209WL#7338, WL#5869, WL#6068, WL#7339, WL#7276WL#7315, WL#7316). We have also extended the handler interface with a new API to provide estimates for how much of table and index data is in main memory. It also contains a default implementation that will be used if the storage engine does not provide this information (WL#7168). See also Jørgen Løland’s article “The MySQL Optimizer Cost Model Project“.

InnoDB Fulltext Search

We introduced InnoDB Fulltext Search in 5.6. We have now added greater flexibility and further optimizations. For example, fulltext indexes in InnoDB now support an external parser just like MyISAM (WL#6943). The plugin can either replace the built-in parser or it can act as a front-end for it. See also Feature requests from Daniel van Eeden (Bug#68816) and Hartmut Holzgraefe (Bug#70400). We have also implemented optimizer hints that are passed down to InnoDB about a query so that InnoDB may skip part of the full text search processing, e.g. not to compute the ranking values if they are not needed (WL#7123). See Shaohua Wang’s article “InnoDB supports plugin parser in fulltext index” and Matt Lord’s article “Rankings with InnoDB Full-Text Search“.

We have also implemented CJK (Chinese, Japanese, and Korean) support for InnoDB Full-Text Search (WL#6607) : This work provides a default fulltext parser for CJK (N-GRAM support) and an alternative plugin which provides MeCab support for Japanese. Users can also implement their own pluggable fulltext parser for CJK using the pluggable parser support. See also Shaohua Wang’s two articles “InnoDB Full-Text : N-gram Parser” and “InnoDB Full-Text: MeCab Parser“.

Performance Schema

Monitoring is important to our users and customers, and essential to any data management system. Our goal is to be “best in class” in this space. At the core of our monitoring strategy we have Performance Schema, which was first introduced in MySQL 5.5. Performance Schema is a specialized MySQL Storage Engine built for the special purpose of storing dynamically created events, and at the same time providing a uniform well known SQL interface to events and their configuration. In 5.7 we continue to extend and enhance our monitoring, utilizing the Performance Schema infrastructure.  We have instrumented Metadata Locking (WL#5879), Transactions (WL#5864), Memory Usage (WL#3249, WL#7777), Stored Programs (WL#5766), and Prepared Statements (WL#5768).

We have exposed SHOW SLAVE STATUS information (WL#3656) and user variables (WL#6884) in Performance Schema. We also expose the GLOBAL and SESSION level STATUS and VARIABLES  (WL#6629) while preserving the corresponding SHOW STATUS and SHOW VARIABLES commands for backward compatibility. We have also enabled progress reporting for long running operations (WL#5889) .

We have changed the way performance schema does memory allocations (WL#5889) . Previously, the Performance Schema allocated all of the memory it needs up front when the server starts. We are now automatically scaling the memory consumption to match the actual server load, thus reducing overhead (WL#7802). We have also reduced memory usage by refactoring Performance Schema’s internal buffers so that the memory overhead for the table instrumentation scales better when the number of tables in the database is large (WL#7698) .

We have improved ease-of-use by allowing user/host exclusion (WL#7800) . To allow this, a new column named ENABLED has been added to the setup_actors table to provide users with the ability to specify exclusion as well as inclusion rules. We have made the two entities related to Query Text Length—SQL text and digest—configurable (WL#7270). The default for both remains at 1024 bytes.

See also Mayank Prasad’s articles “Performance Schema implementation Internals: Registering instruments“, “MySQL Performance Schema : Prepared Statements Instrumentation“, “MySQL Performance Schema: Instrumentation Exceptions“, and “MySQL Statement Digests“.

SYS Schema

We have integrated the SYS Schema (formerly ps_helper) within the MySQL Server by default (WL#8159). The MySQL SYS schema project has become increasingly popular within our user base over the last year. Many DBAs and developers within our user base noted that it brought some needed simplicity to configuring and querying the Performance Schema, integrating it with Information_Schema, and more. For example, see a community post here. See also Mark Leith’s article “The MySQL SYS Schema in MySQL 5.7.7“.

Fabric Support

Oracle announced GA for MySQL Fabric on May 27, 2014. The Server team is working on some features to improve sharding, failover, and management of server farms.  We have implemented a new server method for clearing session state (WL#6797). It is now possible for a client to do a reset of the existing connection, i.e. to clean the existing session context and free up resources.  We have also implemented a new server method to bring servers off line (WL#3836). The intended usage is for upgrades and other maintenance purposes. Setting the server to offline mode will gracefully disconnect all connected clients except those with the SUPER privilege. “Super” users are allowed to connect and manage the system while in offline mode.

Secure by Default

MySQL 5.7 aims to be the most secure MySQL Server release ever, and that means some significant changes around SSL/TLS and work to secure deployments overall.

MySQL deployments are now secure by default (WL#6962). The installation process creates only a single root account,

root@localhost
, automatically generates a random password for this account, and marks the password as expired. The MySQL administrator must then connect as root using the generated random password and use the SET PASSWORD command to set a new password .

The installation process creates no anonymous user accounts, no test database, and no demo related files by default (WL#6977, WL#6973). Secure deployments, initially done for Oracle Linux, has been extended to all other Unix variants and Unix like operating systems in WL#7787. The test database and the demo related files is included as a separate package.

We have simplified the server bootstrap process and removed the need for the mysql_install_db script (WL#7307). Simply specifying --initialize on the server command line is now enough to create a database directory if it’s absent, and then initialize it. The --initialize option also creates the user with a strong random and expired password.

We have restricted the scope of the FILE privilege to a secure default value for --secure-file-priv (WL#6782). The server will also warn users of insecure configurations for --secure-file-priv at start-up time.

We have redefined the client --ssl option to imply enforced encryption (WL#6791). Before, when a MySQL client specified the --ssl option a connection could still happen without encryption being enforced. Now if specified, and no SSL connection is available, the connection will instead fail. We have also added SSL support for mysqlbinlog (WL#7198).

We provide a “best effort” SSL setup process during installation. If successful, the MySQL server configuration file is also modified to reference the newly generated SSL certs and keys (WL#7706). We ensure the use of SSL whenever it has been enabled within the Server (WL#7712). If none of the SSL options are specified, the libmysql client will attempt an SSL connection if it is supported by the Server. If an SSL connection is not possible, however, then libmysql client will fall back to an unencrypted connection. See also Todd Farmer’s article “SSL/TLS in MySQL 5.7” and “Implications of TLS plans for third-party products“.

We have changed the default value of sql_mode to include NO_AUTO_CREATE_USER (WL#8326). This is to prevent the GRANT statement from unintentionally and automatically creating new user accounts without any authentication information having been specified/provided.

Security Features

In addition to “secure by default” installations we we have added many features that help users keep their database instances free from unintended use. This includes better data encryption, better password handling, better transport layer security, and more.

We now support multiple AES Encryption modes (WL#6781). We have enhanced the security strength of our Advanced Encryption Standard (AES) encryption/decryption functions—AES_ENCRYPT() and AES_DECRYPT()—by adding support for larger key sizes and different block modes. See also Georgi Kodinov’s article “Understand and satisfy your AES encryption needs with 5.6.17“.

We have added a timestamp field to the mysql.user table on the last time the password was changed (WL#7131). This work provides the means for implementing password rotation policies. See Todd Farmer’s article “Implementing a password policy in MySQL“.

We have made it possible to enable (unlock) or disable (lock) a user account (login permission) by extending the CREATE USER and ALTER USER commands (WL#6054). See Todd Farmer’s article “Building a better CREATE USER command“.

We have extended the built-in authentication plugins to support proxy users  (WL#7724). MySQL had an existing concept of proxy users which can support a major use case that is typically met by SQL Roles: the ability to abstract user credentials/identity from the privileges assigned. This allows multiple users—identified, logged, and audited in a distinct manner—to share a single set of managed privileges. For deployments with many users having identical privileges, this can provide major operational benefits, but until now, proxy users could only be leveraged by external authentication plugins. This work removes that previous limitation. See Todd Farmer’s article “Emulating roles with expanded proxy user support in 5.7.7“.

InnoDB Native Partitioning

We have added native partitioning support to InnoDB (WL#6035). Until now, partitioning support for InnoDB has relied on the ha_partition handler, which created a new handler for each partition, which in turn wasted a lot of resources when using many partitions. By supporting native partitioning within InnoDB one can use far fewer overall resources (see also: bug#62536, bug#37252, and bug#70641). InnoDB native partitioning also paves the way for better overall partitioning. That would include things such as parallel query processing, improved partition pruning (due to more accurate index statistics), foreign key support, global secondary indexes, and full-text searches on partitioned tables. As part of this work have also separated the partitioning specific parts of the handler class into its own partitioning interface (WL#4807). This is refactoring done to modularize and decouple the partitioning engine from the rest of the server code base.

Furthermore, we have  added support for Index Condition Pushdown (ICP) for partitioned tables (WL#7231, motivated by Bug#70001). We have added support for the [{WITH| WITHOUT} VALIDATION] clause to the EXCHANGE PARTITION command (WL#5630, motivated by Bug#57708). We have added support for transportable tablespaces for partitioned InnoDB tables (WL#6867, WL#6868). See also Mattias Jonsson’s article “MySQL 5.7.4 now supports Transportable Tablespaces for InnoDB Partitions“.

InnoDB General Tablespaces

We have added the ability for InnoDB to create a general tablespace using the CREATE TABLESPACE syntax (WL#6205WL#8109). This work gives the user the freedom to choose their own mapping between tables and tablespaces, i.e. which tablespaces to create and what tables they should contain. This provides the means for doing things such as grouping all tables for a given user or customer within a single tablespace, and thus having all of their data within a single file on the filesystem. We have also implemented meta data locking (MDL) for general tablespaces (WL#7957). This is specifically needed for the new general tablespaces in InnoDB, and for the already existing NDB Cluster general tablespaces.

InnoDB Temporary Table Performance

One of the goals of 5.7 is to optimize for better performance for normal SQL temporary tables. First, we made temp table creation and removal a more light-weight operation by avoiding the unnecessary step of persisting temp table metadata to disk. We moved temp tables to a separate tablespace (WL#6560) so that the recovery process for temp tables becomes a single stateless step by simply re-creating it at start-up. We removed unnecessary persistence for temp tables (WL#6469). Temp tables are only visible within the connection/session in which they were created, and they are bound by the lifetime of the server. We optimized  DML for Temp Tables (WL#6470) by removing unnecessary UNDO and REDO logging, change buffering, and locking. We added an additional type of UNDO log (WL#6915), one that is not REDO logged and resides in a new separate temp tablespace. These non-redo-logged UNDO logs are not required during recovery and are only used for rollback operations.

Second, we made a special type of temporary tables which we call intrinsic temporary tables (WL#7682, WL#6711). An intrinsic temporary table is like a normal temporary table but with relaxed ACID and MVCC semantics. The purpose is to support internal use cases where internal modules such as the optimizer demand light-weight and ultra-fast tables for quick intermediate operations. We then made the optimizer capable of using InnoDB “intrinsic temporary tables” for internal storage (WL#6711). Finally, we made InnoDB the default engine used for the internal temporary tables (WL#6737). See Krunal Bauskar’s article “MySQL 5.7: InnoDB Intrinsic Tables“.

Buffer Pool—Dump and Load

We have improved both the buffer pool dump and load scenarios (WL#6504). It is now possible to dump only the hottest N% of the pages from each buffer pool. The load operation is also made less disruptive to user activity because the load now happens in the background while continuing to serve clients; while also attempting not to be too aggressive and taking too much IO capacity away from servicing new client requests. See also Tony Darnell’s article “MySQL Dumping and Reloading the InnoDB Buffer Pool”.

We have also changed the server to use the buffer pool dump and load feature by default and changed the default percentage to 25% (WL#8317). This offers a good default balance between 1. supporting a “hot” working data set and 2. shutdown and startup times.

Tools

The Server comes with a set of utility programs or scripts (tools). The general direction is to improve and add more tools. We also want to move away from “scripts” and over to C/C++ to improve on portability and cover more usage scenarios (one cannot run scripts in all environments).

We have significantly extended the innochecksum utility’s functionality (WL#6045). It is now possible to specify the checksum algorithm (innodb/crc32/none), rewrite the current checksum using the specified algorithm, rewrite the checksum even if the current checksum is invalid, and specify the maximum checksum mismatch allowed before terminating the program. innochecksum can also now operate on multiple tablespace files and on multiple files in the same tablespace. See Anil Toshniwal’s article “Improving Innochecksum“.

We have rewritten the mysql_upgrade tool (WL#7308), which fixes many reported bugs while also making mysql_upgrade more robust and easier to maintain. For example, this work fixes Bug#65288 reported by Nicholas Bamber and Bug#71579 reported by Florian Weimer.

We have added SSL options and support for the mysqlbinlog client program (WL#7198), allowing system administrators to perform remote binlog queries (--read-from-remote-server) over secure connections. This was previously the last remaining MySQL client program without SSL support.

We have converted mysql_secure_installation script to C/C++ (WL#6441). This program can now connect to the server directly and execute the specified commands using the C API (libmysql). This removes the need for storing the user supplied password in a temporary option file on the filesystem.

We started out with converting the mysql_install_db script to C/C++ (WL#7688), to make the program usable on all platforms—particularly on Windows—while also redesigning the program to provide a better user experience, cover more functionality, and improve security. Later in the 5.7 cycle we decided to fold this functionality into the server itself (see WL#7307). The mysql_install_db program is in 5.7, it can be used but is no longer needed, and we plan to remove it in a future release.

Community Contributions

Server-side statement timeouts (WL#6936) : This work is based on a contribution submitted by Davi Arnaut (Bug#68252). The work implements a server-side time limit for the execution of top-level read-only SELECT statements. After the specified amount of time, the statement will be aborted without affecting the session (connection) or the transaction contexts. See Praveen Hulakund’s article “Server-side SELECT statement timeouts“.

Multiple User Level Locks : Allow multiple locks in GET_LOCK() (WL#1159). User-level locks are often used to organize mutual exclusion when accessing some resource in cases when table or row-level locks are not appropriate. This work allows for multiple user level locks per connection. The work is based on a contribution by Konstantin Osipov (Bug#67806). See Dmitry Lenev’s article “The Story of One Contribution“.

Triggers

BEFORE Triggers Are Not Processed for NOT NULL Columns (WL#6030) : This work ensures that we check column constraints at the end of the SQL statement. This is in compliance with the SQL standard. In 5.6 and earlier, MySQL checks the column constraints too soon. See Bug#6295 reported by Peter Gulutzan, and Dmitry Shulga’s article “BEFORE triggers and NOT NULL columns in MySQL“.

Multiple Triggers Per Table (WL#3253) : This work provides the ability to have more than one trigger for every action (INSERT, UPDATE, DELETE) and timing (BEFORE or AFTER). This is in accordance with the SQL standard. See Dmitry Shulga’s article “Support for multiple triggers per table for the same value of action/timing“.

IGNORE Clause

Define and Reimplement IGNORE (WL#6614) : This work properly defines the meaning and handling of the IGNORE clause, a MySQL extension to the SQL standard. It reimplements IGNORE so that it is consistent across all supported SQL statements while also making it much easier to maintain. See also Bug#30191, Bug#49539, Bug#55421, Bug#54543, Bug#54106, Bug#49534, Bug#47788, Bug#46539, and Bug#46425. See also Abhishek Ranjan’s article “Improvements to the MySQL IGNORE Implementation“.

STRICT Mode

Define and Reimplement STRICT Mode (WL#6891) : We have made STRICT MODE behaviour consistent across all supported SQL statements. We have also made STRICT MODE the default for all transactional storage engines (WL#7764). The IGNORE clause downgrades errors to warnings to allow statements to skip row(s) which would have otherwise have caused the entire statement to abort. STRICT MODE does just the opposite—it upgrades warnings to errors. Similar to IGNORE, STRICT MODE has not previously been clearly and consistently defined, thus the implementation has been the source of many bugs like Bug#42910, Bug#5929, Bug#43880, Bug#48637, Bug#5912, and Bug#5913. See also Abhishek Ranjan’s article “Improvements to STRICT MODE in MySQL“.

Error Reporting & Logging

Introduce a separate error code range for 5.7 (WL#8206) : This work implements a separate range of numbers for new server error messages introduced in 5.7. These codes are currently numbered consecutively, starting at 1000. We also have a second range of error codes used by the client, starting at 2000. The problem is that the first range of codes is currently up to 1974 which means that the two ranges would soon overlap, making it hard to differentiate between server and client errors. The new 5.7 server error codes will now instead start at 3000.

Error Reporting — Stacked Diagnostic Areas (WL#6406) : This work implements support for stacked diagnostic areas as defined by the SQL standard. The GET DIAGNOSTICS statement has been extended to support GET [STACKED] DIAGNOSTICS.

Error Reporting — Most Statements Should Clear the Diagnostic Area (WL#5928) : This work makes MySQL follow the SQL standard with respect to clearing the diagnostic area. This work fixes bugs like Bug#35296, Bug#43012, and Bug#49634.

Error Logging — Allow Control of Verbosity (WL#6661, WL#6755) : This work gives the DBA control of how verbose the MySQL Server should be when writing to the error log (ERROR/WARNING/NOTE). This work also changes the timestamp format printed to a more standard format (UTC timestamp) and converts the existing fprintf(stderr, …) in the server layer to use the new internal error logging API.

Add Native Support for Syslog on Unixoid Platforms (WL#7793) : This work adds full support for logging server output to the system’s native syslog facility. See also Bug#55370 reported by Kyle Joiner and later enhanced by Simon Mudd and Mark Alff. See Tatiana’s article “Logging with MySQL: Error-Logging to Syslog & EventLog“.

MySQL Client

Log Interactive Commands to Syslog (WL#6788) : This work introduces a new client option, --syslog, which enables/disables the logging of attributes like sudo_user (or user), mysql_user, connection_id, db_server, DB, and query entered in an interactive session. This has been requested by some users due to auditing compliance requirements, i.e. requirements to log all interactive commands entered at the mysql command-line prompt to syslog.

Client Side Protocol Tracing (WL#6226) : This work creates hooks inside the client library code which allows tracing of protocol events such as sending packets to the server, receiving server replies, and authentication handshakes. This provides a mechanism for collecting performance data about the client-server connections, from the client’s perspective.

Client-Server Protocol

Extend mysql_real_escape_string() to be aware of the string type it’s escaping for (WL#8077) : We have added an argument of a “quote type” to the function mysql_real_escape_string_quote(). This provides the means to explicitly distinguish between single-quoted and double-quoted strings. This breaks the ABI, so it will not be backported to 5.6.

Extending the Protocol’s OK Packet (WL#4797) : This work extends the client-server protocol’s OK packet to allow the server to send additional information, e.g. server state changes. By default the server now sends information about the effect of SET character_set and USE database commands. This avoids situations like, for example,  after SET NAMES big5 the server assumes that the client will send big5 encoded data, while the client character set is still using latin1.

Flag for Session-Specific State (WL#6885) : This work makes it possible for the client to tell the server that it wants notification about session state changes. One possible usage for this feature is to be able to detect if it is possible to migrate a user session context to another physical connection within a load balanced or clustered environment.

GIS: InnoDB Spatial Indexes

We have implemented spatial (R-tree) indexing within InnoDB (WL#6968,  WL#6968,  WL#6745) : InnoDB spatial indexes can be used with all existing syntax that has been developed for MyISAM spatial indexes. In addition, InnoDB spatial indexes support full transactional, ACID, and MVCC properties (as well as isolation levels). It employs predicate locks to prevent phantom scenarios (WL#6609). We have added a new InnoDB internal datatype called DATA_GEOMETRY, and we map all MySQL GEOMETRY datatypes to this new internal datatype (WL#6455). We have also extended CHECK TABLE so that it is able to determine whether any spatial indexes are valid (WL#7740). It now checks for a valid R-tree structure and ensures that the entry count matches up with the clustered index. See also Jimmy Yang’s article “InnoDB Spatial Indexes in 5.7.4 LAB release“.

GIS: Geometry Functions & Formats

After a careful evaluation of various open source geometry engines, we decided to replace our original GIS algorithms with Boost.Geometry. For those that build MySQL from source, it’s important to read about the new CMake options we added in the process. Changing the geometry engine is not a simple task, so a lot of the GIS effort has gone into this work (WL#7220,  WL#7221,  WL#7224,  WL#7225, WL#7236, WL#7280,  WL#7420WL#7929). In the process, we’ve also fixed a number of bugs and added support for many additional SQL/MM standard spatial operations.

As part of the increased GIS effort, we’ve started cleaning up the name space for GIS functions. With the exception of the constructor functions that have the same names as the data types (Point, LineString, Polygon, MultiPoint, MultiLineString, MultiPolygon and
GeometryCollection) and functions that do calculations on minimum bounding rectangles
(MBRs), all spatial functions now have names prefixed by the standard “ST_” (spatio-temporal) convention, and function names without that prefix have been deprecated (WL#8055).

Support for two new import and export formats, GeoJSON and geohash, has been added. These come in addition to the existing WKT and WKB support. The new GeoJSON functions ST_AsGeoJSON and ST_GeomFromGeoJSON will encode and decode GeoJSON documents (WL#7444). The new geohash ST_Geohash, ST_LongFromGeohash, ST_LatFromGeohash and ST_PointFromGeohash will do the same for geohash representation of points (WL#7928).

We’ve also added various other helper functions (WL#8034):  ST_Distance_Sphere, ST_MakeEnvelope, ST_IsValid, ST_Validate and ST_Simplify. Among these, ST_Distance_Sphere may be the most exciting one. While GIS support in MySQL still only uses a flat 2d plane, ST_Distance_Sphere will calculate distance between two points (or multipoints) on a sphere with a given radius. Two new MBR functions have also been added: MBRCoveredBy and MBRCovers (WL#7541). Since the MBR functions do calculations on MBRs instead of exact shapes, the calculations are faster than the corresponding ST_ functions.

To see how it all fits together, have a look at Matt Lord’s article, “MySQL 5.7 and GIS, an Example.

Multi-Source Replication

We have implemented Multi-Source Replication  (WL#1697). It allows a slave to replicate from multiple sources/masters, but without any additional conflict detection and resolution. One use case is to commission a “fan in slave” for data aggregation or backups. This version takes into consideration the great feedback we got from the community when we first released this via MySQL Labs some time ago. See Shivji Jha’s article “MySQL-5.7.6: Introducing Multi-source replication“.

Replication — Multi-Threaded Slaves (MTS)

We have implemeted intra-schema multi-threaded slaves (WL#6314). With this implementation (--slave-parallel-type=LOGICAL-CLOCK) the slave will be able to apply transactions in parallel, even within a single database or schema, as long as they have a disjoint read and write set. See also Rohit’s article “MySQL 5.7 Enhanced MTS: configuring slave for Intra-database parallelization“.

We have also implemented ordered commits (Sequential Consistency) (WL#6813). This ensures that the commits by slave applier threads running in parallel will be done in the same order as they were on the master. This also means that the slave will never externalize a database state which was never externalized by the master. This is a requirement when the applications reading from the slave must observe the same set of states that existed on the master due to some application enforced constraint. This has become a necessity after WL#6314, which enables multiple transactions to be executed in parallel by the slave threads, some of which may be modifying a single database.

We have allowed for replication slave servers to automatically retry a transaction after a temporary failure (WL#6964). Before this, only non-MTS replication slave servers attempted to retry a transaction after a temporary failure. See Bug#68465 reported by Yoshinori Matsunobu. Finally, we have improved the performance of Multi-Threaded Slaves (MTS) by using a more precise algorithm to determine which transactions are non-conflicting (WL#7165). This allows more transactions to execute in parallel when using --slave-parallel-type=LOGICAL_CLOCK, thus greatly improving the overall replication performance.

Semi-Sync Replication

We have implemented an option to make the master wait for N slaves to acknowledge back, instead of just one, when semi-sync is enabled (WL#7169).  Choosing to wait for N slaves (N > 1), adds resiliency to consecutive failures. It also improves transaction durability, as one transaction gets persisted in more than two servers before the results are externalized on the master. Furthermore, we now externalize transactions only after ACK is received (WL#6355). This allows for true lossless failovers when using semi-sync replication. If the master crashes, the slave is still ensured to be up to date. The implementation makes the master wait for the ACK after preparing within the storage engine and writing to the binary log, but before committing to the storage engine. See also Libing Song’s article “Loss-less Semi-Synchronous Replication on MySQL 5.7.2“. Finally, we have reduced semi-sync delays by using separate threads to send and receive semi-sync acknowledgements (WL#6630). So event and ACK streams can now be sent and received simultaneously.

Replication — GTID

As mentioned earlier we have provided a way to enable GTIDs online (WL#7083), so that reads and writes are allowed during the procedure, and servers do not need to synchronize. Prior to this work, the user had to stop all updates, synchronize all servers, and then restart all of them simultaneously. In addition we are now ensuring that similar events are generated regardless of the current value for GTID_MODE (WL#7592). Without ensuring this consistent behavior, there were cases where you could potentially lose GTID_EXECUTED and GTID_PURGED values (see the details in the WorkLog entry). (This was originally part of WL#7083). See also Sven Sandberg’s article “Enabling Global Transaction Identifiers Without Downtime in MySQL 5.7.6“.

Finally, we have implemented protocol support for GTIDs to allow clients to be GTID aware. We have implemented a mechanism to collect the necessary set of GTIDs to be sent over the wire in the response packet (WL#6972). We have added a tracker to the response packet of the MySQL protocol (WL#6128). This is done to be able to pass the connector information about the session state collected which can then be used to implement session consistency.

Replication — Refactoring

We have created stable interfaces useful for MySQL Group Replication and other server plugins (WL#8007 and WL#8202). Server plugins can now be informed of server events in the form of server callbacks. We have also separated out the deserialization of events in a MySQL replication stream into the a separate module (WL#7440). The goal of this refactoring is to break the dependencies between the server core and the replication framework.

Other Replication Features

  • Non-Blocking SHOW SLAVE STATUS (WL#6402) : This work adds a non-blocking option to SHOW SLAVE STATUS. The new option makes SHOW SLAVE STATUS non-blocking when run in parallel with STOP SLAVE (stopping the slave may take a long time to complete when it is waiting for an SQL thread to finish applying large events).
  • Add Idempotent Mode to mysqlbinlog (WL#6403) : This work provides an idempotent mode of operation for the mysql server. In this mode the server will ignore errors while applying ROW based events from a binlog file. This mode is useful when a DBA wants to replay binlogs using mysqlbinlog, but against a MySQL server which may not contain all of the data, so suppressing expected duplicate-key and no-key-found errors can be very useful.
  • Add a Rewrite-DB Option to mysqlbinlog for ROW Events (WL#6404) : This work adds support for a rewrite-db option to mysqlbinlog, so that a ROW based events can be applied to a different database/schema. I.E. replace “from_db” with “to_db” when reading a ROW based event from the binlog.
  • Binlog_sender: Do Not Reallocate (WL#7299) : This work implements an optimization on the dump thread that removes unnecessary reallocation of the send buffer. The user visible effect is that CPU usage will be lessened for each dump thread that the master spawns. See also Bug#31932 reported by Mark Callaghan.
  • Move Status Variables to Replication Performance Schema Tables (WL#7817) : This work moves replication system variables to Performance Schema tables so that they can be monitored per-source and not simply as global variables. This work was a requirement for Multi-source Replication.
  • Make Master-Slave Syncing Option Independent of the Slave Threads (WL#7796) : This work adds a new SQL function WAIT_FOR_EXECUTED_GTID_SET which makes the master-slave syncing option independent of the slave threads. If the slave thread is not running the WAIT_FOR_EXECUTED_GTID_SET(GTID_SET [, TIMEOUT]) function, then keep waiting until success (0) or timeout (1).
  • Optimize GTIDs for Passive Slaves — Store GTIDs in a Table (WL#6559) : This work adds the option of storing GTIDs in a table instead of in the binary log. The use case may be a slave that is only used for read scale-out and is never going to become a master, thus it may not have any use for the transactions in the binary log, but it may have a use for the related GTID features (e.g. to initiate a fail over to another new master).
  • Waiting for More Transactions to Enter Binlog Group Commit (BGC) Queues (WL#7742) : This work adds two new options to introduce an artificial delay to make the binary log group commit procedure pause: --binlog_group_commit_sync_delay and --binlog_group_commit_sync_no_delay_count. This increases the likelihood that more transactions are flushed and synced together to disk, thus reducing the overall time spent in creating a group of transactions (the bigger the groups the less number of sync operations). With the correct tuning, this can make the slave perform several times faster without compromising the master’s throughput.
  • Binlogging XA-prepared transactions (WL#6860) : We have added full support for XA-transactions within replication. An XA-transaction allows the client to participate in a two-phase commit protocol. The state of the XA-transaction being prepared is persisted in the database; this means that a prepared XA-transaction will survive client reconnects and server restarts. This work fixes Bug#12161.

Other Improvements

  • Make InnoDB fill factor settable (WL#6747) : This work makes the merge_threshold settable per index. Until now it has been fixed at 50%. If the amount of data within the page falls below the merge_threshold, e.g. when deleting a row or shortening it via an UPDATE, InnoDB will attempt to merge it with a neighbor page. This offers a way to decrease InnoDB’s overall disk footprint, at the expense of some additional work due to the additional page merges.
  • Support for 32k and 64k pages (WL#5757) : This work adds support for 32k and 64k page sizes (the default remains 16k). Bigger page sizes will help to improve compression ratios (the bigger the page size, the more redundant bits), thus offering much improved data compression in conjunction with the new transparent page compression. Furthermore, bigger page sizes allow more “on page” or “inline” storage of BLOBs and large VARCHAR/TEXT fields, thus improving I/O performance when such fields are used.
  • High Priority Transactions in InnoDB (WL#6835) : This work implements high priority transactions within InnoDB, i.e. transactions that shall never be chosen to be aborted in a deadlock scenario. The motivation is to better support MySQL Group Replication, where a transaction cannot be aborted in one replica and committed in another.
  • ENSURE 5.7 SUPPORTS SMOOTH LIVE UPGRADE FROM 5.6 (WL#8350) : This work  ensures a smooth upgrade fom 5.6 to 5.7 without having to specify --skip-grant-tables as part of an intermediate step.
  • Move the plugin and servers tables from MyISAM to transactional storage (WL#7160) : This work makes InnoDB the default storage engine used for the plugin and server system tables (MyISAM remains optional).
  • Refactor low-level thread handling (WL#8190) : This work improves the low-level code for handling OS threads. For example, by harmonizing the APIs for Windows and non-Windows platforms (thread create & join).
  • Non-intrusive refactoring of the Security_context class code (WL#8048) : This work by refactors the Security_context code to ensure proper data encapsulation.
  • DTrace Support (WL#7894) : We have added full Dtrace support to MySQL in the Server 5.6+ packages we ship for Oracle Linux 6+.
  • Update_time for InnoDB Tables (WL#6658) : This work implements in-memory maintenance of UPDATE_TIME for InnoDB tables. This functionality was previously missing in InnoDB and people have been asking for it, see Bug#2681 reported by Phil Sladen.
  • TRUNCATE TABLE Statement Becomes Atomic (WL#6501) : This work makes the internal InnoDB TRUNCATE TABLE statement atomic by reinitializing the original table-space header with the same space id and then physically truncating its .ibd file during the truncation of a single table tablespace.
  • Proper Connection ID Handling (WL#7293) : This work avoids the attempted reuse of any connection IDs that are still being used. See also Bug#44167 reported by Jan Kneschke.
  • GB 18030 Chinese Character Set Support (WL#4024) : This work adds the MySQL character set GB18030, which supports the China National Standard GB 18030 character set.

The above does not include a description of deprecations and removals, neither of changes we made to system defaults. These are candidates for a follow up blog post.

That’s it for now, and thank you for using MySQL!


PlanetMySQL Voting: Vote UP / Vote DOWN

MySQL Performance: Pushing yet more far scalability limits with MySQL 5.7

$
0
0

MySQL 5.7-RC1 is available now since the last week and you may find a lot about all the new improvement coming from our Team Blog and many other blog posts on this site as well. While in this article I'll just mention that with MySQL 5.7 all scalability limits are going more and more far! -- it's not that we resolved all of them, no, just that we become better and better ;-)

And one of the huge win coming now with MySQL 5.7-RC1 is that for the first time ever we're getting the same performance levels on a single hot table as on several tables used in parallel!

Here is the Max QPS result on the Sysbench RO Point-Select workload with 8-tables running on 40cores-HT server :

And here is the same load, but bombarding only one single table :

Now a full Sysbench OLTP_RO workload on 8-tables :

And on 1-table :

The story is pretty fun here, and I'll tell it in its full version (and many other "fun" stories) this afternoon (1:20pm) during my talk at Percona Live'15:
- http://www.percona.com/live/mysql-conference-2015/sessions/mysql-57-performance-scalability-benchmarks

Slides will be available then soon as well.

What to add.. - MySQL 5.7 really rocks!! kudos MySQL Team! ;-)

Rgds,
-Dimitri


PlanetMySQL Voting: Vote UP / Vote DOWN

Percona Toolkit 2.2.14 is now available

$
0
0

Percona ToolkitPercona is pleased to announce the availability of Percona Toolkit 2.2.14.  Released April 14, 2015. Percona Toolkit is a collection of advanced command-line tools to perform a variety of MySQL server and system tasks that are too difficult or complex for DBAs to perform manually. Percona Toolkit, like all Percona software, is free and open source.

This release is the current GA (Generally Available) stable release in the 2.2 series. It includes multiple bug fixes for pt-table-checksum with better support for Percona XtraDB Cluster, various other fixes, as well as continued preparation for MySQL 5.7 compatibility. Full details are below. Downloads are available here and from the Percona Software Repositories.

New Features:

  • pt-slave-find can now resolve the IP address and show the slave’s hostname. This can be done with the new --resolve-address option.
  • pt-table-sync can now ignore the tables whose names match a specific Perl regex with the new --ignore-tables-regex option.

Bugs Fixed:

  • Fixed bug 925781: Inserting non-BMP characters into a column with utf8 charset would cause the Incorrect string value error when running the pt-table-checksum.
  • Fixed bug 1368244: pt-online-schema-change --alter-foreign-keys-method=drop-swap` was not atomic and thus it could be interrupted. Fixed by disabling common interrupt signals during the critical drop-rename phase.
  • Fixed bug 1381280: pt-table-checksum was failing on BINARY field in Primary Key. Fixed by implementing new --binary-index flag to optionally create checksum table using BLOB data type.
  • Fixed bug 1421405: Running pt-upgrade against a log with many identical (or similar) queries was producing repeated sections with the same fingerprint.
  • Fixed bug 1402730: pt-duplicate-key-checker was not checking for duplicate keys when --verbose option was set.
  • Fixed bug 1406390: A race condition was causing pt-heartbeat to crash with sleep argument error.
  • Fixed bug 1417558: pt-stalk when used along with --collect-strace didn’t write the strace output to the expected destination file.
  • Fixed bug 1421025: Missing dependency for perl-TermReadKey RPM package was causing toolkit commands to fail when they were run with --ask-pass option.
  • Fixed bug 1421781: pt-upgrade would fail when log contained SELECT...INTO queries. Fixed by ignoring/skipping those queries.
  • Fixed bug 1425478: pt-stalk was removing non-empty files that were starting with an empty line.
  • Fixed bug 1419098: Fixed bad formatting in the pt-table-checksum documentation.

Details of the release can be found in the release notes and the 2.2.14 milestone at Launchpad. Bugs can be reported on the Percona Toolkit launchpad bug tracker.

The post Percona Toolkit 2.2.14 is now available appeared first on MySQL Performance Blog.


PlanetMySQL Voting: Vote UP / Vote DOWN

Tokutek now part of the Percona family

$
0
0

It is my pleasure to announce that Percona has acquired Tokutek and will take over development and support for TokuDB® and TokuMX™ as well as the revolutionary Fractal Tree® indexing technology that enables those products to deliver improved performance, reliability and compression for modern Big Data applications.

At Percona we have been working with the Tokutek team since 2009, helping to improve performance and scalability. The TokuDB storage engine has been available for Percona Server for about a year, so joining forces is quite a natural step for us.

Fractal Tree indexing technology—developed by years of data science research at MIT, Stony Brook University and Rutgers University—is the new generation data structure which, for many workloads, leapfrogs traditional B-tree technology which was invented in 1972 (over 40 years ago!).  It is also often superior to LSM indexing, especially for mixed workloads.

But as we all know in software engineering, an idea alone is not enough.  There are hundreds of databases which have data structures based on essentially the same B-Tree idea, but their performance and scalability differs dramatically. The Tokutek engineering team has spent more than 50 man years designing, implementing and polishing this technology, which resulted  (in my opinion) in the only production-ready Open Source transactional alternative to the InnoDB storage engine in the MySQL space – TokuDB; and the only viable alternative distribution of MongoDB  – TokuMX.

Designed for Modern World –  TokuDB and TokuMX were designed keeping in mind modern database workloads, modern hardware and modern operating system properties which allowed for much more clean and scalable architecture, leading to great performance and scalability.

Compression at Speed  – As part of it, compression was an early part of design, so a very high level of compression can be achieved with low performance overhead. In fact, chances are with fast compression you will get better performance with compression enabled.

Great Read/Write Balance  – You find databases (or storage engines) are often classified into read optimized and write optimized, and even though you most likely heard about much better insert speed with Fractal Tree indexing, both for MySQL and MongoDB  you may not know that this is achieved with Read performance being in the same ballpark or better for many workloads. The difference is just not so drastic.

Multiple Clustered Keys  –  This is a great feature, which together with compression and low cost index maintenance, allows  TokuDB and TokuMX to reach much better performance for performance critical queries by clustering the data needed by such query together.

Messages    – When we’re speaking about conventional data structure such as B-trees or Hash tables, it is essentially a way data is stored and operations are being performed in it.  Fractal Tree indexing operates with a different paradigm which is focused around “Messages” being delivered towards the data to perform operations in questions.  This allows it to do a lot of clever stuff, such as implement more complex operations with the same message,  merge multiple messages together to optimize performance and use messages for internal purposes such as low overhead online optimization, table structure changes etc.

Low Overhead Maintenance  –  One of obvious uses of such Messages is  Low Overhead Maintenance.  The InnoDB storage engine allows you to add column “online,” which internally requires a full table rebuild, requiring a lot of time and resources for copy of the table.  TokuDB however, can use “broadcast message” to add the column which will become available almost immediately and will gradually physically propagate when data is modified. It is quite a difference!

Smart No-Read Updates –  Messages allow you to do smart complex updates without reading the data, dramatically improving performance.  For example this is used to implement “Read Free Replication”

Optimized In Memory Data Structures –  You may have heard a lot about in-memory databases, which are faster because they are using data structure optimized for properties on memory rather just caching the pages from disk, as, for example,  MyISAM and InnoDB do.   TokuDB and  TokuMX offer you the best of both worlds  by using memory optimized data structures for resident data and disk optimized data structures when data is pushed to disk.

Optimized IO  –  Whether you’re using legacy spinning media or Solid State Storage you will appreciate TokuDB having optimized IO – doing less and more sequential IO which helps spinning media performance, as well as dramatically reducing wear on flash, so you can improve longevity for your media or use lower cost storage.

Between the Tokutek engineering team and Percona we have a lot of ideas on how to take this technology even further, so it is the technology of choice for large portions of modern database workloads in the MySQL and MongoDB space. We are committed to working together to advance the limits of Open Source databases (relational or not)!

Interested to check out whether TokuDB or TokuMX is right for your application? Please contact us at tokutek@percona.com.

The post Tokutek now part of the Percona family appeared first on MySQL Performance Blog.


PlanetMySQL Voting: Vote UP / Vote DOWN

Team Tokutek is proud to join Team Percona!

$
0
0

If you haven’t already heard, on the Tuesday morning of the 2015 Percona Live MySQL Conference and Expo it was announced that Tokutek is now part of the Percona family.  This means TokuDB® for MySQL, and TokuMX™ for MongoDB are Percona products now; and that the Tokutek  team is now part of the Percona team.

Percona’s well-deserved reputation for unparalleled customer service and support in the MySQL market makes them the perfect home for Tokutek’s ground-breaking products.  And with the Tokutek acquisition, Percona can expand and extend their activities and offerings into the MongoDB market.

This is a win/win for NoSQL and MySQL fans alike.

More About Tokutek

Tokutek is the company that productized a new and revolutionary form of database indexing designed specifically for modern, Big Data applications.  Based on data science research on new methods for high-performance data processing for data sets that no longer fit in memory, Fractal Tree® indexing is the secret sauce inside TokuDB and TokuMX.

Unlike the 40-year-old B-tree indexing found in other MySQL and MongoDB solutions, Fractal Tree indexing enables: up to 50x better performance; as much as 90% data compression; and 95% better write-optimization.  That translates into significant customer satisfaction gains as well as major cost savings.

In addition, drawing upon their experience in the MySQL world, Tokutek developers introduced full ACID and MVCC transaction compliance, better concurrency, and an improved failover protocol to the MongoDB marketplace with TokuMX. And that means better reliability for mission-critical big data applications built with MongoDB.

Next Steps

The Tokutek team is very excited to be joining the Percona team as we move into the next phase of growth on the MySQL and NoSQL market.

For now, if you want to learn more about TokuDB and TokuMX please visit www.tokutek.com.  (In the coming weeks, the Tokutek site will be folded into the Percona site.)

If you want to strike up a conversation about enterprise subscriptions for either product drop us a line at tokutek@percona.com.

Regards,
Craig Clark
Vice President, Percona Sales

The post Team Tokutek is proud to join Team Percona! appeared first on MySQL Performance Blog.


PlanetMySQL Voting: Vote UP / Vote DOWN

Why Percona Acquired Tokutek: by Peter Zaitsev

$
0
0

It is my pleasure to announce that Percona has acquired Tokutek and will take over development and support for TokuDB® and TokuMX™ as well as the revolutionary Fractal Tree® indexing technology that enables those products to deliver improved performance, reliability and compression for modern Big Data applications.

At Percona we have been working with the Tokutek team since 2009, helping to improve performance and scalability. The TokuDB storage engine has been available for Percona Server for about a year, so joining forces is quite a natural step for us.

Fractal Tree indexing technology—developed by years of data science research at MIT, Stony Brook University and Rutgers University—is the new generation data structure which, for many workloads, leapfrogs traditional B-tree technology which was invented in 1972 (over 40 years ago!).  It is also often superior to LSM indexing, especially for mixed workloads.

But as we all know in software engineering, an idea alone is not enough.  There are hundreds of databases which have data structures based on essentially the same B-Tree idea, but their performance and scalability differs dramatically. The Tokutek engineering team has spent more than 50 man years designing, implementing and polishing this technology, which resulted  (in my opinion) in the only production-ready Open Source transactional alternative to the InnoDB storage engine in the MySQL space – TokuDB; and the only viable alternative distribution of MongoDB  – TokuMX.

Designed for Modern World -  TokuDB and TokuMX were designed keeping in mind modern database workloads, modern hardware and modern operating system properties which allowed for much more clean and scalable architecture, leading to great performance and scalability.

Compression at Speed  - As part of it, compression was an early part of design, so a very high level of compression can be achieved with low performance overhead. In fact, chances are with fast compression you will get better performance with compression enabled.

Great Read/Write Balance  – You find databases (or storage engines) are often classified into read optimized and write optimized, and even though you most likely heard about much better insert speed with Fractal Tree indexing, both for MySQL and MongoDB  you may not know that this is achieved with Read performance being in the same ballpark or better for many workloads. The difference is just not so drastic.

Multiple Clustered Keys  -  This is a great feature, which together with compression and low cost index maintenance, allows  TokuDB and TokuMX to reach much better performance for performance critical queries by clustering the data needed by such query together.

Messages    – When we’re speaking about conventional data structure such as B-trees or Hash tables, it is essentially a way data is stored and operations are being performed in it.  Fractal Tree indexing operates with a different paradigm which is focused around “Messages” being delivered towards the data to perform operations in questions.  This allows it to do a lot of clever stuff, such as implement more complex operations with the same message,  merge multiple messages together to optimize performance and use messages for internal purposes such as low overhead online optimization, table structure changes etc.

Low Overhead Maintenance  –  One of obvious uses of such Messages is  Low Overhead Maintenance.  The InnoDB storage engine allows you to add column “online,” which internally requires a full table rebuild, requiring a lot of time and resources for copy of the table.  TokuDB however, can use “broadcast message” to add the column which will become available almost immediately and will gradually physically propagate when data is modified. It is quite a difference!

Smart No-Read Updates -  Messages allow you to do smart complex updates without reading the data, dramatically improving performance.  For example this is used to implement “Read Free Replication

Optimized In Memory Data Structures –  You may have heard a lot about in-memory databases, which are faster because they are using data structure optimized for properties on memory rather just caching the pages from disk, as, for example,  MyISAM and InnoDB do.   TokuDB and  TokuMX offer you the best of both worlds  by using memory optimized data structures for resident data and disk optimized data structures when data is pushed to disk.

Optimized IO  –  Whether you’re using legacy spinning media or Solid State Storage you will appreciate TokuDB having optimized IO – doing less and more sequential IO which helps spinning media performance, as well as dramatically reducing wear on flash, so you can improve longevity for your media or use lower cost storage.

Between the Tokutek engineering team and Percona we have a lot of ideas on how to take this technology even further, so it is the technology of choice for large portions of modern database workloads in the MySQL and MongoDB space. We are committed to working together to advance the limits of Open Source databases (relational or not)!

Interested to check out whether TokuDB or TokuMX is right for your application? Please contact us at tokutek@percona.com.

The post Why Percona Acquired Tokutek: by Peter Zaitsev appeared first on Tokutek.


PlanetMySQL Voting: Vote UP / Vote DOWN

Percona Live Presentation: Improving Performance With Better Indexes

$
0
0

The slides for my Improving Performance With Better Indexes presentation at Percona Live 2015 MySQL Conference and Expo are now available.

In this presentation I discuss how to identify, review and analyze SQL statements in order to create better indexes for your queries. This includes understanding the EXPLAIN syntax and how to create and identify covering and partial column indexes.

This presentation is based on the work with a customer showing the 95% improvement of a key 15 table join query running 15,000 QPS in a 25 billion SQL statements per day infrastructure.

As mentioned, Explaining the MySQL Explain is an additional presentation that goes into more detail for learning how to read Query Execution Plans (QEP) in MySQL.


PlanetMySQL Voting: Vote UP / Vote DOWN

Deep Dive Into How To Monitor MySQL or MariaDB Galera Cluster - Live Webinar April 21st

$
0
0

MySQL provides hundreds of status counters, but how do you make sense of all that monitoring data? 

If you’re in Operations and your job is to monitor the health of MySQL/MariaDB Galera Cluster or Percona XtraDB Cluster, then this webinar is for you. Setting up a Galera Cluster is fairly straightforward, but keeping it in a good shape and knowing what to look for when it’s having production issues can be a challenge.

Status counters can be tricky to read … 

  • Which of them are more important than others? 
  • How do you find your way in a labyrinth of different variables? 
  • Which of them can make a significant difference? 
  • How might a host’s health impact MySQL performance?
  • How to identify problematic nodes in your cluster?

To find out more, please register for this new live webinar.

When: Tuesday April 21st
Who: Krzysztof Książek, Senior Support Engineer, Severalnines
Where: 

Join our colleague Krzysztof Książek for this deep-dive session. Krzysztof is a MySQL DBA with experience managing complex database environments for companies like Zendesk, Chegg, Pinterest and Flipboard. This webinar builds upon recent blog posts by Krzysztof on OS and database monitoring.

Register for the webinar

mag_glass_ccui.PNG


Blog category:


PlanetMySQL Voting: Vote UP / Vote DOWN

MaxScale Binlog Server HOWTO: Operations (including Chaining)

$
0
0
In the Install and Configure HOWTO, we learned how to install and configure a MaxScale Binlog Server.  In this HOWTO, I will present the common operations that you might need to perform when using this software.  Those operations include:
  • Purging Binary Logs,
  • Chaining Binlog Servers,
  • Saving Binary Log Files in the Non-Default Directory,
  • Downloading Binary Logs other than First,
  • Listing Connected Slaves,
  • Disconnecting one or all Slaves,
  • Differentiating a MaxScale from a MySQL Server,
  • Getting More Information about Slaves (and more),
  • Recovering After a Crash.

    Purging Binary Logs


    There is no build-in mechanism to purge/expire binary logs from the MaxScale Binlog Router.  You need to write a cron job for that.


    Chaining Binlog Servers


    Chaining Binlog Server is essential to many scenario presented in the original Binlog Server article.  In the Install and Configure HOWTO, we learn how to configure the following replication topology:
    -----     / \     -----
    | A | -> / X \ -> | B |
    ----- ----- -----
    From this, you should be able to build the following topology.  You will need it for the rest of this section, so start by setting it up in your environment.
    -----
    | A |
    -----
    |
    +---------+
    | |
    / \ / \
    / X \ / Y \
    ----- -----
    | |
    ----- -----
    | B | | C |
    ----- -----
    I will now describe how to go from the topology above to the topology below.
    -----
    | A |
    -----
    |
    / \ / \
    / X \ --> / Y \
    ----- -----
    | |
    | |
    ----- -----
    | B | | C |
    ----- -----
    It is actually very simple (but there is a trap explained in the next paragraph): once you have both X and Y replicating from A, you only have to edit the configuration file replacing A by X and restart MaxScale on Y.

    However, do not try to skip the step of making Y replicating from A.  If you skip that step, you will not be able to bootstrap a Binlog Router.  The reason bootstrapping a Binlog Router replicating from another Binlog Router does not work is that MaxScale does not know how to serve the user list to a client.  Remember that MaxScale needs to authenticate client connections and to do so, it downloads the user list from the master.  As MaxScale does not know how to serve this list, if you try to initialize Y replicating from X, Y will not be able to learn the user list from X and will not be able to accept client connections.

    This allows me to introduce the notion of the Binlog Router cache.  You might have realized that there is a .cache directory under /usr/local/mariadb-maxscale/Binlog_Service/.  This cache directory stores all the information the MaxScale Binlog Router needs to serve client without being connected to the master.  Without that cache, if the MaxScale Binlog Router is not able to connect to the master, it cannot serve client as it does not know:
    • the version of the master,
    • the server-id of the master,
    • the UUID of the master,
    • max_allowed_packet from the master,
    • the user list from the master,
    • and many others.
    So this cache is very useful, including for chaining: as Y is not able to get the user list from X, it authenticates client connection using its cache.  However, it brings a small problem: if a new user is created on A while Y is replicating from X, Y will not be able to learn the existence of this new user (X will learn its existence as it will regularly refresh its user list, including when an unknown user establishes a connection).  To avoid this problem, Y should be connected back to A regularly to refresh its cache (or when new users are created on the master).

    Saving Binary Log Files in the Non-Default Directory


    As previously discussed, the binary logs from the master are saved by default in the directory /usr/local/mariadb-maxscale/Binlog_Service.  This directory name correspond to the Binlog Router section in the MaxScale configuration file ([Binlog_Service] in our case) and its location correspond to the MAXSCALE_HOME environment variable set in the /etc/init.d/maxscale script (/usr/local/mariadb-maxscale in our case).

    If you do not want to store your binary logs in this directory, you can create a symbolic link pointing to your favorite directory.  Those commands in bash will move the binary log directory in /var/lib/maxscale/my_binlogs/:
    sudo service maxscale stop;
    sudo mkdir /var/lib/maxscale;
    cd /usr/local/mariadb-maxscale/;
    sudo mv Binlog_Service /var/lib/maxscale;
    sudo mv /var/lib/maxscale/{Binlog_Service,my_binlogs};
    sudo ln -s /var/lib/maxscale/my_binlogs Binlog_Service;
    sudo service maxscale start;
    Even if the symbolic link trick works well, it is not elegant.  A nicer solution is a router parameter, called binlogdir.  By adding the following at the end of the router_options line, we should get the same result as the symbolic link trick (the coma is important):
    ,binlogdir=/var/lib/maxscale/my_binlogs
      However, there is a known bug with binlogdir around the .cache directory (the cache directory is explained above).  This bug is that the MaxScale Binlog Router does not use the parameter binlogdir for creating the cache directory: this directory is always created in the default location like if binlogdir was not set.  This should be fixed in a future version.

      Downloading Binary Logs other than First


      By default, the MaxScale Binlog Router starts downloading binary logs from file # 1.  However, if this file does not exist on the master or if starting at this file is not suitable (lot of binary logs files and we are in a hurry), the default must be modified.  In the Install and Configure HOWTO, we saw how to use the initialfile router option.  However, an initial file number is not something that should stay in a configuration file (it will not make sense in 6 months from now) and if you want to avoid editing the configuration file after bootstrapping MaxScale, there is a more elegant way.

      This other way relies on the startup behavior of the Binlog Router: on initialization, the binary log directory is scanned for the latest binary log file: the resulting file number and size are used to start downloading the binary logs from the master.  By putting the right file in the binary log directory before starting MaxScale, we trick the router to download the file we want.  However, you should not put an empty binary log file there as MaxScale will try downloading this file at position zero from the master, which does not make sense.

      A binary log file start by 4 bytes (magic number) and those are never requested from a master.  So the solution consists in creating a 4 bytes file with the right content.  You can do so using the following command:
      xxd -r <<< "0000000: fe62 696e" > $your_binlog_file;
      To convince you from the validity of this solution, you can run the following on any existing binary log file on the master:
      head -c 4 $an_existing_binlog_file | xxd;

      Listing Connected Slaves


      To get the list of slaves connected on a MaxScale Binlog Server, you can connect to MaxScale using the MySQL client and issue the command "SHOW SLAVE HOSTS;":
      # Edit the below line.
      maxscale="<hostname or ip address of maxscale>";
      cmd="SHOW SLAVE HOSTS;";
      mysql -h $maxscale -u repl -pslavepass <<< "$cmd";
      Note: if 127.0.0.1 or localhost does not work for the variable maxscale above, try the complete IP address of the server as returned by the following command:
      maxscale="$(ip a s dev eth0 | grep "inet " |
      awk '{print $2}' | cut -d "/" -f 1)";
      or, to be able to user 127.0.0.1 with MaxScale, add the following line after the line router=binlogrouter in the MaxScale configuration file:
      localhost_match_wildcard_host=1

      Disconnecting one or all Slaves


      Disconnecting one, some, or all slaves from a MaxScale Binlog Server might be useful in some situations.  The use-case I have in mind is the following:
      • two MaxScale Binlog Servers are deployed (X and Y),
      • both MaxScale Binlog Servers are replicating from the same master,
      • slaves are connecting to MaxScale using a DNS entry including both IP addresses (X and Y).
      This way, if one of X or Y fails, the slaves will reconnect to the other thanks to DNS.  (Note that you can achieve the same result with 2 lines in the /etc/hosts file with different IP addresses but with the same hostname.)

      In the situation described above, after a failure (or a restart) of a MaxScale, all the slaves are connected to the same Binlog Server.  This is not a problem in itself but one might want to rebalance the load on the 2 nodes.  To do that, the command "DISCONNECT ALL;" can be issued on a MaxScale using the MySQL client (see the previous section for an example of running a command on a MaxScale using the MySQL client ).

      It is also possible to disconnect a single slave running the command "DISCONNECT SERVER <server-id>;".

      Note that for MaxScale 1.1.0, there is no GRANT management for the DISCONNECT command.  Anybody able to connect to MaxScale will be able to disconnect slaves.  It should be improved in a next version.

      Differentiating a MaxScale Binlog Server from a MySQL Server


      When using automation (or a MySQL client), it could be useful to know if you are connected to a MaxScale Binlog Router or a "standard" MySQL Server.  For that, you can issue the command "SHOW VARIABLES LIKE 'MAXSCALE%';".

      A MySQL Server does not return any lines to that command but a MaxScale Binlog Router returns a line with the MaxScale version:
      > $ mysql -h 127.0.0.1 -u repl -pslavepass \
      > 2> /dev/null <<< "SHOW VARIABLES LIKE 'MAXSCALE%';";
      > Variable_name value
      > MAXSCALE_VERSION 1.1.0
      Note that the Binlog Router is not very flexible in the syntax of this command: you must run exactly "SHOW VARIABLES LIKE 'MAXSCALE%';", all letters mush match without error.  Adding an underscore after MAXSCALE or removing the last E will return an error.

      Getting More Information about Slaves (and more)


      Sometimes, the list of slaves (SHOW SLAVE HOSTS;) or the download position of MaxScale in the master binary logs (ls -l /usr/local/mariadb-maxscale/Binlog_Service) is not enough.  Then, you must use on the administration interface of MaxScale to get more information.  Running the following command will show you probably more information that you need:
      /usr/local/mariadb-maxscale/bin/maxadmin \
      -pmariadb show services;
      Replacing "show services" by "help" will give you all the possible commands of the administration interface.  Read the MaxScale documentation for more information.

      Using a password on the command line (-pmariadb, the default password for the administration interface) is not very nice.  You can put that password in a .maxadmin file in your home directory:
      printf "passwd=mariadb" > ~/.maxadmin;
      /usr/local/mariadb-maxscale/bin/maxadmin show services;

      Recovering After a Crash


      As presented in the Install and Configure HOWTO, the MaxScale Binlog Router is not crash-safe.  On startup, the module scans the binary log directory and starts downloading binary log from the master at the most recent file and at the position corresponding to the size of that file.  If the size of the file is not align to a binary log event (partial write before a crash), things will go wrong.

      There are 3 solutions to that, listed below in order if increasing complexity.  One of them should to be applied after a crash (a crash is easy to detect, see further down):
      1. Delete the latest binary log file,
      2. Truncate the latest binary log file to 4 bytes,
      3. Truncate the latest binary log file at the position of the last complete event.
      With solution # 1, the Binlog Router will try downloading the binary log from the master at the size of the the previous binary log file.  This will lead to the creation of the next file.  The drawback of this solution is that if MaxScale is crashing often, we might drop all our binary logs one after the other, which would be bad.

      The solution # 2 is the one I am using at the moment.  As presented above, the 4 first bytes of a binary log file is a magic number identifying the file as a MySQL binary log.  By truncating the file at this position, you are guaranty to be aligned with an event: the next restart of MaxScale will redownload this file from the beginning.  But if you have large binary log files, this might waist bandwidth (which I am willing to accept at this time for simplicity).

      The solution # 3 is the smartest: using mysqlbinlog, one can find the ending position of the last complete event in a binary log file.  Truncating the file at this position will minimize bandwidth usage.

      But how can we know that MaxScale crashed ?  Easy: when MaxScale starts, it creates a sub-directory in /usr/local/mariadb-maxscale/data/, and it deletes that directory when it stops cleanly.  So if /usr/local/mariadb-maxscale/data/ is not empty, it means that MaxScale was not cleanly stopped and that Binlog Router crash recovery must be applied.

      The Binlog Router crash recovery is not yet included in the current implementation: a startup script must take care of that.  This might make its way in a future release of the Binlog Router.


      We are now done with presenting the common operations on a MaxScale Binlog Server.  I hope this helps.

      Known Issues:

      • The Binlog Router does not serve GRANTs: bug number to come soon... (until implemented, connect your chained Binlog Router with the upstream master regularly),
      • Parameter binlogdir does not work with cache: bug number to come soon... (until fixed, use the symbolic link trick),
      • The Binlog Router does not handle zero size binlog file: bug number to come soon... (until implemented, use the 4 bytes file creation trick with xxd),
      • Manage Grants for DISCONNECT command: bug number to come soon...
      • The Binlog Router is not crash-safe:  bug number to come soon... (until implemented, do manual crash recovery as described above).

      PlanetMySQL Voting: Vote UP / Vote DOWN
      Viewing all 18842 articles
      Browse latest View live


      <script src="https://jsc.adskeeper.com/r/s/rssing.com.1596347.js" async> </script>