Quantcast
Channel: Planet MySQL
Viewing all 18797 articles
Browse latest View live

MaxScale Binlog Server HOWTO: POC for Master Promotion without Touching any Slave

$
0
0
Note: DO NOT use this procedure in production, this is a proof of concept (POC).  MaxScale 1.1.0 does not yet fully support that procedure and things could go wrong in some situations (see at the end of the post for the details).

In my talk at PLMCE 2015, I presented an architecture to promote a slave as a new master without touching any other slave and I claimed that I tested it.  This HOWTO will show you how I did my test so you are able to reproduce my results.

In the Install and Configure HOWTO, we learn how to configure the following replication topology:
-----     / \     -----
| A | -> / X \ -> | B |
----- ----- -----
From this, you should be able to build the topology below.  You will need it for the rest of this HOWTO, so start by setting it up in your environment.  Make sure that:
  • binary logging is enabled everywhere: log-bin=binlog,
  • log-slave-updates is disabled everywhere,
  • the replication user 'repl'@'%' exists on all nodes with its password being slavepass,
  • the user 'repl'@'%' has the right GRANTs for accepting a MaxScale connection (search "user list" in Install and Configure HOWTO for more details).
-----
| A |
-----
|
+-------------+
| |
/ \ / \
/ X \ / Y \
----- -----
| |
+------+ |
| | |
----- ----- -----
| B | | C | | D |
----- ----- -----
From the replication topology above, we will simulate a failure of A when X and Y are not at the same position downloading binary logs.  Then, we will level the Binlog Servers, the slaves will follow, and we will finally promote C as the new master.

First, make sure that the binary log number on A is ahead of the binary logs on B, C and D.  You can achieve that by running "FLUSH BINARY LOGS;" a few times on A.  The promotion of C as the new master will only work if C is behind A in its binary log numbering.  This constraint is not unrealistic as C should never write to its binary log (log-slave-updates disabled).

Once the binary log constraint above is met, run some transactions on A:
# On A in a MySQL client session.
CREATE DATABASE test_mbls;
CREATE TABLE test_mbls.t1
(user BIGINT PRIMARY KEY, pass BIGINT DEFAULT NULL);
INSERT INTO test_mbls.t1 VALUES (1, 0);
INSERT INTO test_mbls.t1 VALUES (2, 0);
INSERT INTO test_mbls.t1 VALUES (3, 0);
Make sure all those transactions are replicated to all slaves by running "SELECT * from test_mbls.t1;".

Then, to simulate that Y is ahead of X, stop MaxScale on X and insert two new rows on A:
# On X in bash.
sudo service maxscale stop;

# On A in a MySQL client session.
INSERT INTO test_mbls.t1 VALUES (4, 0);
INSERT INTO test_mbls.t1 VALUES (5, 0);
At this point, D has all rows, and B and C are missing the last 2 rows.

Now, let's start the fun part: kill MySQL on a A:
# On A in bash.
sudo killall -9 mysqld_safe;
sudo killall -9 mysqld;
We are now in this situation with Y ahead of X:
-\-/-
| A |
-/-\-

/ \ / \
/ X \ / Y \
----- -----
| |
+------+ |
| | |
----- ----- -----
| B | | C | | D |
----- ----- -----
To promote a new master, we must first level the slaves by chaining X to Y.  This operation is explained in the Operations HOWTO.   Once done, all the slaves should eventually be leveled.  This might take a few seconds as B and C were disconnected from X when it was restarted (needed for chaining).  In a future version, this restart will not be needed, the slaves will stay connected, and they will level much quicker.  After chaining, we are in the following situation:
-\-/-
| A |
-/-\-

/ \ / \
/ X \ <------ / Y \
----- -----
| |
+------+ |
| | |
----- ----- -----
| B | | C | | D |
----- ----- -----
Once the slaves are leveled (at least C as we want it as our new master), do the following on C:
  1. run "SHOW MASTER LOGS;" to get the binary log filename,
  2. then run enough "FLUSH BINARY LOGS;" to get one file further than the last binary log available on X and Y,
  3. then run "STOP SLAVE; RESET SLAVE ALL;" to drop all replication configuration from C,
  4. and then run "PURGE BINARY LOGS BEFORE NOW();" to forget all binary logs on C that would exist/conflict on X and Y.
At this point, C is the new node for writes (master but without slaves) and you can begin to insert/update/delete data on it.  Let's run:
# On C in a MySQL client session.
INSERT INTO test_mbls.t1 VALUES (6, 0);
DELETE FROM test_mbls.t1 WHERE user = 3;
Those changes are now in the binary logs of C but nowhere else.  We need to make both MaxScale Binlog Server replicate from C.  Do the following on both X and Y:
  • sudo service maxscale stop
  • Edit the MaxScale configuration file to replicate from C but DO NOT start MaxScale yet.
  • Create, in the binary log directory, a new 4 bytes binary log file with the name of the first binary log available on C (the next file in the sequence of binary logs):
    xxd -r <<< "0000000: fe62 696e" > $right_binlog_file
  • Make sure the new binary log file has the right ownership and permissions (the same as the other binary log files).
  • sudo service maxscale start
At this point, both MaxScale should start downloading binary logs from C and after B and D reconnect to their Binlog Server, they will get the changes from C.

Bingo ! we did a master failover without touching any slave except the new master and reconfiguring the Binlog Servers !  We now have this fully working topology:
-\-/-  -----
| A | | C |
-/-\- -----
|
+------+------+
| |
/ \ / \
/ X \ / Y \
----- -----
| |
----- -----
| B | | D |
----- -----
No GTID required, log-slave-updates disabled everywhere, all the slaves replicating from the same binary logs, and only the good old file/offset replication (and the Binlog Server).

However, this is only a POC, some work must still be done on the Binlog Router implementation to avoid restarting MaxScale and manually putting files in the binary log directory.  Nonetheless, the most important thing is this works and we will be able to take advantage of it in production soon.

A last observation: this will only work if the latest binary log on the Binlog Servers ends at a transaction boundary.  In our example, we do not have partial transaction on X or Y.  If we have had those, things would have gone wrong.  To make sure this does not happen, the version of the Binlog Router implementing this failover mechanism needs to:
  • never serve binary log event downstream before having received the complete transaction,
  • be able to truncate its local binary log at the last completed transaction before creating the next binary log.
Those two should not be very difficult to implement.


    PlanetMySQL Voting: Vote UP / Vote DOWN

    MaxScale Binlog Server HOWTO: Install and Configure

    $
    0
    0
    MaxScale 1.1.0 is out and includes the new Binlog Server module.  This is the first post in s series of three.  The two others are about Operations and High Availability.  The links to the 2 other posts are at the end of this page.

    In this post, I present how to install and configure MaxScale as a Binlog Server using the Binlog Router plugin.

    This post assumes that you already have the replication topology below with:
    • the 2 nodes running MySQL 5.6 (I did tests with MySQL 5.6.24 using Amazon VMs),
    • binary logging enabled on both master (A) and slave (B): log-bin=binlog,
    • log-slave-updates DISABLED on both nodes,
    • the replication user 'repl'@'%' existing on both nodes with its password being slavepass.
    -----    -----
    | A | -> | B |
    ----- -----
    Our target is to obtain the following topology, with X as a MaxScale Binlog Server.
    -----     / \     -----
    | A | -> / X \ -> | B |
    ----- ----- -----
    I will go on the step by step operation to setup X.  I used an Amazon Linux VM of type t2.micro to prepare this HOWTO but it should work on any RHEL / CentOS / Fedora system (and it should be easy to extrapolate to Debian / Ubuntu, SLES / OpenSUSE or to a tarball installation).  At this point, I suppose that you already have root/sudo access to a server (or VM) that will be your future MaxScale Binlog Server (X above).

    First, install MaxScale 1.1.0 on X:
    • Follow the instructions in https://mariadb.com/my_portal/download/maxscale
      (You will need a MariaDB account do access this page.)
      (You might need to accept importing the Maxscale-GPG-KEY when running yum.)
      (If all fails, try to access the URL reported by yum and fix it in /etc/yum.repos.d/maxscale.repo.)
    Then, create the MaxScale configuration file from the template by running the following commands in bash (and make sure this file is not world readable as it will contain usernam and password to connect to your master):
    cd /usr/local/mariadb-maxscale/etc/;
    sudo cp MaxScale_BinlogServer_template.cnf MaxScale.cnf;
    sudo chmod og-rwx MaxScale.cnf;
    ls -l MaxScale.cnf;
    After creating the configuration file, it needs to be modified for your environment.  For that, in the same directory as above run sudo vi MaxScale.cnf (or your favorite text editor) and do the following modifications:
    • (No need to change the user and password, we are using the same as in the template),
    • Change version_string=5.6.15-log to version_string=5.6.24-log
      (MaxScale will advertise itself to the master as 5.6.24-log),
    • Change server-id=1000000000 to server-id=<a uniq server-id>
      (this is the server-id used by MaxScale to connect to the master; MaxScale will present itself to slaves using the server-id of the master),
    • Change filestem=mysql-bin to filestem=binlog
      (this is the basename of the binary log file to download from the master; it must be the same as what is configured on the master; and a prerequisite/simplification above is to configure all nodes with  log-bin=binlog),
    • In the [master] section, change address=master.example.com
      to address=<hostname or IP address of your master>
      ([master] is the servers option referenced in the [Binlog_Service] section which indicates the Binlog Router which master to download binary logs from),
    • In the [Binlog Listener] section, change port=5306 to port=3306
      (this section makes the link between the module/router section and network/listener layer and we want the MaxScale Binlog Router to listen on the same port as a standard MySQL).
    Then, modify the repl user to be used by MaxScale.  In addition to downloading binary logs from the master, MaxScale needs to download the list of users to authenticate client connections.  A different user can be used for that but I decide to use the same to simplify things and stick to the Binlog Server template configuration file .  If you want to use a different user, you can change the user and passwd options in the [Binlog_Service] section (not the one on the router_options line, this last one is used to download the binary logs from the master).  So on your master (A in the topology above), in a MySQL client session, run the three following commands to give access to the user list to MaxScale:
    GRANT SELECT ON mysql.user  TO 'repl'@'%';
    GRANT SELECT ON mysql.db TO 'repl'@'%';
    GRANT SHOW DATABASES ON *.* TO 'repl'@'%';
      Note: this will also update the user on the slave (a prerequisite above is to also have this user created on the slave: this will be needed in a next HOWTO).

      If your master still has the binary log file binlog.000001 on disk, you can start MaxScale right away.  If not, you must tell the Binlog Router at which file it must start downloading binary log files from the master.  There are two methods for that.  The more simple is to add ",initialfile=<binlog file number>" at the end of the router_options line in the MaxScale configuration file.  The other method is explained in the Operation HOWTO (link at the end of this article).  This option will be ignored when the binary log directory will contain binary logs files.

      You are now ready to start MaxScale by running:
      sudo service maxscale start;
        If MaxScale starts correctly:
        • a data directory should be created under /usr/local/mariadb-maxscale/,
        • Binlog_Service directory should be created under /usr/local/mariadb-maxscale/,
        • binary logs should be created in the Binlog_Service directory,
        • log files should be created in the directory /usr/local/mariadb-maxscale/log/.
        Check the logs (in /usr/local/mariadb-maxscale/log/) for scary messages.  Below are the messages you might have and the corresponding corrective actions:
        • Encrypted password file /usr/local/mariadb-maxscale/etc/.secrets can't be accessed (No such file or directory). Password encryption is not used.
          This is not a scary message, you can ignore it.
        • Error : Unable to get user data from backend database for service [Binlog_Service]. Missing server information.
          Binlog_Service: Master connection error '#HY000 Lost connection to backend server.' in state 'Timestamp retrieval', attempting reconnect to master
          Binlog_Service: Master mysql1 disconnected after 0 seconds. 0 events read.
          MySQL is not started on your master, or your configuration file does not hove the right address/port for your master.  If MySQL was not started on the master, restart MaxScale after starting MySQL to avoid falling in one of the pitfalls described below.
        • Error : Loading users for service [Binlog_Service] encountered error: [SELECT command denied to user 'repl'@'x.y.z.a' for table 'user'].
          Error : Unable to load users from 0.0.0.0:3306 for service Binlog_Service.
          Failed to start service 'Binlog_Service'.
          You missed the GRANT part on the master, read back above to add GRANTs to the repl user.
        • Packet length is 72, but event size is 1684829551, binlog file mysql-bin.000001 position 4 reslen is 72 and preslen is -1, length of previous event -1. No residual data from previous call
          Binlog_Service: Master mysql1 disconnected after 0 seconds. 1 events read.
          The MaxScale Binlog Router is not able to download the binary log file from the master: you probably have the wrong filestem or initialfile in the configuration file, see above.
        Once the logs are clean and MaxScale is running, you should see the binary logs from the master in the /usr/local/mariadb-maxscale/Binlog_Service directory.  To test that everything is working well, try the following in a MySQL client session on the master:
        CREATE DATABASE test_mbls;
        FLUSH BINARY LOGS;
        DROP DATABASE test_mbls;
          After each of those operations, the binary logs in the Binlog_Service directory should grow, rotate and grow again respectively.  And they should be exactly the same as on the master (you can run the command sha1sum on the binary log files to convince you of that; it will not work on the latest binary log file though as MySQL still has it opened on the master: do a FLUSH BINARY LOGS on the master before running sha1sum to avoid that).

          Once everything is working well with MaxScale, it is time to put a slave under the Binlog Server.  On a slave replicating from the master, run the following commands in bash (after setting the correct hostname/IP address for MaxScale):
          # Edit the line below.
          maxscale="<hostname or ip address of your maxscale>";

          sudo mysql <<< "STOP SLAVE;";
          sss=$(sudo mysql <<< "SHOW SLAVE STATUS\G");
          rmlf=$(printf "$sss" |
          awk '$1 == "Relay_Master_Log_File:"{print $2}');
          emlp=$(printf "$sss" |
          awk '$1 == "Exec_Master_Log_Pos:"{print $2}');
          cmd="CHANGE MASTER TO MASTER_HOST='$maxscale'";
          cmd="$cmd, MASTER_LOG_FILE='$rmlf'";
          cmd="$cmd, MASTER_LOG_POS=$emlp;";
          sudo mysql <<< "$cmd";
          sudo mysql <<< "START SLAVE;";
          That slave is now replicating from MaxScale.  You can verify this by running "SHOW SLAVE STATUS\G" and/or running some commands on the master (CREATE DATABASE ...; FLUSH BINARY LOGS; DROP DATABASE ...;) and checking their side effect on the slave.

          And you are done !  If you want your slave replicating back from the master, run the above bash commands using the hostname/IP address of the master in the maxscale variable.

          I hope you had fun trying the MaxScale Binlog Server and that you will test it more.  If you have any questions about this article, feel free to post a comment below.  If you have any questions about the MaxScale Binlog Router, you can send a mail to the MaxScale mailing list: maxscale@googlegroups.com.  If you find bugs in MaxScale, you can report them via JIRA.

          Other MaxScale Binlog Server HOWTOs:

          • MaxScale is running as root by default after yum install: bug number to come soon...
          • The Binlog Router is not crash-safe: bug number to come soon... (see the Operations HOWTO for a work-around),
          • If MySQL is stopped on the master when MaxScale is started, MaxScale will not download GRANTs after successfully connecting to the master: bug number to come soon... (to work around that bug, restart MaxScale after starting the master),
          • Configuring the Binlog Router to download a non-existing binlog file from the master lead to a connection storm to the master and to a log storm in MaxScale: bug number to come soon...
          • A CHANGE MASTER TO MaxScale without file and position triggers a log storm in MaxScale: bug number to come soon...

          PlanetMySQL Voting: Vote UP / Vote DOWN
          Checking table definition consistency with mysqldiff

          $
          0
          0

          Data inconsistencies in replication environments are a pretty common. There are lots of posts that explain how to fix those using pt-table-checksum and pt-table-sync. Usually we only care about the data but from time to time we receive this question in support:

          How can I check the table definition consistency between servers?

          Replication also allow us to have different table definition between master and slaves. For example, there are some cases that you need some indexes on slaves for querying purposes but are not really needed on the master. There are some other cases where those differences are just a mistake that needs to be fixed.

          mysqldiff, included in Oracle’s MySQL Utilities, can help us to find those differences and get the information we need to fix those them. In this post I’m going to show you how to use it with an example.

          Find table definition inconsistencies

          mysqldiff allows us to find those inconsistencies checking the differences between the tables on the same server (different databases) or on different servers (also possible on different databases). In this example I’m going to search for differences in table definitions between two different servers, server1 and server2.

          The command line is pretty simple. This is used to compare the tables on “test” database:

          mysqldiff --server1=user@host1 --server2=user@host2 test:test

          If the database name is different:

          mysqldiff --server1=user@host1 --server2=user@host2 testdb:anotherdb

          If the table name is different:

          mysqldiff --server1=user@host1 --server2=user@host2 testdb.table1:anotherdb.anothertable

          Now I want to check the table definition consistency between two servers. The database’s name is “employees”:

          # mysqldiff --force --server1=root:msandbox@127.0.0.1:21489 --server2=root:msandbox@127.0.0.1:21490 employees:employees
          # WARNING: Using a password on the command line interface can be insecure.
          # server1 on 127.0.0.1: ... connected.
          # server2 on 127.0.0.1: ... connected.
          # Comparing `employees` to `employees`                             [PASS]
          # Comparing `employees`.`departments` to `employees`.`departments`   [FAIL]
          # Object definitions differ. (--changes-for=server1)
          #
          --- `employees`.`departments`
          +++ `employees`.`departments`
          @@ -1,6 +1,6 @@
           CREATE TABLE `departments` (
             `dept_no` char(4) NOT NULL,
          -  `dept_name` varchar(40) NOT NULL,
          +  `dept_name` varchar(256) DEFAULT NULL,
             PRIMARY KEY (`dept_no`),
             UNIQUE KEY `dept_name` (`dept_name`)
           ) ENGINE=InnoDB DEFAULT CHARSET=latin1
          # Comparing `employees`.`dept_emp` to `employees`.`dept_emp`       [PASS]
          # Comparing `employees`.`dept_manager` to `employees`.`dept_manager`   [PASS]
          # Comparing `employees`.`employees` to `employees`.`employees`     [FAIL]
          # Object definitions differ. (--changes-for=server1)
          #
          --- `employees`.`employees`
          +++ `employees`.`employees`
          @@ -5,5 +5,6 @@
             `last_name` varchar(16) NOT NULL,
             `gender` enum('M','F') NOT NULL,
             `hire_date` date NOT NULL,
          -  PRIMARY KEY (`emp_no`)
          +  PRIMARY KEY (`emp_no`),
          +  KEY `last_name` (`last_name`,`first_name`)
           ) ENGINE=InnoDB DEFAULT CHARSET=latin1
          # Comparing `employees`.`salaries` to `employees`.`salaries`       [PASS]
          # Comparing `employees`.`titles` to `employees`.`titles`           [PASS]
          Compare failed. One or more differences found.

          There are at least two differences. One in departments table and another one in employees table. The output is similar to diff. By default the tool stops after finding the first difference. That’s why we use –force, to tell the tool to continue checking all the tables.

          It shows us that on departments the dept_name is varchar(40) on server1 and varchar(256) on server2. For “employees” table, it has a KEY (last_name, first_name) on the server2 that is not present on server1. Why is it taking server2 as a reference? Because of this line:

          # Object definitions differ. (--changes-for=server1)

          So, the changes shown on the diff are for server1. If you want server2 to be the one to be changed and server1 used as reference, then –changes-for=server2 would be needed.

          In some cases the diff output is not really useful. We actually need a SQL query to do the changes on the server. We just need to add –difftype=sql to the command line:

          # mysqldiff --force --difftype=sql --server1=root:msandbox@127.0.0.1:21489 --server2=root:msandbox@127.0.0.1:21490 employees:employees
          [...]
          # Comparing `employees`.`departments` to `employees`.`departments`   [FAIL]
          # Transformation for --changes-for=server1:
          ALTER TABLE `employees`.`departments`
            DROP INDEX dept_name,
            ADD UNIQUE INDEX dept_name (dept_name),
            CHANGE COLUMN dept_name dept_name varchar(256) NULL;
          [...]
          # Comparing `employees`.`employees` to `employees`.`employees`     [FAIL]
          # Transformation for --changes-for=server1:
          #
          ALTER TABLE `employees`.`employees`
            DROP PRIMARY KEY,
            ADD PRIMARY KEY(`emp_no`),
            ADD INDEX last_name (last_name,first_name);

          As we can see, the tool is not perfect. There are two problems here:

          1- On “departments table” it drops a UNIQUE key that is present in both servers only to add it again. Waste of time and resources.

          2- On “employees” table it drops and recreate the PRIMARY KEY, again something that is not needed a all.

          I have created a bug report but this also teaches us a good lesson. Don’t just copy and paste commands without first double checking it.

          What mysqldiff runs under the hood?

          Mostly queries on INFORMATION_SCHEMA. These are the ones used to check inconsistencies on departments:

          SHOW CREATE TABLE `departments`;
          SELECT TABLE_SCHEMA, TABLE_NAME, ENGINE, AUTO_INCREMENT, AVG_ROW_LENGTH, CHECKSUM, TABLE_COLLATION, TABLE_COMMENT, ROW_FORMAT, CREATE_OPTIONS
            FROM INFORMATION_SCHEMA.TABLES WHERE TABLE_SCHEMA = 'employees' AND TABLE_NAME = 'departments';
          SELECT ORDINAL_POSITION, COLUMN_NAME, COLUMN_TYPE, IS_NULLABLE,
                   COLUMN_DEFAULT, EXTRA, COLUMN_COMMENT, COLUMN_KEY
            FROM INFORMATION_SCHEMA.COLUMNS
            WHERE TABLE_SCHEMA = 'employees' AND TABLE_NAME = 'departments';
          SELECT PARTITION_NAME, SUBPARTITION_NAME, PARTITION_ORDINAL_POSITION,
                   SUBPARTITION_ORDINAL_POSITION, PARTITION_METHOD, SUBPARTITION_METHOD,
                   PARTITION_EXPRESSION, SUBPARTITION_EXPRESSION, PARTITION_DESCRIPTION
            FROM INFORMATION_SCHEMA.PARTITIONS
            WHERE TABLE_SCHEMA = 'employees' AND TABLE_NAME = 'departments';
          SELECT CONSTRAINT_NAME, COLUMN_NAME, REFERENCED_TABLE_SCHEMA,
                   REFERENCED_TABLE_NAME, REFERENCED_COLUMN_NAME
            FROM INFORMATION_SCHEMA.KEY_COLUMN_USAGE
            WHERE TABLE_SCHEMA = 'employees' AND TABLE_NAME = 'departments' AND
                  REFERENCED_TABLE_SCHEMA IS NOT NULL;
          SELECT TABLE_SCHEMA, TABLE_NAME, ENGINE, AUTO_INCREMENT, AVG_ROW_LENGTH, CHECKSUM, TABLE_COLLATION, TABLE_COMMENT, ROW_FORMAT, CREATE_OPTIONS
            FROM INFORMATION_SCHEMA.TABLES WHERE TABLE_SCHEMA = 'employees' AND TABLE_NAME = 'departments';
          SELECT ORDINAL_POSITION, COLUMN_NAME, COLUMN_TYPE, IS_NULLABLE,
                   COLUMN_DEFAULT, EXTRA, COLUMN_COMMENT, COLUMN_KEY
            FROM INFORMATION_SCHEMA.COLUMNS
            WHERE TABLE_SCHEMA = 'employees' AND TABLE_NAME = 'departments';
          SELECT PARTITION_NAME, SUBPARTITION_NAME, PARTITION_ORDINAL_POSITION,
                   SUBPARTITION_ORDINAL_POSITION, PARTITION_METHOD, SUBPARTITION_METHOD,
                   PARTITION_EXPRESSION, SUBPARTITION_EXPRESSION, PARTITION_DESCRIPTION
            FROM INFORMATION_SCHEMA.PARTITIONS
            WHERE TABLE_SCHEMA = 'employees' AND TABLE_NAME = 'departments';

          As a summary, it checks partitions, row format, collation, constraints and so on.

          Conclusion

          There are different tools for different purposes. We can check the data consistency with pt-table-checkum/pt-table-sync but also the table definitions with mysqldiff.

          The post Checking table definition consistency with mysqldiff appeared first on MySQL Performance Blog.


          PlanetMySQL Voting: Vote UP / Vote DOWN

          MDX: retrieving the entire hierarchy path with Ancestors()

          $
          0
          0
          A couple of days ago I wrote about one of my forays into MDX land (Retrieving denormalized tabular results with MDX). The topic of that post was how to write MDX so as to retrieve the kind of flat, tabular results one gets from SQL queries. An essential point of that solution was the MDX Ancestor() function.

          I stumbled upon the topic of my previous blogpost while I was researching something else entirely. Creating flat tables and looking up individual ancestors is actually a rather specific application of a much more general solution I found initially.

          Pivot tables and the "Show Parents" functionality

          GUI OLAP tools typically offer a pivot table query interface. They let you drag and drop measures and dimension items, like members and levels to create a pivot table. The cells of the pivot table are aggregated values of the measures, and the row and column headers of the pivot table are dimension members, which are typically derived from a level that was dragged into the pivot table.

          Please recall the sales cube example I introduced in my previous post:


          Now, suppose we would drag the Sales quantity measure unto the columns axis of our pivot table, and drag the Quarters level from the Time dimension unto the rows axis. The GUI tool might generate an MDX query quite like the one I introduced in my previous post:

          SELECT Measures.Quantity ON COLUMNS
          , Time.Quarters.Members ON ROWS
          FROM SteelWheelsSales
          Here's how this is rendered in Saiku Analytics:


          And here's how it looks in Olap4J>:


          Now, as I pointed out in my previous post, the problem with this result is that we don't see any context: we cannot see to which year the quarters belong. Both tools have a very useful feature called "Show parents". This is a toggle button that changes the view so that the headers show the values of the corresponding higher levels. For example, this is what the previous result looks like in Olap4J when "Show Parents" is toggled:

          As you can see, the year level and even the "All level" is now visible.

          In Saiku we can achieve a similar thing, but the other way around: you can add the year and the all level, at which point totals are shown for these higher levels:


          And you can then choose "Hide Parents" to get rid of the rows for the higher level aggregats, leaving you with essentially the same view of the data as shown in the last Pivot4J screenshot.

          Implementing Show/Hide Parents

          In Saiku, the "Hide Parents" functionality is achieved by post-processing the resultset: when the result is iterated to render the table, rows for all but the lowest level are filtered away and discarded. I'm not quite sure (yet) how Pivot4J achieves this, but when I do I'll update this post to describe the principle.

          A pure MDX expression

          I thought it would be fun to try and rewrite our original query in such a way that its result would give us this information.

          The Ancestors() function

          As it turns out, we can do this for one particular hierarchy in our query by creating a Calculated Member on the Measures hierarchy that applies the Ancestors() function to the current member of the hierarchy for which we want the path.

          The Ancestors() function takes 2 arguments
          1. A member for which to find ancestor members (members at a higher level that contain the argument member)
          2. An argument that specifies how many levels to traverse up.
          The function returns a set of members that are an ancestor of the member passed as first argument.

          Specifying the first argument is easy: we simply want to find ancestors for whatever member, so we can specify it as <Hierarchy Name>.CurrentMember and it will just work.

          The second argument can be specified in 2 ways:
          • As a level: the second argument specifies a level and all ancestors up to that level will be retrieved
          • As a integer representing a distance: the second argument specifies the number of levels that will be traversed upwards
          The first form is useful if you want to retrieve ancestors up to a specific level. I want to retrieve all ancestors, so the number of levels I want the function to traverse is in fact equal to the level number of the first argument. We can conveniently specify this with the LEVEL_NUMBER property using an expression like:

          <Hierarchy Name>.CurrentMember.Properties("LEVEL_NUMBER")

          But this is not yet entirely right, since this form of the Properties() function always returns a string, even though the LEVEL_NUMBER property is actually of the integer type. The standard MDX Properties() function allows an optional second argument TYPED. When this is passed, the property will be returned as a value having its declared type.

          Unfortunately, Mondrian, a.k.a. Pentaho Analysis Services does not support that form of the Properties() function (see: MONDRIAN-1795). So, in order to retrieve the level number as an integer value, we have to apply the CInt() function to convert the string representation of the level number to an integer.

          So, our call to the Ancestors() function will look like this:

          Ancestors(<Hierarchy Name>.CurrentMember, CInt(<Hierarchy Name>.CurrentMember.Properties("LEVEL_NUMBER")))

          Converting the set of Ancestor members to a scalar value

          However we can't just use the bare Ancestors() expression in our query, nor can we use it as is to create a calculated member. That's because Ancestors() returns a set of members, while we want something that we can retrieve from the cells in the result.

          As an initial attempt we can try and see if we can use the SetToStr() function, which takes a set as argument and returns a string representation of that set. So We can now finally write a query and it would look something like this:

          WITH
          MEMBER Measures.[Time Ancestors]
          AS SetToStr(
          Ancestors(
          Time.CurrentMember,
          CInt(
          Time.CurrentMember.Properties("LEVEL_NUMBER")
          )
          )
          )
          SELECT Measures.[Time Ancestors] ON COLUMNS
          , Time.Quarters.Members ON ROWS
          FROM SteelWheelsSales
          The results might look something like this:


          Time Time Ancestors
          QTR1 {[Time].[2003], [Time].[All Years]}
          QTR2 {[Time].[2003], [Time].[All Years]}
          QTR3 {[Time].[2003], [Time].[All Years]}
          QTR4 {[Time].[2003], [Time].[All Years]}
          QTR1 {[Time].[2004], [Time].[All Years]}
          QTR2 {[Time].[2004], [Time].[All Years]}
          QTR3 {[Time].[2004], [Time].[All Years]}
          QTR4 {[Time].[2004], [Time].[All Years]}
          QTR1 {[Time].[2005], [Time].[All Years]}
          QTR2 {[Time].[2005], [Time].[All Years]}

          Well this certainly looks like we're on the right track! Two things are clearly not in order though:
          • The string representation returned by SetToStr() looks very much like how one would write the set down as a MDX set literal (is that a thing? It should be :-). While entirely correct, it does not look very friendly and it is certainly quite a bit different from what our GUI tools present to end-users
          • The order of the members. It looks like Ancestors() returns the members in order of upward traversal, that is to say, from lower levels (=higher level numbers) to higher levels (=lower level numbers). The fancy way of saying that is that our result suggests that Ancestors() returns its members in post-natural order. We'd like the members to be in natural order, that is to say, in descending order of level (from high to low). Note that the specification of Ancestors() does not specify or require any particular order. So in the general case we should not rely on the results to be in any particular order.
          First, let's see if we can fix the order of ancestor members. There's two different MDX functions that seem to apply here:
          • Order() is general purpose function that can be used to order the members of a set by an arbitrary numberic expression.
          • Hierarchize() is designed to order members into hierarchical order, that is to say, the members are ordered by their level number and by the level number of any of its ancestors.
          While Order() is a nice and reasonable choice, Hierarchize() seems tailored exactly for our purpose so that's what we'll use:

          WITH
          MEMBER Measures.[Time Ancestors]
          AS SetToStr(
          Hierarchize(
          Ancestors(
          Time.CurrentMember,
          CInt(
          Time.CurrentMember.Properties("LEVEL_NUMBER")
          )
          )
          )
          )
          SELECT Measures.[Time Ancestors] ON COLUMNS
          , Time.Quarters.Members ON ROWS
          FROM SteelWheelsSales
          And the result will now look like:


          Time Time Ancestors
          QTR1 {[Time].[All Years], [Time].[2003]}
          QTR2 {[Time].[All Years], [Time].[2003]}
          QTR3 {[Time].[All Years], [Time].[2003]}
          QTR4 {[Time].[All Years], [Time].[2003]}
          QTR1 {[Time].[All Years], [Time].[2004]}
          QTR2 {[Time].[All Years], [Time].[2004]}
          QTR3 {[Time].[All Years], [Time].[2004]}
          QTR4 {[Time].[All Years], [Time].[2004]}
          QTR1 {[Time].[All Years], [Time].[2005]}
          QTR2 {[Time].[All Years], [Time].[2005]}

          Now, as for obtaining a more friendly, human-readable string representation of the set, this is a considerably more open requirement. One the one hand there is the matter of how to represent each member in the ancestor set; on the other hand there is the matter of extracting this information from the resultset and using it in the GUI.

          To represent members we have a handful of options: we could use the member name, or we could use its key value; however since we want to expose the information to the user, the only thing that seems really suitable is the member caption. Placing that data into the GUI is an implementation detail that need not concern us too much at this point. Let's say we aim to return the data as a comma-separated list, and assume our GUI tool is capable of extracting that data and then use it to render a result.

          The function that seems to suit our need is called Generate(). There are actually 2 forms of Generate(), which frankly seem to suit completely different purposes. The form we're interested in is functionally quite similar to the MySQL-builtin aggregate function GROUP_CONCAT().

          The arguments to this form of Generate() are:
          1. A set. This is where we'll feed the Ancestors() expression in
          2. A string expression. This expression will be evaluated for each member in the set passed as first argument. We'll use this to retrieve the caption of the current member of the hiearchy for which we're generating the ancestors list.
          3. A separator. Generate() concatenates the result values returned by the string expression passed as second argument, and this string will be used to separate those values. Since we want to obtain a comma-separated list, we'll use the literal string ", " for this argument.
          The result is a single string value.

          Putting it together, our query becomes:

          WITH
          MEMBER Measures.[Time Ancestors]
          AS Generate(
          Hierarchize(
          Ancestors(
          Time.CurrentMember,
          CInt(
          Time.CurrentMember.Properties("LEVEL_NUMBER")
          )
          )
          )
          , Time.CurrentMember.Properties("MEMBER_CAPTION")
          , ","
          )
          SELECT Measures.[Time Ancestors] ON COLUMNS
          , Time.Quarters.Members ON ROWS
          FROM SteelWheelsSales
          And the result:


          Time Time Ancestors
          QTR1 All Years,2003
          QTR2 All Years,2003
          QTR3 All Years,2003
          QTR4 All Years,2003
          QTR1 All Years,2004
          QTR2 All Years,2004
          QTR3 All Years,2004
          QTR4 All Years,2004
          QTR1 All Years,2005
          QTR2 All Years,2005
          And we can repeat this process for every hierarchy on every axis, just like we did with the Ancestor() function in the previous post.
          PlanetMySQL Voting: Vote UP / Vote DOWN

          Big numbers for web scale MySQL

          $
          0
          0
          It is conference time. I haven't been at the MySQL UC as I am at another conference (ICDE) so I missed the talks but tweets make strong claims about a successful MySQL deployment.


          PlanetMySQL Voting: Vote UP / Vote DOWN

          Database Security - How to fully SSL-encrypt MySQL Galera Cluster and ClusterControl

          $
          0
          0

          Data security is a hot topic for many companies these days. But for those who need to adhere to security standards like PCI DSS or HIPAA, security is not an option. We showed you sometime back how to encrypt Galera replication traffic, but for a more complete solution, you’ll want to encrypt all database connections from client applications and any management/monitoring infrastructure. With ClusterControl 1.2.9, we introduced a number of features to facilitate this, including the ability to add new nodes to an encrypted Galera Cluster.

          The following are the new relevant configuration options:

          • cmondb_ssl_key - path to SSL key, for SSL encryption between CMON and the CMON DB.
          • cmondb_ssl_cert - path to SSL cert, for SSL encryption between CMON and the CMON DB
          • cmondb_ssl_ca - path to SSL CA, for SSL encryption between CMON and the CMON DB
          • cluster_ssl_key - path to SSL key, for SSL encryption between CMON and managed MySQL Servers.
          • cluster_ssl_cert - path to SSL cert, for SSL encryption between CMON and managed MySQL Servers.
          • cluster_ssl_ca - path to SSL CA, for SSL encryption between CMON and managed MySQL Servers.
          • cluster_certs_store - path to storage location of SSL related files, defaults to /etc/ssl/<clustertype>/<cluster_id>

          Details on the configuration options above is explained in our ClusterControl Administration Guide under Configuration File section.

          In this blog post, we are going to show you how to deploy a fully encrypted Galera Cluster. This includes:

          • MySQL clients to MySQL servers
          • ClusterControl to managed MySQL servers
          • ClusterControl to CMON DB
          • Galera replication traffic

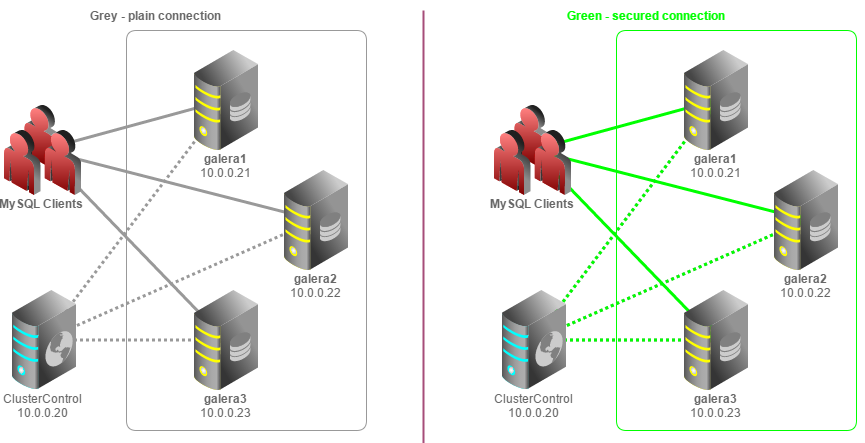
          The following diagram shows our architecture, before and after the deployment of SSL:


          Upgrade to ClusterControl latest version

          Please upgrade to ClusterControl controller version 1.2.9-708 or above before performing the exercise explained in this blog post. Upgrade instructions are available here.


          Generating SSL with OpenSSL

          The following steps should be performed on the ClusterControl node.

          1. To make things simpler, we are going to create keys and certificates under a directory, /etc/ssl/mysql on the ClusterControl node and transfer them over to the managed MySQL nodes. Firstly, create the directory:

          $ mkdir /etc/ssl/mysql
          $ cd /etc/ssl/mysql

          2. Generate Certificate Authority (CA) key and certificate:

          $ openssl genrsa 2048 > ca-key.pem
          $ openssl req -new -x509 -nodes -days 3600 -key ca-key.pem > ca-cert.pem

          3. Create the MySQL server’s certificate:

          $ openssl req -newkey rsa:2048 -days 3600 -nodes -keyout server-key.pem > server-req.pem
          $ openssl x509 -req -in server-req.pem -days 3600 -CA ca-cert.pem -CAkey ca-key.pem -set_serial 01 > server-cert.pem

          4. Create the MySQL client’s certificate:

          $ openssl req -newkey rsa:2048 -days 3600 -nodes -keyout client-key.pem > client-req.pem
          $ openssl x509 -req -in client-req.pem -days 1000 -CA ca-cert.pem -CAkey ca-key.pem -set_serial 01 > client-cert.pem

          5. Remove the passphrase for the key files:

          $ openssl rsa -in client-key.pem -out client-key.pem
          $ openssl rsa -in server-key.pem -out server-key.pem

          6. Create the same directory and copy over the generated keys and certs to all MySQL nodes:

          $ ssh 10.0.0.21 "mkdir -p /etc/ssl/mysql"
          $ scp -r /etc/ssl/mysql/* 10.0.0.21:/etc/ssl/mysql/
          $ ssh 10.0.0.22 "mkdir -p /etc/ssl/mysql"
          $ scp -r /etc/ssl/mysql/* 10.0.0.22:/etc/ssl/mysql/
          $ ssh 10.0.0.23 "mkdir -p /etc/ssl/mysql"
          $ scp -r /etc/ssl/mysql/* 10.0.0.23:/etc/ssl/mysql/


          Enabling Galera replication traffic encryption

          1. Firstly, deactivate ClusterControl auto recovery. The option is available in the summary bar:

          2. Then, run the following command on the ClusterControl node via SSH:

          $ s9s_galera --encrypt-replication -i 1 -o enable

          ** This action will rolling restart the Galera cluster.

          3. To check the status, run following command and verify that it detects the key:

          $ s9s_galera --encrypt-replication -i 1 -o status
          load opts 1
          Cluster Address: 10.0.0.21:4567,10.0.0.22:4567,10.0.0.23:4567
          Galera port: 4567
          Cluster name: my_wsrep_cluster
          Garbd (arbitrators):
          OS class: redhat
          10.0.0.21     key: /etc/ssl/galera/cluster_1/galera_rep.key, cert: /etc/ssl/galera/cluster_1/galera_rep.crt, status: enabled
          10.0.0.22     key: /etc/ssl/galera/cluster_1/galera_rep.key, cert: /etc/ssl/galera/cluster_1/galera_rep.crt, status: enabled
          10.0.0.23     key: /etc/ssl/galera/cluster_1/galera_rep.key, cert: /etc/ssl/galera/cluster_1/galera_rep.crt, status: enabled

          4. Once the cluster has restarted, you should see a padlock icon next to the Galera nodes:

          5. Re-enable ClusterControl auto recovery:

          6. Add the following line in /etc/cmon.cnf or /etc/cmon.d/cmon_<cluster ID>.cnf, this is required by ClusterControl when adding a new node to a Galera cluster with encrypted replication:

          cluster_certs_store=/etc/ssl/galera/cluster_1

          Restart the CMON service to apply the change:

          $ service cmon restart

          7. Re-import the Galera cluster configuration files so we will have our configuration template updated with the latest configuration version.

          Our Galera cluster communication and replication are now running in an encrypted environment.


          Activating SSL on MySQL nodes

          The following steps should be performed on all MySQL nodes (including ClusterControl node) so they can accept client connections through SSL.

          1. Add the following lines into my.cnf under [mysqld] directive:

          ssl-ca=/etc/ssl/mysql/ca-cert.pem
          ssl-cert=/etc/ssl/mysql/server-cert.pem
          ssl-key=/etc/ssl/mysql/server-key.pem

          2. Restart the MySQL service one node at a time:

          $ service mysql restart

          3. Grant CMON user with SSL support:

          $ mysql -uroot -p

          Run the following statements:

          mysql> GRANT ALL PRIVILEGES ON *.* TO 'cmon'@'<ClusterControl IP address>' IDENTIFIED BY '<cmon password>' REQUIRE SSL WITH GRANT OPTIONS;
          mysql> GRANT ALL PRIVILEGES ON *.* TO 'cmon'@'127.0.0.1' IDENTIFIED BY '<cmon password>' REQUIRE SSL WITH GRANT OPTIONS;
          mysql> FLUSH PRIVILEGES;

          ** Replace <ClusterControl IP address> and <cmon password> with respective values.

          Our Galera nodes are now able to accept client’s connections through SSL.


          Activating ClusterControl encryption configuration options

          1. Add the following lines into /etc/cmon.cnf or /etc/cmon.d/cmon_<cluster ID>.cnf for respective cluster ID:

          cluster_ssl_key=/etc/ssl/mysql/client-key.pem
          cluster_ssl_cert=/etc/ssl/mysql/client-cert.pem
          cluster_ssl_ca=/etc/ssl/mysql/ca-cert.pem
          cmondb_ssl_key=/etc/ssl/mysql/client-key.pem
          cmondb_ssl_cert=/etc/ssl/mysql/client-cert.pem
          cmondb_ssl_ca=/etc/ssl/mysql/ca-cert.pem

          2. Restart CMON service:

          $ service cmon restart

          3. Monitor the output of /var/log/cmon.log or /var/log/cmon_<cluster ID>.log and ensure CMON does not throw any errors regarding connection to the CMON DB and the managed MySQL nodes. Our cluster is now running in fully encrypted mode, from ClusterControl controller process to CMON DB and the managed MySQL nodes.

          4. At the time of writing, the ClusterControl UI has a limitation in accessing CMON DB through SSL using the cmon user. As a workaround, we are going to create another database user for the ClusterControl UI and ClusterControl CMONAPI called cmonui. This user will not have SSL enabled on its privilege table.

          mysql> GRANT ALL PRIVILEGES ON *.* TO 'cmonui'@'127.0.0.1' IDENTIFIED BY '<cmon password>';
          mysql> FLUSH PRIVILEGES;

          5. Update the ClusterControl UI and CMONAPI configuration files located at $wwwroot/clustercontrol/bootstrap.php and $wwwroot/cmonapi/config/database.php respectively with the newly created database user, cmonui :

          define('DB_USER', 'cmonui');
          define('DB_PASS', '<cmon password>');

          These files will not be replaced when you perform an upgrade through package manager.


          Activating SSL on clients

          To connect to the Galera nodes through SSL, ensure you have set up the user’s grant with ‘REQUIRE SSL’ syntax, similar to below:

          $ CREATE SCHEMA testdb;
          $ GRANT ALL PRIVILEGES ON testdb.* TO 'testuser'@'127.0.0.1' IDENTIFIED BY 'password' REQUIRE SSL;
          $ FLUSH PRIVILEGES;

           You can test the console connections by using the following command:

          $ mysql -u testuser -p -h 127.0.0.1 -P3306 --ssl-ca=/etc/ssl/mysql/ca-cert.pem --ssl-cert=/etc/ssl/mysql/client-cert.pem --ssl-key=/etc/ssl/mysql/client-key.pem

          Or specify the SSL configuration options inside my.cnf (or .my.cnf for user’s option file) under [client] directive:

          [client]
          ssl-ca=/etc/ssl/mysql/ca-cert.pem
          ssl-cert=/etc/ssl/mysql/client-cert.pem
          ssl-key=/etc/ssl/mysql/client-key.pem

          You should now able to connect the Galera nodes through SSL. All connections from client applications and ClusterControl are now fully encrypted.


          Verifying connection

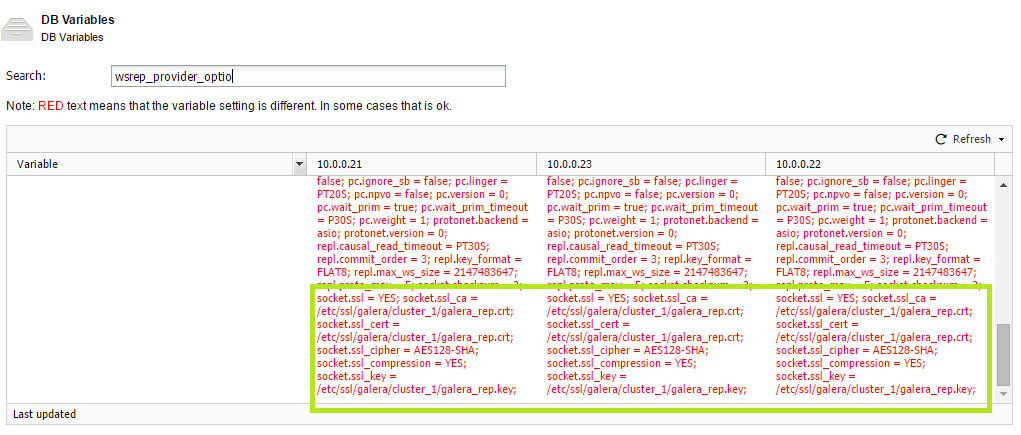
          Go to ClusterControl > Performance > DB Variables and look for SSL related variables. Ensure all of them are defined correctly as per below example:

          You can see from ClusterControl > Performance > DB Variables that the certificate and key are loaded inside wsrep_provider_options. This tells us that Galera is now communicating and replicating through a secured channel.

          That’s it. You are now running a fully SSL-encrypted Galera Cluster!

          Blog category:


          PlanetMySQL Voting: Vote UP / Vote DOWN

          The Perfect Server – CentOS 7.1 with Apache2, Postfix, Dovecot, Pure-FTPD, BIND and ISPConfig 3

          $
          0
          0
          This tutorial shows how to install ISPConfig 3 on a CentOS 7.1 (64Bit) server. ISPConfig 3 is a web hosting control panel that allows you to configure the following services through a web browser: Apache web server, Postfix mail server, MySQL, BIND nameserver, PureFTPd, SpamAssassin, ClamAV, Mailman, and many more.
          PlanetMySQL Voting: Vote UP / Vote DOWN
          How to Easily Identify Tables With Temporal Types in Old Format!

          $
          0
          0

          The MySQL 5.6.4 release introduced support for fractional values within the temporal datatypes: TIME, DATETIME, and TIMESTAMP. Hence the storage requirement and encoding differs for them in comparison to older (5.5 and earlier) temporal datatypes. The storage format for the temporal datatypes in the old format are not space efficient either, and recreating tables having both the new and old formats can be a long and tedious process. For these reasons, we wanted to make it easier for users to identify precisely which tables, if any, need to be upgraded.

          In my previous blog post, where we looked at the process of upgrading old MySQL-5.5 format temporals to the MySQL-5.6 format, there was the question about how one would go about identifying whether a table actually contained temporal columns in the old format or not (thus needing to be upgraded). Based on the feedback we received from one of our customers, and also for the benefit of all our MySQL users who plan to upgrade tables having such columns to the new format, we have introduced a new server option in 5.6.24 called show_old_temporals. When this variable is enabled, the SHOW CREATE TABLE behavior for that session is changed so that we use comments to clearly mark the temporal columns that are using the old binary format. For example:

          mysql> SET SESSION show_old_temporals=ON;
          Query OK, 0 rows affected, 1 warning (0.00 sec)
          
          mysql> SHOW WARNINGS;
          +---------+------+-------------------------------------------------------------------------------+
          | Level   | Code | Message |
          +---------+------+-------------------------------------------------------------------------------+
          | Warning | 1287 | '@@show_old_temporals' is deprecated and will be removed in a future release. |
          +---------+------+-------------------------------------------------------------------------------+
          1 row in set (0.00 sec) 
          
          mysql> SHOW CREATE TABLE ts;
          +-------+-------------------------------------------------------------------------------------------------------------------------------------------------------------------------------------------------------------------------------------------------------------------------------------------------+
          | Table | Create Table |
          +-------+-------------------------------------------------------------------------------------------------------------------------------------------------------------------------------------------------------------------------------------------------------------------------------------------------+
          | ts    | CREATE TABLE `ts` (
            `f_time` time /* 5.5 binary format */ DEFAULT NULL,
            `f_timestamp` timestamp /* 5.5 binary format */ NOT NULL DEFAULT CURRENT_TIMESTAMP ON UPDATE CURRENT_TIMESTAMP,
            `f_datetime` datetime /* 5.5 binary format */ DEFAULT NULL
          ) ENGINE=InnoDB DEFAULT CHARSET=latin1 |
          +-------+-------------------------------------------------------------------------------------------------------------------------------------------------------------------------------------------------------------------------------------------------------------------------------------------------+
          1 row in set (0.00 sec)

          Also a similar comment is added to the ‘COLUMN_TYPE’ field in the Information_Schema.COLUMNS table:

          mysql> SELECT * FROM INFORMATION_SCHEMA.COLUMNS WHERE table_name='ts';
          +---------------+--------------+------------+-------------+------------------+-------------------+-------------+-----------+--------------------------+------------------------+-------------------+---------------+--------------------+--------------------+----------------+-----------------------------------+------------+-----------------------------+---------------------------------+----------------+
          | TABLE_CATALOG | TABLE_SCHEMA | TABLE_NAME | COLUMN_NAME | ORDINAL_POSITION | COLUMN_DEFAULT    | IS_NULLABLE | DATA_TYPE | CHARACTER_MAXIMUM_LENGTH | CHARACTER_OCTET_LENGTH | NUMERIC_PRECISION | NUMERIC_SCALE | DATETIME_PRECISION | CHARACTER_SET_NAME | COLLATION_NAME | COLUMN_TYPE                       | COLUMN_KEY | EXTRA                       | PRIVILEGES                      | COLUMN_COMMENT |
          +---------------+--------------+------------+-------------+------------------+-------------------+-------------+-----------+--------------------------+------------------------+-------------------+---------------+--------------------+--------------------+----------------+-----------------------------------+------------+-----------------------------+---------------------------------+----------------+
          | def           | test         | ts         | f_time      |                1 | NULL              | YES         | time      |                     NULL |                   NULL |              NULL |          NULL |                  0 | NULL               | NULL           | time /* 5.5 binary format */      |            |                             | select,insert,update,references |                |
          | def           | test         | ts         | f_timestamp |                2 | CURRENT_TIMESTAMP | NO          | timestamp |                     NULL |                   NULL |              NULL |          NULL |                  0 | NULL               | NULL           | timestamp /* 5.5 binary format */ |            | on update CURRENT_TIMESTAMP | select,insert,update,references |                |
          | def           | test         | ts         | f_datetime  |                3 | NULL              | YES         | datetime  |                     NULL |                   NULL |              NULL |          NULL |                  0 | NULL               | NULL           | datetime /* 5.5 binary format */  |            |                             | select,insert,update,references |                |
          +---------------+--------------+------------+-------------+------------------+-------------------+-------------+-----------+--------------------------+------------------------+-------------------+---------------+--------------------+--------------------+----------------+-----------------------------------+------------+-----------------------------+---------------------------------+----------------+
          3 rows in set (0.00 sec)

          When show_old_temporals is OFF (the default), then both SHOW CREATE TABLE and Information_Schema.COLUMNS will provide the standard behavior and output.

          As listed in my previous blog post, there are disadvantages of having tables with temporal columns in the old format, and hence we will remove support for them entirely in a future release. For this reason, the show_old_temporals option is already deprecated and will also be removed in a future release. Its value is only temporary, and it will be removed at the same time that we remove support for the old temporal formats.

          We really hope that this new feature makes users’ lives easier when upgrading to MySQL 5.6 and later! We also look forward to your feedback! You can leave a comment here on the blog post or in a support ticket. If you feel that you encountered any related bugs, please do let us know via a bug report.

          As always, THANK YOU for using MySQL!


          PlanetMySQL Voting: Vote UP / Vote DOWN

          MySQL Cluster 7.4 New Features Webinar Replay

          $
          0
          0

          MySQL Cluster 7.4 GAI recently hosted a webinar introducing MySQL Cluster and then looking into what’s new in the latest version (MySQL Cluster 7.4) in some more detail. The replay of the MySQL Cluster 7.4 webinar is now available here. Alternatively if just want to skim through the charts then scroll down.

          Abstract

          MySQL Cluster powers the subscriber databases of major communication services providers as well as next generation web, cloud, social and mobile applications. It is designed to deliver:

          • Real-time, in-memory performance for both OLTP and analytics workloads
          • Linear scale-out for both reads and writes
          • 99.999% High Availability
          • Transparent, cross-shard transactions and joins
          • Update-Anywhere Geographic replication
          • SQL or native NoSQL APIs
          • All that while still providing full ACID transactions.

          Understand some of the highlights of MySQL Cluster 7.4:

          • 200 Million queries per minute
          • Active-Active geographic replication with conflict detection and resolution
          • 5x faster on-line maintenance activities
          • Enhanced reporting for memory and database operations

          Charts


          PlanetMySQL Voting: Vote UP / Vote DOWN

          Profiling MySQL queries from Performance Schema

          $
          0
          0

          When optimizing queries and investigating performance issues, MySQL comes with built in support for profiling queries aka

          SET profiling = 1;
           . This is already awesome and simple to use, but why the PERFORMANCE_SCHEMA alternative?

          Because profiling will be removed soon (already deprecated on MySQL 5.6 ad 5.7); the built-in profiling capability can only be enabled per session. This means that you cannot capture profiling information for queries running from other connections. If you are using Percona Server, the profiling option for log_slow_verbosity is a nice alternative, unfortunately, not everyone is using Percona Server.

          Now, for a quick demo: I execute a simple query and profile it below. Note that all of these commands are executed from a single session to my test instance.

          mysql> SHOW PROFILES;
          +----------+------------+----------------------------------------+
          | Query_ID | Duration   | Query                                  |
          +----------+------------+----------------------------------------+
          |        1 | 0.00011150 | SELECT * FROM sysbench.sbtest1 LIMIT 1 |
          +----------+------------+----------------------------------------+
          1 row in set, 1 warning (0.00 sec)
          mysql> SHOW PROFILE SOURCE FOR QUERY 1;
          +----------------------+----------+-----------------------+------------------+-------------+
          | Status               | Duration | Source_function       | Source_file      | Source_line |
          +----------------------+----------+-----------------------+------------------+-------------+
          | starting             | 0.000017 | NULL                  | NULL             |        NULL |
          | checking permissions | 0.000003 | check_access          | sql_parse.cc     |        5797 |
          | Opening tables       | 0.000021 | open_tables           | sql_base.cc      |        5156 |
          | init                 | 0.000009 | mysql_prepare_select  | sql_select.cc    |        1050 |
          | System lock          | 0.000005 | mysql_lock_tables     | lock.cc          |         306 |
          | optimizing           | 0.000002 | optimize              | sql_optimizer.cc |         138 |
          | statistics           | 0.000006 | optimize              | sql_optimizer.cc |         381 |
          | preparing            | 0.000005 | optimize              | sql_optimizer.cc |         504 |
          | executing            | 0.000001 | exec                  | sql_executor.cc  |         110 |
          | Sending data         | 0.000025 | exec                  | sql_executor.cc  |         190 |
          | end                  | 0.000002 | mysql_execute_select  | sql_select.cc    |        1105 |
          | query end            | 0.000003 | mysql_execute_command | sql_parse.cc     |        5465 |
          | closing tables       | 0.000004 | mysql_execute_command | sql_parse.cc     |        5544 |
          | freeing items        | 0.000005 | mysql_parse           | sql_parse.cc     |        6969 |
          | cleaning up          | 0.000006 | dispatch_command      | sql_parse.cc     |        1874 |
          +----------------------+----------+-----------------------+------------------+-------------+
          15 rows in set, 1 warning (0.00 sec)

          To demonstrate how we can achieve the same with Performance Schema, we first identify our current connection id. In the real world, you might want to get the connection/processlist id of the thread you want to watch i.e. from

          SHOW PROCESSLIST
           .
          mysql> SELECT THREAD_ID INTO @my_thread_id
              -> FROM threads WHERE PROCESSLIST_ID = CONNECTION_ID();
          Query OK, 1 row affected (0.00 sec)

          Next, we identify the bounding EVENT_IDs for the statement stages. We will look for the statement we wanted to profile using the query below from the

          events_statements_history_long
          table. Your LIMIT clause may vary depending on how much queries the server might be getting.
          mysql> SELECT THREAD_ID, EVENT_ID, END_EVENT_ID, SQL_TEXT, NESTING_EVENT_ID
              -> FROM events_statements_history_long
              -> WHERE THREAD_ID = @my_thread_id
              ->   AND EVENT_NAME = 'statement/sql/select'
              -> ORDER BY EVENT_ID DESC LIMIT 3 G
          *************************** 1. row ***************************
                 THREAD_ID: 13848
                  EVENT_ID: 419
              END_EVENT_ID: 434
                  SQL_TEXT: SELECT THREAD_ID INTO @my_thread_id
          FROM threads WHERE PROCESSLIST_ID = CONNECTION_ID()
          NESTING_EVENT_ID: NULL
          *************************** 2. row ***************************
                 THREAD_ID: 13848
                  EVENT_ID: 374
              END_EVENT_ID: 392
                  SQL_TEXT: SELECT * FROM sysbench.sbtest1 LIMIT 1
          NESTING_EVENT_ID: NULL
          *************************** 3. row ***************************
                 THREAD_ID: 13848
                  EVENT_ID: 353
              END_EVENT_ID: 364
                  SQL_TEXT: select @@version_comment limit 1
          NESTING_EVENT_ID: NULL
          3 rows in set (0.02 sec)

          From the results above, we are mostly interested with the EVENT_ID and END_EVENT_ID values from the second row, this will give us the stage events of this particular query from the

          events_stages_history_long
          table.
          mysql> SELECT EVENT_NAME, SOURCE, (TIMER_END-TIMER_START)/1000000000 as 'DURATION (ms)'
              -> FROM events_stages_history_long
              -> WHERE THREAD_ID = @my_thread_id AND EVENT_ID BETWEEN 374 AND 392;
          +--------------------------------+----------------------+---------------+
          | EVENT_NAME                     | SOURCE               | DURATION (ms) |
          +--------------------------------+----------------------+---------------+
          | stage/sql/init                 | mysqld.cc:998        |        0.0214 |
          | stage/sql/checking permissions | sql_parse.cc:5797    |        0.0023 |
          | stage/sql/Opening tables       | sql_base.cc:5156     |        0.0205 |
          | stage/sql/init                 | sql_select.cc:1050   |        0.0089 |
          | stage/sql/System lock          | lock.cc:306          |        0.0047 |
          | stage/sql/optimizing           | sql_optimizer.cc:138 |        0.0016 |
          | stage/sql/statistics           | sql_optimizer.cc:381 |        0.0058 |
          | stage/sql/preparing            | sql_optimizer.cc:504 |        0.0044 |
          | stage/sql/executing            | sql_executor.cc:110  |        0.0008 |
          | stage/sql/Sending data         | sql_executor.cc:190  |        0.0251 |
          | stage/sql/end                  | sql_select.cc:1105   |        0.0017 |
          | stage/sql/query end            | sql_parse.cc:5465    |        0.0031 |
          | stage/sql/closing tables       | sql_parse.cc:5544    |        0.0037 |
          | stage/sql/freeing items        | sql_parse.cc:6969    |        0.0056 |
          | stage/sql/cleaning up          | sql_parse.cc:1874    |        0.0006 |
          +--------------------------------+----------------------+---------------+
          15 rows in set (0.01 sec)

          As you can see the results are pretty close, not exactly the same but close. SHOW PROFILE shows Duration in seconds, while the results above is in milliseconds.

          Some limitations to this method though:

          • As we’ve seen it takes a few hoops to dish out the information we need. Because we have to identify the statement we have to profile manually, this procedure may not be easy to port into tools like the sys schema or pstop.
          • Only possible if Performance Schema is enabled (by default its enabled since MySQL 5.6.6, yay!)
          • Does not cover all metrics compared to the native profiling i.e. CONTEXT SWITCHES, BLOCK IO, SWAPS
          • Depending on how busy the server you are running the tests, the sizes of the history tables may be too small, as such you either have to increase or loose the history to early i.e.
            performance_schema_events_stages_history_long_size
            variable. Using ps_history might help in this case though with a little modification to the queries.
          • The resulting Duration per event may vary, I would think this may be due to the additional as described on performance_timers table. In any case we hope to get this cleared up as result when this bug is fixed.

          The post Profiling MySQL queries from Performance Schema appeared first on MySQL Performance Blog.


          PlanetMySQL Voting: Vote UP / Vote DOWN

          Performance Schema: Great Power Comes Without Great Cost

          $
          0
          0

          Performance Schema is used extensively both internally and within the MySQL community, and I expect even more usage with the new SYS Schema and the Performance Schema enhancements in 5.7. Performance Schema is the single best tool available for monitoring MySQL Server internals and execution details at a lower level. Having said that, we are also no stranger to the fact that any monitoring tool comes with an additional cost to performance. Hence It has always been an important question to find out just how much it costs us when Performance Schema is turned ON and to see what we can do to make it perform as fast as possible.

          I have been using MySQL Performance Schema for the past year. This is my first blog on Performance Schema and here I am primarily concerned with the performance impact and characteristics around the default values.

          Performance Schema Default ON vs OFF

          The question I will try and answer here is this: How well does MySQL scale with performance_schema=ON (default parameters and configuration) compared to performance_schema=OFF?

          Test Details

          I used Sysbench to get TPS benchmarks. Just to ensure that I have some variation in my tests I ran Sysbench in both the CPU bound and the Disk bound environments to gather the stats. All tests were performed on the same server and with the same MySQL Server build. I used the latest development release (at the time), 5.7.6-m16, for my tests. With MySQL 5.7.6, 311 instruments are enabled by default.

          Test Results

          I was very happy to see the answers after the tests ran! They clearly show that the numbers are quite reasonable (within 1% – 3%) if we consider the huge benefits offered by Performance Schema with the default settings. More Details below:

          CPU Bound
          Sysbench Read Only Mode
          oltp_ro_cpu_bound
          performance_schema=ON shows a dip of 2.45%
          Threads OFF ON Percent Of Change
          1 754.42 750.47 -0.52%
          8 5663.33 5542.28 -2.14%
          16 9195.28 8976.31 -2.38%
          32 12797.86 12490.66 -2.40%
          64 12455.2 12117.88 -2.71%
          128 12229.43 11852.55 -3.08%
          256 12451.55 12077.16 -3.01%
          512 12681.43 12350.65 -2.61%
          1024 12717.92 12361.66 -2.80%
          Sysbench Read Write Mode
          oltp_rw_cpu_bound
          performance_schema=ON shows a dip of 2.32%
          Threads OFF ON Percent Of Change
          1 567.81 554.59 -2.33%
          8 3989.29 3937.59 -1.30%
          16 6495.95 6325.28 -2.63%
          32 8718.39 8528.89 -2.17%
          64 8777.19 8470.87 -3.49%
          128 8367.69 8287.51 -0.96%
          256 8506.86 8271.87 -2.76%
          512 8395.93 8202.53 -2.30%
          1024 8078.42 7901.9 -2.19%
          Disk Bound
          Sysbench Read Only Mode
          oltp_ro_disk_bound
          performance_schema=ON shows a dip of little less than 1%
          Threads OFF ON Percent Of Change
          1 633.1 624.68 -1.33
          8 4395.45 4332.14 -1.44
          16 6889.67 6774.17 -1.68
          32 7899.11 7847.52 -0.65
          64 7779.39 7721.26 -0.75
          128 7674.51 7611.16 -0.83
          256 7764.23 7752.19 -0.16
          512 7233.22 7190.7 -0.59
          1024 5313.35 5266.08 -0.89
          Sysbench Read Write Mode
          oltp_rw_disk_bound
          performance_schema=ON shows a dip of 0.45%
          Threads OFF ON Percent Of Change
          1 210.36 202.17 -3.89%
          8 200.02 200.17 0.07%
          16 197.27 198.07 0.41%
          32 202.76 202.39 -0.18%
          64 205.4 205.63 0.11%
          128 208.55 208.41 -0.07%
          256 209.41 209.64 0.11%
          512 209.21 208.91 -0.14%
          1024 202.81 202.67 -0.07%

          Conclusion

          In my tests we see average overhead results of:

          • Just over 2% in the CPU Bound OLTP RW (2.23%) and OLTP_RO (2.40%) runs
          • Less than 1% in the Disk Bound OLTP RW (0.41%) and OLTP_RO (0.92%) runs

          Overall, as we see I think you can expect a performance impact of approximately 1-3% with performance_schema=ON vs OFF (again, using the default configuration). The most important takeaway is that while there are still some dips in raw performance numbers—which is expected—the overall impact is relatively small. We will also continue to do all that we can to lower the overhead and performance impact of Performance Schema even further in the future! I hope that these benchmarks may help anyone looking forward to using Performance Schema extensively, but are concerned about what performance impact may come with it.

          As I’ve demonstrated here—due to all of the helpful input from the MySQL Community, and the work that we’ve done to lower the related impact and overhead—the Performance Schema can truly be said to offer great power, and do so without great cost!

          That’s all for now. Thank you for using MySQL!


          Appendix: Test Details.


          Table1: 311 Instruments

          Instrument category Count
          statement/sql% 139
          memory/performance_schema% 70
          wait/io% 48
          statement/com% 32
          statement/sp% 16
          statement/abstract% 3
          wait/lock% 1
          idle 1
          statement/scheduler% 1


          Table2: MySQL Details

          Product MySQL
          Version 5.7.6-m16
          Location https://dev.mysql.com/downloads/mysql/5.7.html Development Releases


          Table3: Test Machine Details

          OS Linux
          Memory 128 GB
          CPU 32 x intel(r) xeon(r) cpu e5-2690 0 @ 2.90ghz
          Arch x86_64
          OS Version oracle linux server release 7.0


          Table4: Sysbench Configuration Details

          Version 4.13
          Tests sysbench oltp-ro , sysbench oltp-rw
          Engine Innodb
          Thread Count 1,8,16,32,64,128,256,512,1024
          DB Size 10000000 rows in single table
          Duration 300 Seconds
          Warmup Time check table for warmup
          Iteration 3


          Table5: MySQLD Configuration Details

          MySQLd Parameter Disk Bound CPU Bound
          back_log 1500 1500
          disable-log-bin TRUE TRUE
          innodb_adaptive_flushing 1 1
          innodb_buffer_pool_instances 8 8
          innodb_buffer_pool_size 340M 16384M
          innodb_checksums 0 0
          innodb_data_file_path ibdata1:2000M:autoextend ibdata1:2000M:autoextend
          innodb_doublewrite 0 0
          innodb_file_per_table 1 1
          innodb_flush_log_at_trx_commit 2 2
          innodb_flush_neighbors 0 0
          innodb_io_capacity 1000 1000
          innodb_log_buffer_size 64M 64M
          innodb_log_files_in_group 3 3
          innodb_log_file_size 2048M 2048M
          innodb_max_dirty_pages_pct 50 50
          innodb_monitor_enable ‘%’ ‘%’
          innodb_open_files 4000 4000
          innodb_purge_threads 1 1
          innodb_read_io_threads 16 16
          innodb_spin_wait_delay 24 24
          innodb_stats_persistent 1 1
          innodb_support_xa 0 0
          innodb_thread_concurrency 0 0
          innodb_use_native_aio 0 0
          innodb_write_io_threads 16 16
          join_buffer_size 32K 32K
          key_buffer_size 200M 200M
          loose-local-infile 1 1
          low_priority_updates 1 1
          max_allowed_packet 1048576 1048576
          max_connections 4000 4000
          max_connect_errors 50 50
          port 3306 3306
          query-cache-size 0 0
          query-cache-type 0 0
          sort_buffer_size 2097152 2097152
          sql-mode NO_ENGINE_SUBSTITUTION NO_ENGINE_SUBSTITUTION
          table_open_cache 2048 2048
          table_open_cache_instances 10 10
          transaction_isolation REPEATABLE-READ REPEATABLE-READ
          user root root

          PlanetMySQL Voting: Vote UP / Vote DOWN

          MySQL-AutoXtrabackup command line tool for using Percona Xtrabackup

          $
          0
          0

          Want to introduce our MySQL-AutoXtraBackup command line tool, using Percona Xtrabackup in core. Looking for contributor ;)

          Project Structure:

          XtraBackup is powerfull and open-source hot online backup tool for MySQL from Percona.
          This script is using XtraBackup for full and incremental backups, also for preparing and recovering taken backups.
          Here is project path tree (default location is /home/MySQL-AutoXtraBackup):

          * backup_dir — The main folder for storing backups.
          * master_backup_script — Full and Incremental backup taker script.
          * backup_prepare — Backup prepare and restore script.
          * partial_recovery — Partial table recovery script.
          * general_conf — All-in-one config file’s and config reader class folder.
          * setup.py — Setup file.
          * autoxtrabackup.py — Commandline Tool provider script.

          Here you can watch Demo Usage Video.

          The post MySQL-AutoXtrabackup command line tool for using Percona Xtrabackup appeared first on Azerbaijan MySQL UG.


          PlanetMySQL Voting: Vote UP / Vote DOWN

          Log Buffer #419: A Carnival of the Vanities for DBAs

          $
          0
          0

          This Log Buffer Edition covers Oracle, MySQL, SQL Server blog posts from around the world.

          Oracle:

          • Why the Internet of Things should matter to you
          • Modifying Sales Behavior Using Oracle SPM – Written by Tyrice Johnson
          • SQLcl: Run a Query Over and Over, Refresh the Screen
          • Data Integration Tips: ODI 12.1.3 – Convert to Flow
          • JRE 1.8.0_45 Certified with Oracle E-Business Suite

          SQL Server:

          • What’s this, a conditional WHERE clause that doesn’t use dynamic SQL?
          • The job of a DBA requires a fusion of skill and knowledge. To acquire this requires a craftsman mindset. Craftsmen find that the better they get at the work, the more enjoyable the work gets, and the more successful they become.
          • Using SQL to perform cluster analysis to gain insight into data with unknown groups
          • There are times when you don’t what to return a complete set of records. When you have this kind of requirement to only select the TOP X number of items Transact SQL (TSQL) has the TOP clause to meet your needs.
          • Spatial Data in SQL Server has special indexing because it has to perform specialised functions.

          MySQL:

          Profiling MySQL queries from Performance Schema

          How to Easily Identify Tables With Temporal Types in Old Format!

          The Perfect Server – CentOS 7.1 with Apache2, Postfix, Dovecot, Pure-FTPD, BIND and ISPConfig 3

          Database Security – How to fully SSL-encrypt MySQL Galera Cluster and ClusterControl

          MDX: retrieving the entire hierarchy path with Ancestors()


          PlanetMySQL Voting: Vote UP / Vote DOWN

          Social Networking Using OQGraph

          $
          0
          0
          I was given the chance to experiment typical social networking query on an existing 60 Millions edges dataset

          How You're Connected


          Such algorithms and others are simply hardcoded into the OQGraph. 

          With the upgrade of OQGraph V3 into MariaDB 10 we can proceed directly on top of the exiting tables holding the edges kine of featured VIRTUAL VIEW. 


          CREATE OR REPLACE TABLE `relations` (
            `created_at` timestamp NOT NULL DEFAULT CURRENT_TIMESTAMP ON UPDATE CURRENT_TIMESTAMP,
            `id1` int(10) unsigned NOT NULL,
            `id2` int(10) unsigned NOT NULL,
            `relation_type` tinyint(3) unsigned DEFAULT NULL,
            KEY `id1` (`id1`),
            KEY `id2` (`id2`)
          ) ENGINE=InnoDB DEFAULT CHARSET=utf8

          oqgraph=# select count(*) from relations;

          +----------+
          | count(*) |
          +----------+
          | 59479722 |
          +----------+
          1 row in set (23.05 sec)

          Very nice integration of table discovery that save me referring to documentation to found out all columns definition.  

          CREATE TABLE `oq_graph`
          ENGINE=OQGRAPH `data_table`='relations' `origid`='id1' `destid`='id2';

          oqgraph=# SELECT * FROM oq_graph WHERE latch='breadth_first' AND origid=175135 AND destid=7;
          +---------------+--------+--------+--------+------+--------+
          | latch         | origid | destid | weight | seq  | linkid |
          +---------------+--------+--------+--------+------+--------+
          | breadth_first | 175135 |      7 |   NULL |    0 | 175135 |
          | breadth_first | 175135 |      7 |      1 |    1 |      7 |
          +---------------+--------+--------+--------+------+--------+
          2 rows in set (0.00 sec)


          oqgraph=# SELECT * FROM oq_graph WHERE latch='breadth_first' AND origid=175135 AND destid=5615775;
          +---------------+--------+---------+--------+------+----------+
          | latch         | origid | destid  | weight | seq  | linkid   |
          +---------------+--------+---------+--------+------+----------+
          | breadth_first | 175135 | 5615775 |   NULL |    0 |   175135 |
          | breadth_first | 175135 | 5615775 |      1 |    1 |        7 |
          | breadth_first | 175135 | 5615775 |      1 |    2 | 13553091 |
          | breadth_first | 175135 | 5615775 |      1 |    3 |  1440976 |
          | breadth_first | 175135 | 5615775 |      1 |    4 |  5615775 |
          +---------------+--------+---------+--------+------+----------+
          5 rows in set (0.44 sec)

          What we first highlight is that underlying table indexes KEY `id1` (`id1`), KEY `id2` (`id2`) are used by OQgrah to navigate the vertices via a number of key reads and range scans, such 5 level relation was around 2689 jump and 77526  range access to the table . 

          Meaning the death of the graph was around 2500 with an average of 30 edges per vertex 

          # MyISAM

          oqgraph=# SELECT * FROM oq_graph_myisam WHERE latch='breadth_first' AND origid=175135 AND destid=5615775;
          +---------------+--------+---------+--------+------+----------+
          | latch         | origid | destid  | weight | seq  | linkid   |
          +---------------+--------+---------+--------+------+----------+
          | breadth_first | 175135 | 5615775 |   NULL |    0 |   175135 |
          | breadth_first | 175135 | 5615775 |      1 |    1 |        7 |
          | breadth_first | 175135 | 5615775 |      1 |    2 | 13553091 |
          | breadth_first | 175135 | 5615775 |      1 |    3 |  1440976 |
          | breadth_first | 175135 | 5615775 |      1 |    4 |  5615775 |
          +---------------+--------+---------+--------+------+----------+
          5 rows in set (0.11 sec)

          Need to investigate more such speed difference using MyISAM. Ideas are welcome ?


          PlanetMySQL Voting: Vote UP / Vote DOWN

          Introducing VMware Continuent 4.0 – MySQL Clustering and Real-time Replication to Data Warehouses

          $
          0
          0
          It’s with great pleasure we announce the general availability of VMware Continuent 4.0 – a new suite of solutions for clustering and replication of MySQL to data warehouses. VMware Continuent enables enterprises running business-critical database applications to achieve commercial-grade high availability (HA), globally redundant disaster recovery (DR) and performance scaling. The new suite
          PlanetMySQL Voting: Vote UP / Vote DOWN

          Java-MySQL Program

          $
          0
          0

          It turns out that configuring Perl wasn’t the last step for my student instance. It appears that I neglected to configure my student instance to support Java connectivity to MySQL. This post reviews the configuration of Java to run programs against MySQL. It also covers the new syntax on how you register a DriverManager, and avoid Java compilation errors with the older syntax.

          In prior posts, I’ve shown how to use Perl , PHP, Python, and Ruby languages to query a MySQL database on Linux.

          You need to install the Open JDK libraries with the yum utility command:

          yum install -y java-1.7.0-openjdk*

          It should generate the following log output:

          Loaded plugins: langpacks, refresh-packagekit
          Package 1:java-1.7.0-openjdk-1.7.0.75-2.5.4.2.fc20.x86_64 already installed and latest version
          Package 1:java-1.7.0-openjdk-headless-1.7.0.75-2.5.4.2.fc20.x86_64 already installed and latest version
          Resolving Dependencies
          --> Running transaction check
          ---> Package java-1.7.0-openjdk-accessibility.x86_64 1:1.7.0.75-2.5.4.2.fc20 will be installed
          --> Processing Dependency: java-atk-wrapper for package: 1:java-1.7.0-openjdk-accessibility-1.7.0.75-2.5.4.2.fc20.x86_64
          ---> Package java-1.7.0-openjdk-demo.x86_64 1:1.7.0.75-2.5.4.2.fc20 will be installed
          ---> Package java-1.7.0-openjdk-devel.x86_64 1:1.7.0.75-2.5.4.2.fc20 will be installed
          ---> Package java-1.7.0-openjdk-javadoc.noarch 1:1.7.0.75-2.5.4.2.fc20 will be installed
          ---> Package java-1.7.0-openjdk-src.x86_64 1:1.7.0.75-2.5.4.2.fc20 will be installed
          --> Running transaction check
          ---> Package java-atk-wrapper.x86_64 0:0.30.4-4.fc20 will be installed
          --> Finished Dependency Resolution
           
          Dependencies Resolved
           
          ================================================================================
           Package                          Arch   Version                  Repository
                                                                                     Size
          ================================================================================
          Installing:
           java-1.7.0-openjdk-accessibility x86_64 1:1.7.0.75-2.5.4.2.fc20  updates  32 k
           java-1.7.0-openjdk-demo          x86_64 1:1.7.0.75-2.5.4.2.fc20  updates 1.9 M
           java-1.7.0-openjdk-devel         x86_64 1:1.7.0.75-2.5.4.2.fc20  updates 9.2 M
           java-1.7.0-openjdk-javadoc       noarch 1:1.7.0.75-2.5.4.2.fc20  updates  14 M
           java-1.7.0-openjdk-src           x86_64 1:1.7.0.75-2.5.4.2.fc20  updates  39 M
          Installing for dependencies:
           java-atk-wrapper                 x86_64 0.30.4-4.fc20            fedora   71 k
           
          Transaction Summary
          ================================================================================
          Install  12 Packages (+1 Dependent package)
           
          Total download size: 163 M
          Installed size: 765 M
          Downloading packages:
          (1/6): java-1.7.0-openjdk-accessibility-1.7.0.75-2.5.4.2.f |  32 kB  00:00     
          (2/6): java-1.7.0-openjdk-demo-1.7.0.75-2.5.4.2.fc20.x86_6 | 1.9 MB  00:02     
          (3/6): java-1.7.0-openjdk-devel-1.7.0.75-2.5.4.2.fc20.x86_ | 9.2 MB  00:05     
          (4/6): java-1.7.0-openjdk-javadoc-1.7.0.75-2.5.4.2.fc20.no |  14 MB  00:04     
          (5/6): java-atk-wrapper-0.30.4-4.fc20.x86_64.rpm           |  71 kB  00:00     
          (6/6): java-1.7.0-openjdk-src-1.7.0.75-2.5.4.2.fc20.x86_6  |  39 MB  00:23     
          --------------------------------------------------------------------------------
          Total                                             4.5 MB/s | 163 MB  00:36     
          Running transaction check
          Running transaction test
          Transaction test succeeded
          Running transaction (shutdown inhibited)
            Installing : java-atk-wrapper-0.30.4-4.fc20.x86_64                       3/13 
            Installing : 1:java-1.7.0-openjdk-accessibility-1.7.0.75-2.5.4.2.fc20    4/13 
            Installing : 1:java-1.7.0-openjdk-devel-1.7.0.75-2.5.4.2.fc20.x86_64     9/13 
            Installing : 1:java-1.7.0-openjdk-src-1.7.0.75-2.5.4.2.fc20.x86_64      10/13 
            Installing : 1:java-1.7.0-openjdk-javadoc-1.7.0.75-2.5.4.2.fc20.noarc   12/13 
            Installing : 1:java-1.7.0-openjdk-demo-1.7.0.75-2.5.4.2.fc20.x86_64     13/13 
            Verifying  : 1:java-1.7.0-openjdk-demo-1.7.0.75-2.5.4.2.fc20.x86_64      2/13 
            Verifying  : 1:java-1.7.0-openjdk-javadoc-1.7.0.75-2.5.4.2.fc20.noarc    3/13 
            Verifying  : java-atk-wrapper-0.30.4-4.fc20.x86_64                       5/13 
            Verifying  : 1:java-1.7.0-openjdk-accessibility-1.7.0.75-2.5.4.2.fc20    6/13 
            Verifying  : 1:java-1.7.0-openjdk-devel-1.7.0.75-2.5.4.2.fc20.x86_64     8/13 
            Verifying  : 1:java-1.7.0-openjdk-src-1.7.0.75-2.5.4.2.fc20.x86_64      12/13 
           
          Installed:
            java-1.7.0-openjdk-accessibility.x86_64 1:1.7.0.75-2.5.4.2.fc20               
            java-1.7.0-openjdk-demo.x86_64 1:1.7.0.75-2.5.4.2.fc20                        
            java-1.7.0-openjdk-devel.x86_64 1:1.7.0.75-2.5.4.2.fc20                       
            java-1.7.0-openjdk-javadoc.noarch 1:1.7.0.75-2.5.4.2.fc20                     
            java-1.7.0-openjdk-src.x86_64 1:1.7.0.75-2.5.4.2.fc20                         
           
          Dependency Installed:
            java-atk-wrapper.x86_64 0:0.30.4-4.fc20                                       
           
          Complete!

          You can find the Java compiler’s version with the following command:

          javac -version

          It should show you the following Java version:

          javac 1.7.0_75

          Next, you need to install the mysql-connector-java library with yum like this:

          yum install -y mysql-connector-java

          It should generate the following installation output:

          Loaded plugins: langpacks, refresh-packagekit
          mysql-connectors-community                                  | 2.5 kB  00:00     
          mysql-tools-community                                       | 2.5 kB  00:00     
          mysql56-community                                           | 2.5 kB  00:00     
          pgdg93                                                      | 3.6 kB  00:00     
          updates/20/x86_64/metalink                                  |  15 kB  00:00     
          Resolving Dependencies
          --> Running transaction check
          ---> Package mysql-connector-java.noarch 1:5.1.28-1.fc20 will be installed
          --> Processing Dependency: jta >= 1.0 for package: 1:mysql-connector-java-5.1.28-1.fc20.noarch
          --> Processing Dependency: slf4j for package: 1:mysql-connector-java-5.1.28-1.fc20.noarch
          --> Running transaction check
          ---> Package geronimo-jta.noarch 0:1.1.1-15.fc20 will be installed
          ---> Package slf4j.noarch 0:1.7.5-3.fc20 will be installed
          --> Processing Dependency: mvn(log4j:log4j) for package: slf4j-1.7.5-3.fc20.noarch
          --> Processing Dependency: mvn(javassist:javassist) for package: slf4j-1.7.5-3.fc20.noarch
          --> Processing Dependency: mvn(commons-logging:commons-logging) for package: slf4j-1.7.5-3.fc20.noarch
          --> Processing Dependency: mvn(commons-lang:commons-lang) for package: slf4j-1.7.5-3.fc20.noarch
          --> Processing Dependency: mvn(ch.qos.cal10n:cal10n-api) for package: slf4j-1.7.5-3.fc20.noarch
          --> Running transaction check
          ---> Package apache-commons-lang.noarch 0:2.6-13.fc20 will be installed
          ---> Package apache-commons-logging.noarch 0:1.1.3-8.fc20 will be installed
          --> Processing Dependency: mvn(logkit:logkit) for package: apache-commons-logging-1.1.3-8.fc20.noarch
          --> Processing Dependency: mvn(avalon-framework:avalon-framework-api) for package: apache-commons-logging-1.1.3-8.fc20.noarch
          ---> Package cal10n.noarch 0:0.7.7-3.fc20 will be installed
          ---> Package javassist.noarch 0:3.16.1-6.fc20 will be installed
          ---> Package log4j.noarch 0:1.2.17-14.fc20 will be installed
          --> Processing Dependency: mvn(org.apache.geronimo.specs:geronimo-jms_1.1_spec) for package: log4j-1.2.17-14.fc20.noarch
          --> Processing Dependency: mvn(javax.mail:mail) for package: log4j-1.2.17-14.fc20.noarch
          --> Running transaction check
          ---> Package avalon-framework.noarch 0:4.3-9.fc20 will be installed
          --> Processing Dependency: xalan-j2 for package: avalon-framework-4.3-9.fc20.noarch
          ---> Package avalon-logkit.noarch 0:2.1-13.fc20 will be installed
          --> Processing Dependency: tomcat-servlet-3.0-api for package: avalon-logkit-2.1-13.fc20.noarch
          ---> Package geronimo-jms.noarch 0:1.1.1-17.fc20 will be installed
          ---> Package javamail.noarch 0:1.5.0-6.fc20 will be installed
          --> Running transaction check
          ---> Package tomcat-servlet-3.0-api.noarch 0:7.0.52-2.fc20 will be installed
          ---> Package xalan-j2.noarch 0:2.7.1-22.fc20 will be installed
          --> Processing Dependency: xerces-j2 for package: xalan-j2-2.7.1-22.fc20.noarch
          --> Processing Dependency: osgi(org.apache.xerces) for package: xalan-j2-2.7.1-22.fc20.noarch
          --> Running transaction check
          ---> Package xerces-j2.noarch 0:2.11.0-17.fc20 will be installed
          --> Processing Dependency: xml-commons-resolver >= 1.2 for package: xerces-j2-2.11.0-17.fc20.noarch
          --> Processing Dependency: xml-commons-apis >= 1.4.01 for package: xerces-j2-2.11.0-17.fc20.noarch
          --> Processing Dependency: osgi(org.apache.xml.resolver) for package: xerces-j2-2.11.0-17.fc20.noarch
          --> Processing Dependency: osgi(javax.xml) for package: xerces-j2-2.11.0-17.fc20.noarch
          --> Running transaction check
          ---> Package xml-commons-apis.noarch 0:1.4.01-14.fc20 will be installed
          ---> Package xml-commons-resolver.noarch 0:1.2-14.fc20 will be installed
          --> Finished Dependency Resolution
           
          Dependencies Resolved
           
          ================================================================================
           Package                    Arch       Version                Repository   Size
          ================================================================================
          Installing:
           mysql-connector-java       noarch     1:5.1.28-1.fc20        updates     1.3 M
          Installing for dependencies:
           apache-commons-lang        noarch     2.6-13.fc20            fedora      281 k
           apache-commons-logging     noarch     1.1.3-8.fc20           updates      78 k
           avalon-framework           noarch     4.3-9.fc20             fedora       87 k
           avalon-logkit              noarch     2.1-13.fc20            fedora       87 k
           cal10n                     noarch     0.7.7-3.fc20           fedora       37 k
           geronimo-jms               noarch     1.1.1-17.fc20          fedora       32 k
           geronimo-jta               noarch     1.1.1-15.fc20          fedora       21 k
           javamail                   noarch     1.5.0-6.fc20           fedora      606 k
           javassist                  noarch     3.16.1-6.fc20          fedora      626 k
           log4j                      noarch     1.2.17-14.fc20         fedora      449 k
           slf4j                      noarch     1.7.5-3.fc20           fedora      173 k
           tomcat-servlet-3.0-api     noarch     7.0.52-2.fc20          updates     207 k
           xalan-j2                   noarch     2.7.1-22.fc20          updates     1.9 M
           xerces-j2                  noarch     2.11.0-17.fc20         updates     1.1 M
           xml-commons-apis           noarch     1.4.01-14.fc20         fedora      227 k
           xml-commons-resolver       noarch     1.2-14.fc20            fedora      108 k
           
          Transaction Summary
          ================================================================================
          Install  1 Package (+16 Dependent packages)
           
          Total download size: 7.3 M
          Installed size: 10 M
          Downloading packages:
          (1/17): apache-commons-logging-1.1.3-8.fc20.noarch.rpm      |  78 kB  00:00     
          (2/17): apache-commons-lang-2.6-13.fc20.noarch.rpm          | 281 kB  00:00     
          (3/17): avalon-framework-4.3-9.fc20.noarch.rpm              |  87 kB  00:00     
          (4/17): avalon-logkit-2.1-13.fc20.noarch.rpm                |  87 kB  00:00     
          (5/17): cal10n-0.7.7-3.fc20.noarch.rpm                      |  37 kB  00:00     
          (6/17): geronimo-jms-1.1.1-17.fc20.noarch.rpm               |  32 kB  00:00     
          (7/17): geronimo-jta-1.1.1-15.fc20.noarch.rpm               |  21 kB  00:00     
          (8/17): javamail-1.5.0-6.fc20.noarch.rpm                    | 606 kB  00:00     
          (9/17): javassist-3.16.1-6.fc20.noarch.rpm                  | 626 kB  00:00     
          (10/17): log4j-1.2.17-14.fc20.noarch.rpm                    | 449 kB  00:00     
          (11/17): slf4j-1.7.5-3.fc20.noarch.rpm                      | 173 kB  00:00     
          (12/17): mysql-connector-java-5.1.28-1.fc20.noarch.rpm      | 1.3 MB  00:01     
          (13/17): tomcat-servlet-3.0-api-7.0.52-2.fc20.noarch.rpm    | 207 kB  00:00     
          (14/17): xalan-j2-2.7.1-22.fc20.noarch.rpm                  | 1.9 MB  00:00     
          (15/17): xerces-j2-2.11.0-17.fc20.noarch.rpm                | 1.1 MB  00:00     
          (16/17): xml-commons-apis-1.4.01-14.fc20.noarch.rpm         | 227 kB  00:00     
          (17/17): xml-commons-resolver-1.2-14.fc20.noarch.rpm        | 108 kB  00:00     
          --------------------------------------------------------------------------------
          Total                                              1.3 MB/s | 7.3 MB  00:05     
          Running transaction check
          Running transaction test
          Transaction test succeeded
          Running transaction (shutdown inhibited)
            Installing : xml-commons-apis-1.4.01-14.fc20.noarch                      1/17 
            Installing : geronimo-jms-1.1.1-17.fc20.noarch                           2/17 
            Installing : xml-commons-resolver-1.2-14.fc20.noarch                     3/17 
            Installing : xerces-j2-2.11.0-17.fc20.noarch                             4/17 
            Installing : xalan-j2-2.7.1-22.fc20.noarch                               5/17 
            Installing : javamail-1.5.0-6.fc20.noarch                                6/17 
            Installing : log4j-1.2.17-14.fc20.noarch                                 7/17 
            Installing : tomcat-servlet-3.0-api-7.0.52-2.fc20.noarch                 8/17 
            Installing : avalon-framework-4.3-9.fc20.noarch                          9/17 
            Installing : avalon-logkit-2.1-13.fc20.noarch                           10/17 
            Installing : apache-commons-logging-1.1.3-8.fc20.noarch                 11/17 
            Installing : javassist-3.16.1-6.fc20.noarch                             12/17 
            Installing : cal10n-0.7.7-3.fc20.noarch                                 13/17 
            Installing : apache-commons-lang-2.6-13.fc20.noarch                     14/17 
            Installing : slf4j-1.7.5-3.fc20.noarch                                  15/17 
            Installing : geronimo-jta-1.1.1-15.fc20.noarch                          16/17 
            Installing : 1:mysql-connector-java-5.1.28-1.fc20.noarch                17/17 
            Verifying  : geronimo-jta-1.1.1-15.fc20.noarch                           1/17 
            Verifying  : geronimo-jms-1.1.1-17.fc20.noarch                           2/17 
            Verifying  : xalan-j2-2.7.1-22.fc20.noarch                               3/17 
            Verifying  : apache-commons-lang-2.6-13.fc20.noarch                      4/17 
            Verifying  : slf4j-1.7.5-3.fc20.noarch                                   5/17 
            Verifying  : log4j-1.2.17-14.fc20.noarch                                 6/17 
            Verifying  : avalon-framework-4.3-9.fc20.noarch                          7/17 
            Verifying  : xerces-j2-2.11.0-17.fc20.noarch                             8/17 
            Verifying  : cal10n-0.7.7-3.fc20.noarch                                  9/17 
            Verifying  : avalon-logkit-2.1-13.fc20.noarch                           10/17 
            Verifying  : 1:mysql-connector-java-5.1.28-1.fc20.noarch                11/17 
            Verifying  : xml-commons-resolver-1.2-14.fc20.noarch                    12/17 
            Verifying  : xml-commons-apis-1.4.01-14.fc20.noarch                     13/17 
            Verifying  : javassist-3.16.1-6.fc20.noarch                             14/17 
            Verifying  : tomcat-servlet-3.0-api-7.0.52-2.fc20.noarch                15/17 
            Verifying  : javamail-1.5.0-6.fc20.noarch                               16/17 
            Verifying  : apache-commons-logging-1.1.3-8.fc20.noarch                 17/17 
           
          Installed:
            mysql-connector-java.noarch 1:5.1.28-1.fc20                                   
           
          Dependency Installed:
            apache-commons-lang.noarch 0:2.6-13.fc20                                      
            apache-commons-logging.noarch 0:1.1.3-8.fc20                                  
            avalon-framework.noarch 0:4.3-9.fc20                                          
            avalon-logkit.noarch 0:2.1-13.fc20                                            
            cal10n.noarch 0:0.7.7-3.fc20                                                  
            geronimo-jms.noarch 0:1.1.1-17.fc20                                           
            geronimo-jta.noarch 0:1.1.1-15.fc20                                           
            javamail.noarch 0:1.5.0-6.fc20                                                
            javassist.noarch 0:3.16.1-6.fc20                                              
            log4j.noarch 0:1.2.17-14.fc20                                                 
            slf4j.noarch 0:1.7.5-3.fc20                                                   
            tomcat-servlet-3.0-api.noarch 0:7.0.52-2.fc20                                 
            xalan-j2.noarch 0:2.7.1-22.fc20                                               
            xerces-j2.noarch 0:2.11.0-17.fc20                                             
            xml-commons-apis.noarch 0:1.4.01-14.fc20                                      
            xml-commons-resolver.noarch 0:1.2-14.fc20                                     
           
          Complete!

          I must write too much Java code for the Windows platform because I didn’t notice the change in how the DriverManager should be instantiated. Initially, I wrote the program using the following declaration for the DriverManager class:

          30
          
                DriverManager.registerDriver(new com.mysql.jdbc.Driver());

          While it worked on Windows, the same syntax in the MySQL.java program raised two errors on the Linux server. One for the declaration of the com.mysql.jdbc.Driver class and another trying to declare an instance of Driver class.

          These are the two errors:

          MySQL.java:5: error: package com.mysql.jdbc does not exist
          import com.mysql.jdbc.Driver;
                               ^
          MySQL.java:31: error: package com.mysql.jdbc does not exist
                DriverManager.registerDriver(new com.mysql.jdbc.Driver());
                                                               ^

          I rewrote the MySQL.java program as follows, and it works on both implementations:

          1
          2
          3
          4
          5
          6
          7
          8
          9
          10
          11
          12
          13
          14
          15
          16
          17
          18
          19
          20
          21
          22
          23
          24
          25
          26
          27
          28
          29
          30
          31
          32
          33
          34
          35
          36
          37
          38
          39
          40
          41
          42
          43
          44
          45
          46
          47
          48
          49
          50
          51
          52
          53
          54
          55
          56
          57
          58
          59
          60
          61
          62
          63
          64
          65
          66
          67
          68
          69
          70
          71
          72
          73
          74
          75
          76
          77
          
          // Import classes.
          import java.sql.*;
           
          /* You can't include the following on Linux without raising an exception. */
          // import com.mysql.jdbc.Driver;
           
          public class MySQL {
            public MySQL() {
              /* Declare variables that require explicit assignments because
                 they're addressed in the finally block. */
              Connection conn = null;
              Statement stmt = null;
              ResultSet rset = null;
           
              /* Declare other variables. */
              String url;
              String username = "student";
              String password = "student";
              String database = "studentdb";
              String hostname = "localhost";
              String port = "3306";
              String sql;
           
              /* Attempt a connection. */
              try {
                // Set URL.
                url = "jdbc:mysql://" + hostname + ":" + port + "/" + database;
           
                // Create instance of MySQL.
                Class.forName ("com.mysql.jdbc.Driver").newInstance();
                conn = DriverManager.getConnection (url, username, password);
           
                // Query the version of the database.
                sql = "SELECT version()";
                stmt = conn.createStatement();
                rset = stmt.executeQuery(sql);
           
                System.out.println ("Database connection established");
           
                // Read row returns for one column.
                while (rset.next()) {
                  System.out.println("MySQL Version [" + rset.getString(1) + "]"); }
           
              }
              catch (SQLException e) {
                System.err.println ("Cannot connect to database server:");
                System.out.println(e.getMessage());
              }
              catch (ClassNotFoundException e) {
                System.err.println ("Cannot connect to database server:");
                System.out.println(e.getMessage());
              }
              catch (InstantiationException e) {
                System.err.println ("Cannot connect to database server:");
                System.out.println(e.getMessage());
              }
              catch (IllegalAccessException e) {
                System.err.println ("Cannot connect to database server:");
                System.out.println(e.getMessage());
              }
              finally {
                if (conn != null) {
                  try {
                    rset.close();
                    stmt.close();
                    conn.close();
                    System.out.println ("Database connection terminated");
                  }
                  catch (Exception e) { /* ignore close errors */ }
                }
              }
            }
            /* Unit test. */
            public static void main(String args[]) {
              new MySQL();
            }
          }

          The old approach to the DriverManager and Driver classes disallows the use of the ClassNotFoundException, InstantiationException, and IllegalAccessException classes. The new syntax works on Linux, Mac OS X, and Windows. If you’re running on Mac OS X, you need to import the following additional library in the MySQL.java program:

          import com.apple.eawt.*;

          Before you compile the MySQL.java program, you need to put the mysql-connector-java.jar and your present working directory into your environment’s $CLASSPATH variable. You can set the $CLASSPATH variable at the command-line or embed the following in your .bashrc file:

          export CLASSPATH=/usr/share/java/mysql-connector-java.jar:.

          If you embedded it in the .bashrc file, you need to source that file or restart your terminal session, which resources the .bashrc for you. You can source your .bashrc file from an active Terminal session in your home directory with this syntax:

          . ./.bashrc

          If you’re new to Java and the MySQL Connector/J, you compile the MySQL.java program with the following syntax. At least, it works when you have the MySQL.java source file in the present working directory and want to create the class file in the same directory. You can find more about the javac command-line at the www.tutorialpoint.com web site>

          javac -verbose -cp . MySQL.java

          Then, you can run it with the class file with this syntax:

          java MySQL

          It should return the following:

          Database connection established
          MySQL Version [5.6.24]
          Database connection terminated

          If you’d prefer to return data, you can replace line 34 in the MySQL.java program with a query against a table, like:

          34
          
                sql = "SELECT item_title, item_rating FROM item";

          Then, change line 42 in the MySQL.java program with syntax to manage the output, like:

          42
          
                  System.out.println(rset.getString(1) + ", " + rset.getString(2)); }

          Recompile it, and rerun the MySQL class file with this syntax:

          java MySQL

          It should return the following:

          Database connection established
          The Hunt for Red October, PG
          Star Wars I, PG
          Star Wars II, PG
          Star Wars II, PG
          Star Wars III, PG13
          The Chronicles of Narnia, PG
          RoboCop, Mature
          Pirates of the Caribbean, Teen
          The Chronicles of Narnia, Everyone
          MarioKart, Everyone
          Splinter Cell, Teen
          Need for Speed, Everyone
          The DaVinci Code, Teen
          Cars, Everyone
          Beau Geste, PG
          I Remember Mama, NR
          Tora! Tora! Tora!, G
          A Man for All Seasons, G
          Hook, PG
          Around the World in 80 Days, G
          Harry Potter and the Chamber of Secrets, PG
          Camelot, G
          Database connection terminated

          As always, I hope this helps those looking for a solution.


          PlanetMySQL Voting: Vote UP / Vote DOWN

          Using Docker for Fast and Easy Testing of MaxScale

          $
          0
          0
          Fri, 2015-04-17 06:40
          maria-luisaraviol

          Docker & MariaDB MaxScaleRecently, I asked Colt Engine to help us with the MaxScale Beta Testing process. They agreed to do this, but they had to find the best way to test a new environment, with MaxScale on top and with as little impact as possible on their datacenter. The traditional approach would be to create as many virtual machines as needed and configure them for the designed test environment. This is a valid approach, but it requires some time to setup and the unnecessary use of resources. Instead, they decided to use an “Application Container”; they decided to use Docker.

          Docker is an open platform that allows building, shipping, and running distributed applications in a fast and effective way. Docker enables applications to be assembled quickly from components. It also allows you to share easily Docker images inside a group or externally through packages (i.e., Docker files). Processes within Docker run in an isolated environment and without the need to create a virtual machine.

          Docker allows creating, running and destroying application containers in a very fast and easy way. To make it even easier, you can find many “pre-cooked” containers in the community. The Docker Engine container is comprised of just the application and its dependencies. It runs as an isolated process in a user space on the host operating system, and shares the kernel with other containers. Thus, it enjoys the resource isolation and allocation benefits of virtual machines, but it’s much more portable and efficient.

          Figure - Virtual Box
          Figure - Docker

          For beta testing, Colt Engine used three different containers: MaxScale Beta, MariaDB 10.0 and MySQL 5.1.

          MySQL 5.1 is one of the reasons why Colt Engine agreed to test MaxScale: several “old” Joomla! plugins could not be updated easily to newer versions. They still use MySQL deprecated statements. Without the use of MaxScale and due to these limitations, all of the MySQL servers must be MySQL 5.1.

          The test environment was in the end based on four containers:

          • a MySQL 5.1 container to backup Joomla! 1.5.x installations;
          • a MariaDB 10.0 container set as master;
          • a MariaDB 10.0 container set as slave of the master; and
          • a MaxScale container that is able to reach all of the databases.

          Andrea Sosso, one of the engineers at Colt Engine who ran the beta tests, deployed a Docker image to run a MaxScale server. If you want to try both Docker and Maxscale, you can find them here: https://registry.hub.docker.com/u/asosso/maxscale/

          Thanks to Docker and container technology, it has been extremely easy to set up a test environment that’s lightweight, safe, and easy to deploy. And it was done without the extra load that a set of virtual machines normally would have introduced. As an added value, a container made it easy to reproduce and share application environments anywhere. This can allow a group to share efforts and resources when testing on different servers, but in identical environments.

          In one of my future blogs, I’ll explain in more detail the MaxScale use case that Colt Engine tested with this set of containers.

          Tags: 

          About the Author

          maria-luisaraviol's picture

          Maria-Luisa Raviol is a Senior Sales Engineer with over 20 years industry experience.


          PlanetMySQL Voting: Vote UP / Vote DOWN

          a wild Supposition: can MySQL be Kafka ?

          mysqldiskusage – source code examination

          $
          0
          0

          As you know there is a great toolset named “MySQL Utilities”, which you can use for solving various administrative tasks.
          mysqldiskusage utility is for calculating MySQL Server’s disk usage and generating informative reports.
          Of course this project is open source and everybody could review the source code.
          A few words about how mysqldiskusage calculates database disk usage will be crucial for understanding algorithm.
          The source tree is: mysql-utilities-1.5.4/scripts/mysqldiskusage.py
          If you open this Python file you will see (line 169-175) :

           # We do database disk usage by default.
              try:
                  diskusage.show_database_usage(servers[0], datadir, args, options)
              except UtilError:
                  _, e, _ = sys.exc_info()
                  print("ERROR: %s" % e.errmsg)
                  sys.exit(1)
          

          By default it shows database disk usage and calling another function named show_database_usage from mysql-utilities-1.5.4/mysql/utilities/command/diskusage.py file.
          Now if we open up this diskusage.py file and search for show_database_usage function, you should see that in turn this function uses another function named _build_db_list. From _build_db_list it gets back all necessary information as in code stated clearly(line 550-562):

          # Get list of databases with sizes and formatted when necessary
              columns, rows, db_total = _build_db_list(server, res, dblist, datadir,
                                                       fmt == "grid",
                                                       have_read, verbosity,
                                                       include_empty or do_all,
                                                       is_remote)
          
              if not quiet:
                  print "# Database totals:"
              print_list(sys.stdout, fmt, columns, rows, no_headers)
              if not quiet:
                  _print_size("\nTotal database disk usage = ", db_total)
                  print
          

          Now we know that all calculations are happened in _build_db_list function. If you search and find this function(begins from line 360) you can see that, in fact mysqldiskusage is calculating database disk usage as follows:

          1. It finds (data_length + index_length) from information_schema.tables per database manner
          2. Then it sum ups (data_length + index_length) with misc_files variable data which is in fact returned by _get_db_dir_size function.

          But what is this misc_files? Logically misc_files must be .opt and .frm files. So misc_files must not be an “.MYD” , “.MYI”, “.IBD”, “general_log”, “slow_log”.
          So in fact mysqldiskusage calculates database disk usage as -> (data_length + index_length)[size in bytes] + (.opt+.frm)[size in bytes].

          First of all we must insist on not using information_schema for accurate disk usage calculation because of simple rule: “InnoDB preallocates pages(16Kib) for further table usage, but data_length column will not show these pages”
          As proof of concept let’s create sample empty table:

          mysql> create database test;
          Query OK, 1 row affected (0,01 sec)
          
          mysql> use test;
          Database changed
          
          mysql> select data_length, index_length from information_schema.tables where table_schema='test' and table_name='t1';
          +-------------+--------------+
          | data_length | index_length |
          +-------------+--------------+
          |       16384 |            0 |
          +-------------+--------------+
          1 row in set (0,00 sec)
          

          If we consider that our exact table size is 16384 bytes, we are in wrong direction.
          In fact if we use OS commands we could see that the exact size of table is 98304 bytes:

          [root@node1 ~]# ls -lt /var/lib/mysql/test/
          total 208
          -rw-rw----. 1 mysql mysql 98304 Apr 18 11:44 t1.ibd
          

          So when we create an InnoDB table it is preallocates 6 pages(16Kib*6 = 98304) but only 1 page shown up from data_length column.

          Now let’s come back to our misc_files or exactly _get_db_dir_size() function.
          From source code we can see that there is no a check for “.IBD” files:

          ...
          for item in os.listdir(folder):
                  name, ext = os.path.splitext(item)
                  if ext.upper() not in (".MYD", ".MYI") and \
                     name.upper() not in ('SLOW_LOG', 'GENERAL_LOG'):
                      itemfolder = os.path.join(folder, item)
          ...
          

          Because of this calculation is wrong for databases as we see from output:

          [root@node1 ~]# mysqldiskusage --server=root_pass -vvv
          # Source on localhost: ... connected.
          # Database totals:
          +---------------------+--------------+--------------+--------------+--------------+
          | db_name             | db_dir_size  |   data_size  |  misc_files  |       total  |
          +---------------------+--------------+--------------+--------------+--------------+
          | employees           | 242.523.049  | 205.979.648  | 242.523.049  | 448.502.697  |


          As you see it sum ups data_size with misc_files and gets back total as 448.502.697 bytes. But in fact our employees database is exactly 242.523.049 bytes. And of course the:
          Total database disk usage = 450.940.391 bytes or 430,05 MB is wrong as well.
          For further exploration and how to patch source code see related BUG REPORT #76703.

          The post mysqldiskusage – source code examination appeared first on Azerbaijan MySQL UG.


          PlanetMySQL Voting: Vote UP / Vote DOWN

          Ruby-MySQL Columns

          $
          0
          0

          Last week I posted how to configure and test Ruby and MySQL. Somebody asked me how to handle a dynamic list of columns. So, here’s a quick little program to show you how to read the dynamic list of column:

          1
          2
          3
          4
          5
          6
          7
          8
          9
          10
          11
          12
          13
          14
          15
          16
          17
          18
          19
          20
          21
          22
          23
          24
          25
          26
          27
          28
          29
          30
          31
          32
          33
          34
          35
          36
          37
          
          require 'rubygems'
          require 'mysql'
           
          # Begin block.
          begin
            # Create a new connection resource.
            db = Mysql.new('localhost','student','student','studentdb')
           
            # Create a result set.
            rs = db.query('SELECT item_title, item_rating FROM item')
            # Read through the result set hash.
            rs.each do | row |
              out = ""
              i = 0
              while i < db.field_count
                # Check if not last column.
                if i < db.field_count - 1
                  out += "#{row[i]}, "
                else
                  out += "#{row[i]}"
                end
                i += 1
              end
              puts "#{out}"
            end
            # Release the result set resources.
            rs.free
          rescue Mysql::Error => e
            # Print the error.
            puts "ERROR #{e.errno} (#{e.sqlstate}): #{e.error}"
            puts "Can't connect to MySQL database specified."
            # Signal an error.
            exit 1
          ensure
            # Close the connection when it is open.
            db.close if db
          end

          The new logic on lines 13 through 22 reads the list of columns into a comma delimited list of values. The if-block checks to make sure it doesn’t append a comma to the last column in the list. It prints output like:

          The Hunt for Red October, PG
          Star Wars I, PG
          Star Wars II, PG
          Star Wars II, PG
          Star Wars III, PG13
          The Chronicles of Narnia, PG
          RoboCop, Mature
          Pirates of the Caribbean, Teen
          The Chronicles of Narnia, Everyone
          MarioKart, Everyone
          Splinter Cell, Teen
          Need for Speed, Everyone
          The DaVinci Code, Teen
          Cars, Everyone
          Beau Geste, PG
          I Remember Mama, NR
          Tora! Tora! Tora!, G
          A Man for All Seasons, G
          Hook, PG
          Around the World in 80 Days, G
          Harry Potter and the Sorcerer's Stone, PG
          Camelot, G

          As always, I hope this helps those looking for a solution.


          PlanetMySQL Voting: Vote UP / Vote DOWN
          Viewing all 18797 articles
          Browse latest View live


          <script src="https://jsc.adskeeper.com/r/s/rssing.com.1596347.js" async> </script>