Quantcast
Channel: Planet MySQL
Viewing all 18789 articles
Browse latest View live

FromDual.en: MySQL Environment MyEnv 1.2.0 has been released

$
0
0

FromDual has the pleasure to announce the release of the new version 1.2.0 of its popular MySQL, Galera Cluster, MariaDB and Percona Server multi-instance environment MyEnv.

The new MyEnv can be downloaded here.

In the inconceivable case that you find a bug in the MyEnv please report it to our bug tracker.

Any feedback, statements and testimonials are welcome as well! Please send them to feedback@fromdual.com.

Upgrade from 1.1.x to 1.2.0

# cd ${HOME}/product
# tar xf /download/myenv-1.2.0.tar.gz
# rm -f myenv
# ln -s myenv-1.2.0 myenv

If you are using plug-ins for showMyEnvStatus create all the links in the new directory structure:

cd ${HOME}/product/myenv
ln -s ../../utl/oem_agent.php plg/showMyEnvStatus/

Changes in MyEnv 1.2.0

MyEnv

  • Some minor fixes on init script.
  • Introduction of states production, quality, testing and development.
  • Colored prompt added for stage production databases.
  • All /tmp/*sock moved to /var/run/mysqld.
  • up output prepared for bind-address awareness.
  • lsb_release dummy implemented.

MyEnv Installer

  • Advice for 2 sudo commands in row was wrong.
  • Port conflict resolution more verbose.
  • Init script replacement check added. Replace init script is distribution aware and auto executable.
  • Installer made mode modular and prepared for automatization.
  • Installer allows now to run as other user than mysql.
  • Bugs in preparing myenv.conf fixed and instance name removed.
  • Install routine made more distribution aware.

MyEnv Utilities

  • Split partition (split_partition.php) improved.
  • Fix of DROP PARTITION (drop_partition.php) was executed in wrong order (new before old).
  • Alter Engine script rewritten into PHP (alter_engine.php).
  • Alter Engine script handles ROW_FORMAT=FIXED problem correctly now.
  • Alter Engine script handles too large Primary Key better.
  • Alter Engine script recognizes tables with AUTO_INCREMENT column not at 1st position.
  • Purge Binary Log rewritten into PHP (purge_binary_log.php).
  • compare_status_files.pl added to compare output of 2 SHOW GLOBAL STATUS.

For subscriptions of commercial use of MyEnv please get in contact with us.


PlanetMySQL Voting: Vote UP / Vote DOWN

Ruby Thin Web Server

$
0
0

Somebody suggested that I try out thin, “A fast and very simple Ruby web server.” So, I thought it might be interesting to test, and a simplification over Rails to demonstrate an small Ruby MVC pattern.

Installing thin seemed straight forward as a gem installation, like

gem install thin

The initial install didn’t work out of the box because I’d neglected to install the gcc-c++ library. It raised the following errors:

Fetching: eventmachine-1.0.7.gem (100%)
Building native extensions.  This could take a while...
ERROR:  Error installing thin:
	ERROR: Failed to build gem native extension.
 
    /usr/bin/ruby extconf.rb
checking for main() in -lssl... no
checking for rb_trap_immediate in ruby.h,rubysig.h... no
checking for rb_thread_blocking_region()... yes
checking for ruby/thread.h... yes
checking for rb_thread_call_without_gvl() in ruby/thread.h... yes
checking for inotify_init() in sys/inotify.h... yes
checking for writev() in sys/uio.h... yes
checking for rb_thread_fd_select()... yes
checking for rb_fdset_t in ruby/intern.h... yes
checking for rb_wait_for_single_fd()... yes
checking for rb_enable_interrupt()... no
checking for rb_time_new()... yes
checking for sys/event.h... no
checking for epoll_create() in sys/epoll.h... yes
checking for clock_gettime()... yes
checking for CLOCK_MONOTONIC_RAW in time.h... yes
checking for CLOCK_MONOTONIC in time.h... yes
creating Makefile
 
make "DESTDIR="
g++ -I. -I/usr/include -I/usr/include/ruby/backward -I/usr/include -I. -DWITHOUT_SSL -DBUILD_FOR_RUBY -DHAVE_RB_THREAD_BLOCKING_REGION -DHAVE_TBR -DHAVE_RUBY_THREAD_H -DHAVE_RB_THREAD_CALL_WITHOUT_GVL -DHAVE_RB_THREAD_CALL_WITHOUT_GVL -DHAVE_INOTIFY_INIT -DHAVE_INOTIFY -DHAVE_WRITEV -DHAVE_WRITEV -DHAVE_RB_THREAD_FD_SELECT -DHAVE_RB_THREAD_FD_SELECT -DHAVE_TYPE_RB_FDSET_T -DHAVE_RB_FDSET_T -DHAVE_RB_WAIT_FOR_SINGLE_FD -DHAVE_RB_TIME_NEW -DOS_UNIX -DHAVE_EPOLL_CREATE -DHAVE_EPOLL -DHAVE_CLOCK_GETTIME -DHAVE_CONST_CLOCK_MONOTONIC_RAW -DHAVE_CONST_CLOCK_MONOTONIC    -fPIC -O2 -g -pipe -Wall -Wp,-D_FORTIFY_SOURCE=2 -fexceptions -fstack-protector-strong --param=ssp-buffer-size=4 -grecord-gcc-switches -mtune=generic -m64 -o ed.o -c ed.cpp
make: g++: Command not found
make: *** [ed.o] Error 127
 
 
Gem files will remain installed in /usr/local/share/gems/gems/eventmachine-1.0.7 for inspection.
Results logged to /usr/local/share/gems/gems/eventmachine-1.0.7/ext/gem_make.out

Naturally, I installed the gcc-c++ library with the yum utility, like this:

yum list gcc-c++

It displayed the following log output:

Loaded plugins: langpacks, refresh-packagekit
mysql-connectors-community                                  | 2.5 kB  00:00     
mysql-tools-community                                       | 2.5 kB  00:00     
mysql56-community                                           | 2.5 kB  00:00     
pgdg93                                                      | 3.6 kB  00:00     
updates/20/x86_64/metalink                                  |  14 kB  00:00     
updates                                                     | 4.9 kB  00:00     
updates/20/x86_64/primary_db                                |  13 MB  00:04     
(1/2): updates/20/x86_64/updateinfo                         | 1.9 MB  00:02     
(2/2): updates/20/x86_64/pkgtags                            | 1.4 MB  00:00     
Resolving Dependencies
--> Running transaction check
---> Package gcc-c++.x86_64 0:4.8.3-7.fc20 will be installed
--> Processing Dependency: libstdc++-devel = 4.8.3-7.fc20 for package: gcc-c++-4.8.3-7.fc20.x86_64
--> Running transaction check
---> Package libstdc++-devel.x86_64 0:4.8.3-7.fc20 will be installed
--> Finished Dependency Resolution
 
Dependencies Resolved
 
================================================================================
 Package                Arch          Version              Repository      Size
================================================================================
Installing:
 gcc-c++                x86_64        4.8.3-7.fc20         updates        7.2 M
Installing for dependencies:
 libstdc++-devel        x86_64        4.8.3-7.fc20         updates        1.5 M
 
Transaction Summary
================================================================================
Install  1 Package (+1 Dependent package)
 
Total download size: 8.7 M
Installed size: 25 M
Downloading packages:
(1/2): gcc-c++-4.8.3-7.fc20.x86_64.rpm                      | 7.2 MB  00:05     
(2/2): libstdc++-devel-4.8.3-7.fc20.x86_64.rpm              | 1.5 MB  00:01     
--------------------------------------------------------------------------------
Total                                              1.3 MB/s | 8.7 MB  00:06     
Running transaction check
Running transaction test
Transaction test succeeded
Running transaction (shutdown inhibited)
  Installing : libstdc++-devel-4.8.3-7.fc20.x86_64                          1/2 
  Installing : gcc-c++-4.8.3-7.fc20.x86_64                                  2/2 
  Verifying  : gcc-c++-4.8.3-7.fc20.x86_64                                  1/2 
  Verifying  : libstdc++-devel-4.8.3-7.fc20.x86_64                          2/2 
 
Installed:
  gcc-c++.x86_64 0:4.8.3-7.fc20                                                 
 
Dependency Installed:
  libstdc++-devel.x86_64 0:4.8.3-7.fc20                                         
 
Complete!

After installing the gcc-c++ libraries, I reran the gem utility to install the thin utility. It created three Ruby Gems: eventmachine-1.0.7, daemons-1.2.2.gem, and thin-1.6.3.gem, as shown:

Building native extensions.  This could take a while...
Successfully installed eventmachine-1.0.7
Fetching: daemons-1.2.2.gem (100%)
Successfully installed daemons-1.2.2
Fetching: thin-1.6.3.gem (100%)
Building native extensions.  This could take a while...
Successfully installed thin-1.6.3
Parsing documentation for daemons-1.2.2
Installing ri documentation for daemons-1.2.2
Parsing documentation for eventmachine-1.0.7
Installing ri documentation for eventmachine-1.0.7
Parsing documentation for thin-1.6.3
Installing ri documentation for thin-1.6.3
Done installing documentation for daemons, eventmachine, thin after 11 seconds
3 gems installed

Having created the Ruby Gems, I followed the thin instruction on the web site, and created the following Ruby web server:

app = proc do |env|
  [
    200,             # Status code
    {                # Response headers
      'Content-Type' => 'text/html',
      'Content-Length' => '12',
    },
    ['Hello World!'] # Response body
  ]
end
 
# You can install Rack middlewares
# to do some crazy stuff like logging,
# filtering, auth or build your own.
use Rack::CommonLogger
 
run app

Then, I tested the Ruby web server with the following command:

thin start -R thin.ru

It displayed the following test server as the result of localhost:3000 URL:

ThinRubyWebServer

As always, I hope this helps those who land on this page.


PlanetMySQL Voting: Vote UP / Vote DOWN

FromDual.en: FromDual Performance Monitor for MySQL and MariaDB 0.10.1 has been released

$
0
0

FromDual has the pleasure to announce the release of the new version 0.10.1 of its popular Database Performance Monitor for MySQL, MariaDB, Galera Cluster and Percona Server fpmmm.

You can download fpmmm from here.

In the inconceivable case that you find a bug in fpmmm please report it to our Bug-tracker.

Any feedback, statements and testimonials are welcome as well! Please send them to feedback@fromdual.com.

This release contains various minor bug fixes and improvements. Mainly it was a rewrite from Perl into PHP.

New installation of fpmmm v0.10.1

Please follow our mpm installation guide. A specific fpmmm installation guide will follow with the next version.

Prerequisites

CentOS 6

# yum install php-cli php-process php-mysqli

# cat << _EOF >/etc/php.d/fpmmm.ini
variables_order = "EGPCS"
date.timezone = 'Europe/Zurich'
_EOF

rpm -Uvh http://repo.zabbix.com/zabbix/2.2/rhel/6/x86_64/zabbix-release-2.2-1.el6.noarch.rpm
yum update
yum install zabbix-sender

CentOS 7

# yum install php-cli php-process php-mysqli

# cat << _EOF >/etc/php.d/fpmmm.ini
variables_order = "EGPCS"
date.timezone = 'Europe/Zurich'
_EOF

rpm -Uvh http://repo.zabbix.com/zabbix/2.2/rhel/7/x86_64/zabbix-release-2.2-1.el7.noarch.rpm
yum update
yum install zabbix-sender

Ubuntu 14.04

# apt-get install php5-cli php5-mysqlnd

# cat << _EOF >/etc/php5/cli/conf.d/fpmmm.ini
variables_order = "EGPCS"
date.timezone = 'Europe/Zurich'
_EOF

apt-get install zabbix-agent

OpenSuSE 13.1

# zypper install php5 php5-posix php5-mysql php5-pcntl php5-curl

#cat << _EOF >/etc/php5/conf.d/fpmmm.ini
variables_order = "EGPCS"
date.timezone = 'Europe/Zurich'
_EOF

zypper addrepo http://download.opensuse.org/repositories/server:/monitoring/openSUSE_13.1 server_monitoring
zypper update
zypper install zabbix-agent

Upgrade from mpm 0.x to fpmmm 0.10.1

# cd /opt
# tar xf /download/fpmmm-0.10.1.tar.gz
# rm -f fpmmm
# ln -s fpmmm-0.10.1 fpmmm

You further have to replace all mysql_performance_monitor_agent.pl hooks (in Zabbix agent) by bin/fpmmm.

Changes in fpmmm v0.10.1

fpmmm agent

  • Defaults in fpmmm.conf.template adapted.
  • Item sending prepared for empty strings.
  • Log of cachedData more verbose.
  • zabbix_sender stuff fixed and made more robust.
  • New naming convention fpmmm implemented.
  • Connection problems and error catching fixed.
  • NDB cluster and PBXT stuff removed and locking made more robust.
  • zabbix-sender on SuSE should work now as well. Bug #149.
  • exec/system replaced by my_exec.
  • Debug parameter replaced by LogLevel parameter, including all templates and warning for deprecation.
  • export LC_ALL=C added to all O/S calls to make it language independent.
  • Usage added (--help).
  • All Perl code replaced by PHP code.
  • Bug fix on cache clean-up on corruption.
  • Mac OSX (darwin) support added, partially.
  • Changed defaults away from /tmp This is no good location for persistent things because of RedHat tmpcleaner job.
  • Debugging info added for missing lock file.

fpmmm agent and MaaS

  • none.

Various modules

  • Regexp pattern fixed for mr_versions.

MySQL module

  • Trailing / from datadir is removed.

InnoDB module

  • Innodb buffer pool hit ratio rounded to 2 digits.
  • Innodb_os_log_written item added.
  • InnoDB hash searches item fixed.

Galera module

  • Galera status now gathered with causal reads off.

Memcached module

  • Memcached stuff activated.

DRBD module

  • Bug report on new DRBD fixed.

fpmmm templates for Zabbix

  • Security template data typo fixed.
  • Templates moved from xml folder to tpl folder and other file structure and renaming.
  • InnoDB Flush Log at Transaction Commit Serverity lowered from Warning to Information.

For subscriptions of commercial use of fpmmm please get in contact with us.


PlanetMySQL Voting: Vote UP / Vote DOWN

Percona Live 2015 Wrap-up: Bigger and better every year

$
0
0
Mon, 2015-04-20 20:43
Marc Sherwood

So I am now back in my office in Vancouver, BC after an amazing week in Santa Clara for the Percona Live MySQL Conference and Expo. I though that I would take a break from trying to catch up with my email and write down some quick thoughts about this great event. 

This year's event was announced to be the largest in several years, with an estimated 1200 people in attendance. To me what stands out about this number is just how it supports the fact that the MariaDB and MySQL community is growing and stronger than ever. If we assume that each of the 1200 attendees were our of the office for the full three days we are looking at 28,800 hours dedicated to learning and sharing about MariaDB and MySQL at this event!

This year our team has eight talks/tutorials and keynotes combined. You can see a full list of our talks here. We will also have our slide decks, and any recordings published on our website soon. Follow us on Twitter and FaceBook for updates. 

We also brought back our caricature artist from EventToons this year, and this was once again a big hit. You can check out the rest of the drawings here. We ran out of time to get drawings done for everyone, so next year we may have to have the artist in the booth longer. Or you can find us at another one of our events for another chance to get your drawing done.

During this year's event we also announced the Spring 2015 release of MariaDB Enterprise. This release includes:

  • Optimized server binaries that can increase overall database performance by more than 15%; these binaries are the result of careful profiling and optimizing for typical use cases
  • Enhanced HA (high availability) and scalability on the highly cost-effective IBM POWER8 architecture supported by Galera clustering
  • Expanded choice of supported operating systems - RHEL 7.1 (little endian), SLES 12 and Ubuntu 14.04 binaries for the IBM POWER8 architecture
  • Enhanced customer experience with online subscription management now available via the MariaDB Customer Portal

MariaDB MaxScale 1.1 was also announced at this event. Our team had a talk about MaxScale and our customer (Booking.com) also talked about how they use MaxScale for BinLog Servers. Both of these talks were to full rooms. We also found many others who were in different stages of deploying MaxScale for some very interesting use cases. This is a product to watch for sure!

At events we often run a short survey to gather some information on how the adoption of MariaDB is progressing, and to see what is on top of mind for those who are attending the shows.

Between MariaDB Enterprise and MariaDB Community we are catching up to the number of those who are running MySQL Community, and are equal to the number of those who are running MySQL Enterprise. Keeping in mind that those using MariaDB may be more likely to stop by our booth and fill out our survey, but none the less MariaDB's adoption is growing quickly.

The question of "What are your key areas of interest around databases" shows that high availability and performance are still very much the hot topics.

About the Author

Marc Sherwood's picture

Marc Sherwood is North American Marketing Manager.


PlanetMySQL Voting: Vote UP / Vote DOWN

Ever Wondered How Pythian is Kind of Like a Fire Truck?

$
0
0
pierce____enforcerg____-54ee03db38d10


I have.

Coming from the world of selling fire trucks I’m used to selling necessary solutions to customers in need. The stakes are high. If the truck doesn’t perform best case scenario it’s a false alarm. Worst case scenario someone, many people, die.

Let me tell you a bit about fire trucks.

A lot of people think that a fire truck is a fire truck. That there is some factory where fire trucks are made, carbon copies of one another, varying only in what they carry – water, a pump, a ladder. That’s not the case. Every truck is custom engineered, designed, and manufactured from scratch. Things can go wrong. In a world where response time is everything, you don’t want something to go wrong. Not with the fire truck. Not when everything else is going wrong. Not when someone is trapped in their vehicle. Not when a house is burning down.

For the past five years I have been selling disaster management systems. There has been a clear, immediate, pressing need from my customers. I loved the urgency, I fed off that energy, helping people in charge of saving lives come up with solutions that help them do just that. When first walking into Pythian, I didn’t understand the importance of data, I didn’t comprehend the stakes. But they are present and the analogy can be made.

Pythian’s services are like a fire truck.

Data is like your house, your car, your life. When your business is dependent on your data and your data fails, your business fails. Data failures are serious. Downtime causes huge revenue losses as well as loss of trust and reputation. Identity theft, loss of security, these disasters are pressing threats in our digitized society.

Pythian’s FIT-ACER program is like your Fire Marshall.

We don’t just prepare for disasters, we help prevent them. Modeled after the Mayo Clinic’s patient checklist, Pythian’s FIT-ACER human reliability check acknowledges that no matter how intelligent our DBAs are (http://www.pythian.com/experts/) they can still make mistakes:

FIT-ACER: Pythian Human Reliability Checklist

F

Focus (SLOW DOWN! Are you ready?)

A

Assess the command (SPEND TIME HERE!)

I

Identify server/DB name, time, authorization

C

Check the server / database name again

T

Type the command (do not hit enter yet)

E

Execute the command

R

Review and document the results

We don’t just hire the best to do the best work, we hire the best, make sure they’re at their best, check their best, and apply their best. Every time we interact with your data we do so at a high level to improve your system, to prevent disaster.  And we answer our phones when disaster hits.

The average response time for a fire crew in Ontario is 6 minutes. The average response time for Pythian is under 4.

Take it from someone who knows disaster,

Pythian’s the best fire truck around.


PlanetMySQL Voting: Vote UP / Vote DOWN

Connector/Python 2.0

VividCortex Receives the MySQL Application of the Year Award

$
0
0

Last week at Percona Live, VividCortex received the MySQL community award for 2015 Application of the Year.

Baron Schwartz, our founder and CEO, is quoted, “It’s an honor to receive this award from the MySQL community. We aim to raise the bar for database monitoring the same way MySQL has raised the bar for open source databases. Our product would not be at this point without the dedication and help of our employees, friends, customers and investors. We thank them for their support and look forward to many years of mutually beneficial relationships. On a personal note, as a previous recipient of Community Member of the Year award, and having dedicated the last decade of my life to the MySQL community, this is deeply meaningful to me.”

If you have not yet tried VividCortex, sign up for a free trial to get unprecedented insights into your databases.


PlanetMySQL Voting: Vote UP / Vote DOWN

SQL Load Balancing Benchmark - Comparing Performance of MaxScale vs HAProxy

$
0
0

In a previous post, we gave you a quick overview of the MaxScale load balancer and walked through installation and configuration. We did some quick benchmarks using sysbench, a system performance benchmark that supports testing CPU, memory, IO, mutex and also MySQL performance. We will be sharing the results in this blog post.

Sysbench setup

For our tests we used the latest version of sysbench, straight from bzr. Installation is simple. First, make sure you have all the prerequisites. For Ubuntu these are: libmysqlclient-dev (or equivalent), bzr, automake, make, libtool and libssl-dev.

Get the code and compile it:

$ cd /root
$ bzr branch lp:sysbench
$ cd /root/sysbench
$ ./autogen.sh
$ ./configure
$ make
$ make install

The next step was to prepare database for a benchmark. We created the ‘sbtest’ schema and granted access to it to the ‘sbtest’ user with a correct password. After that, populate the database using the following command:

$ sysbench \
--test=/root/sysbench/sysbench/tests/db/oltp.lua \
--mysql-host=10.69.179.54 \
--mysql-port=3307 \
--mysql-user=sbtest \
--mysql-password=sbtest \
--oltp-tables-count=128 \
--oltp-table-size=400000 \
prepare

Once complete, it is time for some benchmarking.


Performance benchmarks

We were interested mostly in the proxy’s throughput thus we executed a series of read-only sysbench OLTP tests. The exact command looked as below:

$ sysbench \
--test=/root/sysbench/sysbench/tests/db/oltp.lua \
--num-threads=512 \
--max-requests=0 \
--max-time=600 \
--mysql-host=10.69.179.54 \
--mysql-port=3307 \
--mysql-user=sbtest \
--mysql-password=sbtest \
--oltp-tables-count=128 \
--oltp-read-only=on \
--oltp-skip-trx=on  \
--report-interval=1 \
--oltp-table-size=400000 \
run

Now, one of the gotchas we ran into while evaluating MaxScale - when using RW service, is that all reads headed directly to the ‘Master’. After some head scratching, we found that, by default, sysbench uses explicit transactions (see --oltp-skip-trx=on in the sysbench command above). MaxScale implements read/write split in a way that may be slightly misleading before you get used to it - reads are split across "slave" nodes, but there are some exceptions. One of them are transactions that are started explicitly - if your app executes queries using BEGIN; ... ; COMMIT; , then all such queries will be routed to the single ‘Master’ instance. As a result, we had to add --oltp-skip-trx=on flag to the sysbench program to make sure reads will be split onto the slaves.

Let’s take a look at the results. Hardware-wise, we’ve been using r3.4xlarge EC2 instances for a proxy/sysbench node and three r3.2xlarge EC2 instances for Galera nodes. Workload was in-memory, CPU bound. Thanks to scalability improvements in MySQL 5.6, we were able to fully saturate all 8 CPU cores on an instance when running sysbench directly against a node - this confirmed that results won’t be skewed by MySQL’s scalability limitations.

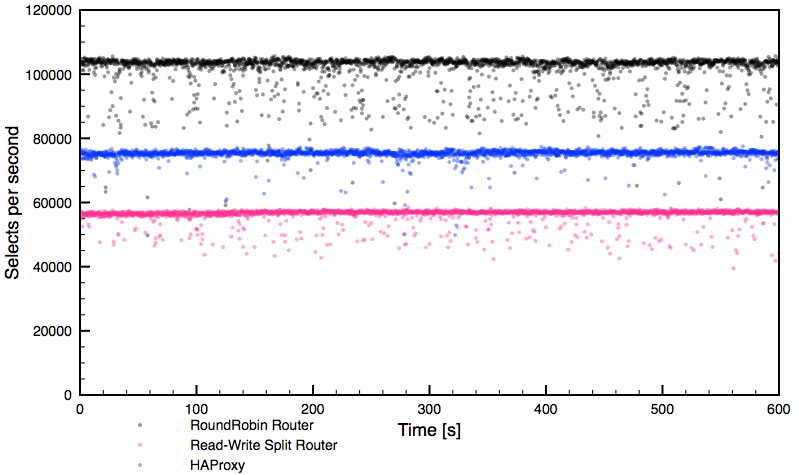
As can be seen, each routing method provided fairly stable performance with occasional drops. What’s important to clarify - HAProxy fully saturated one CPU core so this level of performance, around 75k selects per second, is the maximum we can get from this proxy under the test workload. 

On the other hand, the round-robin MaxScale router hit contention of some kind outside of the proxy itself - neither network nor CPU were saturated on the proxy or the Galera nodes. We were not able to push through this level of performance. While performing a sanity check using direct connections to Galera, bypassing the proxy, we were only able to reach the same level of performance, confirming it is something outside of MaxScale. We did not investigate further, AWS is a bit too black-boxish for that and it wasn’t really necessary. The total theoretical throughput of the system under our workload was ~135 - 140k selects per second (two nodes with 100% CPU utilization, delivered ~90-95k selects per second).

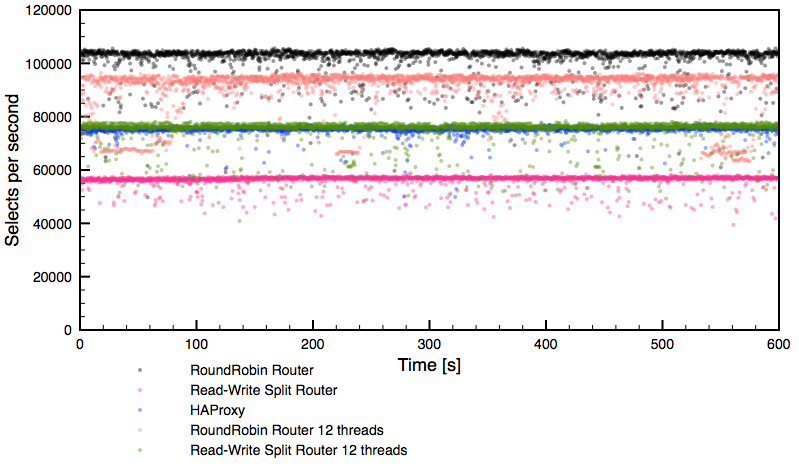
The read-write split router performed around ~57k of selects per second, saturating four cores - MaxScale was configured to use four threads. Having seen that, we repeated the benchmark allowing MaxScale to use 12 threads. Here are results:

We can see that read-write split router (green dots) bypassed HAProxy’s performance (blue dots). What we can’t see on the graph, but it was captured by us during the benchmark, was that MaxScale used almost nine CPU cores to get there:

   PID USER      PR  NI    VIRT    RES    SHR S  %CPU %MEM     TIME+ COMMAND
 31612 root      20   0 1389876  62860   4392 R 877.2  0.0 339:53.56 maxscale
 34485 root      20   0 8435680  48384   1640 S 317.8  0.0  28:46.06 sysbench

R3.4xlarge has 16 virtual cores so there was still room for growth. It seems like this was a maximum possible throughput under our conditions.

What’s interesting is that the round-robin like setup, using readconnroute router, performed worse while having 12 threads (versus when we had 4 threads) enabled in MaxScale’s configuration. After a short investigation, we could see an internal contention on mspin_lock which decreased the performance. What else we can see? Readconnroute router definitely had issues with maintaining stable performance - drops are noticeable and long-running.


Response time results

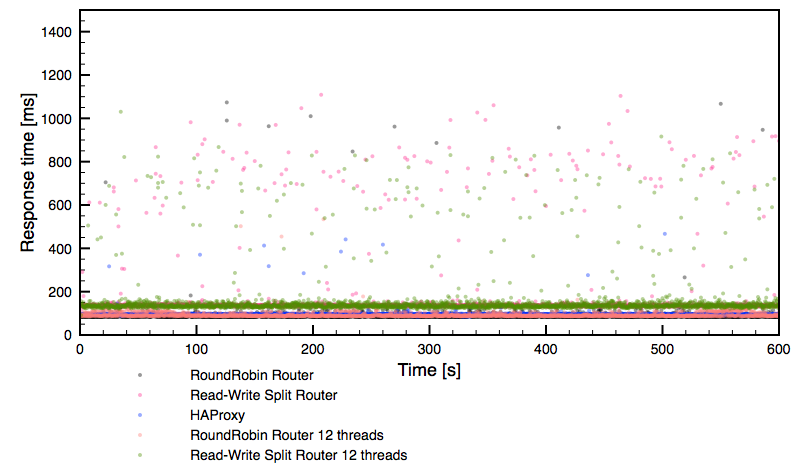
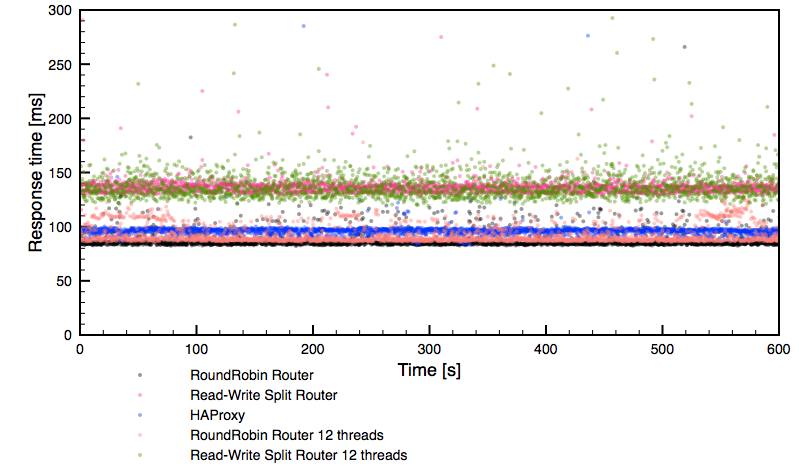
Let’s check the response time graphs. Below, you can see a global overview followed by a zoom into the 0 - 300ms region.

Rather expected results, in line with the performance we have seen in earlier graphs. It’s worth noticing though that both 12 thread configurations delivered much less stable performance than the rest of the setups tested.


Conclusions

Let’s try to draw some conclusions from the data. First, MaxScale allows you to implement read/write split without the need to redesign your application. All you need to do is to setup MaxScale with the correct configuration (readwritesplit router). At least, that’s the theory. In practice, your application cannot use explicit transactions (which is not that big limitation per se, but if you do use them, you will not be able to benefit from RW split in an easy way). There are some other gotchas regarding the use of user-defined variables in queries. Those are pretty valid limitations, which are totally understandable, but it has to be said that one can’t expect that RW split in MaxScale will work in all of the cases. You should take some time to read MaxScale’s documentation to familiarize with any other limitations which may affect your particular workload.

Second, MaxScale RW split, while it was able to bypass HAProxy by a small margin in terms of the performance, required significant CPU resources to get there (9 cores compared to HAProxy’s single core) and its performance was not as stable as HAProxy’s. It’s obviously caused by the additional logic needed for a RW split (a MaxScale configuration similar to HAProxy, round-robin, delivered much higher performance than HAProxy and comparable in the stability) but it makes this setup not necessarily the best option to use in all cases.

Taking it all under consideration, we’d say that, for now at least, if you have the possibility of performing a RW split on the application side, you might want to consider it - setup two listeners in the way we did it in this test. Use readconnroute router for reads and readwritesplit router for writes. In that way you’ll be able to read from all nodes of the cluster while writing only to one of them, to minimize chances of deadlocks in Galera. If your application does not allow you to do that, you can still use readwritesplit router to get a RW split even when it results in additional CPU utilization on the proxy’s node. It’s great to have this option even if it comes with a reduced overall performance.

Having said that, the workload that we tested was designed to stress a proxy - it’s very unlikely that your application will want to execute 75k selects per second. Heavier queries will take longer time and total throughput will be much lower. You can also be less CPU-bound but more I/O-bound - usually databases do not fit entirely in the InnoDB buffer pool. In such cases you may never notice the performance limits of the MaxScale readwritesplit router. As usual, it’s all about performing tests and checking what works best in your environment.

Last but not least, MaxScale is still a pretty new software and we’d expect it to mature with every release, adding new options and removing design and scalability limitations. It’s definitely nice to have more options when it comes to proxies, especially when the proxy is database-centric.

Blog category:


PlanetMySQL Voting: Vote UP / Vote DOWN

SSL/TLS and RSA Improvements for OpenSSL Linked MySQL 5.7 Binaries

$
0
0

What?

MySQL 5.7 server binaries compiled with the OpenSSL library now make it easy to set up SSL/TLS and RSA artifacts, and to enable them within MySQL. Two new read-only global options have been introduced through this work:

  • --auto-generate-certs: Enables automatic generation and detection of SSL artifacts at server start-up.
  • --sha256-password-auto-generate-rsa-keys: Enables automatic generation of an RSA key pair.

These options govern automatic generation and detection of SSL/TLS artifacts and RSA key pairs respectively. Auto generated files are placed inside the data directory, and both options now default to ON.

For the sha256_password authentication plugin, the private key and public key file locations already default to the data directory and hence, automatic detection of these files was already in place. Due to this existing functionality, the sole function of --sha256-password-auto-generate-rsa-keys is related to automatic key generation.

Why?

Using encrypted connections in communications with the server protects one’s data from the eyes of malicious entities while in transit. This is especially important when the server and clients are connected through open and/or insecure networks. While MySQL does provide a definitive guide to help users set up certificates and keys, one still needs to take the following steps in order to enable SSL/TLS manually within the MySQL server:

  1. Use the steps provided in the documentation to generate the certificates
  2. Move these certificates and keys to a secure location
  3. Update the MySQL server configuration file to specify the location of these certificates
  4. Start the MySQL server in order to use the new SSL artifacts

The case is similar when it comes to RSA keys. While the documentation helps you in generating an RSA key pair, using the newly generated key still requires steps similar to those mentioned above.

Our aim is to make MySQL secure by default. At the same time, we also want to make sure that it is easy to setup this secure environment with very little user intervention. These new options are a step towards this goal. These new server options default to ON, and hence in the absence of existing SSL/TLS artifacts and/or an RSA key pair, automatic generation of them will take place resulting in the MySQL server automatically having the capability to create secure connections immediately. This will be convenient for users who wish to create secure connections to the MySQL server without going through the trouble of generating SSL/TLS artifacts and/or RSA key pairs by themselves and then configuring the server to use them.

Note that the purpose of this functionality is to encourage users to use secure methods when connecting to the server by making the initial secure configuration easy. For better security, it is strongly recommended that users later switch to a valid set of certificates signed by a recognized certificate authority as soon as possible, rather than continuing to use the auto generated certificates indefinitely.

How?

Auto-enabling SSL support

The option --auto-generate-certs kicks in if none of the ssl command line options (except --ssl of course!) are specified. It works in following manner:

  • Step 1: Check whether any of the ssl command line options except --ssl are specified, if so, the server will skip automatic generation and try to use the supplied options.
    ...
    2014-09-23T06:56:07.353216Z 0 [Note] Skipping generation of SSL certificates as options related to SSL are specified.
    ...
  • Step 2: Check for existing SSL/TLS artifacts in the data directory. If they exist then the automatic creation process is skipped with a message similar to following:
    ...
    2014-09-23T06:56:45.146238Z 0 [Note] Skipping generation of SSL certificates as certificate files are present in data directory.
    ...

    Note that we check for the presence of ca.pem, server-cert.pem, and server-key.pem files as these three files are essential for enabling SSL support within the MySQL server.
  • Step 3: If the certificate files are not present in the data directory then the new certificate files—ca.pem, server-cert.pem, and server-key.pem—are generated and placed within the data directory.
    Upon successful automatic generation of these files, the MySQL server will log a message similar to following:
    ...
    2014-09-23T06:58:03.184170Z 0 [Note] Auto generated SSL certificates are placed in data directory.
    ...

From this set of generated files, ca.pem, server-cert.pem, and server-key.pem are used for the --ssl-ca, --ssl-cert and --ssl-key options respectively. These auto generated files allow SSL/TLS support to be automatically enabled within the MySQL server from the get-go.

mysql> show variables like '%ssl%';
+---------------+-----------------+
| Variable_name | Value           |
+---------------+-----------------+
| have_openssl  | YES             |
| have_ssl      | YES             |
| ssl_ca        | ca.pem          |
| ssl_capath    |                 |
| ssl_cert      | server-cert.pem |
| ssl_cipher    |                 |
| ssl_crl       |                 |
| ssl_crlpath   |                 |
| ssl_key       | server-key.pem  |
+---------------+-----------------+
9 rows in set (0.01 sec)

mysql> show status like 'Ssl_cipher';
+---------------+--------------------+
| Variable_name | Value              |
+---------------+--------------------+
| Ssl_cipher    | DHE-RSA-AES256-SHA |
+---------------+--------------------+
1 row in set (0.00 sec)

Furthermore, an extra set of X509 certificates and private keys are generated, which can be used as the client certificate and key.

Some of the properties of the automatically generated certificates and keys are:

  • The RSA key is 2048 bits.
  • The certificates are signed using the sha256 algorithm.
  • The certificates are valid for 1 year.
  • The subject line of the certificates contain only the common name (CN) field.
  • The naming convention for the generated CN is:
    <MySQL_Server_Version>_Auto_Generated_Certificate

    Where MySQL_Server_Version is fixed at compile time. TYPE can be one of the CA, Server and Client. e.g.
    CN=MySQL_Server_X.Y.Z_Auto_Generated_Server_Certificate
  • The new CA certificate is self-signed and other certificates are signed by this new auto generated CA certificate and private key.
 Auto-enabling RSA support for sha256_password authentication

Much like auto-enabling SSL/TLS support, --sha256-password-auto-generate-rsa-keys is responsible for automatic generation of the RSA key pair. When the client tries to connect to the server using the sha256_password authentication plugin, a password is never sent in cleartext. By default, the sha256_password plugin attempts to use an SSL connection. If MySQL is built with OpenSSL, an additional option of using RSA encryption is also available to the client. The MySQL server exposes --sha256_password_private_key_path and --sha256_password_public_key_path, which can be used to point to an RSA private key and public key respectively at server startup.

The new --sha256-password-auto-generate-rsa-keys option works in following manner:

  • Step 1: Check if a non-default value for either --sha256_password_private_key_path or --sha256_password_public_key_path is used. If so, the server will skip automatic generation and try to obtain keys from the specified location(s).
    ...
    2014-09-23T06:59:22.776254Z 0 [Note] Skipping generation of RSA key pair as options related to RSA keys are specified.
    ...
  • Step 2: If the default location is used for both of these options, then check if the private_key.pem and public_key.pem files are present in the data directory. If these files are found, then auto generation is skipped.
    ...
    2014-09-23T06:56:45.160448Z 0 [Note] Skipping generation of RSA key pair as key files are present in data directory.
    ...
  • Step 3: Otherwise we generate the private_key.pem and public_key.pem files with a key length of 2048 bits. These files are then placed within the data directory and are picked up automatically by the server.
    ...
    2014-09-23T06:58:03.363858Z 0 [Note] Auto generated RSA key files are placed in data directory.
    ...

Again, these keys are then automatically picked up by the MySQL server thus enabling RSA support for the sha256_password authentication from the get-go.

mysql> show variables like 'sha256_password%';
+----------------------------------------+-----------------+
| Variable_name                          | Value           |
+----------------------------------------+-----------------+
| sha256_password_auto_generate_rsa_keys | ON              |
| sha256_password_private_key_path       | private_key.pem |
| sha256_password_public_key_path        | public_key.pem  |
+----------------------------------------+-----------------+
3 rows in set (0.00 sec)

mysql> show status like '%public_key%'\G
*************************** 1. row ***************************
Variable_name: Rsa_public_key
       Value: -----BEGIN PUBLIC KEY-----
MIIBIjANBgkqhkiG9w0BAQEFAAOCAQ8AMIIBCgKCAQEAuTlv3K2nKl8+PbutlSxX
mJ9+S9iW9Bz0Y6QWXa+FwNH00e2ZYBTfhemx25JmcLS1nI6yyX/ToV9d+s9yWLEf
9gaa8wpE8rfzucfy/BpyrQidF2coSKNW50SMbPG7nEkkC0p6iCw+ejCZhqNBKUEK
uYajrdUhnj/dNVTpIoCDteAC14oDMN0ZbhhnuNM0loZGW2LQMPNG3r9UxXbs/d31
nKa07jkIA0t89QtYH4FVYTek582EDwdFm/yWDizFGxmllVmOL3A50GsX72YT+8VF
l1hI39t6vQGskMDsoSjDpMOGzQBeNXdeNHy8gl/QG4ZrREFd9lvlC5Won1MRo7TJ
FwIDAQAB
-----END PUBLIC KEY-----
 1 row in set (0.00 sec)

As always, a big thank you for using MySQL and we look forward to your input on these new features! Please let us know if you have any questions, or if you encounter any problems. You can leave a comment here on the blog post or in a support ticket. If you feel that you encountered any related bugs, please do let us know via a bug report.


PlanetMySQL Voting: Vote UP / Vote DOWN

MySQL 5.7 milestone

$
0
0

MySQL 5.7 will be a great milestone in MySQL total history.
Oracle has released many useful new features in LAB version . MySQL is becoming more similar to Oracle database :)

Read this presentation I post on slideshare:

MySQL 5.7 milestone


PlanetMySQL Voting: Vote UP / Vote DOWN

Considering Sharding with MySQL? Join my April 22 webinar. Questions welcome!

$
0
0

Sharding with MySQLMySQL sharding is one of the most used and surely the most abused MySQL scaling technology. My April 2 Dzone article, “To Shard, or Not to Shard,” proved there is indeed quite an interest in this topic.

As such, I’m hosting a live webinar tomorrow (April 22) that shed light on questions about sharding with MySQL. It’s titled: To Shard or Not to Shard That is the Question!

I’ll be answering questions such as:

  • Is sharding right for your application or should you use other scaling technologies?
  • If you’re sharding, what things do you need to consider and which questions do you need to have answered?
  • What kind of specific technologies can assist you with sharding?

I hope you can make it for this April 22. Please register now and bring your questions, as sharing them with me and the other attendees is half of the fun of live webinars. :)

Or if you prefer, share your questions about sharding with MySQL in the comments section below, and I’ll do my best to answer them. I’ll be writing a followup post that will include all questions and my answers soon. A recording of this webinar along with my slides will also be available here afterwards.

The post Considering Sharding with MySQL? Join my April 22 webinar. Questions welcome! appeared first on MySQL Performance Blog.


PlanetMySQL Voting: Vote UP / Vote DOWN

Percona Live Presentation: MySQL Security Essentials

$
0
0

The slides for my MySQL Security Essentials presentation at Percona Live 2015 MySQL Conference and Expo are now available.

In this presentation I discuss just how insecure legacy versions of MySQL are and what are the essential requirements for securing your installation on disk, via network and with user privileges. I provide recommendations for how to manage application access for your most important data asset.

This presentation describes the key security improvements in MySQL 5.6 and MySQL 5.7 as well as additional features provided in MariaDB 10.0 and 10.1 supporting roles and encryption.

I have also included slides for how easy it is to Hack MySQL and examples of denial of service attacks that are possible with even limited MySQL access.


PlanetMySQL Voting: Vote UP / Vote DOWN

MySQL Enterprise Edition Database Firewall – Control and Monitor SQL Statement Executions

$
0
0

As of MySQL 5.6.24, MySQL Enterprise Edition includes MySQL Enterprise Firewall, an application-level firewall (it runs within the mysql database process) that enables database administrators to permit or deny SQL statement execution based on matching against whitelists of accepted statement patterns. This helps harden MySQL Server against attacks such as SQL injection or attempts to exploit applications by using them outside of their legitimate query workload characteristics.

Each MySQL account registered with the firewall has its own whitelist of statement patterns (a tokenized representation of a SQL statement), enabling protection to be tailored per account. For a given account, the firewall can operate in recording or protecting mode, for training in the accepted statement patterns or protection against unacceptable statements. The diagram illustrates how the firewall processes incoming statements in each mode.

MySQL Enterprise Firewall Operation

(from https://dev.mysql.com/doc/refman/5.6/en/firewall.html)

If you do not have a MySQL Enterprise Edition license, you may download a trial version of the software via Oracle eDelivery. The MySQL Firewall is included in the MySQL Product Pack, specifically for MySQL Database 5.6.24 or higher.

MySQL Enterprise Firewall has these components:

  • A server-side plugin named MYSQL_FIREWALL that examines SQL statements before they execute and, based on its in-memory cache, renders a decision whether to execute or reject each statement.
  • Server-side plugins named MYSQL_FIREWALL_USERS and MYSQL_FIREWALL_WHITELIST implement INFORMATION_SCHEMA tables that provide views into the firewall data cache.
  • System tables named firewall_users and firewall_whitelist in the mysql database provide persistent storage of firewall data.
  • A stored procedure named sp_set_firewall_mode() registers MySQL accounts with the firewall, establishes their operational mode, and manages transfer of firewall data between the cache and the underlying system tables.
  • A set of user-defined functions provides an SQL-level API for synchronizing the cache with the underlying system tables.
  • System variables enable firewall configuration and status variables provide runtime operational information.

(from https://dev.mysql.com/doc/refman/5.6/en/firewall-components.html)

Installing the Firewall

Installing the firewall is fairly easy. After you install MySQL version 5.6.24 or greater, you simply execute an SQL script that is located in the $MYSQL_HOME/share directory. There are two versions of the script, one for Linux and one for Windows (the firewall isn’t supported on the Mac yet).

The scripts are named win_install_firewall.sql for Windows and linux_install_firewall.sql for linux. You may execute this script from the command line or via MySQL Workbench. For the command line, be sure you are in the directory where the script is located.

shell> mysql -u root -p mysql < win_install_firewall.sql
Enter password: (enter root password here)

The script create the firewall tables, functions, stored procedures and installs the necessary plugins. The script contains the following:

# Copyright (c) 2015 Oracle and/or its affiliates. All rights reserved.
# Install firewall tables
USE mysql;
CREATE TABLE IF NOT EXISTS mysql.firewall_whitelist( USERHOST VARCHAR(80) NOT NULL, RULE text NOT NULL) engine= MyISAM;
CREATE TABLE IF NOT EXISTS mysql.firewall_users( USERHOST VARCHAR(80) PRIMARY KEY, MODE ENUM ('OFF', 'RECORDING', 'PROTECTING', 'RESET') DEFAULT 'OFF') engine= MyISAM;

INSTALL PLUGIN mysql_firewall SONAME 'firewall.dll';
INSTALL PLUGIN mysql_firewall_whitelist SONAME 'firewall.dll';
INSTALL PLUGIN mysql_firewall_users SONAME 'firewall.dll';

CREATE FUNCTION set_firewall_mode RETURNS STRING SONAME 'firewall.dll';
CREATE FUNCTION normalize_statement RETURNS STRING SONAME 'firewall.dll';
CREATE AGGREGATE FUNCTION read_firewall_whitelist RETURNS STRING SONAME 'firewall.dll';
CREATE AGGREGATE FUNCTION read_firewall_users RETURNS STRING SONAME 'firewall.dll';
delimiter //
CREATE PROCEDURE sp_set_firewall_mode (IN arg_userhost VARCHAR(80), IN arg_mode varchar(12))
BEGIN
IF arg_mode = "RECORDING" THEN
  SELECT read_firewall_whitelist(arg_userhost,FW.rule) FROM mysql.firewall_whitelist FW WHERE FW.userhost=arg_userhost;
END IF;
SELECT set_firewall_mode(arg_userhost, arg_mode);
if arg_mode = "RESET" THEN
  SET arg_mode = "OFF";
END IF;
INSERT IGNORE INTO mysql.firewall_users VALUES (arg_userhost, arg_mode);
UPDATE mysql.firewall_users SET mode=arg_mode WHERE userhost = arg_userhost;

IF arg_mode = "PROTECTING" OR arg_mode = "OFF" THEN
  DELETE FROM mysql.firewall_whitelist WHERE USERHOST = arg_userhost;
  INSERT INTO mysql.firewall_whitelist SELECT USERHOST,RULE FROM INFORMATION_SCHEMA.mysql_firewall_whitelist WHERE USERHOST=arg_userhost;
END IF;
END //
delimiter ;

After you run the script, the firewall should be enabled. You may verify it by running this statement:

mysql> SHOW GLOBAL VARIABLES LIKE 'mysql_firewall_mode';
+-------------------------------+-------+
| Variable_name                 | Value |
+-------------------------------+-------+
| mysql_firewall_max_query_size |  4096 |
| mysql_firewall_mode           |    ON |
| mysql_firewall_trace          |   OFF |
+-------------------------------+-------+

Testing the Firewall

To test the firewall, you may use a current mysql user, but we are going to create a test user for this example – webuser@localhost. (The user probably doesn’t need all privileges, but for this example we will grant everything to this user)

CREATE USER 'webuser'@'localhost' IDENTIFIED BY 'Yobuddy!';
'GRANT ALL PRIVILEGES ON *.* TO 'webuser'@'localhost' WITH GRANT OPTION'

OPTIONAL: For our test, we will be using the sakila schema provided by MySQL. You may download the sakila database schema (requires MySQL 5.0 or later) at http://dev.mysql.com/doc/index-other.html. If you don’t want to use the sakila database, you may use your own existing database or create a new database.

After downloading the sakila schema, you will have two files, named sakila-schema.sql and sakila-data.sql. Execute the sakila-schema.sql first, and then sakila-data.sql to populate the database with data. If you are using the command line, simply do the following: (substitute UserName for a mysql user name)

# mysql -uUserName -p < sakila-schema.sql
# mysql -uUserName -p < sakila-data.sql

After creating the sakila schema and importing the data, we now set the firewall to record those queries which we want to allow:

mysql> CALL `mysql`.`sp_set_firewall_mode`("webuser@localhost","RECORDING")
+-----------------------------------------------+
| read_firewall_whitelist(arg_userhost,FW.rule) |
+-----------------------------------------------+
| Imported users: 0  Imported rules: 0          |
+-----------------------------------------------+
1 row in set (0.14 sec)

+-------------------------------------------+
| set_firewall_mode(arg_userhost, arg_mode) |
+-------------------------------------------+
| OK                                        |
+-------------------------------------------+
1 row in set (0.22 sec)
Query OK, 5 rows affected (0.28 sec)

We can check to see the firewall mode via this statement, to be sure we are in the recording mode:

mysql> SELECT * FROM MYSQL.FIREWALL_USERS;
+-------------------+------------+
| USERHOST          | MODE       |
+-------------------+------------+
| webuser@localhost |  RECORDING |
+-------------------+------------+
1 row in set (0.02 sec)

Now that we have recording turned on, let’s run a few queries:

mysql> use sakila
Database changed
mysql> show tables;
+----------------------------+
| Tables_in_sakila           |
+----------------------------+
| actor                      |
| actor_info                 |
| address                    |
| category                   |
| city                       |
| country                    |
| customer                   |
| customer_list              |
| film                       |
| film_actor                 |
| film_category              |
| film_list                  |
| film_text                  |
| inventory                  |
| language                   |
| nicer_but_slower_film_list |
| payment                    |
| rental                     |
| sales_by_film_category     |
| sales_by_store             |
| staff                      |
| staff_list                 |
| store                      |
+----------------------------+
23 rows in set (0.00 sec)

mysql> select * from actor limit 2;
+----------+------------+-----------+---------------------+
| actor_id | first_name | last_name | last_update         |
+----------+------------+-----------+---------------------+
|        1 | PENELOPE   | GUINESS   | 2006-02-15 04:34:33 |
|        2 | NICK       | WAHLBERG  | 2006-02-15 04:34:33 |
+----------+------------+-----------+---------------------+
2 rows in set (0.13 sec)

mysql> select first_name, last_name from actor where first_name like 'T%';
+------------+-----------+
| first_name | last_name |
+------------+-----------+
| TIM        | HACKMAN   |
| TOM        | MCKELLEN  |
| TOM        | MIRANDA   |
| THORA      | TEMPLE    |
+------------+-----------+
4 rows in set (0.00 sec)

We turn off the recording by turning on the protection mode:

mysql> CALL `mysql`.`sp_set_firewall_mode`("webuser@localhost","PROTECTING");
+-------------------------------------------+
| set_firewall_mode(arg_userhost, arg_mode) |
+-------------------------------------------+
| OK                                        |
+-------------------------------------------+
1 row in set (0.00 sec)

We can check to see the firewall mode via this statement:

mysql> SELECT * FROM MYSQL.FIREWALL_USERS;
+-------------------+------------+
| USERHOST          | MODE       |
+-------------------+------------+
| webuser@localhost | PROTECTING |
+-------------------+------------+
1 row in set (0.02 sec)

And we can look at our whitelist of statements:

mysql>  SELECT * FROM MYSQL.FIREWALL_WHITELIST;
+-------------------+-------------------------------------------------------------------+
| USERHOST          | RULE                                                              |
+-------------------+-------------------------------------------------------------------+
| webuser@localhost | SELECT * FROM actor LIMIT ?                                       |
| webuser@localhost | SELECT SCHEMA ( )                                                 |
| webuser@localhost | SELECT first_name , last_name FROM actor WHERE first_name LIKE ?  |
| webuser@localhost | SHOW TABLES                                                       |
+-------------------+-------------------------------------------------------------------+
4 rows in set (0.00 sec)

The firewall is now protecting against non-whitelisted queries. We can execute a couple of the queries we previously ran, which should be allowed by the firewall.

mysql> show tables;
+----------------------------+
| Tables_in_sakila           |
+----------------------------+
| actor                      |
| actor_info                 |
| address                    |
| category                   |
| city                       |
| country                    |
| customer                   |
| customer_list              |
| film                       |
| film_actor                 |
| film_category              |
| film_list                  |
| film_text                  |
| inventory                  |
| language                   |
| nicer_but_slower_film_list |
| payment                    |
| rental                     |
| sales_by_film_category     |
| sales_by_store             |
| staff                      |
| staff_list                 |
| store                      |
+----------------------------+
23 rows in set (0.01 sec)

Now we run two new queries, which should be blocked by the firewall.

mysql> select * from rental;
ERROR 1045 (42000): Firewall prevents statement

mysql> select * from staff;
ERROR 1045 (42000): Firewall prevents statement

The server will write an error message to the log for each statement that is rejected. Example:

2015-03-21T22:59:05.371772Z 14 [Note] Plugin MYSQL_FIREWALL reported:
'ACCESS DENIED for webuser@localhost. Reason: No match in whitelist.
Statement: select * from rental '

You can use these log messages in your efforts to identify the source of attacks.

To see how much firewall activity you have, you may look look at the status variables:

mysql> SHOW GLOBAL STATUS LIKE 'Firewall%';
+-------------------------+-------+
| Variable_name           | Value |
+-------------------------+-------+
| Firewall_access_denied  | 42    |
| Firewall_access_granted | 55    |
| Firewall_cached_entries | 78    |
+-------------------------+-------+

The variables indicate the number of statements rejected, accepted, and added to the cache, respectively.

The MySQL Enterprise Firewall Reference is found at https://dev.mysql.com/doc/refman/5.6/en/firewall-reference.html.


Tony Darnell is a Principal Sales Consultant for MySQL, a division of Oracle, Inc. MySQL is the world’s most popular open-source database program. Tony may be reached at info [at] ScriptingMySQL.com and on LinkedIn.
Tony is the author of Twenty Forty-Four: The League of Patriots 

Visit http://2044thebook.com for more information.


PlanetMySQL Voting: Vote UP / Vote DOWN

Locking accounts in MySQL 5.7

$
0
0

I’ve written previously about use cases where having accounts which cannot be used to establish client connections are useful. There are various hacks to accomplish this with legacy versions (insert invalid password hash into mysql.user table, etc.), and we introduced the mysql_no_login authentication plugin for this very purpose. Now as of MySQL 5.7.6, account locking gets native support through the ACCOUNT LOCK clause of CREATE USER and ALTER USER commands. This post revisits the use cases which drove this feature and the implementation details.

Use Cases

Security best practices dictate giving accounts the minimum privileges required, and in some cases, that means no client connections.  As an example, views or stored programs may be defined to execute with the privileges of an account different than the one invoking them.  My specific use case explored earlier was encountered while creating stored procedures to help enforce a password policy. These scripts needed access to the mysql.user table, as well as privileges to set account flags to require password changes. By creating the stored routines with an explicit DEFINER and associated security context, and ensuring that account cannot be used for client connections, we eliminate the possibility that the account credentials can be compromised and leveraged to perform unexpected actions.

Another use case relates to proxy users.  Especially relevant now that MySQL 5.7 adds support for proxy users with native authentication plugins to emulate SQL roles, it’s a good practice to define the base user that is proxied as an account which cannot be directly accessed.  All access should happen through the accounts which can proxy the base account.

Usage

Creating a user account that is locked is simple:

mysql> CREATE USER locked@localhost ACCOUNT LOCK;
Query OK, 0 rows affected (0.00 sec)

Modifying an existing account to lock it or unlock it is similarly easy:

mysql> ALTER USER locked@localhost ACCOUNT UNLOCK;
Query OK, 0 rows affected (0.00 sec)

mysql> ALTER USER locked@localhost ACCOUNT LOCK;
Query OK, 0 rows affected (0.00 sec)

The lock status is reflected in the (new to 5.7) SHOW CREATE USER output:

mysql> SHOW CREATE USER locked@localhost\G
*************************** 1. row ***************************
CREATE USER for locked@localhost: CREATE USER 'locked'@'localhost' IDENTIFIED 
WITH 'mysql_native_password' REQUIRE NONE PASSWORD EXPIRE DEFAULT ACCOUNT LOCK
1 row in set (0.00 sec)

When attempting to connect using an account that is locked, users are given error code 3118 and the following error message:

R:\mysql-5.7.7>bin\mysql -ulocked -P3310
ERROR 3118 (HY000): Access denied for user 'locked'@'localhost'. Account is locked.

Account lock status is checked during the authentication stage (establishing a new connection or COM_CHANGE_USER). That means that if you issue ALTER USER ... ACCOUNT LOCK, it will not impact existing connections for the specified user (notable especially for environments where persistent connections are used). To affect existing connections, you will need to also issue KILL CONNECTION commands.

Examples

The above point is important in that it also enables the use cases described earlier. Here’s how to use it with roles-emulating PROXY USER capabilities:

mysql> ALTER USER locked@localhost ACCOUNT UNLOCK;
Query OK, 0 rows affected (0.00 sec)

mysql> ALTER USER locked@localhost ACCOUNT LOCK;
Query OK, 0 rows affected (0.00 sec)

mysql> CREATE USER base@localhost ACCOUNT LOCK;
Query OK, 0 rows affected (0.00 sec)

mysql> GRANT SELECT ON mysql.user TO base@localhost;
Query OK, 0 rows affected (0.00 sec)

mysql> CREATE USER user@localhost;
Query OK, 0 rows affected (0.00 sec)

mysql> GRANT PROXY ON base@localhost TO user@localhost;
Query OK, 0 rows affected (0.00 sec)

mysql> SET @@global.check_proxy_users = ON,
    ->     @@global.mysql_native_password_proxy_users = ON;
Query OK, 0 rows affected (0.00 sec)

mysql> exit
Bye

R:\mysql-5.7.7>bin\mysql -uuser -P3310
Welcome to the MySQL monitor.  Commands end with ; or \g.
Your MySQL connection id is 6
...
mysql> SELECT USER(), CURRENT_USER(), @@session.proxy_user;
+----------------+----------------+----------------------+
| USER()         | CURRENT_USER() | @@session.proxy_user |
+----------------+----------------+----------------------+
| user@localhost | base@localhost | 'user'@'localhost'   |
+----------------+----------------+----------------------+
1 row in set (0.00 sec)

mysql> SELECT user, host, account_locked FROM mysql.user;
+--------+-----------+----------------+
| user   | host      | account_locked |
+--------+-----------+----------------+
| root   | localhost | N              |
| locked | localhost | Y              |
| base   | localhost | Y              |
| user   | localhost | N              |
+--------+-----------+----------------+
4 rows in set (0.00 sec)

The base@localhost account cannot be directly accessed, yet the privileges associated with that account can be proxied to other accounts and used without those end user accounts being affected by the locked status of the base@localhost account. Also as seen above, the account_locked column of mysql.user reflects whether the account is locked or not.

Conclusion

By introducing the ability to explicitly lock (and unlock) accounts, MySQL 5.7 makes it easier to apply security best practices by restricting accounts from establishing client connections.


PlanetMySQL Voting: Vote UP / Vote DOWN

Running Galera on Kubernetes

$
0
0

I recently gave a presentation at Percona Live 2015 in Santa Clara, CA. In this presentaiton I originally wanted to simply show running MySQL replication, first asynchronous, and more importantly, a Galera cluster, and in so doing, demonstrate how useful Kubernetes is.

Why?

The talk was a good chance to introduce the MySQL community-- developers, DBAs, sysadmins, and others to what Kubernetes is and what it means for MySQL

A bit of learning

I thought at the time when I submitted my synopsis that the talk would be straightforward. About 2-3 months ago, I started working on the setup I would use for the demonstration. My goal was to use a stock CoreOS cluster with the necessary Kubernetes components installed and running as a cluster.

The reality was that there was a bit more to it than that. Isn't that how everything that has to do with complex systems is? To make a long story short, I tried the Vagrant setup for CoreOS but using the cloud-init scripts in Kubernetes documentation but I could never get complete success running a Kubernetes cluster this way. Hence, the blog post I recently published that covered my basic setup.

Finally, using the process outlined in that [post], I had a Kubernetes cluster that consistently worked for the most part. Some gotchas were that upon launching the cluster, the cloud-init scripts had dependencies that required downloading various binaries required to run Kubernetes and set up networking. A slow network connection resulted in failure because of this particular timing-- something I plan to fix and contribute back to the community.

Asynchronous Replication

With a working Kubernetes cluster, I decided it was time to first start with regular MySQL asyncronous replication since it might present a more simple proof of concept. The way to do this was essentially to modify the standard MySQL Docker container to have a master and slave variant. The higher abstraction of this is that there will be two pods - a master pod, and a slave pod. For the master pod, only one container will run. The slave pod could run one or more containers.

The master container is built using a Dockerfile that specifies and entrypoint shell script. This is the basic pattern that the stock MySQL container uses, albeit only to set up essential MySQL settings, particularly the root user and password. This modifications to this entrypoint script sets up the replication user privileges (name, password, and host to allow). In order to do this, when the container is started, environment variables are passed from the pod configuration file supplying the mysql root password, replication username, and replication password. The host to allow connection from uses 10.x.x.x as that's the IP range that Kubernetes uses to assigns to pods. This range would cover any container in the slave pod(s) that would need to connect as a slave. With these environment variables, the entrypoint script builds up an SQL script that runs these priviledge modification is run with MySQL in insecure mode (for initialization) using mysqld --initialize-insecure=on. Additionally, a script called "random.sh" runs to set the server-id value in my.cnf. Once the master pod is running, a master service is started called mysql_master which the great functionality of Kubernetes makes availble as environment variables MYSQL_MASTER_HOST and MYSQL_MASTER_PORT on any container launched there afterword, including the slave container.

From the entrypoint script:

echo "GRANT REPLICATION SLAVE, REPLICATION CLIENT on *.* TO '$MYSQL_REPLICATION_USER'@'10.100.%' IDENTIFIED BY '$MYSQL_REPLICATION_PASSWORD';" >> "$tempSqlFile"

The slave container is built similar to the master container with regard to the Dockerfile specifying an entrypoint script, except instead of setting up privileges, it sets up replication by running the CHANGE MASTER... in the sql script that is built up using the aforementioned environment variables both passed and available through Kubernetes MYSQL_MASTER_HOST which is the master the slave is set up to read from.

From the entrypoint script:

if [ ! -z "$MYSQL_MASTER_SERVICE_HOST" ]; then
    echo "STOP SLAVE;" >> "$tempSqlFile"
    echo "CHANGE MASTER TO master_host='$MYSQL_MASTER_SERVICE_HOST', master_user='$MYSQL_REPLICATION_USER', master_password='$MYSQL_REPLICATION_PASSWORD';">> "$tempSqlFile"
    echo "START SLAVE;" >> "$tempSqlFile"
fi

This actually is quite straightforward and worked the first time I prototyped it. I first ran it as two separate containers, passing the environment variables explicitly - like the example below:

docker run -e MYSQL_ROOT_PASSWORD=c-kr1t capttofu/mysql_master_kubernetes
docker run -e MYSQL_MASTER_SERVICE_HOST=x.x.x.x -e MYSQL_ROOT_PASSWORD=c-kr1t capttofu/mysql_slave_kubernetes

Once I verified this, it was a matter of creating master and slave pod files (to view follow links)

This proved the basic concept worked. That being, using an entrypoint script to set up the dabase in advance.

Galera replication

For Galera replication, it seemed it might actually be more simple since when setting up Galera replication one need not concern themselves with binary log position nor how to get a snapshot of data-- that being handled by Galera (SST - single state transfer when joining). The difficulty was due to the fact that services can only have a single port and IP using the version of Kubernetes that I had to use for my demo. Galera replication requires 4 ports: 3306, 4444, 4567, and 4568. In newer versions of Kubernetes support multiple ports. The way I planned to get around this is that I took advantage of the read-only Kubernete API running on the host value found in the enviroment variable $KUBERNETES_RO_SERVICE_HOST on every container Kubernetes starts (in a pod). The Kubernetes client kubectl is included on the Docker image. The entrypoint script in turn runs kubectl and parses the output for every pod named "pxc_0", iterating from 1 to 3, in a loop, building up the string used for wsrep_cluster_address. Of course, if the container is launched and the environment variable WSREP_CLUSTER_ADDRESS is set to gcomm://, then that value is used, in this case the pod pxc_node1, the "bootstrap" pod.

Galera replication is pretty simple once you know which hosts will be part of the cluster. In this case, the pattern is to launch the pxc_node1 pod as the bootstrap pod, then pxc_node2 and pxc_node3. When this is completed, there should be a cluster.

Actual steps

First, set up a Kubernetes cluster per my blog post.

Pre-reqs

Build the kubernetes client program:

$ git clone https://github.com/GoogleCloudPlatform/kubernetes 
$ cd kubernetes
kubernetes $ make
kubernetes $ sudo cp cmd/kubectl /usr/local/bin


Clone the kubernetes mysql replication repository

$ git clone https://github.com/CaptTofu/mysql_replication_kubernetes.git
$ cd mysql_replication_kubernetes
mysql_replication_kubernetes $ git submodule init
mysql_replication_kubernetes $ git submodule update


Create pxc_01 pod

mysql_replication_kubernetes $ cd galera_sync_replication
galera_sync_replication $ kubectl create -f pxc-node1.yaml 
pxc-node1


Verify pod is running

galera_sync_replication $ kubectl get pods
POD                 IP                  CONTAINER(S)        IMAGE(S)                                     HOST                            LABELS              STATUS              CREATED
pxc-node1           10.244.78.2         pxc-node1           capttofu/percona_xtradb_cluster_5_6:latest   172.16.230.131/172.16.230.131   name=pxc-node1      Pending 5 Seconds 

In the example above, the status is Pending. Once the status is Running, create the second pod

Create pxc-node2 and pxc-node3 pod

Once pxc_node1 has a status of Running, create pxc_node2 and pxc_node3:

galera_sync_replication $ kubectl create -f pxc-node2.yaml 
pxc-node2
galera_sync_replication $ kubectl create -f pxc-node3.yaml 
pxc-node3


Create a service for pxc-node1

From before, recall that pxc-node1 is running on the kubernetes minion/node with an IP address of 172.16.230.131. Edit the configuration file for pxc_node1 service to make it possible to connect to the pxc_node1 pod using that address with publicIPs. Edit pxc-node1-service.yaml:

---
  id: pxc-node1
  kind: Service
  apiVersion: v1beta1
  port: 3306
  containerPort: 3306
  selector:
    name: pxc-node1
  labels:
    name: pxc-node1
  publicIPs:
  - 172.16.230.131

Once this file is ready, create the service

galera_sync_replication $ kubectl create -f pxc-node3.yaml 
pxc-node3


Verify everything is running

There should be all three pods running (status Running) and a single pxc_node1 service:

galera_sync_replication $ kubectl get pods,services
POD                 IP                  CONTAINER(S)        IMAGE(S)                                     HOST                            LABELS              STATUS              CREATED
pxc-node1           10.244.78.2         pxc-node1           capttofu/percona_xtradb_cluster_5_6:latest   172.16.230.131/172.16.230.131   name=pxc-node1      Running             About an hour
pxc-node2           10.244.75.2         pxc-node2           capttofu/percona_xtradb_cluster_5_6:latest   172.16.230.139/172.16.230.139   name=pxc-node2      Running             About an hour
pxc-node3           10.244.11.2         pxc-node3           capttofu/percona_xtradb_cluster_5_6:latest   172.16.230.144/172.16.230.144   name=pxc-node3      Running             54 minutes
NAME                LABELS                                    SELECTOR            IP                  PORT
kubernetes          component=apiserver,provider=kubernetes   <none>              10.100.0.2          443
kubernetes-ro       component=apiserver,provider=kubernetes   <none>              10.100.0.1          80
pxc-node1           name=pxc-node1                            name=pxc-node1      10.100.43.123       3306

The output above shows that everything is up and running-- time to connect to the database!

Access pxc-node1 service

Services are created immediately, so the database can be immediately accessed

$ mysql -u root -p -h 172.16.230.131
Enter password: 
Welcome to the MariaDB monitor.  Commands end with ; or \g.
Your MySQL connection id is 6
Server version: 5.6.22-72.0-56 Percona XtraDB Cluster (GPL), Release rel72.0, Revision 978, WSREP version 25.8, wsrep_25.8.r4150

Copyright (c) 2000, 2015, Oracle, MariaDB Corporation Ab and others.

Type 'help;' or '\h' for help. Type '\c' to clear the current input statement.

MySQL [(none)]> show status like 'wsrep_inc%'
    -> ;
+--------------------------+----------------------------------------------------+
| Variable_name            | Value                                              |
+--------------------------+----------------------------------------------------+
| wsrep_incoming_addresses | 10.244.78.2:3306,10.244.11.2:3306,10.244.75.2:3306 |
+--------------------------+----------------------------------------------------+
1 row in set (0.01 sec)

This output shows that all three Galera nodes are up and running!

Summary

With this proof of concept, there is much more to do. Most of all, it would be good to use replication controllers instead of simple pods to create the three galera single-container pods. That way, there is a means of ensuring that all pods will continue to run. It would also be good to demonstrate this proof-of-concept's value by launching an application that uses this Galera cluster. At least at this point, there is something very useful to start with!

Special thanks to -- Kelsey Hightower, Tim Hockin, Daniel Smith and others in #google-containers for their patience and excellent help!


PlanetMySQL Voting: Vote UP / Vote DOWN

Playing with count(*) optimizer work

$
0
0

Article about bug report #68814 related to testing count(*) explain plan.

Or sales table huge enough to play with.

mysql> select count(*) from sales;
+----------+
| count(*) |
+----------+
|  2500003 |
+----------+
1 row in set (0.56 sec)

First with regular count(*) without where clause:

mysql> explain select count(*) from sales\G
*************************** 1. row ***************************
           id: 1
  select_type: SIMPLE
        table: sales
         type: index
possible_keys: NULL
          key: sales_cust_idx
      key_len: 4
          ref: NULL
         rows: 2489938
        Extra: Using index
1 row in set (0.00 sec)

Estimated rows -> rows: 2489938

Then with {where sales_id > 0}:

mysql> explain select count(*) from sales where sales_id > 0\G
*************************** 1. row ***************************
           id: 1
  select_type: SIMPLE
        table: sales
         type: range
possible_keys: PRIMARY
          key: PRIMARY
      key_len: 4
          ref: NULL
         rows: 1244969
        Extra: Using where; Using index
1 row in set (0.00 sec)

Estimated rows -> rows: 1244969 -> so there is difference between query with {sales_id > 0} and with no clause.
Another one with {where sales_id > 1800000}:

mysql> explain select count(*) from sales where sales_id > 1800000\G
*************************** 1. row ***************************
           id: 1
  select_type: SIMPLE
        table: sales
         type: range
possible_keys: PRIMARY
          key: PRIMARY
      key_len: 4
          ref: NULL
         rows: 1244969
        Extra: Using where; Using index
1 row in set (0.00 sec)

Estimated rows -> rows: 1244969
So there is no difference between {sales_id > 1800000} and {sales_id > 0} (by mean of explain plan and estimated rows)

Another interesting thing:

-- 1
mysql> explain select count(*) from sales where sales_id >0 or  sales_id <0\G
*************************** 1. row ***************************
           id: 1
  select_type: SIMPLE
        table: sales
         type: range
possible_keys: PRIMARY
          key: PRIMARY
      key_len: 4
          ref: NULL
         rows: 1244970
        Extra: Using where; Using index
1 row in set (0.00 sec)

Estimated rows -> rows: 1244969 + 1

-- 2

mysql> explain select count(*) from sales where sales_id >0 or  sales_id <=0\G
*************************** 1. row ***************************
           id: 1
  select_type: SIMPLE
        table: sales
         type: index
possible_keys: PRIMARY
          key: sales_cust_idx
      key_len: 4
          ref: NULL
         rows: 2489938
        Extra: Using where; Using index
1 row in set (0.00 sec)

Estimated rows: 2489938

The post Playing with count(*) optimizer work appeared first on Azerbaijan MySQL UG.


PlanetMySQL Voting: Vote UP / Vote DOWN

Connecting to MariaDB through an SSH Tunnel

$
0
0
Wed, 2015-04-22 08:05
martinbrampton

When you want to connect a client to a database server through an insecure network, there are two main choices: use SSL or use an SSH tunnel. Although SSL often may seem to be the best option, SSH tunnels are in fact easier to implement and can be very effective. Traffic through an SSH tunnel is encrypted with all of the security of the SSH protocol, which has a strong track record against attacks.

There are various ways to implement an SSH tunnel. This article suggests a simple approach which is adequate in many situations. For the examples here, let’s assume that there is a database server running on a host named, server.example.com, with an IP address of 1.2.3.4. Suppose further that the client is on a host named, client.example.com, with an IP address of 5.6.7.8. We’ll also suppose that there are tightly configured iptables firewalls on both systems.

Dealing with Firewalls

The first step is to open the firewall for SSH communications between the systems. Let’s use the standard port for SSH (i.e., port 22). The tunnel will be instigated by the client. So the iptables script on the server might contain something like this:

IP_CLIENT=5.6.7.8
IPTABLES=/sbin/iptables
# Accept inbound packets that are 
# part of previously-OK’ed sessions

$IPTABLES -A INPUT -m state --state RELATED,ESTABLISHED -j ACCEPT
...
$IPTABLES -A INPUT -s $IP_CLIENT -p tcp -j ACCEPT --dport 22 -m state --state NEW

On the client side, the iptables script might include the following entries:

IP_SERVER=1.2.3.4
IPTABLES=/sbin/iptables
# Accept inbound packets that are part of previously-OK’ed sessions
$IPTABLES -A INPUT -m state --state RELATED,ESTABLISHED -j ACCEPT
…
$IPTABLES -A OUTPUT -d $IP_SERVER -p tcp --dport 22 -m state --state NEW -j ACCEPT

It’s useful to establish dedicated users on each machine. We’ll assume we’ve done that and called them simply, tunnel on both. They shouldn’t have any special privileges, but they need to have a home directory (assumed to be /home/tunnel) and the ability to run a command shell.

Preparing SSH Keys

The user on the client side will need to create SSH keys. This can be done by executing the ssh-keygen utility while logged in as the tunnel user like so:

ssh-keygen -t DSA -b 1024 -C tunnel@client.example.com

This example uses DSA, although you could use RSA. The last parameter, indicated by -C is purely a comment and doesn’t affect the use of the keys. The comment will be added to the end of the public key, and is useful for keeping track of what key belongs to what system.

When you execute the ssh-keygen command, it will offer to create the keys in the /home/tunnel/.ssh directory. This is fine; just accept this choice. It will also ask for a password, but this isn’t needed. So we’ll ignore it and press return. The result will be two files in the /home/tunnel/.ssh directory called id_dsa and id_dsa.pub. The first is the secret key, which should be kept secure. The second file is the public key, which can be distributed freely.

Now we need to place a copy of the public key on to the server system. It needs to go into the file called, /home/tunnel/.ssh/authorized_keys. Assuming this is the first key to be used on the server system for the tunnel user, the id_dsa.pub file can be copied into the server directory /home/tunnel/.ssh and renamed to authorized_keys. If not, you can append it to the end of the file by executing something like this at the command-line from the directory where you’ve uploaded the id_dsa.pub file:

cat id_dsa.pub >> /home/tunnel/.ssh/authorized_keys

You could also use a simple text editor to copy the contents of the id_dsa.pub file to the end of the authorized_keys file. Just put what you paste on a separate line in that file.

Testing the SSH Connection

Once the keys have been created and put where they belong, we should be able to log into the server with the tunnel user from the client, without having to enter a password. We would do that by executing this from the command-line:

ssh tunnel@server.example.com

The first time you do this, there should be a message that says that it is an unknown server. Just confirm that you want to go ahead with the connection. After this first time, you won’t get this message. If it connects successfully, you have proved that the tunnel user can make a connection to the server.

To make the SSH tunnel robust, it’s helpful to run a utility called autossh. This monitors an SSH tunnel and re-establishes it if it fails. You can find it in the standard repositories for Debian and Ubuntu or may need to add one of the well known additional repositories for other distributions. Once you’ve done that, autossh can be installed using the standard package management tools for the distribution (e.g., aptitude or yum).

Establishing an SSH Tunnel

We’re now ready to establish the SSH tunnel. In a Debian based installation, probably the best place to put the command to establish the tunnel is the directory, /etc/network/if-up.d. For Centos/Red Hat, it could go in the /etc/rc.local directory.

You would execute something like this from the command-line:

su - tunnel -c ‘autossh -M 0 -q -f -N -o “ServerAliveInterval 60” -o \ 
“ServerAliveCountMax 3” -L 4002:localhost:3306 tunnel@server.example.com’

Once we’ve executed that, we will have established port 4002 on the client and it will be connected to port 3306 on the server. If the command is run manually, the software invoked will run in the background and the terminal can be closed. The command can be placed in a script, though, that will run automatically at startup.

Connecting to MariaDB

Assuming the server has a MariaDB running on the default port and we have the MariaDB client installed on the client machine, we can now connect to MariaDB on the server. We would enter something like the first line below at the command-line on the client, and should see a message in response similiar to the one that followings:

mysql -u root -p –host=‘127.0.0.1’ –port=4002

Welcome to the MariaDB monitor.  Commands end with ; or \g.
Your MariaDB connection id is 164575
Server version: 10.1.1-MariaDB-1~wheezy-wsrep-log mariadb.org binary distribution, wsrep_25.10.r4123

Copyright (c) 2000, 2014, Oracle, SkySQL Ab and others.

Type ‘help;’ or ‘\h’ for help. Type ‘\c’ to clear the current input statement.

MariaDB [(none)]> 

Conclusion

Generating SSH keys is a simpler process than the creation of SSL certificates, and the deployment is easier too. From my experience, there have also been fewer vulnerabilities with SSH than SSL. There is obviously some overhead in using an SSH tunnel, compared with an unencrypted connection. However, the overhead seems to be about the same as that imposed by SSL. The gain in security, though, is considerable.

About the Author

martinbrampton's picture

Martin Brampton is Principal Software Engineer at MariaDB


PlanetMySQL Voting: Vote UP / Vote DOWN

Percona Live MySQL & Expo Conference: GTID Replication slides

$
0
0

If you couldn’t have the chance to attend my session “GTID Replication – Implementation and Troubleshooting” at Percona Live MySQL & Expo Conference in Santa Clara April 13-16, 2015, the slides of my presentation are now available.
The talk was mainly about the new feature in MySQL 5.6 “GTID”, what is the concept, benefits, GTID replication implementation and troubleshooting and how to perform the migration from classic replication to GTID replication in both MySQL 5.6 and 5.7.
If you have any question, feel free to contact me :)


PlanetMySQL Voting: Vote UP / Vote DOWN

Much ado about nothing

$
0
0
Kyle does amazing work with Jepsen and I am happy that he devotes some of his skill and time into making MongoDB better. This week a new problem was reported as stale reads despite the use of the majority write concern. Let me compress the bug report and blog post for you, but first this isn't a code bug this is expected behavior for async replication.

  1. MongoDB implements asynchronous master-slave replication
  2. Commits can be visible to others on the master before oplog entries are sent to the slave
The problem occurs when transaction 1 commits a change on the master, transaction 2 views that change on the master, the master disappears and a slave is promoted to be the new master where the oplog entries from transaction 1 never reached any slave. At this point transaction 1 didn't happen and won't happen on the remaining members of the replica set yet transaction 2 viewed that change. A visible commit has been lost.

When reading MongoDB source I noticed this in early 2014. See my post on when MongoDB makes a transaction visible. I even included a request to update the docs for write concerns and included this statement:
I assume the race exists in that case too, meaning the update is visible on the primary to others before a slave ack has been received.
This isn't a bug, this is async replication. You can fix it by adding support for sync replication. The majority write concern doesn't fix it because that only determines when to acknowledge the commit, it does not determine when to make the commit visible to others.  For now the problem might be in the documentation if it wasn't clear about this problem. The majority write concern is a lot like semisync replication in MySQL and then clever people added lossless semisync replication so that commits aren't visible on the master until they have been received by a slave. Finally, really clever people got lossless semisync replication running in production and we were much happier.


PlanetMySQL Voting: Vote UP / Vote DOWN

Breakpoints for stored procedures and functions

$
0
0

and without creating a table to pass the state around (really just an excuse to use the named locks feature).

DELIMITER //
DROP FUNCTION IF EXISTS SET_BREAKPOINT//
CREATE FUNCTION SET_BREAKPOINT()
RETURNS tinyint
NO SQL
BEGIN
	-- Acquire lock 1
	-- Wait until lock 2 is taken to signal that we may continue
	DO GET_LOCK(CONCAT('lock_1_', CONNECTION_ID()), -1);
	REPEAT
		DO 1;
	UNTIL IS_USED_LOCK(CONCAT('lock_2_', CONNECTION_ID())) END REPEAT;
	DO RELEASE_LOCK(CONCAT('lock_1_', CONNECTION_ID()));

	-- Acquire lock 3 to acknowledge message to continue.
	-- Wait for lock 2 to be released as signal of receipt.
	DO GET_LOCK(CONCAT('lock_3_', CONNECTION_ID()), -1);
	REPEAT
		DO 1;
	UNTIL IS_FREE_LOCK(CONCAT('lock_2_', CONNECTION_ID())) END REPEAT;
	DO RELEASE_LOCK(CONCAT('lock_3_', CONNECTION_ID()));

	RETURN 1;
END//

DROP FUNCTION IF EXISTS NEXT_BREAKPOINT//
CREATE FUNCTION NEXT_BREAKPOINT(connection_id int)
RETURNS tinyint
NO SQL
BEGIN
	-- Acquire lock 2 as a signal to go past the breakpoint
	-- Wait until lock 3 is taken as signal of receipt.
	DO GET_LOCK(CONCAT('lock_2_', connection_id), -1);
	REPEAT
		DO 1;
	UNTIL IS_USED_LOCK(CONCAT('lock_3_', connection_id)) END REPEAT;
	DO RELEASE_LOCK(CONCAT('lock_2_', connection_id));

	RETURN 1;
END//

DROP PROCEDURE IF EXISTS test_the_breakpoints//
CREATE PROCEDURE test_the_breakpoints()
NO SQL
BEGIN
	SELECT CONCAT('In another session: DO NEXT_BREAKPOINT(', CONNECTION_ID(), ');') as `instructions`;

	DO SET_BREAKPOINT();

	SELECT 'do it again' as `now:`;

	DO SET_BREAKPOINT();

	SELECT 'end' as `the`;
END//
DELIMITER ;

CALL test_the_breakpoints();

PlanetMySQL Voting: Vote UP / Vote DOWN
Viewing all 18789 articles
Browse latest View live


<script src="https://jsc.adskeeper.com/r/s/rssing.com.1596347.js" async> </script>