Quantcast
Channel: Planet MySQL
Viewing all 18788 articles
Browse latest View live

Percona Server 5.6.24-72.2 is now available

$
0
0

Percona ServerPercona is glad to announce the release of Percona Server 5.6.24-72.2 on May 8, 2015. Download the latest version from the Percona web site or from the Percona Software Repositories.

Based on MySQL 5.6.24, including all the bug fixes in it, Percona Server 5.6.24-72.2 is the current GA release in the Percona Server 5.6 series. Percona Server is open-source and free – and this is the latest release of our enhanced, drop-in replacement for MySQL. Complete details of this release can be found in the 5.6.24-72.2 milestone on Launchpad.

New Features:

  • TokuDB storage engine package has been updated to version 7.5.7.

Bugs Fixed:

  • A server binary as distributed in binary tarballs could fail to load on different systems due to an unsatisfied libssl.so.6 dynamic library dependency. This was fixed by replacing the single binary tarball with multiple tarballs depending on the OpenSSL library available in the distribution: 1) ssl100 – for all Debian/Ubuntu versions except Squeeze/Lucid (libssl.so.1.0.0 => /usr/lib/x86_64-linux-gnu/libssl.so.1.0.0 (0x00007f2e389a5000)); 2) ssl098 – only for Debian Squeeze and Ubuntu Lucid (libssl.so.0.9.8 => /usr/lib/libssl.so.0.9.8 (0x00007f9b30db6000)); 3) ssl101 – for CentOS 6 and CentOS 7 (libssl.so.10 => /usr/lib64/libssl.so.10 (0x00007facbe8c4000)); 4) ssl098e – to be used only for CentOS 5 (libssl.so.6 => /lib64/libssl.so.6 (0x00002aed5b64d000)). Bug fixed #1172916.
  • Executing a stored procedure containing a subquery would leak memory. Bug fixed #1380985 (upstream #76349).
  • A slave server restart could cause a 1755 slave SQL thread error if multi-threaded slave was enabled. This is a regression introduced by fix for bug #1331586 in 5.6.21-70.0. Bug fixed #1380985.
  • A string literal containing an invalid UTF-8 sequence could be treated as falsely equal to a UTF-8 column value with no invalid sequences. This could cause invalid query results. Bug fixed #1247218 by a fix ported from MariaDB (MDEV-7649).
  • Percona Server .deb binaries were built without fast mutexes. Bug fixed #1433980.
  • Installing or uninstalling the Audit Log Plugin would crash the server if the audit_log_file variable was pointing to an inaccessible path. Bug fixed #1435606.
  • The audit_log_file would point to random memory area if the Audit Log Plugin was not loaded into server, and then installed with INSTALL PLUGIN, and my.cnf contained audit_log_file setting. Bug fixed #1437505.
  • A specific trigger execution on the master server could cause a slave assertion error under row-based replication. The trigger would satisfy the following conditions: 1) it sets a savepoint; 2) it declares a condition handler which releases this savepoint; 3) the trigger execution passes through the condition handler. Bug fixed #1438990 (upstream #76727).
  • Percona Server client packages were built with with EditLine instead of Readline. This was causing history file produced by the client no longer easy to read. Further, a client built with EditLine could display incorrectly on PuTTY SSH client after its window resize. Bugs fixed #1266386, #1296192 and #1332822 (upstream #63130, upstream #72108 and #69991).
  • Unlocking a table while holding the backup binlog lock would cause an implicit erroneous backup lock release, and a subsequent server crash or hang at the later explicit backup lock release request. Bug fixed #1371827.
  • Initializing slave threads or executing CHANGE MASTER TO statement would crash a debug build if autocommit was disabled and at least one of slave info tables were configured as tables. Bug fixed #1393682.

Other bugs fixed: #1372263 (upstream #72080), #1436138 (upstream #76505), #1182949 (upstream #69453), #1111203 (upstream #68291), and #1384566 (upstream #74615).

Release notes for Percona Server 5.6.24-72.2 are available in the online documentation. Please report any bugs on the launchpad bug tracker .

The post Percona Server 5.6.24-72.2 is now available appeared first on MySQL Performance Blog.


PlanetMySQL Voting: Vote UP / Vote DOWN

MariaDB 10.0.19 now available

$
0
0

Download MariaDB 10.0.19

Release Notes Changelog What is MariaDB 10.0?

MariaDB APT and YUM Repository Configuration Generator

mariadb-seal-shaded-browntext-altThe MariaDB project is pleased to announce the immediate availability of MariaDB 10.0.19. This is a Stable (GA) release.

See the Release Notes and Changelog for detailed information on this release and the What is MariaDB 10.0? page in the MariaDB Knowledge Base for general information about the MariaDB 10.0 series.

Thanks, and enjoy MariaDB!


PlanetMySQL Voting: Vote UP / Vote DOWN

Eclipse, Java, MySQL

$
0
0

While I previously blogged about installing Netbeans 8, some of my students would prefer to use the Eclipse IDE. This post shows how to install and configure Eclipse IDE, include the mysql-connector-java.jar, and write Java to access the MySQL.

You can download Eclipse IDE and then open it in Fedora’s Archive Manager. You can use the Archive Manager to Extract the Eclipse IDE to a directory of your choice. I opted to extract it into my student user’s home directory, which is /home/student.

After extracting the Eclipse IDE, you can check the contents of the eclipse directory with the following command:

ls -al eclipse

You should see the following:

drwxrwxr-x.  8 student student   4096 May  8 22:16 .
drwx------. 33 student student   4096 May  8 21:57 ..
-rw-rw-r--.  1 student student 119194 Mar 20 07:10 artifacts.xml
drwxrwxr-x. 11 student student   4096 May  8 22:16 configuration
drwxrwxr-x.  2 student student   4096 Mar 20 07:10 dropins
-rwxr-xr-x.  1 student student  78782 Mar 20 07:08 eclipse
-rw-rw-r--.  1 student student    315 Mar 20 07:10 eclipse.ini
-rw-rw-r--.  1 student student     60 Mar 17 15:11 .eclipseproduct
drwxrwxr-x. 41 student student   4096 Mar 20 07:10 features
-rwxr-xr-x.  1 student student 140566 Mar 20 07:08 icon.xpm
drwxrwxr-x.  4 student student   4096 Mar 20 07:09 p2
drwxrwxr-x. 12 student student  40960 Mar 20 07:10 plugins
drwxrwxr-x.  2 student student   4096 Mar 20 07:10 readme

You can launch the Eclipse IDE with the following command-line from the eclipse directory:

./eclipse &

While you can run this from the /home/student/eclipse directory, it’s best to create an alias for the Eclipse IDE in the student user’s .bashrc file:

# Set alias for Eclipse IDE tool.
alias eclipse="/home/student/eclipse/eclipse"

The next time you start the student user account, you can launch the Eclipse IDE by entering eclipse in the search box opened by clicking on the Activities menu.

The following steps take you through installing Eclipse on Fedora Linux, which is more or less the same as any Linux distribution. It’s very similar on Windows platforms too.

Eclipse Installation

EclipseInstall_01

  1. Navigate to eclipse.org/downloads web page to download the current version of the Eclipse software. Click the Linux 32 Bit or Linux 64 Bit link, as required for your operating system.

  1. Click the Green Arrow to download the Eclipse software.

  1. The next dialog gives you an option to open or save the software. Click the Open with radio button to open the archive file.

  1. This the Linux Archive Manager. Click the Extract button from the menu tab to open the archive file.

  1. This extract button on file chooser dialog to install Eclipse into the /home/student/eclipse directory. Click the Extract button to let the Archive Manager create a copy of those files.

  1. The Archive Manager presents a completion dialog. Click the Close button to close the Archive Manager.

After installing the Eclipse software, you can configure Eclipse. There are sixteen steps to setup the Eclipse product. You can launch the product with the

Eclipse Setup

You need to launch the Eclipse application to perform the following steps. The syntax is the following when you did create the alias mentioned earlier in the blog post:

eclipse &

The following steps cover setting up your workspace, project, and adding the MySQL JDBC Java archive.

  1. The branding dialog may display for 30 or more seconds before the Eclipse software application launches.

  1. The Workspace Launcher opens first on a new installation. You need to designate a starting folder. I’m using /home/student/workspace as my Workspace. Click the OK button when you enter a confirmed workspace.

  1. After setting the Workspace Launcher, you open to the Eclipse Welcome page. Click second of the two icons on the left to open a working Eclipse environment. Alternatively, you can connect to Tutorials on the same page.

  1. From the developer view, click on the File menu option, the New option on the list, and the Java Project option on the floating menu. Eclipse will now create a new Java project.

  1. The New Java Project dialog lets you enter a project name and it also gives you the ability to set some basic configuration details. As a rule, you simply enter the Project Name and accept the defaults before clicking the Finish button.

  1. After creating the new Java project, Eclipse returns you to the Welcome page. Click second of the two icons on the left to open a working Eclipse environment.

  1. Now you should see the working environment. Sometimes it takes the full screen but initially it doesn’t. Navigate to the lower right hand side, and expand the window to full size.

  1. Now you should see the full screen view of the Eclipse working environment.

  1. Now you create a new Java class by navigating to the File menu options, then the New menu option, and finally choosing the Class floating menu.

  1. The New Java Class dialog requires you to provide some information about the Java object you’re creating. The most important thing is the Java class name.

  1. The only difference in this copy of the New Java Class dialog is that I’ve entered HelloWorld as the Java Class’s name. Click the Finish button when you’re done.

  1. Eclipse should show you the following HelloWorld.java file. It’s missing a main() method. Add a static main() method to the HelloWorld.java class source file.

  1. This form shows the changes to the HelloWorld.java file. Specifically, it adds the It’s missing a main() method. Add a static main() method to the HelloWorld.java class source file.

  1. You can click the green arrow from the tool panel or you can click the Run menu option and Run submenu choice to test your program.
    1
    2
    3
    4
    
    // Class definition.
    public class HelloWorld {
      public static void main(String args[]) {
        System.out.println("Hello World."); }}

  1. The Save and Launch dialog tells you that you’re ready to test creating a copy of the Java class file. Click the OK button to continue.

  1. The results from your program are written to the Console portion of the Eclipse IDE. This concludes the setup of a workspace, project, and deployment of actual Java classes.
    Hello World.

Add MySQL JDBC Library

The following instructions add the MySQL Library and demonstrate how to write Java programs that connect to the MySQL database. They also use the mysql project.

EclipseMySQLLib_01

  1. Navigate to the Project menu and choose the Properties menu option.

EclipseMySQLLib_02

  1. The Properties menu option opens the Properties for the mysql project on the Order and Export tab. Click the Libraries tab to add an external library.

EclipseMySQLLib_03

  1. In the Libraries tab click the Add Library… button on the right to add an external library.

EclipseMySQLLib_04

  1. In the JAR Selection dialog, click on Computer in the Places list, then click on usr, click on share, and click on java. The Name list should now include mysql-connector-java.jar file, and you should click on it before clicking on the OK button.

EclipseMySQLLib_05

  1. You create new Java class file by clicking on the File menu. Then, you choose the New menu option and the Class menu option from the floating menu.

EclipseMySQLLib_06

  1. Enter MysqlConnector as the name of the new Java class file and click the Finish button to continue.

EclipseMySQLLib_07

  1. Eclipse generates the shell of the MysqlConnector class as shown in the illustration to the left.

EclipseMySQLLib_08

  1. You should replace the MysqlConnector class shell with the code below. Then, click the green arrow or the Run menu and Run menu option to compile and run the new MysqlConnector Java class file.
    1
    2
    3
    4
    5
    6
    7
    8
    9
    10
    11
    12
    13
    14
    15
    16
    17
    18
    19
    20
    21
    22
    23
    24
    25
    
    import java.sql.Connection;
    import java.sql.DriverManager;
    import java.sql.SQLException;
     
    public class MysqlConnector extends Object {
      public static void main(String[] args) {
        try {
          /* The newInstance() call is a work around for some
             broken Java implementations. */
          Class.forName("com.mysql.jdbc.Driver").newInstance();
     
          /* Verify the Java class path. */
          System.out.println("====================");
          System.out.println("CLASSPATH [" + System.getProperty("java.class.path") + "]");
          System.out.println("====================");
     
        } catch (Exception e) {}
        finally {
          /* Verify the Java class path. */
          System.out.println("====================");
          System.out.println("CLASSPATH [" + System.getProperty("java.class.path") + "]");
          System.out.println("====================");
        }
      }
    }

EclipseMySQLLib_09

  1. The Save and Launch dialog informs you are saving a MysqlConnector.java file to your mysql project. Click the OK button to continue.

EclipseMySQLLib_10

  1. The next screen shows that the program successfully connected to the MySQL database by printing the following information to the Console output tab.
    ====================
    CLASSPATH [/home/student/Code/workspace/MySQL/bin:/usr/share/java/mysql-connector-java.jar]
    ====================
    ====================
    CLASSPATH [/home/student/Code/workspace/MySQL/bin:/usr/share/java/mysql-connector-java.jar]
    ====================

EclipseMySQLLib_11

  1. Instead of repeating steps #5 through #10, the image displays the testing of the MysqlResults class file. The code follows below:
    1
    2
    3
    4
    5
    6
    7
    8
    9
    10
    11
    12
    13
    14
    15
    16
    17
    18
    19
    20
    21
    22
    23
    24
    25
    26
    27
    28
    29
    30
    31
    32
    33
    34
    35
    36
    37
    38
    39
    40
    41
    42
    43
    44
    45
    46
    47
    48
    49
    50
    51
    52
    53
    54
    55
    56
    57
    58
    59
    60
    61
    62
    63
    64
    65
    66
    67
    68
    69
    70
    71
    72
    73
    74
    75
    76
    
    /* Import the java.sql.* package. */
    import java.sql.*;
     
    /* You can't include the following on Linux without raising an exception. */
    // import com.mysql.jdbc.Driver;
     
    public class MySQLResult {
      public MySQLResult() {
        /* Declare variables that require explicit assignments because
           they're addressed in the finally block. */
        Connection conn = null;
        Statement stmt = null;
        ResultSet rset = null;
     
        /* Declare other variables. */
        String url;
        String username = "student";
        String password = "student";
        String database = "studentdb";
        String hostname = "localhost";
        String port = "3306";
        String sql;
     
        /* Attempt a connection. */
        try {
          // Set URL.
          url = "jdbc:mysql://" + hostname + ":" + port + "/" + database;
     
          // Create instance of MySQL.
          Class.forName ("com.mysql.jdbc.Driver").newInstance();
          conn = DriverManager.getConnection (url, username, password);
     
          // Query the version of the database, relies on *_ri2.sql scripts.
          sql = "SELECT i.item_title, ra.rating FROM item i INNER JOIN rating_agency ra ON i.item_rating_id = ra.rating_agency_id";
          stmt = conn.createStatement();
          rset = stmt.executeQuery(sql);
     
          System.out.println ("Database connection established");
     
          // Read row returns for one column.
          while (rset.next()) {
            System.out.println(rset.getString(1) + ", " + rset.getString(2)); }
     
        }
        catch (SQLException e) {
          System.err.println ("Cannot connect to database server (SQLException):");
          System.out.println(e.getMessage());
        }
        catch (ClassNotFoundException e) {
          System.err.println ("Cannot connect to database server (ClassNotFoundException)");
          System.out.println(e.getMessage());
        }
        catch (InstantiationException e) {
          System.err.println ("Cannot connect to database server (InstantiationException)");
          System.out.println(e.getMessage());
        }
        catch (IllegalAccessException e) {
          System.err.println ("Cannot connect to database server (IllegalAccesException)");
          System.out.println(e.getMessage());
        }
        finally {
          if (conn != null) {
            try {
              rset.close();
              stmt.close();
              conn.close();
              System.out.println ("Database connection terminated");
            }
            catch (Exception e) { /* ignore close errors */ }
          }
        }
      }
      /* Unit test. */
      public static void main(String args[]) {
        new MySQLResult(); }
    }

    After you click the green arrow or the Run menu and Run menu option to compile and run the program, you should see the following output. That is if you’re using my create_mysql_store_ri2.sql and seed_mysql_store_ri2.sql files.

    Database connection established
    I Remember Mama, NR
    Tora! Tora! Tora!, G
    A Man for All Seasons, G
    Around the World in 80 Days, G
    Camelot, G
    Christmas Carol, G
    I Remember Mama, G
    The Hunt for Red October, PG
    Star Wars I, PG
    Star Wars II, PG
    Star Wars II, PG
    The Chronicles of Narnia, PG
    Beau Geste, PG
    Hook, PG
    Harry Potter and the Sorcerer's Stone, PG
    Scrooge, PG
    Harry Potter and the Sorcer's Stone, PG
    Harry Potter and the Sorcer's Stone, PG
    Harry Potter and the Chamber of Secrets, PG
    Harry Potter and the Chamber of Secrets, PG
    Harry Potter and the Prisoner of Azkaban, PG
    Harry Potter and the Prisoner of Azkaban, PG
    Harry Potter and the Half Blood Prince, PG
    Star Wars III, PG-13
    Casino Royale, PG-13
    Casino Royale, PG-13
    Die Another Day, PG-13
    Die Another Day, PG-13
    Die Another Day, PG-13
    Golden Eye, PG-13
    Golden Eye, PG-13
    Tomorrow Never Dies, PG-13
    Tomorrow Never Dies, PG-13
    The World Is Not Enough, PG-13
    Clear and Present Danger, PG-13
    Clear and Present Danger, PG-13
    Harry Potter and the Goblet of Fire, PG-13
    Harry Potter and the Goblet of Fire, PG-13
    Harry Potter and the Goblet of Fire, PG-13
    Harry Potter and the Order of the Phoenix, PG-13
    Harry Potter and the Deathly Hallows, Part 1, PG-13
    Harry Potter and the Deathly Hallows, Part 2, PG-13
    Brave Heart, R
    The Chronicles of Narnia, E
    MarioKart, E
    Need for Speed, E
    Cars, E
    RoboCop, M
    Pirates of the Caribbean, T
    Splinter Cell, T
    The DaVinci Code, T
    Database connection terminated

As always, I hope the note helps those trying to work with the Eclipse product.


PlanetMySQL Voting: Vote UP / Vote DOWN

Mysql table locking

$
0
0

Locking is important in many scenarios to prevent other sessions from modifying tables during periods when a session requires exclusive access to them. for example altering table definition online or any kind of table definition changes.locking Mysql provide a option to lock table/s with different types of locks, depends on need.

syntax for lock table:

LOCK TABLES
    tbl_name [[AS] alias] lock_type
    [, tbl_name [[AS] alias] lock_type] ...

lock_type:
    READ [LOCAL]
  | [LOW_PRIORITY] WRITE

UNLOCK TABLES

Following are the examples for READ and WRITE LOCK:

READ LOCK:

session1> create table t1( c1 int);
Query OK, 0 rows affected (0.06 sec)

session1> insert into test.t1 values(1001);
Query OK, 1 row affected (0.01 sec)

session1> lock table t1 READ;
Query OK, 0 rows affected (0.00 sec)

session1> select count(*) from t1;
+----------+
| count(*) |
+----------+
| 1 |
+----------+
1 row in set (0.00 sec)
session1> insert into t1 values(1002);
ERROR 1099 (HY000): Table 't1' was locked with a READ lock and can't be updated

Session1 acquired READ lock on table t1 explicitly. After applying READ lock on table users can read the table but not write it.

session2> lock table t1 READ;
Query OK, 0 rows affected (0.00 sec)

session2> insert into t1 values(1002);
ERROR 1099 (HY000): Table 't1' was locked with a READ lock and can't be updated

session3> select * from t1;
+------+
| c1 |
+------+
| 1001 |
+------+
1 row in set (0.00 sec)

Multiple sessions can acquire a READ lock for the table at the same time and other sessions can read the table without explicitly acquiring a READ lock.

currently READ lock s acquired by session1 and session2, both locks needs to be unlock in order to perform write opration on lock table.

session1> UNLOCK TABLES;
session1> insert into t1 values(1005);

INSERT operation executed from session1  will go in waiting state, since READ lock acquired on table t1 by session2 and not  released yet.

You can see this using:

session3> show processlist;
+----+------+-----------+------+---------+------+---------------------------------+----------------------------------+
| Id | User | Host | db | Command | Time | State | Info |
+----+------+-----------+------+---------+------+---------------------------------+----------------------------------+
| 2 | session1 | localhost | test | Query | 89 | Waiting for table metadata lock | insert into test.t1 values(1005) |
| 3 | session3 | localhost | test | Query | 0 | starting | show processlist |
| 4 | session2 | localhost | test | Sleep | 77 | | NULL |
+----+------+-----------+------+---------+------+---------------------------------+----------------------------------+
3 rows in set (0.00 sec)

After release READ lock by session2 insert operation will execute on t1 table.

session2> UNLOCK TABLES;
session1>  select * from t1;
+------+
| c1 |
+------+
| 1001 |
| 1005 |
+------+
2 rows in set (0.00 sec)

NOTE: FLUSH TABLES Different form UNLOCK TABLES:

FLUSH TABLE:  Closes all open tables, forces all tables in use to be closed, and flushes the query cache. FLUSH TABLES also removes all query results from the query cache, like the RESET QUERY CACHE statement. FLUSH TABLE will not work when table acquire READ LOCK.

UNLOCK TABLES: UNLOCK TABLES explicitly releases any table locks held by the current session. LOCK TABLES implicitly releases any table locks held by the current session before acquiring new locks.

********************************************************************************************************************************************

WRITE LOCK:

-The session that holds the lock can read and write the table.

session1> lock table t1 write;
Query OK, 0 rows affected (0.00 sec)

session1> insert into test.t1 values(1006);
Query OK, 1 row affected (0.01 sec)

session1> select count(*) from t1;
+------+
| c1 |
+------+
| 1001 |
| 1005 |
| 1006 |
+------+
3 rows in set (0.00 sec)

-Only the session that holds the lock can access the table. No other session can access it until the lock is released.

session2> select count(*) from t1;
and 
session3> insert into test.t1 values(1002);

session1> show processlist;
+----+------+-----------+------+---------+------+---------------------------------+----------------------------------+
| Id | User | Host | db | Command | Time | State | Info |
+----+------+-----------+------+---------+------+---------------------------------+----------------------------------+
| 2 | session1 | localhost | test | Query | 0 | starting | show processlist |
| 3 | session2 | localhost | test | Query | 127 | Waiting for table metadata lock | select count(*) from t1 |
| 4 | session3 | localhost | test | Query | 116 | Waiting for table metadata lock | insert into test.t1 values(1002) |
+----+------+-----------+------+---------+------+---------------------------------+----------------------------------+
3 rows in set (0.00 sec)

Look into performance_schema.metadata_locks table for more status information on table locks. (Thanks for the hint daniel )

– Enable Locking related instruments (if it’s not enabled) :

UPDATE performance_schema.setup_instruments SET ENABLED=’YES’, TIMED=’YES’ WHERE NAME=’wait/lock/metadata/sql/mdl';

SELECT * FROM performance_schema.metadata_locks WHERE OBJECT_SCHEMA=’test’ AND OBJECT_NAME LIKE ‘t_’;

-Lock requests for the table by other sessions block while the WRITE lock is held.

All set  :) ……


PlanetMySQL Voting: Vote UP / Vote DOWN

Fortran and MariaDB

$
0
0

Introduction

Fortran (FORmula TRANslating System) is a general-purpose, imperative programming language that is especially suited to numeric computation and scientific computing. History of FORTRAN can be tracked late 1953 when John W. Backus submitted a proposal to his superiors at IBM. The First FORTRAN compiler appeared in April 1957.

Some notable historical steps where:

  • FORTRAN II in 1958
  • FORTRAN III in 1958,
  • FORTRAN IV in 1962.
  • FORTRAN 66 or X3.9-1966 become the first industry-standard
  • FORTRAN 77 or X3.9-1978. This is the version of the Fortran I learned 1996.
  • Fortran 90 was released as ISO/IEC standard 1539:1991 and ANSI Standard in 1992
  • Fortran 95 was released as ISO/IEC standard 1539-1:1997
  • Fortan 2003 was released as ISO/IEC 1539-1:2004
  • Fortran 2008 was released as ISO/IEC 1539-1:2010 is most recent standard
  • Fortran 2015 is planned in late 2016.

More comprehensive history and introduction can be found e.g. from http://en.wikipedia.org/wiki/Fortran.

Thus Fortran programming language is not dead ! I did use Fortran in same day as I started writing this blog (05/07/2015). There is some historical reason why I decided to learn Fortran. In department of computer science, university of Helsinki there is course named Software Project where students design, implement and test larger application. I participated on this course 1996 and my application was Ringing Software for Ringing Centre, Natural History Museum, University of Helsinki. Their original software used magnetic tapes and Fortran66/77 programs. Our assignment was to transform this to use Oracle database and UNIX. At that time we decided to use Fortran77 (with some Fortran90 extensions, mainly structures) and ProFortran precompiler from Oracle.

Compilers

There is version of GNU Fortran named GFortran. The GFortran compiler is fully compliant with the Fortran 95 Standard and includes legacy F77 support. In addition, a significant number of Fortran 2003 and Fortran 2008 features are implemented.

To my experience GFortran is very good compiler and really includes most of the legacy support you need (and lot of new stuff I really do not need). However, I found one example that is useful but not supported, variable length format. Consider following:

cnt = max_year - min_year + 1
       WRITE (*, 20) (i, i = min_year, max_year)
   20  FORMAT ('Reng', (2X, I4), 2X, '  Total')

Here format (2x, I4) is repeated times and depends runtime values. This can be transformed to:

cnt = max_year - min_year + 1
       WRITE(fmt,'(A,I2,A,A)') '(A,',cnt,'(2X,I4)',',A)'
       WRITE (*, fmt) 'Reng', (i, i = min_year, max_year), ' Total'

This is because format can be a string variable and above produces format (A,44(2X,I4),A) (assuming years 1971 and 2014). But, in my opinion the first one is more clearer and simpler. Additionally, I learned to use pre-Fortran90 STRUCTURE and RECORD extensions, like

STRUCTURE /TVERSION/
    CHARACTER *80  VERSION
  END STRUCTURE

  RECORD /TVERSION/ MARIADB

  MARIADB.VERSION = ''

This can naturally expressed using TYPE:

TYPE t_version
    CHARACTER *80  :: version
  END TYPE

  TYPE(t_version) mariadb
  mariadb%version = ' '

I mostly use Fortran90 and free-form (longer line lengths than  allowed by standard Fortran77) but only limited amount of new features. Thus code might look like Fortran77 mostly:

50  CONTINUE
   55  FORMAT(I10,1X, A1, 1X, A)
       READ (10, 55, END = 70, ERR=800, IOSTAT = readstat, IOMSG=emsg) pesaid, rlaani, rkunta
       plaani(pesaid) = rlaani
       pkunta(pesaid) = rkunta
       GOTO 50

Naturally, there is number of commercial Fortran compilers like Intel Fortran https://software.intel.com/en-us/fortran-compilers and NAG http://www.nag.com/nagware/np.asp .

Clearly one of the bad features of Fortran are implicit types. If a variable is undeclared, Fortran 77 uses a set of implicit rules to establish the type. This means all variables starting with the letters i-n are integers and all others are real. Many old Fortran 77 programs uses these implicit rules, but you should not! The probability of errors in your program grows dramatically if you do not consistently declare your variables. Therefore, always put following in start of your Fortran program:

PROGRAM myprogram

        IMPLICIT NONE  ! No implicit rules used, compiler error instead

SQL and Fortran

Fortran does not natively understand SQL-clauses, but you can use e.g. embedded SQL. Embedded SQL is SQL-clauses inside a host language like Fortran. Lets take a example:

EXEC SQL BEGIN DECLARE SECTION
       CHARACTER *24 HTODAY
      EXEC SQL END DECLARE SECTION
      EXEC SQL INCLUDE SQLCA
      EXEC ORACLE OPTION (ORACA = YES)
      EXEC SQL INCLUDE ORACA
      EXEC SQL CONNECT :UID1 IDENTIFIED BY :UID2
      EXEC SQL SELECT TO_CHAR(SYSDATE,'YYYYMMDD HH24:MI:SS')
     -      INTO :HTODAY
     -      FROM DUAL

Naturally, normal Fortran compiler will not understand clauses starting with EXEC SQL. Thus, you need to first use precompiler. Precompiler changes embedded SQL-clauses (above include clauses are copied to resulting file) and other SQL-clauses are transformed to CALL-clauses to provided database server API-calls. Naturally, this means that you software will work only for precompiled (and then compiled) database provider.

Currently, there are precompilers at least for Oracle and DB2 databases (see http://en.wikipedia.org/wiki/Embedded_SQL). However, OS support is diminishing. E.g. Oracle Fortran Precompiler does not anymore work on Linux 64bit when using Oracle >10g. This in my opinion is bad because porting your Fortran software from Oracle to e.g. DB2 is not trivial especially if you have application with 100000 lines of Fortran code.

This fact has lead on my experience to situation where some of the system is re-implemented using Java and some of the code modified to pure Fortran so that it read input from files (generated using pure SQL) and by removing all embedded SQL-clauses.

Fortran and MariaDB

There is no connectors for Fortran to MariaDB /MySQL. However, you could use ODBC, however the free ODBC modules FLIBS and fodbc fail to compile in my 64-bit Linux and after some hacking with fodbc, it did not really work. Naturally, you could write your own fodbc for MariaDB/MySQL but currently I do not have a real need or enough free time to do so. Alternative way of doing this is create C-language interface between Fortran code and ODBC driver.

Lets take very simple example where Fortran program connects to MariaDB database, selects a version and disconnects.

PROGRAM myodbc_test

  INTEGER :: RC

  TYPE t_version
    CHARACTER *80  :: version
  END TYPE

  TYPE(t_version) mariadb

  RC = 0

  RC = connect()
  mariadb%version='select version()'//char(0)
  RC = version(mariadb)
  CALL mstrc2f(mariadb%version)
  WRITE (*,'(A)') mariadb%version
  RC = disconnect()

  STOP

  END PROGRAM

  SUBROUTINE mstrc2f(STR)

      IMPLICIT NONE

      CHARACTER *(*) STR
      INTEGER   *4 MAX
      INTEGER   *4 IND
      CHARACTER *1  EOS
      EOS  = CHAR(0)
      MAX  = LEN(STR)
      IND = MAX
  100 CONTINUE
      IF ( IND .GE. 1 ) THEN
          IF ( STR(IND:IND) .EQ. EOS) THEN
              GO TO 200
          ENDIF

          STR(IND:IND) = ' '
          IND = IND - 1

          GO TO 100
      ENDIF


  200 CONTINUE

      IF (IND .GE. 1) THEN
          STR(IND:IND) = ' '
      ENDIF

      RETURN

      END

As you note string variables need special handling as Fortran has constant strings. Therefore, we need to add C string end character before calling C-routines and then remove trailer before using string in Fortran again. And then simple C-interface (no real error handling):

#include 
#include 
#include 
#include 

SQLHENV env;
SQLHDBC dbc;

int connect_(void) {

  SQLHSTMT stmt;
  SQLRETURN ret;
  SQLCHAR outstr[1024];
  SQLSMALLINT outstrlen;

  SQLAllocHandle(SQL_HANDLE_ENV, SQL_NULL_HANDLE, &env);
  SQLSetEnvAttr(env, SQL_ATTR_ODBC_VERSION, (void *) SQL_OV_ODBC3, 0);
  SQLAllocHandle(SQL_HANDLE_DBC, env, &dbc);
  ret = SQLDriverConnect(dbc, NULL, "DSN=test;", SQL_NTS,
			 outstr, sizeof(outstr), &outstrlen,
			 SQL_DRIVER_COMPLETE);

  return ret;
}

int disconnect_(void) {
    SQLDisconnect(dbc);
    SQLFreeHandle(SQL_HANDLE_DBC, dbc);
    SQLFreeHandle(SQL_HANDLE_ENV, env);
    fprintf(stderr, "Disconnected...\n");
}

typedef struct {
	char version[80];
} t_version;

int version_(t_version *version) {
	SQLHSTMT stmt;
	SQLRETURN ret;
	SQLSMALLINT columns;
	char buf[80];
	SQLLEN indicator;
	SQLAllocHandle(SQL_HANDLE_STMT, dbc, &stmt);

	fprintf(stderr, "Selecting version...\n");

	ret = SQLPrepare(stmt,
           version->version, SQL_NTS);
	ret = SQLExecute(stmt);
	ret = SQLFetch(stmt);
	ret = SQLGetData(stmt, 1, SQL_C_CHAR, buf, sizeof(buf), &indicator);
	strcpy(version->version, buf);
	return ret;
}

And, if you compile these and run the resulting program you might see something like following:

$ gcc myodbc.c -c -g -l myodbc5
$ gfortran myodbc_test.f90 myodbc.o -l myodbc5 -g
$ ./a.out
Selecting version...
10.0.18-MariaDB-debug                                                           
Disconnected...

Future of Fortran ?

There is clearly need languages like Fortran. It has some very nice features like formatted I/O and mathematical functions. However, learning Fortran might be up to you because it is not taught as first (or second) programming language on most universities or similar schools. Thus number of people who can use Fortran on programming or teach it is decreasing rapidly. However, my experience is that learning Fortran is simple if you can master at least one programming language (ok, I had learn already C/C++, COBOL, PL/I, Basic on my earlier studies). So you want to learn Fortran ? If Internet resources are not enough there is number of books. Book I have used is obsolete (Fortran 77 and Finish-language version Fortran 90/95) but e.g. http://www.amazon.com/Introduction-Programming-Fortran-With-Coverage/dp/0857292323 is a good one.


PlanetMySQL Voting: Vote UP / Vote DOWN

Upcoming opportunities to talk MySQL/MariaDB in May 2015

$
0
0

May is quickly shaping up to be a month filled with activity in the MySQL/MariaDB space. Just a quick note to talk about where I’ll be; looking forward to meet folk to talk shop. 

  1. The London MySQL Meetup GroupMay 13 2015 – organized by former colleague & friend Ivan Zoratti, we will be doing a wrap up of recent announcements at Percona Live Santa Clara, and I’ll be showing off some of the spiffy new features we are building into MariaDB 10. 
  2. MariaDB Roadshow London – May 19 2015 – I’m going to give an overview of our roadmap, and there will be many excellent talks by colleagues there. I believe MariaDB Corporation CEO Patrik Sallner and Stu Schmidt, President at Zend will also be there. Should be a fun filled day. 
  3. Internet Society (ISOC) Hong Kong World Internet Developer Summit – May 21-22 2015 – I’ll be giving a keynote about MariaDB and how we are trying to make it important Internet infrastructure as well as making it developer friendly. 
  4. O’Reilly Velocity 2015 – May 27-29 2015 – I will in 90 minutes attempt to give a tutorial to attendees (over a 100 have already pre-registered) an overview of MySQL High Availability options and what their choices are in 2015. Expect a lot of talk on replication improvements from both MySQL & MariaDB, Galera Cluster, as well as tools around the ecosystem. 

PlanetMySQL Voting: Vote UP / Vote DOWN

Life of a DBA in GIFs

$
0
0

A Database Administrator experiences a wide range of emotions. It could be one those endless meetings, friendly disagreements with fellow developers, getting something approved from managers or preparing your junior DBAs for bigger battles. Each day is a challenging one. We’ve tried to compile a list of GIFs which every DBA will be able to relate to.

5 minutes before deployment
Life-of-a-DBA-GIFs-typing-fast

Writing the most epic answer Stack Exchange has ever seen and press F5 to “Submit” and end up refreshing the page
DBA-reactions-stack-exchange-refresh

When a DBA.StackExchange answer gets 500+ upvotes!
When-a-DBA.StackExchange-answer-gets-500-upvotes

Slightly “re-factoring” the developers’ code after a code review
re-factoring-the-developers-code-after-a-code-review

Training the junior DBA
Training-the-junior-DBA

The junior DBA trying to figure out the production cluster
The-junior-DBA-trying-to-figure-out-the-production-cluster

When you unknowingly fix the client’s problem
When-you-unknowingly-fix-the-client’s-problem

When the project manager starts questioning my work estimates
When-the-project-manager-starts-questioning-my-work-estimates

When asked why I’m allowed to query all the databases?
When-asked-why-I’m-allowed-to-query-all-the-databases

When a developer says he made few changes to the database
when-a-developer-says-he-made-few-changes-to-the-database

When I shut off the marketing team’s access to run reports on the production server
When-I-shut-off-the-marketing-team’s-access-to-run-reports-on-the-production-server

PS: Don’t forget to visit DBA Reactions for a daily dose of GIFs chronicling the highs and lows of a DBAs life.

If you’re not a DBA, make sure you share it with one and watch them nod their head in approval. If you have anything to share, feel free to use the comments section below.

The post Life of a DBA in GIFs appeared first on Webyog Blog.


PlanetMySQL Voting: Vote UP / Vote DOWN

Building XtraBackup for Mac OS

$
0
0

Percona XtraBackup is free and open source backup tool for MySQL. Percona distributes XtraBackup via package repositories for RedHat and Debian.

Unfortunately there are no packages for Mac OS. In this post I will describe how to build XtraBackup for Mac OS.

Dependencies

To build and use XtraBackup on Mac OS you need to install some additional packages. I will use MacPorts to install the dependencies.

# port install cmake p5.16-dbd-mysql

Building XtraBackup for Mac OS

Download the source code from https://www.percona.com/downloads/XtraBackup/LATEST/

# wget https://www.percona.com/downloads/XtraBackup/Percona-XtraBackup-2.2.10/source/tarball/percona-xtrabackup-2.2.10.tar.gz

Untar the archive:

# tar zxf percona-xtrabackup-2.2.10.tar.gz

Build the binaries.

# cd percona-xtrabackup-2.2.10
# cmake -DBUILD_CONFIG=xtrabackup_release && make

XtraBackup comes with a perl script innobackupex that can be found in storage/innobase/xtrabackup/. The script is a wrapper around few binaries XtraBackup needs to work. They are built in storage/innobase/xtrabackup/src: xbcrypt, xbstream and xtrabackup.

Installing XtraBackup for Mac OS

To install XtraBackup use a Makefile:

# make -C storage/innobase/xtrabackup/ install

It will install XtraBackup in /usr/local/xtrabackup/ . The binaries will be placed in /usr/local/xtrabackup/bin/ so make sure it’s in the $PATH.

XtraBackup Package

For your convenience we built and packaged XtraBackup for Mac OS. The package installs the binaries in /opt/local/bin which should be in your $PATH. I tested XtraBackup on OS X 10.10 Yosemite.


The post Building XtraBackup for Mac OS appeared first on Backup and Data Recovery for MySQL.


PlanetMySQL Voting: Vote UP / Vote DOWN

MySQL LogRotate script

$
0
0

Did you ever try to use log rotate facility in Linux with MySQL?
There is no need to script one for this purpose, it is already installed.
From MySQL spec file, it looks for logrotate.d folder:

# Ensure that needed directories exists
install -d $RBR%{_sysconfdir}/{logrotate.d,init.d}

As well as there is dedicated mysql-log-rotate.sh script for installing logrotate script.
The script path is: /mysql-5.6.24/support-files/mysql-log-rotate.sh

Again from spec file:

# Install logrotate and autostart
install -m 644 $MBD/release/support-files/mysql-log-rotate $RBR%{_sysconfdir}/logrotate.d/mysql

After installing there will be mysql script in /etc/logrottate.d/.

# The log file name and location can be set in
# /etc/my.cnf by setting the "log-error" option
# in either [mysqld] or [mysqld_safe] section as
# follows:
#
# [mysqld]
# log-error=/var/lib/mysql/mysqld.log
#
# In case the root user has a password, then you
# have to create a /root/.my.cnf configuration file
# with the following content:
#
# [mysqladmin]
# password = <secret> 
# user= root
#
# where "<secret>" is the password. 
#
# ATTENTION: The /root/.my.cnf file should be readable
# _ONLY_ by root !

/var/lib/mysql/mysqld.log {
        # create 600 mysql mysql
        notifempty
        daily
        rotate 5
        missingok
        compress
    postrotate
        # just if mysqld is really running
        if test -x /usr/bin/mysqladmin && \
           /usr/bin/mysqladmin ping &>/dev/null
        then
           /usr/bin/mysqladmin flush-logs
        fi
    endscript
}

There is 2 simple and critical problem with this script.
First of all the name of error log file.
If MySQL started from default my.cnf file, path for error log file will be: /var/log/mysqld.log

[mysqld_safe]
log-error=/var/log/mysqld.log
pid-file=/var/run/mysqld/mysqld.pid

But in script it is defined as: /var/lib/mysql/mysqld.log
Even if you comment out default settings in my.cnf file, MySQL by default will create error log file as follows:
datadir + host_name.err = /var/lib/mysql/host_name.err
Again there will be no such error log file defined in log rotate script.

Second problem is usage of mysqladmin. Script is calling mysqladmin without any password. We assume that there is no such MySQL instance without user, at least in production environment:

[root@centos7 ~]# /usr/bin/mysqladmin ping
/usr/bin/mysqladmin: connect to server at 'localhost' failed
error: 'Access denied for user 'root'@'localhost' (using password: NO)'

[root@centos7 ~]# /usr/bin/mysqladmin flush-logs
/usr/bin/mysqladmin: connect to server at 'localhost' failed
error: 'Access denied for user 'root'@'localhost' (using password: NO)'

From now we know that, after installing MySQL there will be non-working log rotate script, which will fail due to explanations above.
Related report is: #73949

The post MySQL LogRotate script appeared first on Azerbaijan MySQL UG.


PlanetMySQL Voting: Vote UP / Vote DOWN

VividCortex - Query Sniffer for PostgreSQL

$
0
0

The query sniffer tool will capture TCP traffic for your server and decode the protocol. It will decode the queries and output them in MySQL’s slow query log format, giving you fresh insight into your database performance. Fill out the form below to receive your free downloadable tool.


PlanetMySQL Voting: Vote UP / Vote DOWN

VividCortex - Query Sniffer for MySQL

$
0
0

The query sniffer tool will capture TCP traffic for your server and decode the protocol. It will decode the queries and output them in MySQL’s slow query log format, giving you fresh insight into your database performance. Fill out the form below to receive your free downloadable tool.


PlanetMySQL Voting: Vote UP / Vote DOWN

MySQL 5.7.7 RC & Multi Source Replication 40 to 1.

$
0
0

One of the cool new features in 5.7 Release Candidate is Multi Source Replication, as I previously looked into in 5.7.5 DMR.

I’ve had more and more people like the idea of this, so here’s a quick set-up as to what’s needed and how it could work.

1. Prepare master environments.
2. Prepare 40 masters for replication.
3. Create slave.
4. Insert data into the Masters.

* I originally tried running 50 mysql’s but I just ran out of resources on my old pc, so it’s at 40.

* The real key behind this scenario is that each of the masters has a unique centre_code that is implicitly inserted via the app & users at that site. i.e. no other site will want to modify any data that was entered from that site, e.g. call centre reclaims dept for specific areas / regions, CNC machine data input originating from specific factories and machinists, etc.

* You might to have a look at the Reference Manual entry to get used to the syntax, etc.

* FYI, instances 3001-3040 are the masters and instance id 3100 is the slave.

1. Prepare master environments.

:: Download MySQL 5.7.7 RC and install.
— 40x on a single master & 1x slave host.
:: create dir’s, permissions, mysqld_multi my.cnf without logging.
— my.cnf

[mysqld_multi]
#no-log
log                    =/usr/local/msr/mysqld_multi.log
mysqld                 =/usr/local/mysql/bin/mysqld_safe
mysqladmin             =/usr/local/mysql/bin/mysqladmin
user                   =root
password               =contraseña
..
..
[mysqld3100]
server-id              =3100
mysqld                 =/usr/local/mysql/bin/mysqld_safe
ledir                  =/usr/local/mysql/bin
port                   =3100
pid-file               =/usr/local/msr/3100/khollman-es_3100.pid
socket                 =/usr/local/msr/3100/mysql.sock
datadir                =/usr/local/msr/3100/data
log-error              =/usr/local/msr/3100/msr.err
innodb_buffer_pool_size=80M
innodb_file_per_table  =1
##log-bin              =3100
..
..
[mysqld3001]
server-id              =3001
mysqld                 =/usr/local/mysql/bin/mysqld_safe
ledir                  =/usr/local/mysql/bin
port                   =3001
pid-file               =/usr/local/msr/3001/khollman-es_3001.pid
socket                 =/usr/local/msr/3001/mysql.sock
datadir                =/usr/local/msr/3001/data
log-error              =/usr/local/msr/3001/msr.err
#log-bin               =3001
..
..
[mysqld3002]
server-id              =3002
mysqld                 =/usr/local/mysql/bin/mysqld
port                   =3002
socket                 =/usr/local/msr/3002/mysql.sock
datadir                =/usr/local/msr/3002/data
log-error              =/usr/local/msr/3002/msr.err
#log-bin               =3002
..
..
[mysqld3003]
..
..
..
[mysqld3039]
..
[mysqld3040]
..

:: create script to initialize (5.7 remember) mysqld, start and reset root passwd.
— myinstall.sh (in my unimportant safe env I used ‘ –initialize-insecure’. Don’t try this at home kids!)

vi myinstall.sh
#!/bin/bash

export PATH=$PATH:/usr/local/mysql/bin
mysqld --user=mysql --datadir=/opt/mysql/msr/$1/data --basedir=/usr/local/mysql --initialize-insecure
mysqld_multi --defaults-file=/usr/local/msr/my.cnf  start $1
mysqladmin -uroot -S/opt/mysql/msr/$1/mysql.sock password 'contraseña'

:: do all 40 in 1 go.
— myinstall_all.sh

myinstall.sh 3001 &
myinstall.sh 3002
myinstall.sh 3003 &
..
myinstall.sh 3039 &
myinstall.sh 3040

2. Prepare 40 masters for replication.

:: create replication user & table we’ll be replicating.
— cre_tab_recdAUTOINC.sql (PK on ‘id’ column)

 create user 'rpl'@'192.168.12.52' identified by '';
 grant replication slave on *.*   to 'rpl'@'192.168.12.52';

 create database coredb;
 use coredb;
 drop table if exists recording_data_AUTOINC;
 create table recording_data_AUTOINC (
   centre_code SET('01','02','03','04','05','06','07','08','09','10',
           '11','12','13','14','15','16','17','18','19','20',
           '21','22','23','24','25','26','27','28','29','30',
           '31','32','33','34','35','36','37','38','39','40') NOT NULL,
   id INT AUTO_INCREMENT,
   user_email VARCHAR(55) NOT NULL,
   start_info DATETIME NOT NULL,
   end_info DATETIME NOT NULL,
   INDEX (user_email),
   PRIMARY KEY (id)
 )  COMMENT='Master table definition with ID column is PK' ;

:: create script for INSERT procedure for each master to generate data.
— cre_proc_msr_loader.sh

cd /usr/local/msr
mysqld_multi --defaults-file=/usr/local/msr/my.cnf start 30$1
sleep 5
mysql -uroot -pcontraseña -v -S/opt/mysql/msr/30$1/mysql.sock << EOF  tee cre_$1.log  source cre_tab_recdAUTOINC.sql  delimiter //  DROP PROCEDURE IF EXISTS msr_loader//  CREATE PROCEDURE msr_loader (p1 INT)   BEGIN    SET @x = 0;    REPEAT     INSERT INTO recording_data_AUTOINC SELECT '$1', NULL, 'centre_$1@testdata.com',date_format(sysdate(),'%Y-%m-%d %H:%i:%s'),date_add(sysdate(),INTERVAL 1 DAY) ;    SET @x = @x + 1;    UNTIL @x > p1 END REPEAT;
  END
 //
 delimiter ;
 exit
EOF
mysqld_multi --defaults-file=/usr/local/msr/my.cnf stop 30$1

:: do it x40
— cre_master_setup.sh

./cre_proc_msr_loader.sh 01 > cre_proc_msr_loader.sh.log &
./cre_proc_msr_loader.sh 02 >> cre_proc_msr_loader.sh.log
...
./cre_proc_msr_loader.sh 39 >> cre_proc_msr_loader.sh.log &
./cre_proc_msr_loader.sh 40 >> cre_proc_msr_loader.sh.log

:: check procedure and table has been created.
:: stop all 40 masters.
— mysqld_multi –defaults-file=/usr/local/msr/my.cnf  stop 3001-3040
:: Activate logging in all 40 masters
— vi multi_my.cnf  ->  :1,$ s/\#log-bin/log-bin/g
:: Start all 40 masters
— mysqld_multi –defaults-file=/usr/local/msr/my.cnf  start 3001-3040

3. Create slave.

Now to be fair, I recognize that this would be done in very few scenarios, as I’d expect you’d probably be restoring a logical dump of each of the 40x masters into the single slave table, or something along those lines. This scenario assumes that we’re starting off with Multi Source Replication and then populating the environment.

:: create single table that will store all data (no AUTO_INCREMENT, & PK on centre_code & id)
— cre_slave_table.sql

 create database coredb;
 use coredb;

 drop table if exists recording_data_AUTOINC;
 create table recording_data_AUTOINC (
   centre_code SET('01','02','03','04','05','06','07','08','09','10',
           '11','12','13','14','15','16','17','18','19','20',
           '21','22','23','24','25','26','27','28','29','30',
           '31','32','33','34','35','36','37','38','39','40') NOT NULL,
   id INT NOT NULL,
   user_email VARCHAR(55) NOT NULL,
   start_info DATETIME NOT NULL,
   end_info DATETIME NOT NULL,
   INDEX (user_email),
   PRIMARY KEY (centre_code,id) 
 ) COMMENT='Slave Table WithOut PK on a non-AUTO_INCREMENT ID column but a multi-column ID+centre_code PK' ;

:: create slave replication script (implicit start)
— start_slave_rep.sh

mysql -uroot -pcontraseña -S/usr/local/msr/3100/mysql.sock << EOF
change master to master_host='192.168.12.39', master_user='rpl', master_port=30$1, master_auto_position=1 for channel "CHANNEL_$1";
start slave for channel "CHANNEL_$1";
exit
EOF

:: script for x40 masters.
— start_all_slave.sh

./start_slave_rep.sh 01
./start_slave_rep.sh 02
...
./start_slave_rep.sh 39
./start_slave_rep.sh 40

:: check them all:

select * 
from performance_schema.replication_connection_status,
 performance_schema.replication_applier_status_by_coordinator
where replication_connection_status.channel_name=replication_applier_status_by_coordinator.channel_name ;

4. Insert data into the Masters

:: create “call msr_loader(10000);” script for inserting data.
— insert_msr_loader.sh

mysql -uroot -pcontraseña -S/opt/mysql/msr/30$1/mysql.sock << EOF
 use coredb; 
 call msr_loader (10000);
 exit
EOF

:: Script for automating 40x 10000 inserts.
— insert_msr_loader_all.sh

cd /usr/local/msr
./insert_msr_loader.sh 01 > insert_msr_loader.sh.log &
./insert_msr_loader.sh 02 >> insert_msr_loader.sh.log &
...
./insert_msr_loader.sh 40 >> insert_msr_loader.sh.log &

:: Observe slave:
— select count(*), centre_code from …. group by centre_code;
— Use MySQL Enterprise Monitor to observe performance increase on slave as the logs are applied from each master.

That’s how it’s done.

My next steps are to look at performance:

5. Sysbench tests

:: install sysbench
— sudo apt-get install sysbench
:: prepare sysbench schema & table for testing
— sysbench_prep.sh
:: create sysbench template script
— sysbench_tests.sh
:: run tests for different values for NoOfThreads, MaxRequests: 1,1  10,1000  40,100
— sysbench_tests.sh  1    1 01 .. sysbench_tests.sh  1    1 40
— sysbench_tests.sh 10 1000 01 .. sysbench_tests.sh 10 1000 40
— sysbench_tests.sh 50  100 01 .. sysbench_tests.sh 50  100 40

Hope it gives some ideas to someone out there.


PlanetMySQL Voting: Vote UP / Vote DOWN

ClusterControl on Docker

$
0
0

Today, we’re excited to announce our first step towards dockerizing our products. Please welcome the official ClusterControl Docker image, available on Docker Registry Hub. This will allow you to evaluate ClusterControl with a couple of commands:

$ docker pull severalnines/clustercontrol

The Docker image comes with ClusterControl installed and configured with all of its components, so you can immediately use it to manage and monitor your existing databases. Supported database servers/clusters:

  • Galera Cluster for MySQL
  • Percona XtraDB Cluster
  • MariaDB Galera Cluster
  • MySQL replication
  • MySQL single instance
  • MongoDB/TokuMX Replica Set
  • PostgreSQL single instance

As more and more people will know, Docker is based on the concept of so called application containers and is much faster or lightweight than full stack virtual machines such as VMWare or VirtualBox. It's a very nice way to isolate applications and services to run in a completely isolated environment, which a user can launch and tear down within seconds.

Having a Docker image for ClusterControl at the moment is convenient in terms of how quickly it is to get it up and running and it's 100% reproducible. Docker users can now start testing ClusterControl, since we have images that everyone can pull down and then launch the tool.

It is a start and our plan is to add better integration with the Docker API in future releases in order to transparently manage Docker containers/images within ClusterControl, e.g., to launch/manage and deploy database clusters using Docker images.

ClusterControl Docker Images

Please refer to the Docker Hub page for the latest instructions. Pick the operating system distribution images that you would like to deploy, and use the docker pull command to download the image. To pull all images:

$ docker pull severalnines/clustercontrol

You can pull the ClusterControl image that you want based on your target cluster’s operating system.

$ docker pull severalnines/clustercontrol:<ubuntu-trusty|debian-wheezy|redhat6|redhat7>

So, if you want to pull the ClusterControl image for CentOS 6/Redhat 6, just run:

$ docker pull severalnines/clustercontrol:redhat6 #or
$ docker pull severalnines/clustercontrol:centos6

** Image tagged with ‘centos6’ or ‘centos7’ aliases to redhat’s respectively.

Use the following command to run:

$ docker run -d --name clustercontrol -p 5000:80 severalnines/clustercontrol:redhat7

Once started, ClusterControl is accessible at http://<host IP address>:5000/clustercontrol. You should see the welcome page to create a default admin user. Use your email address and specify passwords for that user. By default MySQL users root and cmon will be using ‘password’ and ‘cmon’ as default password respectively. You can override this value with -e flag, as example below:

$ docker run -d --name clustercontrol -e CMON_PASSWORD=MyCM0n22 -e MYSQL_ROOT_PASSWORD=SuP3rMan -p 5000:80 severalnines/clustercontrol:debian

Optionally, you can map the HTTPS port using -p by appending the forwarding as below:

$ docker run -d --name clustercontrol -p 5000:80 -p 5443:443 severalnines/clustercontrol:redhat7

Verify the container is running by using the ps command:

$ docker ps

The Dockerfiles are available from our Github repository. You can build it manually by cloning the repository:

$ git clone https://github.com/severalnines/docker 
$ cd docker/[operating system] 
$ docker build -t severalnines/clustercontrol:[operating system] .

** Replace [operating system] with your choice of OS distribution; redhat6, redhat7, centos6, centos7, debian-wheezy, ubuntu-trusty.


Example Deployment

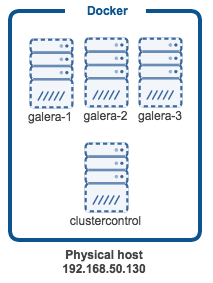
We have a physical host, 192.168.50.130 installed with Docker. We are going to create a three-node Galera cluster running on Percona XtraDB Cluster and then import it into ClusterControl, which is running in another container. This example deployment uses CentOS/Redhat based images. Following is the high-level architecture diagram:

Installing Docker

In this example, we are going to install Docker on CentOS 7, using virt-7 repository.  Create the repository file:

$ vim /etc/yum.repos.d/virt-7-testing.repo

Add the following lines:

[virt7-testing]
name=virt7-testing
baseurl=http://cbs.centos.org/repos/virt7-testing/x86_64/os/
enabled=1
gpgcheck=0

Install Docker:

$ yum install -y docker

Start and enable the Docker daemon:

$ systemctl start docker
$ systemctl enable docker

Disable firewalld to avoid conflicts with Docker’s iptables rules:

$ systemctl disable firewalld
$ systemctl stop firewalld


Deploying Percona XtraDB Cluster

We are going to use a Dockerfile to build and deploy a three-node Galera / Percona XtraDB Cluster:

$ git clone https://github.com/alyu/docker
$ cd docker/percona-xtradb-5.6/centos/
$ ./build.sh
$ ./start-servers.sh 3
$ ./bootstrap-cluster.sh

** Enter root123 as the root password if prompted.

Verify the containers are up:

$ docker ps | grep galera
aedd64fa373b        root/centos:pxc56                    "/bin/bash /opt/init   7 minutes ago        Up 7 minutes        22/tcp, 80/tcp, 443/tcp, 3306/tcp, 4444/tcp, 4567-4568/tcp             galera-3
c5fc95f9912e        root/centos:pxc56                    "/bin/bash /opt/init   7 minutes ago        Up 7 minutes        22/tcp, 80/tcp, 443/tcp, 3306/tcp, 4444/tcp, 4567-4568/tcp             galera-2
7df4814686a0        root/centos:pxc56                    "/bin/bash /opt/init   7 minutes ago        Up 7 minutes        22/tcp, 80/tcp, 443/tcp, 3306/tcp, 4444/tcp, 4567-4568/tcp             galera-1


Deploying ClusterControl

Since our Galera Cluster is deployed and running on Centos 7, we need to use the CentOS/Redhat base image for ClusterControl. Simply run the following command to pull the image:

$ docker pull severalnines/clustercontrol:centos7

Start the container as daemon and forward port 80 on the container to port 5000 on the host:

$ docker run -d --name clustercontrol -p 5000:80 severalnines/clustercontrol:centos7

Verify the ClusterControl container is up:

$ docker ps | grep clustercontrol
59134c17fe5a        severalnines/clustercontrol:centos7   "/entrypoint.sh"       2 minutes ago       Up 2 minutes        22/tcp, 3306/tcp, 9500/tcp, 9600/tcp, 9999/tcp, 0.0.0.0:5000->80/tcp   clustercontrol

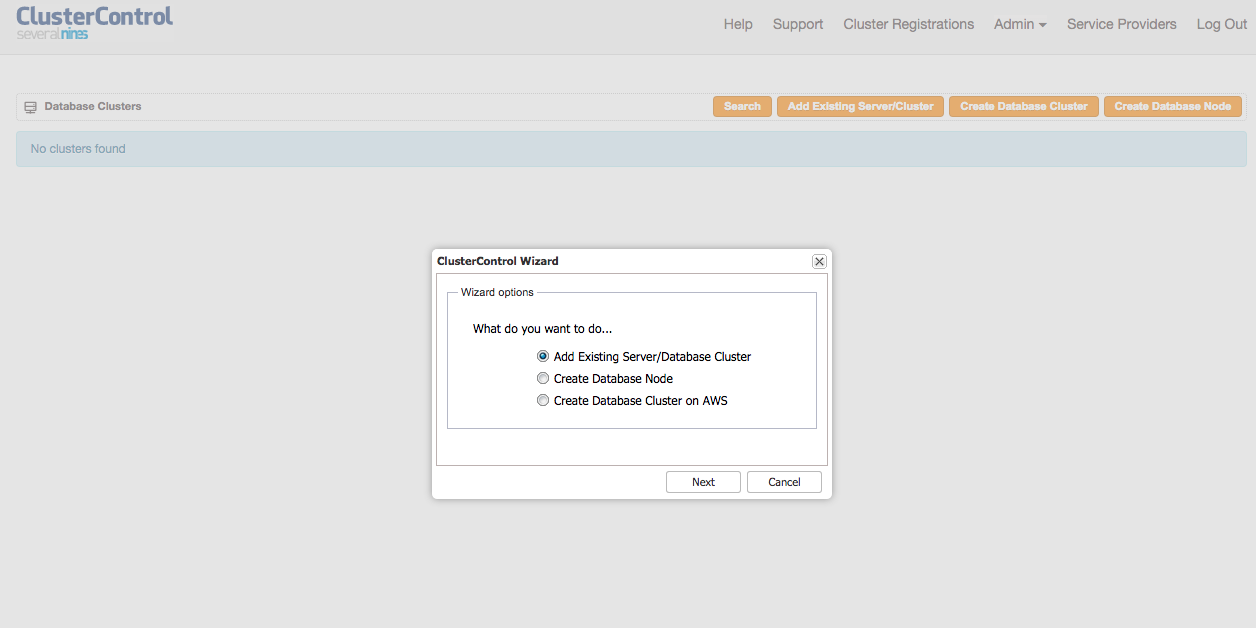
Open a browser, go to http://192.168.50.130:5000/clustercontrol and create a default admin user and password. You should see the ClusterControl landing page similar to below:

You now have ClusterControl and a Galera cluster running on 4 Docker containers. 


Adding your Existing Cluster

After the database cluster is running, you can add it into ClusterControl by setting up the passwordless SSH to all managed nodes beforehand. To do this, run the following steps on ClusterControl node.

1. Enter the container console as root:

$ docker exec -it clustercontrol /bin/bash

2. Copy the SSH key to all managed database nodes:

$ ssh-copy-id 172.17.0.2
$ ssh-copy-id 172.17.0.3
$ ssh-copy-id 172.17.0.4

** The Docker images that we used has root123 setup as root password. Depending on your chosen operating system, please ensure you have the root password configured for this to work, or you can skip it by adding your SSH key file manually into the managed hosts.

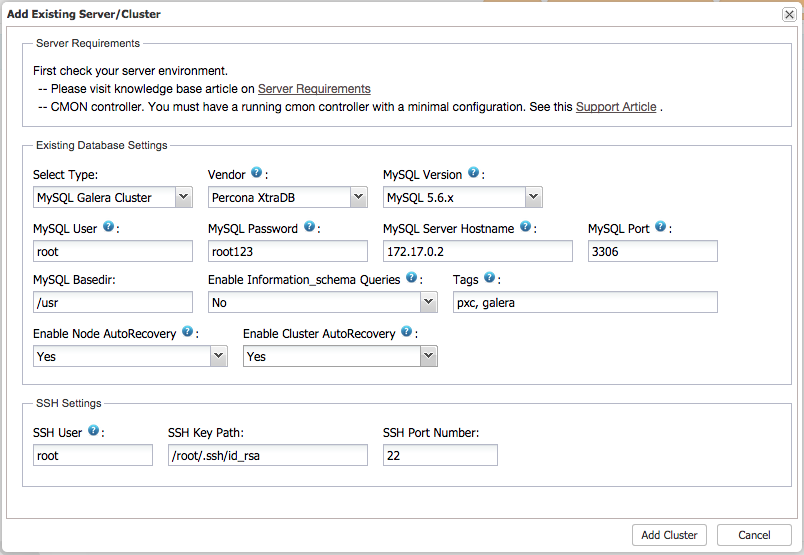
3. Start importing the cluster into ClusterControl. Open a web browser and go to Docker’s physical host IP address with the mapped port e.g, http://192.168.50.130:5000/clustercontrol and click Add Existing Cluster/Server and specify following information:

** You just need to enter ONE IP address of one of the Galera members. ClusterControl will auto discover the rest of the cluster members in the cluster and register them. Once added, you should see the Galera cluster is listed under Database Clusters list:

We are done. 


What happens if a container is restarted and gets a new IP?

Note that Docker container does not use static IP, unless you explicitly configure a custom bridge which is out of the scope of this blog. This could be problematic to ClusterControl since it relies on proper IP address configuration for database grants and passwordless SSH. If the ClusterControl container restarted:

On all nodes (including ClusterControl), run following statements as root@localhost:

mysql> UPDATE mysql.user SET host = '<new IP address>' WHERE host = '<old IP address>';
mysql> FLUSH PRIVILEGES;

You also need to manually change the IP address inside /etc/cmon.cnf and/or /etc/cmon.d/cmon_<cluster ID>.cnf:

$ sed -i 's|<old IP address>|<new IP address>|g' /etc/cmon.cnf
$ sed -i 's|<old IP address>|<new IP address>|g' /etc/cmon.d/cmon_1.cnf # if exists
$ sed -i 's|<old IP address>|<new IP address>|g' /etc/cmon.d/cmon_2.cnf # if exists

** Replace <old IP address> and <new IP address> with their respective values.

Restart the cmon process to apply the changes:

$ service cmon restart

That’s it folks. The above ClusterControl + Galera Cluster setup took about 15 minutes to deploy in a container environment. How long did it take you? :-) 

Blog category:


PlanetMySQL Voting: Vote UP / Vote DOWN

How to crack that “software product company” campus interview

$
0
0

During my many years of recruiting at engineering colleges, I have sometimes wondered why the simple code to crack the campus interview has not been figured out by students.
At the end of the interviews conducted by our company, the conversation with the campus hiring professor goes along predictable lines. We talk about how the students could have done better.

This blog is about my advise to ace the campus interview.
Surprisingly the structure of the interviews has remained the same since the last many years that I have been recruiting.
What most product companies are looking for, is exactly the same things:

1. Do you have basic intelligence to think and give a solution
2. Can you think programmatically
3. How well do you know your data structures

4. Do you understand operating systems
5. Do you have some idea about distributed programming
6. Do you have some idea about the product/company for which you are being recruited

The reason that the first 3 and last 3 have a gap in between is because the first 3 are must haves, while the last 3 are good to have. An average company not looking for top notch programmers will recruit you even if you are good with the first 3.
The best companies will look for all the 6.

It is not very difficult to prepare for the above. Lets go over each :

1. Do you have basic intelligence to think and give a solution
Remember, you have made it to a the computer science department of a good college selected by this company for campus hiring. You also have good grades to have made it to the cut off list.
As long as you remember that and don’t get either too tense or over confident; thinking should not be a problem.
Also remember the recruiters want to hire you, they will try to give hints about the solution.
Listen to them carefully and even if you cannot get to the final solution, you will definitely be able to make the recruiters understand that you can think along the correct lines.
Don’t bullshit and don’t try to hide behind jargon. These are experienced engineers who have come for recruitment, they will see through these tricks. If you are not getting it, saying so and asking for a different problem will probably be seen as a more sincere answer.
Looking at a few problem solving questions on the internet may also not be a bad idea.

2. Can you think programmatically
If you don’t want to program, you are of no use to a product company. Whether it is development, quality, sustaining or even release engineering, you need to love programming. You have spent 4 years studying computer engineering, and will need to program for atleast the next 7 years if not more. Even beyond that you need to understand programming and to be able to think programmatically.
Given any problem, you should be able to write an algorithm to solve it. Preferably it should  be in a real computer language. You don’t need to know all the tricks and tips of C++ or Python but you need to be thorough with you basic programming.
Most product companies; if they are working in a core technology, are happy if you know C. C is the most used programming language for core infrastructure. If you can master C then any other language should not be a problem.
So here comes my first recommendation about which book to read :

The C Programming Language (Ansi C Version) Paperback – 1990
by Brian W. Kernighan (Author), Dennis M. Ritchie (Author)

It is not only the oldest book on C but the most crisp and concise. Read the book and solve the problems.
Once you are thru this book the second hurdle should not be a problem.

3. How well you know your data structures

What hammer, drill and other tools are to a carpenter, data structures are to the computer programmer. You need to know what data structure you need to use to solve a problem. All problems are not nails and arrays are not the hammer. There are more elegant solutions. Running scared of pointers and trees will not get you too far.
If you have read the C Programming book and solved the problems, you should be good with the basic data structures.
Having said “right data structure for the right job”; the recruiters will try and ask you to use pointers to solve a problem that can easily be solved by arrays. Be ready for that. Know the memory constraints and the order of the algorithm for which you are using your data structure.
There are many books on algorithms and data structures. Any one should be good, but being an old man I still have my faith in:

The Art of Computer Programming: Fundamental Algorithms v. 1 Paperback – 1 Dec 2008
by Donald E. Knuth (Author)

You don’t need to learn the whole book, if you can just be thorough with lists, trees and a bit of recursion from this book along with searching and sorting, that should be good enough.

There is now some new thinking about programming in terms of design patterns. Knowing design patterns is also great.
You do need to go atleast 1 step beyond the MVC though. The plain MVC is the one pattern everyone resorts to and no malice towards the good old MVC but frankly after the 5th college grad mentions MVC, it gets too boring.

That covers the must haves. With the above, you should have your step in the door and probably an easy shot at any service company.
But if you need to get into a specialized R&D type product company there is a bit more.

4. Do you understand operating systems

Who cares about the old operating system? The Internet runs on scripting languages.

Wrong and Wrong.

Whether your programs are running on the web or on the cloud, ultimately your program ends up on or interacts with a server that runs an operating system.
You are lucky that all operating systems whether by Apple or Microsoft or IBM are now converging towards the Linux type of operating system. So it is a simple choice, which OS internals you need to learn about.
You need to know the basic old Unix.
This was the operating system which was a trendsetter for the filesystem, the process structure and other OS primitives that you see in most modern operating systems. That brings me to my 3rd book recommendation.

The Design of the Unix Operating System Paperback – 1988
by Bach Maurice J. (Author)

I know that recommending a book from 1988 is not sexy, but I have not found a more simple and elegant explanation of the building blocks of the operating system than this book. Try it, it does read like a novel and has excellent diagrams to explain the basic OS structures. Also since it is not cluttered will all the new extensions to the OS, the basics can be grasped as they were designed.
Otherwise any good book on OS should be good enough.
You need to be really thorough when you go for the interview, the purist programmers who are trying to recruit you want to know exactly what happens to a program, how it compiles and how it gets executed on that OS. You need to be prepared with how the program is structured after compilation and exactly how the OS goes about executing it.

5. Do you have some idea about distributed programming

We talked about the good fortune that all the operating systems are trending in the same direction. Unfortunately there is another trend which makes the life of programmers difficult. That trend is distributed programming.
Earlier there was a single CPU and single threaded programs, now there are multiple cores on a single chip and multiple threads executing in parallel. There are now also clusters of servers and clouds of internet. Your program has to ensure that it can be broken into multiple threads and multiple servers elegantly and that it recombines to generate the final result well.
This opens a whole can of worms for synchronizing threads and programming well, so that no memory corruption takes place.
Debugging such multi threaded programs is a nightmare even for veteran programmers. Most of the last minute issues for a product release are related to bad timing in the synchronization of multiple threads. To make matters worse, some of the problems are difficult to reproduce since they occur intermittently.
The red eyes of your recruiter may indicate that s/he probably has just come back after fight with a naughty distributed program. When they ask you about threads, processes, synchronization, locking; you need to answer in a coherent way. You do not want to be the target of their pent up anger against the last locking/synchronization issue whose resolution kept them awake a few nights.

You are best prepared if there is atleast one multi threaded client server program you have written and ensured that 10 – 20 parallel sessions on the program do not crash the server.

If you have written the program above; it should be good enough, but if you need a book recommendation for writing that client server program and want to make you life interesting with some socket programming, here goes :

Unix Network Programming: The Sockets Networking Api – Volume 1 Paperback – 2005
by Stevens W. Richard (Author), Fenner Bill (Author), Rudoff M. Andrew (Author)

While we are on distributed programming, one of the concepts that is kind of linked to it, is the issue of security.
Many clients accessing servers remotely need to have a security infrastructure. Some knowledge of security, for example: What PKI really means; is always good.

6. Do you have any idea about the product/company for which you are being recruited

Finally; yes finally, if you have reached till here in the interview, your recruiters should be smiling.
But they still want to know your interest in the job you are being recruited for.
So a basic search on the internet can be done even while you are waiting for the interview.
If you are really serious then you would know atleast some details about the company
i.e. who founded it, why it is successful  etc.

Most product companies are working on cutting edge technologies.
For example with MySQL you need to know your databases.
What is a transaction? What is this whole buzz about SQL and NOSQL ?
Issues with multi tenancy for the internet ? What is multi master replication ? etc.
Similarly for the company you are aiming at, there must be technologies they care about.
Find out if there is a preso on slideshare about the implementation architecture of their software.
Also maybe google about the technologies that they use.

Reading a research paper related to the technology should be a feather in your cap. If you have read that research paper, make sure you mention it in your resume.

Remember; you have 3-4 years once you get into the college to prepare for 5 of the 6 points above.
Reading 2 books C & Unix and sections of the other books mentioned may mean a huge difference in your starting company and starting salary.
All the best; maybe we will see you around in our next campus interview.


PlanetMySQL Voting: Vote UP / Vote DOWN

MySQL in Dockerland

$
0
0
Around 18 months ago, we launched the first MySQL Linux package repos, marking an important milestone in our efforts to modernize and improve the way we package and deliver MySQL products to our user community. MySQL product development had gone through radical improvements in terms of quality, dependability and sheer output, but the way we […]
PlanetMySQL Voting: Vote UP / Vote DOWN

Getting Started Galera with Docker, part 2

$
0
0

By Erkan Yanar

In the previous article of this series, we described how to run a multi-node Galera Cluster on a single Docker host.

In this article, we will describe how to deploy Galera Cluster over multiple Docker hosts.

By design, Docker containers are reachable using port-forwarded TCP ports only, even if the containers have IP addresses. So we will set up port forwarding for all TCP ports that are required for Galera to operate.

The following TCP port are used by Galera:

  • 3306-MySQL port
  • 4567-Galera Cluster
  • 4568-IST port
  • 4444-SST port


Before we start, we need to stop enforcing AppArmor for Docker:

aa-complain /etc/apparmor.d/docker


Building a multi-node cluster using the default ports

Building a multi-node cluster using the default ports is not complicated. Besides mapping the ports 1:1, we also need to set `–wsrep-node-address` to the IP address of the host.

We assume following 3 nodes

  • nodea 10.10.10.10
  • nodeb 10.10.10.11
  • nodec 10.10.10.12

A simple cluster setup would look like this:

nodea$ docker run -d -p 3306:3306 -p 4567:4567 -p 4444:4444 -p 4568:4568 
--name nodea erkules/galera:basic 
--wsrep-cluster-address=gcomm:// --wsrep-node-address=10.10.10.10
nodeb$ docker run -d -p 3306:3306 -p 4567:4567 -p 4444:4444 -p 4568:4568 
--name nodeb erkules/galera:basic 
--wsrep-cluster-address=gcomm://10.10.10.10 --wsrep-node-address=10.10.10.11
nodec$ docker run -d -p 3306:3306 -p 4567:4567 -p 4444:4444 -p 4568:4568 
--name nodec erkules/galera:basic 
--wsrep-cluster-address=gcomm://10.10.10.10 --wsrep-node-address=10.10.10.12

nodea$ docker exec -t nodea mysql -e 'show status like "wsrep_cluster_size"'

+——————–+——-+

| Variable_name | Value |

+——————–+——-+

| wsrep_cluster_size | 3 |

+——————–+——-+

In this example, we used the image from the previous blog post. Docker is going to download the image if it is not already present on the node.


Building a multi-node cluster using non-default ports

In the long run, we may want to start more than one instance of Galera on a host in order to run more than one Galera cluster using the same set of hosts.

For the purpose, we set Galera Cluster to use non-default ports and then map MySQL’s default port to 4306:

  • MySQL port 3306 is mapped to 4306
  • Galera Cluster port 4567 is changed to 5567
  • Galera IST port 4568 is changed to 5678
  • Galera SST port 4444 is changed to 5444


The docker command line part is straightforward. Please note the additional command-line options used to configure Galera

nodea$ docker run -d -p 4306:3306 -p 5567:5567 -p 5444:5444 -p 5568:5568 
--name nodea erkules/galera:basic --wsrep-cluster-address=gcomm:// 
--wsrep-node-address=10.10.10.10:5567 --wsrep-sst-receive-address=10.10.10.10:5444 
--wsrep-provider-options="ist.recv_addr=10.10.10.10:5568"
nodeb$ docker run -d -p 4306:3306 -p 5567:5567 -p 5444:5444 -p 5568:5568 
--name nodeb erkules/galera:basic --wsrep-cluster-address=gcomm://10.10.10.10:5567 
--wsrep-node-address=10.10.10.11:5567 --wsrep-sst-receive-address=10.10.10.11:5444 
--wsrep-provider-options="ist.recv_addr=10.10.10.11:5568"
nodec$ docker run -d -p 4306:3306 -p 5567:5567 -p 5444:5444 -p 5568:5568 
--name nodec erkules/galera:basic --wsrep-cluster-address=gcomm://10.10.10.10:5567 
--wsrep-node-address=10.10.10.12:5567 --wsrep-sst-receive-address=10.10.10.12:5444 
--wsrep-provider-options="ist.recv_addr=10.10.10.12:5568"
nodea$ docker exec -t nodea mysql -e 'show status like "wsrep_cluster_size"'

+——————–+——-+

| Variable_name | Value |

+——————–+——-+

| wsrep_cluster_size | 3 |

+——————–+——-+


The following Galera Cluster configuration options are used to specify each port:

  • 4567 Galera Cluster is configured using `–wsrep-node-address`
  • 4568 IST port is configured using `–wsrep-provider-options=”ist.recv_addr=”`
  • 4444 SST port is configured using `–wsrep-sst-receive-address`

Summary

In this blog post, we described how to run Galera Cluster inside Docker on multiple hosts, even with non-standard ports. It is also possible to use solutions such as weave, socketplane.io and flannel that provide a multi-host network for the containers.


PlanetMySQL Voting: Vote UP / Vote DOWN

MMUG12: Talk about Percona Toolkit and the new features of MySQL 5.7

$
0
0

Madrid MySQL Users Group is having a Meetup this afternoon, Wednesday, 13th May at 19:00.

  • I will be presenting (in Spanish) a quick summary of Percona Toolkit and also offering a summary of the new features in MySQL 5.7 as the release candidate has been announced and we don’t expect new functionality.
  • This is also an opportunity to discuss other MySQL related topics in a less formal manner.
  • You can find information about the Meetup here.

So if you are in Madrid and are interested please come along.

El Madrid MySQL Users Group tiene una reunión esta tarde, miércoles 13 de mayo, a las 19:00.

  • Ofreceré una presentación sobre Percona Toolkit y un resumen de las características nuevas de MySQL 5.7 que recientemente se anunció como Release Candidate. Ya no esperamos cambios en su funcionalidad.
  • También habrá una oportunidad de hablar de otros temas relacionados con MySQL de una manera menos formal.
  • Se puede encontrar información de la reunión aquí.

Si estás en Madrid y te interesa estarás bienvenido.


PlanetMySQL Voting: Vote UP / Vote DOWN

Optimizer hints in MySQL 5.7.7 – The missed manual

$
0
0

In version MySQL 5.7.7 Oracle presented a new promising feature: optimizer hints. However it did not publish any documentation about the hints. The only note which I found in the user manual about the hints is:

  • It is now possible to provide hints to the optimizer by including /*+ ... */ comments following the SELECT, INSERT, REPLACE, UPDATE, or DELETE keyword of SQL statements. Such statements can also be used with EXPLAIN. Examples:
    SELECT /*+ NO_RANGE_OPTIMIZATION(t3 PRIMARY, f2_idx) */ f1
    FROM t3 WHERE f1 > 30 AND f1 < 33;
    SELECT /*+ BKA(t1, t2) */ * FROM t1 INNER JOIN t2 WHERE ...;
    SELECT /*+ NO_ICP(t1) */ * FROM t1 WHERE ...;

There are also three worklogs: WL #3996, WL #8016 and WL #8017. But they describe the general concept and do not have much information about which optimizations can be used and how. More light on this provided by slide 59 from Øystein Grøvlen’s session at Percona Live. But that’s all: no “official” full list of possible optimizations, no use cases… nothing.

I tried to sort it out myself.

My first finding is the fact that slide #59 really lists six of seven possible index hints. Confirmation for this exists in one of two new files under sql directory of MySQL source tree, created for this new feature.

$cat sql/opt_hints.h
...
/**
  Hint types, MAX_HINT_ENUM should be always last.
  This enum should be synchronized with opt_hint_info
  array(see opt_hints.cc).
*/
enum opt_hints_enum
{
  BKA_HINT_ENUM= 0,
  BNL_HINT_ENUM,
  ICP_HINT_ENUM,
  MRR_HINT_ENUM,
  NO_RANGE_HINT_ENUM,
  MAX_EXEC_TIME_HINT_ENUM,
  QB_NAME_HINT_ENUM,
  MAX_HINT_ENUM
};

Looking into file sql/opt_hints.cc we can find out what these optimizations give not much choice: either enable or disable.

$cat sql/opt_hints.cc
...
struct st_opt_hint_info opt_hint_info[]=
{
  {"BKA", true, true},
  {"BNL", true, true},
  {"ICP", true, true},
  {"MRR", true, true},
  {"NO_RANGE_OPTIMIZATION", true, true},
  {"MAX_EXECUTION_TIME", false, false},
  {"QB_NAME", false, false},
  {0, 0, 0}
};

A choice for the way to include hints into SQL statements: inside comments with sign “+”

/*+ NO_RANGE_OPTIMIZATION(t3 PRIMARY, f2_idx) */
, – is compatible with style of optimizer hints which Oracle uses.

We actually had access to these hints before: they were accessible via variable optimizer_switch. At least such optimizations like BKA, BNL, ICP, MRR. But with new syntax we cannot only modify this access globally or per session, but can turn on or off particular optimization for a single table and column in the query. I can demonstrate it on this quite artificial but always accessible example:

mysql> use mysql
Database changed
mysql> explain select * from user where host in ('%', '127.0.0.1');
+----+-------------+-------+------------+-------+---------------+---------+---------+------+------+----------+-----------------------+
| id | select_type | table | partitions | type  | possible_keys | key     | key_len | ref  | rows | filtered | Extra                 |
+----+-------------+-------+------------+-------+---------------+---------+---------+------+------+----------+-----------------------+
|  1 | SIMPLE      | user  | NULL       | range | PRIMARY       | PRIMARY | 180     | NULL |    2 |   100.00 | Using index condition |
+----+-------------+-------+------------+-------+---------------+---------+---------+------+------+----------+-----------------------+
1 row in set, 1 warning (0.01 sec)
mysql> explain select /*+ NO_RANGE_OPTIMIZATION(user PRIMARY) */ * from user where host in ('%', '127.0.0.1');
+----+-------------+-------+------------+------+---------------+------+---------+------+------+----------+-------------+
| id | select_type | table | partitions | type | possible_keys | key  | key_len | ref  | rows | filtered | Extra       |
+----+-------------+-------+------------+------+---------------+------+---------+------+------+----------+-------------+
|  1 | SIMPLE      | user  | NULL       | ALL  | PRIMARY       | NULL | NULL    | NULL |    5 |    40.00 | Using where |
+----+-------------+-------+------------+------+---------------+------+---------+------+------+----------+-------------+
1 row in set, 1 warning (0.00 sec)

I used one more hint, which we could not turn on or off directly earlier: range optimization.

One more “intuitively” documented feature is the ability to turn on or off a particular optimization. This works only for BKA, BNL, ICP and MRR: you can specify NO_BKA(table[[, table]…]), NO_BNL(table[[, table]…]), NO_ICP(table indexes[[, table indexes]…]) and NO_MRR(table indexes[[, table indexes]…]) to avoid using these algorithms for particular table or index in the JOIN.

MAX_EXECUTION_TIME does not require any table or key name inside. Instead you need to specify maximum time in milliseconds which query should run:

mysql> select /*+ MAX_EXECUTION_TIME(1000) */  sleep(1) from user;
ERROR 3024 (HY000): Query execution was interrupted, max_statement_time exceeded
mysql> select /*+ MAX_EXECUTION_TIME(10000) */  sleep(1) from user;
+----------+
| sleep(1) |
+----------+
|        0 |
|        0 |
|        0 |
|        0 |
|        0 |
+----------+
5 rows in set (5.00 sec)

QB_NAME is more complicated. WL #8017 tells us this is custom context. But what is this? The answer is in the MySQL test suite! Tests for optimizer hints exist in file t/opt_hints.test For QB_NAME very first entry is query:

EXPLAIN SELECT /*+ NO_ICP(t3@qb1 f3_idx) */ f2 FROM
  (SELECT /*+ QB_NAME(QB1) */ f2, f3, f1 FROM t3 WHERE f1 > 2 AND f3 = 'poiu') AS TD
    WHERE TD.f1 > 2 AND TD.f3 = 'poiu';

So we can specify custom QB_NAME for any subquery and specify optimizer hint only for this context.

To conclude this quick overview I want to show a practical example of when query hints are really needed. Last week I worked on an issue where a customer upgraded from MySQL version 5.5 to 5.6 and found some of their queries started to work slower than before. I wrote an answer which could sound funny, but still remains correct: “One of the reasons for such behavior is optimizer  improvements. While they all are made for better performance, some queries – optimized for older versions – can start working slower than before.”

To demonstrate a public example of such a query I will use my favorite source of information: MySQL Community Bugs Database. In a search for Optimizer regression bugs that are still not fixed we can find bug #68919 demonstrating regression in case the MRR algorithm is used for queries with LIMIT. In run queries, shown in the bug report, we will see a huge difference:

mysql> SELECT * FROM t1 WHERE i1>=42 AND i2<=42 LIMIT 1;
+----+----+----+----+
| pk | i1 | i2 | i3 |
+----+----+----+----+
| 42 | 42 | 42 | 42 |
+----+----+----+----+
1 row in set (6.88 sec)
mysql> explain SELECT * FROM t1 WHERE i1>=42 AND i2<=42 LIMIT 1;
+----+-------------+-------+------------+-------+---------------+------+---------+------+---------+----------+----------------------------------+
| id | select_type | table | partitions | type  | possible_keys | key  | key_len | ref  | rows    | filtered | Extra                            |
+----+-------------+-------+------------+-------+---------------+------+---------+------+---------+----------+----------------------------------+
|  1 | SIMPLE      | t1    | NULL       | range | idx           | idx  | 4       | NULL | 9999958 |    33.33 | Using index condition; Using MRR |
+----+-------------+-------+------------+-------+---------------+------+---------+------+---------+----------+----------------------------------+
1 row in set, 1 warning (0.00 sec)
mysql> SELECT /*+ NO_MRR(t1) */ *  FROM t1  WHERE i1>=42 AND i2<=42 LIMIT 1;
+----+----+----+----+
| pk | i1 | i2 | i3 |
+----+----+----+----+
| 42 | 42 | 42 | 42 |
+----+----+----+----+
1 row in set (0.00 sec)

With MRR query execution takes 6.88 seconds and 0 if MRR is not used! But the bug report itself suggests using

optimizer_switch="mrr=off";
as a workaround. And this will work perfectly well if you are OK to run
SET optimizer_switch="mrr=off";
every time you are running a query which will take advantage of having it OFF. With optimizer hints you can have one or another algorithm to be ON for particular table in the query and OFF for another one. I, again, took quite an artificial example, but it demonstrates the method:
mysql> explain select /*+ MRR(dept_emp) */ * from dept_emp where to_date in  (select /*+ NO_MRR(salaries)*/ to_date from salaries where salary >40000 and salary <45000) and emp_no >10100 and emp_no < 30200 and dept_no in ('d005', 'd006','d007');
+----+--------------+-------------+------------+--------+------------------------+------------+---------+----------------------------+---------+----------+-----------------------------------------------+
| id | select_type  | table       | partitions | type   | possible_keys          | key        | key_len | ref                        | rows    | filtered | Extra                                         |
+----+--------------+-------------+------------+--------+------------------------+------------+---------+----------------------------+---------+----------+-----------------------------------------------+
|  1 | SIMPLE       | dept_emp    | NULL       | range  | PRIMARY,emp_no,dept_no | dept_no    | 8       | NULL                       |   10578 |   100.00 | Using index condition; Using where; Using MRR |
|  1 | SIMPLE       | <subquery2> | NULL       | eq_ref | <auto_key>             | <auto_key> | 3       | employees.dept_emp.to_date |       1 |   100.00 | NULL                                          |
|  2 | MATERIALIZED | salaries    | NULL       | ALL    | salary                 | NULL       | NULL    | NULL                       | 2838533 |    17.88 | Using where                                   |
+----+--------------+-------------+------------+--------+------------------------+------------+---------+----------------------------+---------+----------+-----------------------------------------------+
3 rows in set, 1 warning (0.00 sec)


The post Optimizer hints in MySQL 5.7.7 – The missed manual appeared first on MySQL Performance Blog.


PlanetMySQL Voting: Vote UP / Vote DOWN

MySQL, Percona, MariaDB long running processes clean up one liner

$
0
0

There are tools like pt-kill from the percona tool kit that may print/kill the long running transactions at MariaDB, MySQL or at Percona data instances, but a lot of backup scripts are just some simple bash lines.
So checking for long running transactions before the backup to be executed seems to be a step that is missed a lot.

Here is one line that might be just added in every bash script before the backup to be executed
Variant 1. Just log all the processlist entries and calculate which ones were running longer than TIMELIMIT:

$ export TIMELIMIT=70 && echo "$(date) : check for long runnig queries start:" >> /tmp/processlist.list.to.kill && mysql -BN -e 'show processlist;' | tee -a /tmp/processlist.list.to.kill | awk -vlongtime=${TIMELIMIT} '($6>longtime){print "kill "$1";"}' | tee -a /tmp/processlist.list.to.kill

Variant 2: Log all the processlist, calculate the calculate which processes are running longer than TIMELIMIT, and kill them before to execute the backup:

$ export TIMELIMIT=70 && echo "$(date) : check for long runnig queries start:" >> /tmp/processlist.list.to.kill && mysql -BN -e 'show processlist;' | tee -a /tmp/processlist.list.to.kill | awk -vlongtime=${TIMELIMIT} '($6>longtime){print "kill "$1";"}' | tee -a /tmp/processlist.list.to.kill | mysql >> /tmp/processlist.list.to.kill 2>&1


PlanetMySQL Voting: Vote UP / Vote DOWN

Testing MySQL with “read-only” filesystem

$
0
0

From previous articles about “disk full” conditions, you have some taste of testing MySQL with such approach:
1. Testing Disk Full Conditions
2. Using GDB, investigating segmentation fault in MySQL

But there is still untouched topic, about read-only mounted file system and how MySQL will act in such condition.
In real life, i have encountered such situation that something happened with Linux server and file system suddenly goes to read-only mode.

Buffer I/O error on device sdb1, logical block 1769961
lost page write due to I/O error on sdb1
sd 0:0:1:0: timing out command, waited 360s
sd 0:0:1:0: Unhandled error code
sd 0:0:1:0: SCSI error: return code = 0x06000008
Result: hostbyte=DID_OK driverbyte=DRIVER_TIMEOUT,SUGGEST_OK
mptscsih: ioc0: attempting task abort! (sc=ffff8100b629a6c0)
sd 0:0:1:0:
        command: Write(10): 2a 00 00 d8 15 17 00 04 00 00
mptscsih: ioc0: task abort: SUCCESS (rv=2002) (sc=ffff8100b629a6c0)
Aborting journal on device sdb1.
ext3_abort called.
EXT3-fs error (device sdb1): ext3_journal_start_sb: Detected aborted journal
Remounting filesystem read-only
__journal_remove_journal_head: freeing b_committed_data
EXT3-fs error (device sdb1) in ext3_new_inode: Journal has aborted
ext3_abort called.
EXT3-fs error (device sdb1): ext3_remount: Abort forced by user
ext3_abort called.
EXT3-fs error (device sdb1): ext3_remount: Abort forced by user

There was no error message of course because of read-only partition.
That’s why we have no chance to detect why MySQL did not start, until we examine OS level issues.

In contrast Oracle handles this condition:

[root@bsnew home]# su - oracle
-bash-3.2$ sqlplus / as sysdba

SQL*Plus: Release 11.2.0.4.0 Production on Mon Apr 7 11:35:10 2014

Copyright (c) 1982, 2013, Oracle.  All rights reserved.

ERROR:
ORA-09925: Unable to create audit trail file
Linux-x86_64 Error: 30: Read-only file system
Additional information: 9925
ORA-09925: Unable to create audit trail file
Linux-x86_64 Error: 30: Read-only file system
Additional information: 9925

Of course if you change error log file path to working path there will be messages:

2015-04-28 08:04:16 7f27a6c847e0  InnoDB: Operating system error number 30 in a file operation.
InnoDB: Error number 30 means 'Read-only file system'.
InnoDB: Some operating system error numbers are described at
InnoDB: http://dev.mysql.com/doc/refman/5.6/en/operating-system-error-codes.html
2015-04-28 08:04:16 1486 [ERROR] InnoDB: File ./ibdata1: 'create' returned OS error 130. Cannot continue operation
150428 08:04:17 mysqld_safe mysqld from pid file /home/error_log_dir/mysqld-new.pid ended

But it is not useful at this moment, instead, there should be some message while trying starting MySQL directly to STDOUT.
If you have more test paths check related feature request and add them: #72259

The post Testing MySQL with “read-only” filesystem appeared first on Azerbaijan MySQL UG.


PlanetMySQL Voting: Vote UP / Vote DOWN
Viewing all 18788 articles
Browse latest View live


<script src="https://jsc.adskeeper.com/r/s/rssing.com.1596347.js" async> </script>