Quantcast
Channel: Planet MySQL
Viewing all 18789 articles
Browse latest View live

Announcing VividCortex's Free Network Analyzer Tools for MySQL and PostgreSQL

$
0
0

We have released two free tools that will help MySQL and PostgreSQL DBAs understand the queries their database servers execute. As you probably know, we have spent nearly 3 years building the most advanced and efficient network traffic capture and decoding tools for MySQL and PostgreSQL. With the release of these free tools, we’re placing all the power of our traffic analysis libraries in your hands.

network

In our initial release, the tools sniff the network traffic and print out queries, with microsecond-resolution timing information, in a format that pt-query-digest understands natively. This means you can just pipe the tools into pt-query-digest and you’ll get a report of top queries by time. If you’re not familiar with pt-query-digest, it’s a powerful and flexible query analysis tool.

Here’s a quickstart, assuming you’re using the MySQL tool, but it works just the same for PostgreSQL. After downloading the free tool of your choice and copying it to a server where you have root access,

wget percona.com/get/pt-query-digest
./vc-mysql-sniffer > log.txt
 perl pt-query-digest log.txt

Let the network analyzer run as long as you care, and cancel it with CTRL-C to stop capturing data. Run pt-query-digest to see the top-queries report.

Why build and share these free tools with the MySQL and PostgreSQL communities? From many years of experience we know that network analysis is often one of the most powerful ways to understand what a server is doing. Ask any sysadmin if they’ve ever used tcpdump or Wireshark to inspect a server, and you’ll probably hear an enthusiastic yes.

Although tcpdump and Wireshark are fantastic for debugging, they’re not very usable for large-scale query analysis of the type you need to do as a DBA:

  • Finding top queries by total time
  • Performing audits of the server
  • And a range of other tasks

Unfortunately, no really good options exist for this. The ones that do exist just aren’t built for performance or scale, either in the machine sense or in the human usability factor. Our recent ebook, Practical Query Optimization for MySQL and PostgreSQL, explored some of the reasons why this capability is so important and how hard it is to get.

VividCortex’s network decoding libraries are second to none in performance, accuracy, and ability to handle the kinds of bizarre stuff you see when you’re sniffing a network with libpcap. These libraries form the backbone of our battle-tested agents for the VividCortex service itself. Now they’re available to you, in a form that’s designed to play well with popular tools of all sorts.

Our initial release offers the most important functionality. Later we’ll add functionality to do things like generate metrics from the query traffic in a form suitable to send to StatsD, for example. We also support only 64-bit Linux in this release, but later we’ll support more operating systems such as FreeBSD and Windows. We’ll also add tools for Redis and any other databases we support in our agents. (Ask us about our MongoDB beta if you’re interested.)

The tools require root access to capture network traffic. They are barebones wrappers around our TCP and MySQL/PostgreSQL decoding libraries. They do nothing but decode and print. They don’t try to communicate with our APIs, for example. They’re secure and private to use.

You can download the tools free of charge here:

Questions? Comments? Feedback, ideas, problems? Don’t hesitate to drop us a line. We hope you enjoy and profit from these great free tools!

Cropped photo by generated on Flickr.


PlanetMySQL Voting: Vote UP / Vote DOWN

Upgrading Directly From MySQL 5.0 to 5.6 With mysqldump

$
0
0

Upgrading MySQL

Upgrading MySQL is a task that is almost inevitable if you have been managing a MySQL installation for any length of time. To accomplish that task, we have provided a utility and documentation to upgrade from one version of MySQL to another. The general recommendation is to perform the upgrade by stepping from one major release to the next, without skipping an intermediate major release. For example, if you are at 5.1.73, and you want to go to 5.6.24, the safest and recommended method is to upgrade from 5.1.73 to 5.5.43 (the latest 5.5 release at the time of this writing), and then upgrade from 5.5.43 to 5.6.24 (or any version of 5.6). This allows the upgrade process to apply the changes for one major release at a time.

We test upgrading from one version to the next quite extensively during each release cycle to ensure that all user data and settings are safely and successfully upgraded. In these cases, we run through an extensive set of test cases involving users, privileges, tables, views, procedures, functions, datatypes, partitions, character sets, triggers, performance schema, the mysql system schema, and more. We also create new test cases for every release as needed. We test and validate each topic at the initial, upgraded, and downgraded stages of the process. This also includes tests involving replication between versions. Validation includes ensuring the stability of the mysql server, reviewing integrity of the data, and testing functionality at all stages.

So What Are My Upgrade Options?

There are 2 basic options available when upgrading from one mysql instance to another:

  1. Perform a ‘Dump Upgrade’
  2. Perform an ‘In-place Upgrade’

A ‘Dump Upgrade’ involves dumping the data from your existing mysql instance using mysqldump, loading it into a fresh MySQL instance running the new version (e.g. MySQL 5.7), then running mysql_upgrade. Alternatively, you can perform a purely logical upgrade by dumping only the user schema(s), and loading them into a fresh MySQL instance at the new version. In this case, mysql_upgrade is not necessary.

An ‘In-place Upgrade’ involves shutting down the existing (older) MySQL instance, upgrading the installed MySQL server package and binaries, starting up that (newer) instance using the new mysqld server binary, and then running mysql_upgrade.

It is always a good idea to take a backup of the database instance prior to making any changes. Before any upgrade process, be sure to read the related upgrade documentation for the version to which you are moving. This can include important tips and information about running the upgrade: upgrading to 5.1upgrading to 5.5 , upgrading to 5.6, or upgrading to 5.7 .

There are potentially other methods for upgrading when using native OS packages. I will not cover those processes here. We will focus on the dump based upgrade here, and we will discuss the in-place upgrade in another follow-up article.

What If I Don’t Want to Upgrade Through Every Major Version?

We know that upgrading a MySQL installation can be a big proposition to undertake. With all the preparation, testing and dry runs required for a successful project, upgrades are not taken lightly. Because of the magnitude of this type of effort, we understand that some of our customers may not upgrade at every GA release. This leaves some customers with several major versions to hop through to get to the most current version. The recommended upgrade process can be very time-consuming, and sometimes take more resources, both human and machine, than a customer has.

With all of the interest around a faster upgrade path, we have been testing various upgrade options to see what works. I started upgrading from 5.0 to 5.6 to see what would happen, and to establish a baseline.

My starting MySQL instance was version 5.0.85 with all default settings and the sakila schema loaded.  I used Oracle Linux 7 as the platform.

I followed the following steps to perform the upgrade:

  1. Start with a basic mysql 5.0.85 server instance with the sakila schema loaded. I also used --no-defaults here for simplicity:
    $ cd <mysql 5.0.85 basedir>
    $ ./scripts/mysql_install_db --no-defaults --datadir=<DATADIR> --basedir=.
    $./bin/mysqld_safe --no-defaults --datadir=<DATADIR> --basedir=. --port=<PORT> --socket=<SOCKET> &
    $ ./bin/mysql -uroot --socket=<SOCKET>  --execute="create database sakila;"
    $ ./bin/mysql -uroot --socket=<SOCKET> --execute="source sakila-schema.sql" --database=sakila 
    $ ./bin/mysql -uroot --socket=<SOCKET> --execute="source sakila-data.sql" --database=sakila
  2. Dump all databases/schemas from the existing mysql server using mysqldump:
    $ ./bin/mysqldump -uroot --socket=<SOCKET> --add-drop-table --all-databases --force > alldatabases.dmp
  3. Initialize a new MySQL 5.6.24 server instance4, including any new options or parameters. Again, I used --no-defaults here for simplicity. You can use a new data directory, port, and socket or you can shutdown the 5.0.85 server, clean out the datadir, and reuse those settings. Either way the directory must be empty:
    $ cd <mysql 5.6.24 basedir>
    $ ./scripts/mysql_install_db --no-defaults --datadir=<DATADIR> --basedir=.
    $ ./bin/mysqld_safe --no-defaults --datadir=<DATADIR> --basedir=. --port=<PORT> --socket=<SOCKET> &
  4. Load the dump file into the new MySQL 5.6 server:
    $ ./bin/mysql -uroot --socket=<SOCKET> --execute="source alldatabase.dmp"
  5. Run mysql_upgrade (to get all the system tables upgraded):
    $ ./bin/mysql_upgrade -uroot --socket=<SOCKET>
  6. Load in the help tables (optional step):
    $ ./bin/mysql -uroot --socket=<SOCKET> --execute="source ./share/fill_help_tables.sql" mysql

With mysqldump, these are the parameters that I used, and why I include them:

  • --all-databases — this extracts data and definitions for all databases/schemas stored in the MySQL server except for performance_schema and information_schema.
  • --add-drop-table — this will force the table to be recreated with the load so that in case the existing definition (if defined) is different from the load file, it will be recreated to avoid load failures.
  • --force — this will force the dump to continue in the case that there is an error.

You may be saying to yourself, why don’t you include --routines?  And that is a great question. There are 2 ways of getting the functions and procedures included in the dump file:

  1. Include them by using the --routines parameter. The CREATE statements are then included as part of the user schema dump.
  2. Include them by including the mysql.proc table itself (the system table where the routine definitions are stored) in the dump. This will load the functions and procedures as rows of the mysql.proc table.  These are not create statements for the procedure, but insert statements into the mysql.proc table.

If you use the --routines option with mysqldump in these upgrade scenarios, you will get an error when trying to load the schema including functions and procedures because of an incompatibility of the mysql.proc table. The resulting error will look like this:

ERROR 1547 (HY000) at line 1212 in file: '50data.dmp': Column count of mysql.proc is wrong. Expected 20, found 16. The table is probably corrupted.
ERROR 1728 (HY000) at line 1459 in file: '51data.dmp': Cannot load from mysql.proc. The table is probably corrupted

This error is related to code added to prevent a MySQL server crash when the mysql.proc table is not in the proper format. The reason this happens is that, although the new MySQL 5.6.24 server was initialized properly, the proc table was then reverted to an earlier format via the CREATE TABLE 'proc' statement in the dump file that we subsequently loaded. Later in that same dump file were the definitions for procedures and functions in the sakila schema. The definition of the proc table then differed from what MySQL 5.6 expected to be there. This error can be avoided by not including the --routines parameter on the mysqldump command. Including this option was something that did trip me up in my testing, as I typically include --routines when I perform a dump of my user schemas.

The steps noted above for performing the ‘Dump Upgrade’ above were successful in the upgrade from 5.0.85 to 5.6.24, as well as from 5.0.85 to 5.1.73 and from 5.0.85 to 5.5.43. Validation was done using mysqlcheck, running basic select/insert/update/delete statements on the user schema, and by executing/calling user functions and procedures.

What About a Logical Upgrade?

A variation of the full ‘Dump Upgrade’ method is to only pull in the user/application schema(s) into a freshly built MySQL 5.6.24 server (in our example). This allows you to skip running mysql_upgrade because all the system tables (the mysql schema) and procedures inside the MySQL server will be at the new 5.6.24 version. The steps are slightly different, and are as follows.

  1. Start with a basic MySQL 5.0.85 server instance with the sakila schema loaded. I used --no-defaults again here for simplicity:
    $ cd <mysql 5.0.85 basedir>
    $ ./scripts/mysql_install_db --no-defaults --datadir=<DATADIR> --basedir=.
    $./bin/mysqld_safe --no-defaults --datadir=<DATADIR> --basedir=. --port=<PORT> --socket=<SOCKET> &
    $ ./bin/mysql -uroot --socket=<SOCKET>  --execute="create database sakila;"
    $ ./bin/mysql -uroot --socket=<SOCKET> --execute="source sakila-schema.sql" --database=sakila 
    $ ./bin/mysql -uroot --socket=<SOCKET> --execute="source sakila-data.sql" --database=sakila
  2. Dump only the user databases/schemas (skipping the mysql system schema)—which is only the Sakila schema in our example—from the existing MySQL server using mysqldump:
    $ ./bin/mysqldump -uroot --socket=<SOCKET> --add-drop-table --routines --force --databases sakila> userdatabases.dmp
  3. Initialize a new MySQL 5.6.24 server instance, including any new options or parameters. Again, I used --no-defaults here for simplicity. You can use a new data directory, port, and socket or you can shutdown the 5.0.85 MySQL server, clean out the data dir, and re-use those settings. Either way the data directory must be empty:
    $ cd <mysql 5.6.24 basedir>
    $ ./scripts/mysql_install_db --no-defaults --datadir=<DATADIR> --basedir=.
    $ ./bin/mysqld_safe --no-defaults --datadir=<DATADIR> --basedir=. --port=<PORT> --socket=<SOCKET> &
  4. Load the dump file into the new MySQL 5.6 server instance:
    $ ./bin/mysql -uroot --socket=<SOCKET> --execute="source alldatabase.dmp"

With mysqldump in this scenario, these are the parameters that I use, and why I include them:

  • --databases — this extracts data and definitions for all databases included in the database list
  • --add-drop-table — this will force the table to be recreated with the load so that in case the existing definition (if defined) is different from the load file, it will be recreated to avoid load failures.
  • --routines — this will include the functions and procedures in the user schema dump. We need this because we are not including them with the mysql.proc dump.
  • --force — this will force the dump to continue in the case that there is an error.

One thing to keep in mind with this type of upgrade, is that it does not load any user connection or privilege related data, nor any server settings. All of that would need to be re-created separately.

Actually, I would recommend anyone who considers skipping many major versions to use a pure logical upgrade. With a pure logical upgrade there are no assumptions made about meta-data and thus no mysql_upgrade step is needed. This increases the likelihood of success dramatically. The only downside is that it will not include users and privileges, and if you have archived data in a non pure form you will need to load it into your old version and produce the pure logical dump from there.

In my next article, I will tackle the ‘In-Place Upgrade’.

That’s it for now. THANK YOU for using MySQL!


PlanetMySQL Voting: Vote UP / Vote DOWN

Shutterfly Case Study

$
0
0

Shutterfly needed to develop a cloud-based MySQL back end quickly without disrupting their existing customers. They turned to Pythian’s DevOps and MySQL experts who built, tested, and migrated a scalable cloud environment—ideal for web-scale growth—and significantly improved application stability and flexibility. The solution was delivered on time and successfully supported traffic spikes with no downtime during launch.

Shutterfly Case Study


PlanetMySQL Voting: Vote UP / Vote DOWN

Encrypting MySQL Backups

$
0
0

Encryption is important component of secure environments. While being intangible property security doesn’t get enough attention when it comes to describing various systems. “Encryption support” is often the most of details what you can get asking how secure the system is. Other important details are often omitted, but the devil in details as we know. In this post I will describe how we secure backup copies in TwinDB.

linux_ecb (1)See the picture. This is what happens when encryption is used incorrectly. The encryption algorithm can be perfect, but poor choice of the mode results in a quite readable encrypted image. This mode is called “Electronic Code Book”, avoid it at all means.

Another bright example of improper encryption use was illustrated in Venona project.

There is encryption algorithm that is mathematically proven to be unbreakable. That means you cannot decrypt a cipher text even with brute force attack and having unlimited computing power and time. It is One-Time Pad. It’s very simple and fast – it’s a XOR of a plain-text message and a key. The only problem with the algorithm is – it requires a key to be as large as the plain text message. But if you can securely transfer the key why would you need the encryption at all? That’s a reason why One-time Pad is not so popular. But it’s still usable. For example, you can generate a really large key, much larger than a typical plain text message. Then use some secure channel to transfer the key and then use parts of the key to send encrypted messages. Basically, this is what Soviets did to spy in USA. They generated a bunch of keys and used them to encrypt messages to a Moscow recipient. Because Soviets were broken by design they either ran of keys or some lazy-bone didn’t destroy used keys and at some point the keys were reused to encrypt more than one message. That broke their encryption and the USA managed to decipher many messages.

Thus there is a fundamental rule. Never use or design home backed encryption algorithms.

At TwinDB, we use GnuPG to encrypt MySQL backups and for communication between an agent and the dispatcher (See TwinDB Architecture for details).

The public key of the dispatcher is hard-coded in the agent (I’ll refer to it as api@twindb.com). The agent uses the public key api@twindb.com to send encrypted messages to the dispatcher. When a user registers new MySQL server in TwinDB the agent generates its own RSA keys pair, it’s referred as <UUID>@twindb.com, for example e456b18e-11eb-49ff-93f9-5341656799fe@twindb.com .

gpg -K
/root/.gnupg/secring.gpg
------------------------
sec   2048R/17B2D796 2014-12-08
uid                  Backup Server id e456b18e-11eb-49ff-93f9-5341656799fe (No passphrase) <e456b18e-11eb-49ff-93f9-5341656799fe@twindb.com>
ssb   2048R/604969DA 2014-12-08

Here’s how you can generate a pair of GPG keys in Python non-interactively:

server_id = "e456b18e-11eb-49ff-93f9-5341656799fe"
email = "e456b18e-11eb-49ff-93f9-5341656799fe@twindb.com"
gpg_cmd = ["gpg", "--batch", "--gen-key"]
gpg_script = """
%%echo Generating a standard key
Key-Type: RSA
Key-Length: 2048
Subkey-Type: RSA
Subkey-Length: 2048
Name-Real: Backup Server id %s
Name-Comment: No passphrase
Name-Email: %s
Expire-Date: 0
%%commit
%%echo done
""" % (server_id, email)
p = subprocess.Popen(gpg_cmd, stdin=subprocess.PIPE)
p.communicate(gpg_script)

The agent sends its public key to the dispatcher and the dispatcher since then can communicate securely with the agent. It’s nice that gpg can sign messages, so the dispatcher can authenticate the agents, too.

Encrypting MySQL Backups

When the agent takes a backup it streams the backup copy to gpg process and it encrypts the stream with its own public key.

innobackupex --stream xbstream ./ | gpg --encrypt --yes --batch --no-permission-warning --quiet --recipient e456b18e-11eb-49ff-93f9-5341656799fe@twindb.com

Hence one of the biggest features of TwinDB I’m proud of. The agent encrypts the backup copy with its own key. So, we, at TwinDB, can not decrypt user backups! We did it because of two reasons. First, we want our users to trust TwinDB. “You can get much farther with a kind word and encryption than you can with a kind word alone” (c) almost Al Capone. Second, it’s a kind of protection for us. If TwinDB is broken (I have no illusions, there are smarter hackers out there than we are) the burglars won’t gain access to user data.

The private key is generated locally and never leaves the server where it was generated.

But how can we restore the database if the server is destroyed with the private key?

We ask a user to generate their own keys pair and give us the public key. The user should keep the private key in a secure place, print it out and put in a bank deposit box.


If the public key is available the dispatcher schedules a job for the agent and ask it to encrypt its private key with the user’s public key and send it back to the dispatcher. In case if the server is completely destroyed the user can get the encrypted server’s private key, decrypt it and decrypt the backup copy to restore the database.


The post Encrypting MySQL Backups appeared first on Backup and Data Recovery for MySQL.


PlanetMySQL Voting: Vote UP / Vote DOWN

Free eBook: The Strategic IT Manager's Guide To Building A Scalable DBA Team

$
0
0

How do top-performing companies manage vast amounts of data, while keeping it secure, available, and performant? How do they get teams to tie together disparate databases such as MySQL, Cassandra, Oracle, and Hadoop? Does your organization demonstrate this level of mastery over your data? If not, do you know how to achieve it?

thumbnail

The newest free ebook from VividCortex will help you transform your DBA team into a strategic center of excellence. This 45-page book covers everything from planning to hiring and managing a DBA team, as well as building data competency in a team that doesn’t have a DBA.

Check out the table of contents and download the full book.

table of contents


PlanetMySQL Voting: Vote UP / Vote DOWN

InnoDB 전문 검색 : N-gram Parser

$
0
0

기본 InnoDB 전문 검색(Full Text) 파서는 공백이나 단어 분리자가 토큰인 라틴 기반 언어들에서는 이상적이지만 개별 단어에 대한 고정된 구분자가 없는 중국어, 일본어, 한국어(CJK)같은 언어들에서는 각 단어는 여러개의 문자들의 조합으로 이루어집니다. 그래서 이경우엔 단어 토큰들을 처리할 수 있는 다른 방법이 필요합니다.

우리는 CJK에서 사용할 수 있는 n-gram 파서를 제공하기 위한 새로운 플러그블 전문 파서(pluggable full-text parser)를 MySQL 5.7.6 에서 제공할 수 있게되어 정말 기쁩니다.

N-gram이 정확히 뭘까요?

전문 검색에서 n-gram은 주어진 문자열에서 n개 문자의 인접한 순서입니다. 예를들어 n-gram 을 이용해 우리는 “abcd” 문자열을 다음과 같이 토큰나이즈합니다.

N=1 : 'a', 'b', 'c', 'd';
N=2 : 'ab', 'bc', 'cd';
N=3 : 'abc', 'bcd';
N=4 : 'abcd';

InnoDB에서 n-gram 파서를 어떻게 사용할 수 있을까요?

새 n-gram 파서는 기본적으로 로드되고 활성화되어 있기때문에 그것을 사용하기 위해서는 여러분의 대상 DDL문들에 WITH PARSER ngram 문을 간단히 기술하기만 하면 됩니다. 예를들어 MySQL 5.7.6 과 그 이후버전에서는 다음의 문장을 모두 사용할 수 있습니다.

mysql> CREATE TABLE articles
(
        FTS_DOC_ID BIGINT UNSIGNED AUTO_INCREMENT NOT NULL PRIMARY KEY,
        title VARCHAR(100),
        FULLTEXT INDEX ngram_idx(title) WITH PARSER ngram
) Engine=InnoDB CHARACTER SET utf8mb4;
Query OK, 0 rows affected (1.26 sec)
 
mysql> # ALTER TABLE articles ADD FULLTEXT INDEX ngram_idx(title) WITH PARSER ngram;
mysql> # CREATE FULLTEXT INDEX ngram_idx ON articles(title) WITH PARSER ngram;

MySQL 5.7.6에서는 ngram_token_size(토큰은 n 문자로 만들어진 단어와 거의 동등함)라는 새로운 글로벌 서버 변수도 도입되었습니다. 기본값은 2(bigram)이고 1에서 10까지 변경 가능합니다. 다음 질문은  토큰사이즈를 어떻게 선택할까? 일 것입니다. 일반적인 경우엔 2 또는 bigram이 CJK에서 권장되어 지지만, 여러분은 아래 간단한 규칙에 따라 유효한 값을 선택할 수 있습니다.

규칙 : 여러분이 검색하려고 하는 가장 큰 토큰으로 토큰 사이즈를 설정한다.

만약 단일 문자를 검색하려면, ngram_token_size을 1로 설정해야합니다.  ngram_token_size가 작은 쪽이 인덱스를 작게 할 수있어 그 인덱스를 이용한 전체 텍스트 검색이 더 빨라집니다. 그러나 단점은 당신이 검색 할 수있는 토큰 크기를 제한하는 것입니다. 예를 들어 영어의 “Happy Birthday”전통적인 중국어로는 ‘生日高興” 라고 번역됩니다. ( ‘Happy’== ‘高興’,’Birthday’=’生日’)이 예와 같이 각 단어/토큰은 2 문자로 구성되기 때문에이 토큰을 검색하기 위해서는ngram_token_size을 2 이상으로 설정해야합니다.

N-gram 토큰화의 상세

n-gram 파서는 기본적으로 전문(full text) 파서와 다음과 같은 차이점이 있습니다.

  1. 토큰 크기 : innodb_ft_min_token_sizeinnodb_ft_max_token_size는 무시됩니다. 대신 토큰을 제어하기 위해 ngram_token_size을 지정합니다.
  2. 스탑워드 처리 : 스탑워드(stopwords) 처리도 조금 다릅니다. 일반적으로 토큰 화된 단어 자체(완전히 일치)가 스탑워드 테이블에 있다면 그 단어는 전문 검색 인덱스에 추가되지 않습니다. 그러나, n-gram 파서의 경우, 토큰화된 단어에 스탑워드가 포함되어 있는지 확인하고 포함된 경우엔 인덱스를 생성하지 않습니다. 이렇게 동작이 다른 이유는 CJK에서는 매우 빈번하게 사용되는 무의미한 문자, 단어, 문장 부호를 가지고 있기 때문입니다. 스탑워드와 일치하는 문자가 포함되어 있는지를 확인하는 방식을 사용하면 쓸모없는 토큰을 더 많이 제거 할 수 있습니다.
  3. 공백 : 공백은 항상 하드 코드된 스탑워드입니다 예를 들면, ‘my sql’는 항상 ‘my’, ‘y’, ‘s’, ‘sq’, ‘ql’로 토큰화되어지고 ‘y’와 ‘s’는 인덱싱되지 않습니다.

우리는 INFORMATION_SCHEMA.INNODB_FT_INDEX_CACHE테이블과 INFORMATION_SCHEMA.INNODB_FT_TABLE_TABLE 테이블을 참조하여 특정 전문 검색 인덱스에 어떤 토큰이 인덱스화되어 있는지 정확하게 확인할 수 있습니다. 이것은 디버깅을 위해 매우 유용한 도구입니다. 예를 들어, 단어가 예상대로 전문 검색 결과에 표시되지 않는 경우, 그 단어는 어떤 이유 (스탑워드, 토큰, 크기, 등)로 인덱스화되어 있지 않은지, 이 테이블을 참조하여 확인할 수 있습니다. 간단한 예를 소개합니다.

mysql> INSERT INTO articles (title) VALUES ('my sql');
Query OK, 1 row affected (0.03 sec)
 
mysql> SET GLOBAL innodb_ft_aux_table="test/articles";
Query OK, 0 rows affected (0.00 sec)
 
mysql> SELECT * FROM INFORMATION_SCHEMA.INNODB_FT_INDEX_CACHE;
+------+--------------+-------------+-----------+--------+----------+
| WORD | FIRST_DOC_ID | LAST_DOC_ID | DOC_COUNT | DOC_ID | POSITION |
+------+--------------+-------------+-----------+--------+----------+
| my   |            1 |           1 |         1 |      1 |        0 |
| ql   |            1 |           1 |         1 |      1 |        4 |
| sq   |            1 |           1 |         1 |      1 |        3 |
+------+--------------+-------------+-----------+--------+----------+
3 rows in set (0.00 sec)

N-gram 검색 처리의 상세

텍스트 검색

NATURAL LANGUAGE MODE에서 검색되는 텍스트는 n-gram의 합집합으로 변환됩니다. 예를 들어, ‘sql’는 ‘sq ql’로 변환됩니다 (기본 토큰 크기인 2 또는 bigram의 경우).

mysql> INSERT INTO articles (title) VALUES ('my sql');
Query OK, 1 row affected (0.03 sec)
 
mysql> SET GLOBAL innodb_ft_aux_table="test/articles";
Query OK, 0 rows affected (0.00 sec)
 
mysql> SELECT * FROM INFORMATION_SCHEMA.INNODB_FT_INDEX_CACHE;
+------+--------------+-------------+-----------+--------+----------+
| WORD | FIRST_DOC_ID | LAST_DOC_ID | DOC_COUNT | DOC_ID | POSITION |
+------+--------------+-------------+-----------+--------+----------+
| my   |            1 |           1 |         1 |      1 |        0 |
| ql   |            1 |           1 |         1 |      1 |        4 |
| sq   |            1 |           1 |         1 |      1 |        3 |
+------+--------------+-------------+-----------+--------+----------+
3 rows in set (0.00 sec)

BOOLEAN MODE 에서 검색되는 텍스트는 n-gram 구문 검색으로 변환됩니다. 예를 들어, ‘sql’은 ‘ “sq ql”‘로 변환됩니다.

번역자 주석  : “sq ql”는 ‘sq’와 ‘ql’가 순서대로 모두 일치해야하므로 ‘sq’나 ‘ql’은 검색 결과에 나오지 않는다.

mysql> SELECT * FROM articles WHERE MATCH(title) AGAINST('sql' IN BOOLEAN MODE);
+------------+--------+
| FTS_DOC_ID | title  |
+------------+--------+
|          1 | my sql |
|          2 | my sql |
|          3 | mysql  |
+------------+--------+
3 rows in set (0.00 sec)

와일드 카드를 사용한 검색

접두사 (prefix)가 ngram_token_size 보다 작은 경우, 검색 결과는 그 접두사로 시작하는 n-gram 토큰을 포함한 모든 행을 반환합니다.

mysql> SELECT * FROM articles WHERE MATCH (title) AGAINST ('s*' IN BOOLEAN MODE);
+------------+--------+
| FTS_DOC_ID | title  |
+------------+--------+
|          1 | my sql |
|          2 | my sql |
|          3 | mysql  |
|          4 | sq     |
|          5 | sl     |
+------------+--------+
5 rows in set (0.00 sec)

접두사 길이가 ngram_token_size과 같거나 큰 경우 와일드 카드를 사용한 검색은 구문 검색으로 변환되고 와일드 카드는 무시됩니다. 예를 들어, ‘sq *’는 ‘ “sq”‘로 변환되어 ‘sql *’는 ‘ “sq ql”‘로 변환됩니다.

mysql> SELECT * FROM articles WHERE MATCH (title) AGAINST ('sq*' IN BOOLEAN MODE);
+------------+--------+
| FTS_DOC_ID | title  |
+------------+--------+
|          1 | my sql |
|          2 | my sql |
|          3 | mysql  |
|          4 | sq     |
+------------+--------+
4 rows in set (0.00 sec)
 
mysql> SELECT * FROM articles WHERE MATCH (title) AGAINST ('sql*' IN BOOLEAN MODE);
+------------+--------+
| FTS_DOC_ID | title  |
+------------+--------+
|          1 | my sql |
|          2 | my sql |
|          3 | mysql  |
+------------+--------+
3 rows in set (0.00 sec)

구문 검색

구문 검색은 n-gram 토큰 문구 검색으로 변환됩니다. 예를 들어, “sql”는 “sq ql”로 변환됩니다.

mysql> SELECT * FROM articles WHERE MATCH (title) AGAINST('"sql"' IN BOOLEAN MODE);
+------------+--------+
| FTS_DOC_ID | title  |
+------------+--------+
|          1 | my sql |
|          2 | my sql |
|          3 | mysql  |
+------------+--------+
3 rows in set (0.00 sec)
 
mysql> SELECT * FROM articles WHERE MATCH (title) AGAINST ('"my sql"' IN BOOLEAN MODE);
+------------+--------+
| FTS_DOC_ID | title  |
+------------+--------+
|          1 | my sql |
|          2 | my sql |
+------------+--------+
2 rows in set (0.00 sec)
 
mysql> SELECT * FROM articles WHERE MATCH (title) AGAINST ('"mysql"' IN BOOLEAN MODE);
+------------+-------+
| FTS_DOC_ID | title |
+------------+-------+
|          3 | mysql |
+------------+-------+
1 row in set (0.00 sec)

InnoDB의 전문 검색 전반에 관하여 자세히 알고 싶다면, 사용자 설명서 InnoDB Full-Text Index 부분과 Jimmy의 기사 (Dr. Dobb’s article)를 참조하십시오. N-gram 파서 대한 자세한 내용은 사용자 설명서의 N-gram parser 부분을 참조하십시오.

우리는 이 새로운 기능이 여러분에게 도움이 되기를 바랍니다! 또한 MySQL 5.7을 통해 전문 검색이 CJK에도 적용된 것을 매우 기쁘게 생각합니다. 이 개선은 MySQL 5.7의 개선 사항 중에서도 큰 것입니다. 질문이 있으면, 이 블로그에 댓글을 다시거나 오라클 서포트(support ticket )로 문의 바랍니다. 만약 버그를 발견하면 이 블로그에 댓글을 다시거나 버그 리포트에 게시, 또는 오라클 서포트에 문의 바랍니다.

항상 MySQL을 이용해 주셔서 감사합니다!


PlanetMySQL Voting: Vote UP / Vote DOWN

fsfreeze in Linux

$
0
0

The fsfreeze command, is used to suspend and resume access to a file system. This allows consistent snapshots to be taken of the filesystem. fsfreeze supports Ext3/4, ReiserFS, JFS and XFS.

A filesystem can be frozen using following command:

# /sbin/fsfreeze -f /data

Now if you are writing to this filesystem, the process/command will be stuck. For example, following command will be stuck in D (UNINTERUPTEBLE_SLEEP) state:

# echo “testing” > /data/file

Only after the filesystem is unfreezed using the following command, can it continue:

# /sbin/fsfreeze -u /data

As per the fsfreeze main page, “fsfreeze is unnecessary for device-mapper devices. The device-mapper (and LVM) automatically freezes filesystem on the device when a snapshot creation is requested.”

fsfreeze is provided by the util-linux package in RHEL systems. Along with userspace support, fsfreeze also requires kernel support.

For example, in the following case, fsfreeze was used in the ext4 filesystem of an AWS CentOS node:

# fsfreeze -f /mysql
fsfreeze: /mysql: freeze failed: Operation not supported

From strace we found that ioctl is returning EOPNOTSUPP:

fstat(3, {st_dev=makedev(253, 0), st_ino=2, st_mode=S_IFDIR|0755,
st_nlink=4, st_uid=3076, st_gid=1119, st_blksize=4096, st_blocks=8,
st_size=4096, st_atime=2014/05/20-10:58:56,
st_mtime=2014/11/17-01:39:36, st_ctime=2014/11/17-01:39:36}) = 0
ioctl(3, 0xc0045877, 0) = -1 EOPNOTSUPP (Operation not
supported)

From latest upstream kernel source:

static int ioctl_fsfreeze(struct file *filp)
{
struct super_block *sb = file_inode(filp)->i_sb;if (!capable(CAP_SYS_ADMIN))
return -EPERM;

/* If filesystem doesn’t support freeze feature, return. */
if (sb->s_op->freeze_fs == NULL)
return -EOPNOTSUPP;

/* Freeze */
return freeze_super(sb);
}

EOPNOTSUPP is returned when a filesystem does not support the feature.

On testing to freeze ext4 in CentOs with AWS community AMI, fsfreeze worked fine.

This means that the issue was specific to the kernel of the system. It was found that AMI used to build the system was having a customized kernel without fsfreeze support.


PlanetMySQL Voting: Vote UP / Vote DOWN

MySQL 5.7.6 Overview and Highlights

$
0
0

MySQL 5.7.6 was recently released (it is the latest MySQL 5.7, and is the “m16″ or “Milestone 16″ release), and is available for download here and here.

As for the fixes/changes, there are quite a few (the official release was again split into 3 separate emails), which is expected in a “milestone” release.

The main highlights for me were (though the enhancements, and potentially impactful changes, are definitely not limited to this list):

  • Incompatible Change: The CREATE USER and ALTER USER statements have additional account-management capabilities. Together, they now can be used to fully establish or modify authentication, SSL, and resource-limit properties, as well as manage password expiration and account locking and unlocking. … A new statement, SHOW CREATE USER, shows the CREATE USER statement that creates the named user. The accompanying Com_show_create_user status variable indicates how many times the statement has been executed.
  • Configuration Note: mysqld now supports a –daemonize option that causes it to run as a traditional, forking daemon. This permits the server to work with operating systems that use systemd for process control.
  • Installation Note: The mysqld server and mysql_upgrade utility have been modified to make binary (in-place) upgrades from MySQL 5.6 easier without requiring the server to be started with special options. The server checks whether the system tables are from a MySQL version older than 5.7 (that is, whether the mysql.user table has a Password column). If so, it permits connections by users who have an empty authentication plugin in their mysql.user account row, as long as they have a Password value that is empty (no password) or a valid native (41-character) password hash.
  • Performance Schema Notes: The Performance Schema now allocates memory incrementally, scaling its memory use to actual server load, instead of allocating all the memory it needs during server startup. Consequently, configuration of the Performance Schema is easier; most sizing parameters need not be set at all. A server that handles a very low load will consume less memory without requiring explicit configuration to do so.
  • Incompatible Change: A new C API function, mysql_real_escape_string_quote(), has been implemented as a replacement for mysql_real_escape_string() because the latter function can fail to properly encode characters when the NO_BACKSLASH_ESCAPES SQL mode is enabled.
  • InnoDB: InnoDB system tablespace data is now exposed in the INNODB_SYS_TABLESPACES and INNODB_SYS_DATAFILES Information Schema tables.
  • InnoDB: Numerous (7) buffer pool flushing-related enhancements were added.
  • InnoDB: The default setting for the internal_tmp_disk_storage_engine option, which defines the storage engine the server uses for on-disk internal temporary tables, is now INNODB. With this change, the Optimizer uses the InnoDB storage engine instead of MyISAM for internal temporary tables.
  • InnoDB: InnoDB now supports native partitioning.
  • InnoDB: InnoDB now supports the creation of general tablespaces using CREATE TABLESPACE syntax. Tables are added to a general tablespace using CREATE TABLE tbl_name … TABLESPACE [=] tablespace_name or ALTER TABLE tbl_name TABLESPACE [=] tablespace_name syntax.
  • InnoDB: InnoDB now supports 32KB and 64KB page sizes. For both page sizes, the maximum record size is 16KB.
  • InnoDB: Replication-related support was added to InnoDB which enables prioritization of slave applier transactions over other transactions in deadlock scenarios. This transaction prioritization mechanism is reserved for future use.
  • InnoDB: The Performance Schema now instruments stage events for monitoring InnoDB ALTER TABLE and buffer pool load operations.
  • Replication: MySQL Multi-Source Replication adds the ability to replicate from multiple masters to a slave. MySQL Multi-Source Replication topologies can be used to back up multiple servers to a single server, to merge table shards, and consolidate data from multiple servers to a single server. See MySQL Multi-Source Replication. As part of MySQL Multi-Source Replication, replication channels have been added. Replication channels enable a slave to open multiple connections to replicate from, with each channel being a connection to a master. See Replication Channels.

Again, there are numerous enhancements and hundreds of bug fixes, so please check out the full changelogs. If you’re running some 5.7 version, then you should definitely upgrade. (But this should not be used for production systems yet, of course.)

You can view the full 5.7.6 changelogs here:

http://dev.mysql.com/doc/relnotes/mysql/5.7/en/news-5-7-6.html

Hope this helps.


PlanetMySQL Voting: Vote UP / Vote DOWN

MySQL 5.7.7 Overview and Highlights

$
0
0

MySQL 5.7.7 was recently released (it is the latest MySQL 5.7, and is the first “RC” or “Release Candidate” release of 5.7), and is available for download here and here.

As for the fixes/changes, there are quite a few again, which is expected in an early RC release.

The main highlights for me were (though the enhancements, and potentially impactful changes, are definitely not limited to this list):

  • Optimizer Note: It is now possible to provide hints to the optimizer within individual SQL statements, which enables finer control over statement execution plans than can be achieved using the optimizer_switch system variable. Optimizer hints are specified as /*+ … */ comments following the SELECT, INSERT, REPLACE, UPDATE, or DELETE keyword of statements or query blocks. Hints are also permitted in statements used with EXPLAIN, enabling you to see how hints affect execution plans.
  • Security Note: The C client library now attempts to establish an SSL connection by default whenever the server is enabled to support SSL. This change affects these standard MySQL client programs: mysql, mysql_config_editor, mysql_install_db, mysql_plugin, mysql_secure_installation, mysql_upgrade, mysqladmin, mysqlbinlog, mysqlcheck, mysqldump, mysqlimport, mysqlshow, and mysqlslap. It will also affect new releases of MySQL Connectors that are based on the C client library: Connector/C, Connector/C++, and Connector/ODBC.
  • Spatial Data Support: The ST_Buffer(), ST_Difference(), ST_Distance(), ST_Intersection(), ST_IsSimple(), ST_SymDifference(), and ST_Union() functions have been reimplemented to use the functionality available in Boost.Geometry. The functions may raise an exception for invalid geometry argument values when the previous implementation may not have.
  • InnoDB: The innodb_file_format default value was changed to Barracuda. The previous default value was Antelope. This change allows tables to use Compressed or Dynamic row formats.
  • InnoDB: The innodb_large_prefix default value was changed to ON. The previous default was OFF. When innodb_file_format is set to Barracuda, innodb_large_prefix=ON allows index key prefixes longer than 767 bytes (up to 3072 bytes) for tables that use a Compressed or Dynamic row format.
  • InnoDB: The innodb_strict_mode default value was changed to ON. The previous default was OFF. When innodb_strict_mode is enabled, InnoDB raises error conditions in certain cases, rather than issuing a warning and processing the specified statement (perhaps with unintended behavior).

    The configuration parameter default changes described above may affect replication and mysqldump operations. Consider the following recommendations when using the new default settings:
    • When replicating or replaying mysqldump data from older MySQL versions to MySQL 5.7.7 or higher, consider setting innodb_strict_mode to OFF to avoid errors. Target settings should not be more strict than source settings.
    • When replicating from MySQL 5.7.7 or higher to older slaves, consider setting innodb_file_format=Barracuda and innodb_large_prefix=ON on the slave so that the target and source have the same settings.
  • InnoDB: To address a scalability bottleneck for some workloads where LOCK_grant is locked in read-mode, LOCK_grant locks are now partitioned. Read lock requests on LOCK_grant now acquire one of multiple LOCK_grant partitions. Write locks must acquire all partitions. To address another scalability bottleneck, the server no longer performs unnecessary lock acquisitions when creating internal temporary tables. (Bug #72829)
  • Replication: The XA implementation in MySQL has been made much more compatible with the XA specification.
  • Replication: The defaults of some replication related variables have been modified. The following changes have been made:
    • binlog_gtid_simple_recovery=TRUE
    • binlog-format=ROW
    • binlog_error_action=ABORT_SERVER
    • sync_binlog=1
    • slave_net_timeout=60

Again, there are numerous enhancements and many bug fixes, so please check out the full changelogs. If you’re running some 5.7 version, then you should definitely upgrade. (But this should not be used for production systems yet, of course.)

You can view the full 5.7.7 changelogs here:

http://dev.mysql.com/doc/relnotes/mysql/5.7/en/news-5-7-7.html

Hope this helps.


PlanetMySQL Voting: Vote UP / Vote DOWN

Want to be a MySQL/MariaDB Support Engineer?

$
0
0

MariaDB is looking to hire Support Engineers. If interested, email me your resume.

I look forward to hearing from you. :)


PlanetMySQL Voting: Vote UP / Vote DOWN

Shinguz: Controlling worldwide manufacturing plants with MySQL

$
0
0

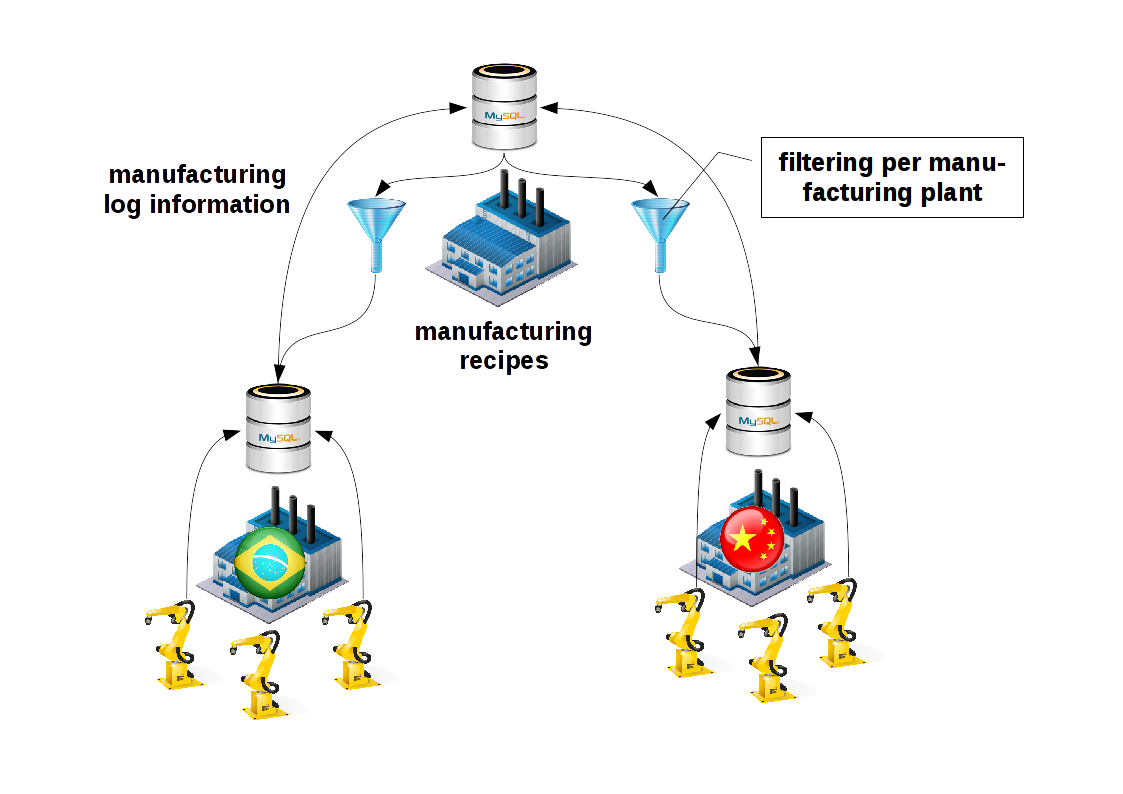
A MySQL customer of FromDual has different manufacturing plants spread across the globe. They are operated by local companies. FromDuals customer wants to maintain the manufacturing receipts centralized in a MySQL database in the Head Quarter in Europe. Each manufacturing plant should only see their specific data.

gtid_replication_customer.png

Manufacturing log information should be reported backup to European Head Quarter MySQL database.

The process was designed as follows:

gtid_replication_production_plant.png

Preparation of Proof of Concept (PoC)

To simulate all cases we need different schemas. Some which should be replicated, some which should NOT be replicated:

CREATE DATABASE finance;

CREATE TABLE finance.accounting (
  `id` int(10) unsigned NOT NULL AUTO_INCREMENT,
  `data` varchar(255) DEFAULT NULL,
  `ts` timestamp NOT NULL DEFAULT CURRENT_TIMESTAMP ON UPDATE CURRENT_TIMESTAMP,
  PRIMARY KEY (`id`),
  KEY `data_rename` (`data`)
);


CREATE DATABASE crm;

CREATE TABLE crm.customer (
  `id` int(10) unsigned NOT NULL AUTO_INCREMENT,
  `data` varchar(255) DEFAULT NULL,
  `ts` timestamp NOT NULL DEFAULT CURRENT_TIMESTAMP ON UPDATE CURRENT_TIMESTAMP,
  PRIMARY KEY (`id`),
  KEY `data_rename` (`data`)
);


CREATE DATABASE erp;

-- Avoid specifying Storage Engine here!!!
CREATE TABLE erp.manufacturing_data (
  id INT UNSIGNED NOT NULL AUTO_INCREMENT
, manufacture_plant VARCHAR(32)
, manufacture_info VARCHAR(255)
, PRIMARY KEY (id)
, KEY (manufacture_plant)
);

CREATE TABLE erp.manufacturing_log (
  id INT UNSIGNED NOT NULL AUTO_INCREMENT
, manufacture_plant VARCHAR(32)
, log_data VARCHAR(255)
, PRIMARY KEY (id)
, KEY (manufacture_plant)
);

MySQL replication architecture

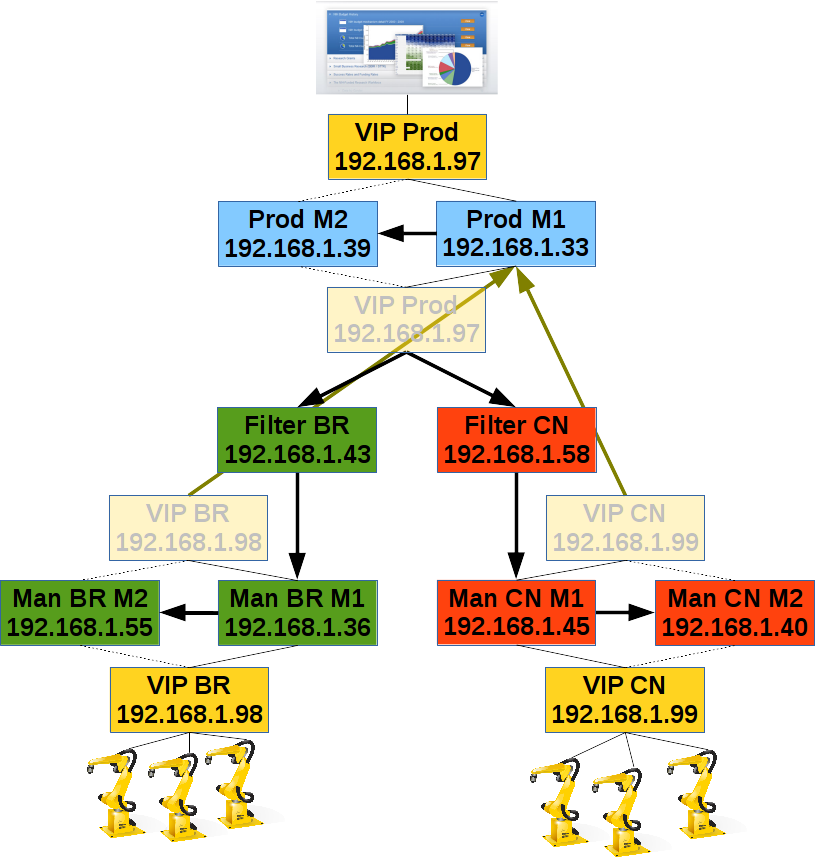
Before you start with such complicated MySQL set-ups it is recommended to make a little sketch of what you want to build:

gtid_replication_master_slave.png

Preparing the Production Master database (Prod M1)

To make use of all the new and cool features of MySQL we used the new GTID replication. First we set up a Master (Prod M1) and its fail-over System (Prod M2) in the customers Head Quarter:

# /etc/my.cnf

[mysqld]

binlog_format            = row          # optional
log_bin                  = binary-log   # mandatory, also on Slave!
log_slave_updates        = on           # mandatory
gtid_mode                = on           # mandatory
enforce_gtid_consistency = on           # mandatory
server-id                = 39           # mandatory

This step requires a system restart (one minute downtime).

Preparing the Production Master standby database (Prod M2)

On Master (Prod M1):

GRANT REPLICATION SLAVE ON *.* TO 'replication'@'192.168.1.%' IDENTIFIED BY 'secret';

mysqldump -u root --set-gtid-purged=on --master-data=2 --all-databases --triggers --routines --events > /tmp/full_dump.sql

On Slave (Prod M2):

CHANGE MASTER TO MASTER_HOST='192.168.1.39', MASTER_PORT=3306
, MASTER_USER='replication', MASTER_PASSWORD='secret'
, MASTER_AUTO_POSITION=1;
RESET MASTER;   -- On SLAVE!
system mysql -u root < /tmp/full_dump.sql
START SLAVE;

To make it easier for a Slave to connect to its master we set a VIP in front of those 2 database servers (VIP Prod). This VIP should be used by all applications in the head quarter and also the filter engines.

Set-up filter engines (Filter BR and Filter CN)

To make sure every manufacturing plant sees only the data it is allowed to see we need a filtering engine between the production site and the manufacturing plant (Filter BR and Filter CN).

To keep this filter engine lean we use a MySQL instance with all tables converted to the Blackhole Storage Engine:

# /etc/my.cnf

[mysqld]

binlog_format            = row          # optional
log_bin                  = binary-log   # mandatory, also on Slave!
log_slave_updates        = on           # mandatory
gtid_mode                = on           # mandatory
enforce_gtid_consistency = on           # mandatory
server-id                = 36           # mandatory
default_storage_engine   = blackhole

On the production master (Prod M1) we get the data as follows:

mysqldump -u root --set-gtid-purged=on --master-data=2 --triggers --routines --events --no-data --databases erp > /tmp/erp_dump_nd.sql

The Filter Engines (Filter BR and CN) are set-up as follows::

-- Here we can use the VIP!
CHANGE MASTER TO master_host='192.168.1.33', master_port=3306
, master_user='replication', master_password='secret'
, master_auto_position=1;
RESET MASTER;   -- On SLAVE!

system cat /tmp/erp_dump_nd.sql | sed 's/ ENGINE=[a-zA-Z]*/ ENGINE=blackhole/' | mysql -u root

START SLAVE;

Do not forget to also create the replication user on the filter engines.

GRANT REPLICATION SLAVE ON *.* TO 'replication'@'192.168.1.%' IDENTIFIED BY 'secret';

Filtering out all non ERP schemata

We only want the erp schema to be replicated to the manufacturing plants, not the crm or the finance application. This we achieve with the following option on the filter engines:

# /etc/my.cnf

[mysqld]

replicate_do_db                = erp
replicate_ignore_table         = erp.manufacturing_log

MySQL row filtering

To achieve row filtering we use TRIGGERS. Make sure they are not replicated further down the hierarchy:

SET SESSION SQL_LOG_BIN = 0;

use erp

DROP TRIGGER IF EXISTS filter_row;

delimiter //

CREATE TRIGGER filter_row
BEFORE INSERT ON manufacturing_data
FOR EACH ROW
BEGIN

  IF ( NEW.manufacture_plant != 'China' ) THEN

    SIGNAL SQLSTATE '45000'
    SET MESSAGE_TEXT      = 'Row was filtered out.'
      , CLASS_ORIGIN      = 'FromDual filter trigger'
      , SUBCLASS_ORIGIN   = 'filter_row'
      , CONSTRAINT_SCHEMA = 'erp'
      , CONSTRAINT_NAME   = 'filer_row'
      , SCHEMA_NAME       = 'erp'
      , TABLE_NAME        = 'manufacturing_data'
      , COLUMN_NAME       = ''
      , MYSQL_ERRNO       = 1644
    ;
  END IF;
END;
//

delimiter ;

SET SESSION SQL_LOG_BIN = 0;

Up to now this would cause to stop replication for every filtered row. To avoid this we tell the Filtering Slaves to skip this error number:

# /etc/my.cnf

[mysqld]

slave_skip_errors = 1644

Attaching production manufacturing Slaves (Man BR M1 and Man CN M1)

When we have finished everything on our head quarter site. We can start with the manufacturing sites (BR and CN):

On Master (Prod M1):

mysqldump -u root --set-gtid-purged=on --master-data=2 --triggers --routines --events --where='manufacture_plant="Brazil"' --databases erp > /tmp/erp_dump_br.sql

mysqldump -u root --set-gtid-purged=on --master-data=2 --triggers --routines --events --where='manufacture_plant="China"' --databases erp > /tmp/erp_dump_cn.sql

On the Manufacturing Masters (Man BR M1 and Man BR M2). Here we do NOT use a VIP because we think a blackhole storage engine is robust enough as master:

CHANGE MASTER TO master_host='192.168.1.43', master_port=3306
, master_user='replication', master_password='secret'
, master_auto_position=1;
RESET MASTER;   -- On SLAVE!

system cat /tmp/erp_dump_br.sql | mysql -u root

START SLAVE;

The standby manufacturing (Man BR M2 and Man CN M2) database is created in the same way as the production manufacturing database on the master.

Testing replication from HQ to manufacturing plants

First we make sure, crm and finance is not replicated out and replication also does not stop (on Prod M1):

INSERT INTO finance.accounting VALUES (NULL, 'test data over VIP', NULL);
INSERT INTO crm.customer VALUES (NULL, 'test data over VIP', NULL);
UPDATE finance.accounting SET data = 'Changed data';
UPDATE crm.customer SET data = 'Changed data';
DELETE FROM finance.accounting WHERE id = 1;
DELETE FROM crm.customer WHERE id = 1;

SELECT * FROM finance.accounting;
SELECT * FROM crm.customer;
SHOW SLAVE STATUS\G

The schema filter seems to work correctly. Then we check if also the row filter works correctly. For this we have to run the queries in statement based replication (SBR)! Otherwise the trigger would not fire:

use mysql

INSERT INTO erp.manufacturing_data VALUES (NULL, 'China', 'Highly secret manufacturing info as RBR.');
INSERT INTO erp.manufacturing_data VALUES (NULL, 'Brazil', 'Highly secret manufacturing info as RBR.');

-- This needs SUPER privilege... :-(
SET SESSION binlog_format = STATEMENT;

-- Caution those rows will NOT be replicated!!!
-- See filter rules for SBR
INSERT INTO erp.manufacturing_data VALUES (NULL, 'China', 'Highly secret manufacturing info as SBR lost.');
INSERT INTO erp.manufacturing_data VALUES (NULL, 'Brazil', 'Highly secret manufacturing info as SBR lost.');

use erp

INSERT INTO manufacturing_data VALUES (NULL, 'China', 'Highly secret manufacturing info as SBR.');
INSERT INTO manufacturing_data VALUES (NULL, 'Brazil', 'Highly secret manufacturing info as SBR.');
INSERT INTO manufacturing_data VALUES (NULL, 'Germany', 'Highly secret manufacturing info as SBR.');
INSERT INTO manufacturing_data VALUES (NULL, 'Switzerland', 'Highly secret manufacturing info as SBR.');

SET SESSION binlog_format = ROW;

SELECT * FROM erp.manufacturing_data;

Production data back to head quarter

Now we have to take care about the production data on their way back to the HQ. To achieve this we use the new MySQL 5.7 feature called multi source replication. For multi source replication the replication repositories must be kept in tables instead of files:

# /etc/my.cnf

[mysqld]

master_info_repository    = TABLE   # mandatory
relay_log_info_repository = TABLE   # mandatory

Then we have to configure 2 replication channels from Prod M1 to their specific manufacturing masters over the VIP (VIP BR and VIP CN):

CHANGE MASTER TO MASTER_HOST='192.168.1.98', MASTER_PORT=3306
, MASTER_USER='replication', MASTER_PASSWORD='secret'
, MASTER_AUTO_POSITION=1
FOR CHANNEL "manu_br";

CHANGE MASTER TO MASTER_HOST='192.168.1.99', MASTER_PORT=3306
, MASTER_USER='replication', MASTER_PASSWORD='secret'
, MASTER_AUTO_POSITION=1
FOR CHANNEL "manu_cn";

START SLAVE FOR CHANNEL 'manu_br';
START SLAVE FOR CHANNEL 'manu_cn';

SHOW SLAVE STATUS FOR CHANNEL 'manu_br'\G
SHOW SLAVE STATUS FOR CHANNEL 'manu_cn'\G

Avoid to configure and activate the channels on Prod M2 as well.

Testing back replication from manufacturing plants

Brazil on Man BR M1:

INSERT INTO manufacturing_log VALUES (1, 'Production data from Brazil', 'data');

China on Man CN M1:

INSERT INTO manufacturing_log VALUES (2, 'Production data from China', 'data');

For testing:

SELECT * FROM manufacturing_log;

Make sure you do not run into conflicts (Primary Key, AUTO_INCREMENTS). Make sure filtering is defined correctly!

To check the different channel states you can use the following command:

SHOW SLAVE STATUS\G

or

SELECT ras.channel_name, ras.service_state AS 'SQL_thread', ras.remaining_delay
     , CONCAT(user, '@', host, ':', port) AS user
     , rcs.service_state AS IO_thread, REPLACE(received_transaction_set, '\n', '') AS received_transaction_set
  FROM performance_schema.replication_applier_status AS ras
  JOIN performance_schema.replication_connection_configuration AS rcc ON rcc.channel_name = ras.channel_name
  JOIN performance_schema.replication_connection_status AS rcs ON ras.channel_name = rcs.channel_name
;

Troubleshooting

Inject empty transaction

If you try to skip a transaction as you did earlier (SQL_SLAVE_SKIP_COUNTER) you will face some problems:

STOP SLAVE;
ERROR 1858 (HY000): sql_slave_skip_counter can not be set when the server is running with @@GLOBAL.GTID_MODE = ON. Instead, for each transaction that you want to skip, generate an empty transaction with the same GTID as the transaction

To skip the next transaction you have find the ones applied so far:

SHOW SLAVE STATUS\G
...
Executed_Gtid_Set: c3611091-f80e-11e4-99bc-28d2445cb2e9:1-20

then tell MySQL to skip this by injecting a new empty transaction:

SET SESSION GTID_NEXT='c3611091-f80e-11e4-99bc-28d2445cb2e9:21';

BEGIN;
COMMIT;

SET SESSION GTID_NEXT='AUTOMATIC';

SHOW SLAVE STATUS\G
...
Executed_Gtid_Set: c3611091-f80e-11e4-99bc-28d2445cb2e9:1-21

START SLAVE;

Revert from GTID-based replication to file/position-based replication

If you want to fall-back from MySQL GTID-based replication to file/position-based replication this is quite simple:

CHANGE MASTER TO MASTER_AUTO_POSITION = 0;

MySQL Support and Engineering

If you need some help or support our MySQL support and engineering team is happy to help you.


PlanetMySQL Voting: Vote UP / Vote DOWN

MySQL 5.5.43 Overview and Highlights

$
0
0

MySQL 5.5.43 was recently released (it is the latest MySQL 5.5, is GA), and is available for download here:

http://dev.mysql.com/downloads/mysql/5.5.html

This release, similar to the last 5.5 release, is mostly uneventful.

There were only 2 “Functionality Added or Changed” items this time, and 10 additional bugs fixed.

Out of the 10 bugs, there was 1 InnoDB bug, 1 replication bug, and 6 crashing bugs, all of which seemed rather minor or obscure. Here are the ones worth noting:

  • Functionality Changed: CMake support was updated to handle CMake version 3.1.
  • Functionality Added: The server now includes its version number when it writes the initial “starting” message to the error log, to make it easier to tell which server instance error log output applies to. This value is the same as that available from the version system variable. (Bug #74917)
  • Replication: When using a slave configured to use a special character set such as UTF-16, UTF-32, or UCS-2, the receiver (I/O) thread failed to connect. The fix ensures that in such a situation, if a slave’s character set is not supported then default to using the latin1 character set.
  • InnoDB: Certain InnoDB errors caused stored function and trigger condition handlers to be ignored.
  • Large values of the transaction_prealloc_size system variable could cause the server to allocate excessive amounts of memory. The maximum value has been adjusted down to 128K. A similar change was made for transaction_alloc_block_size. Transactions can still allocate more than 128K if necessary; this change reduces the amount that can be preallocated, as well as the maximum size of the incremental allocation blocks.
  • Crashing Bug: Ordering by a GROUP_CONCAT() result could cause a server exit.
  • Crashing Bug: A malformed mysql.proc table row could result in a server exit for DROP DATABASE of the database associated with the proc row.
  • Crashing Bug: A server exit could occur for queries that compared two rows using the <=> operator and the rows belonged to different character sets.
  • Crashing Bug: The optimizer could raise an assertion due to incorrectly associating an incorrect field with a temporary table.
  • Crashing Bug: The server could exit due to an optimizer failure to allocate enough memory for resolving outer references.
  • Crashing Bug: Creating a FEDERATED table with an AUTO_INCREMENT column using a LIKE clause results in a server exit.

I don’t think I’d call any of these critical, but if running 5.5, especially if not a very recent 5.5, you should consider upgrading.

For reference, the full 5.5.43 changelog can be viewed here:

http://dev.mysql.com/doc/relnotes/mysql/5.5/en/news-5-5-43.html

Hope this helps.


PlanetMySQL Voting: Vote UP / Vote DOWN

MySQL 5.6.24 Overview and Highlights

$
0
0

MySQL 5.6.24 was recently released (it is the latest MySQL 5.6, is GA), and is available for download here.

For this release, there are 4 “Functionality Added or Changed” items:

  • Functionality Added/Changed: CMake support was updated to handle CMake version 3.1.
  • Functionality Added/Changed: The server now includes its version number when it writes the initial “starting” message to the error log, to make it easier to tell which server instance error log output applies to. This value is the same as that available from the version system variable. (Bug #74917)
  • Functionality Added/Changed: ALTER TABLE did not take advantage of fast alterations that might otherwise apply to the operation to be performed, if the table contained temporal columns found to be in pre-5.6.4 format (TIME, DATETIME, and TIMESTAMP columns without support for fractional seconds precision). Instead, it upgraded the table by rebuilding it. Two new system variables enable control over upgrading such columns and provide information about them:
    • avoid_temporal_upgrade controls whether ALTER TABLE implicitly upgrades temporal columns found to be in pre-5.6.4 format. This variable is disabled by default. Enabling it causes ALTER TABLE not to rebuild temporal columns and thereby be able to take advantage of possible fast alterations.
    • show_old_temporals controls whether SHOW CREATE TABLE output includes comments to flag temporal columns found to be in pre-5.6.4 format. Output for the COLUMN_TYPE column of the INFORMATION_SCHEMA.COLUMNS table is affected similarly. This variable is disabled by default.
  • Functionality Added/Changed: Statement digesting as done previously by the Performance Schema is now done at the SQL level regardless of whether the Performance Schema is compiled in and is available to other aspects of server operation that could benefit from it. The default space available for digesting is 1024 bytes, but can be changed at server startup using the max_digest_length system variable.

In addition to those, there were 50 other bug fixes:

  • 15 InnoDB
  •   4 Replication
  •   1 Partitioning
  • 30 Miscellaneous

The highlights for me are the Partitioning bug and 2 of the Replication bugs (of the 15 InnoDB bugs, 5 were related to full-text search, and 6 were related to Memcached plugin, and the other 4 were mostly obscure):

  • Partitioning: A number of ALTER TABLE statements that attempted to add partitions, columns, or indexes to a partitioned table while a write lock was in effect for this table were not handled correctly.
  • Replication: When gtid_mode=ON and slave_net_timeout was set to a low value, the slave I/O thread could appear to hang. This was due to the slave heartbeat not being sent regularly enough when the dump thread found many events that could be skipped. The fix ensures that the heartbeat is sent correctly in such a situation.
  • Replication: When replicating from a MySQL 5.7.6 or later server to a MySQL 5.6.23 or earlier server, if the older version applier thread encountered an Anonymous_gtid_log_event it caused an assert. The fix ensures that these new log events added in MySQL 5.7.6 and later do not cause this problem with MySQL 5.6.24 and later slaves.

Conclusions:

So while there were no major changes, the partitioning fix covered a number of bugs, the replication fixes could potentially be important for you, and the numerous InnoDB full-text and Memcached fixes would be important if you’re using either of those. Thus if you rely on any of this, I’d consider upgrading.

The full 5.6.24 changelogs can be viewed here (which has more details about all of the bugs listed above):

http://dev.mysql.com/doc/relnotes/mysql/5.6/en/news-5-6-24.html

Hope this helps. :)


PlanetMySQL Voting: Vote UP / Vote DOWN

About Azerbaijan MUG 1st meetup

$
0
0

Yesterday in 14 May at 7 PM we had our first meetup, thanks for great interest from our local community. It is also noted by Oracle: MySQL User Group meeting Azerbaijan
I spoke about contributing MySQL community and project, such ways as finding and reporting bugs, testing beta or RC versions, writing articles, giving tips, feedbacks so forth.
Also there was a note about code contribution paths, what is patch , how to get source code, what is GPL, OCA agreement etc.
Below i will put photos from meeting:
IMG_2942

IMG_2944

IMG_2950

IMG_2951

IMG_2952

IMG_2953

IMG_2954

IMG_2955

IMG_2956

IMG_2957

The post About Azerbaijan MUG 1st meetup appeared first on Azerbaijan MySQL UG.


PlanetMySQL Voting: Vote UP / Vote DOWN

MySQL QA Episode 2: Build a MySQL server – Git, Bazaar, compiling & build tools

$
0
0

Welcome to MySQL QA Episode 2: Build a MySQL Server – Git, Bazaar (bzr), Compiling, and Build Tools

In this episode you’ll learn how to build Percona Server and/or MySQL Server for QA purposes & more in this short 25 minute tutorial.

In HD quality (set your player to 720p!)

To watch the other episodes in this series, see the MySQL QA & Bash Linux Training Series post. If you missed MySQL QA Episode 1, it was titled “Bash/GNU Tools & Linux Upskill & Scripting Fun.” You are read it here.

If you have any questions or comments, please leave them below.

The post MySQL QA Episode 2: Build a MySQL server – Git, Bazaar, compiling & build tools appeared first on MySQL Performance Blog.


PlanetMySQL Voting: Vote UP / Vote DOWN

Add Gedit Plugins

$
0
0

Fedora comes with vim and gedit installed but the gedit installation is bare bones. You can update gedit to include supplemental Plug-ins with the following yum command as the root user:

yum install -y gedit-plugins

It generates the following log file:

Loaded plugins: langpacks, refresh-packagekit
mysql-connectors-community                                  | 2.5 kB  00:00     
mysql-tools-community                                       | 2.5 kB  00:00     
mysql56-community                                           | 2.5 kB  00:00     
pgdg93                                                      | 3.6 kB  00:00     
updates/20/x86_64/metalink                                  |  14 kB  00:00     
updates                                                     | 4.9 kB  00:00     
(1/2): pgdg93/20/x86_64/primary_db                          |  86 kB  00:00     
(2/2): updates/20/x86_64/primary_db                         |  11 MB  00:03     
(1/2): updates/20/x86_64/pkgtags                            | 1.5 MB  00:00     
(2/2): updates/20/x86_64/updateinfo                         | 2.0 MB  00:01     
Resolving Dependencies
--> Running transaction check
---> Package gedit-plugins.x86_64 0:3.10.1-1.fc20 will be installed
--> Processing Dependency: libgit2-glib for package: gedit-plugins-3.10.1-1.fc20.x86_64
--> Running transaction check
---> Package libgit2-glib.x86_64 0:0.0.6-2.fc20 will be installed
--> Processing Dependency: libgit2.so.0()(64bit) for package: libgit2-glib-0.0.6-2.fc20.x86_64
--> Running transaction check
---> Package libgit2.x86_64 0:0.19.0-2.fc20 will be installed
--> Processing Dependency: libxdiff.so.1()(64bit) for package: libgit2-0.19.0-2.fc20.x86_64
--> Processing Dependency: libhttp_parser.so.2()(64bit) for package: libgit2-0.19.0-2.fc20.x86_64
--> Running transaction check
---> Package http-parser.x86_64 0:2.0-5.20121128gitcd01361.fc20 will be installed
---> Package libxdiff.x86_64 0:1.0-3.fc20 will be installed
--> Finished Dependency Resolution
 
Dependencies Resolved
 
================================================================================
 Package          Arch      Version                            Repository  Size
================================================================================
Installing:
 gedit-plugins    x86_64    3.10.1-1.fc20                      updates    830 k
Installing for dependencies:
 http-parser      x86_64    2.0-5.20121128gitcd01361.fc20      fedora      23 k
 libgit2          x86_64    0.19.0-2.fc20                      fedora     281 k
 libgit2-glib     x86_64    0.0.6-2.fc20                       fedora      82 k
 libxdiff         x86_64    1.0-3.fc20                         fedora      33 k
 
Transaction Summary
================================================================================
Install  1 Package (+4 Dependent packages)
 
Total download size: 1.2 M
Installed size: 5.2 M
Downloading packages:
(1/5): http-parser-2.0-5.20121128gitcd01361.fc20.x86_64.rpm |  23 kB  00:00     
(2/5): libgit2-0.19.0-2.fc20.x86_64.rpm                     | 281 kB  00:00     
(3/5): libgit2-glib-0.0.6-2.fc20.x86_64.rpm                 |  82 kB  00:00     
(4/5): libxdiff-1.0-3.fc20.x86_64.rpm                       |  33 kB  00:00     
(5/5): gedit-plugins-3.10.1-1.fc20.x86_64.rpm               | 830 kB  00:01     
--------------------------------------------------------------------------------
Total                                              899 kB/s | 1.2 MB  00:01     
Running transaction check
Running transaction test
Transaction test succeeded
Running transaction (shutdown inhibited)
  Installing : libxdiff-1.0-3.fc20.x86_64                                   1/5 
  Installing : http-parser-2.0-5.20121128gitcd01361.fc20.x86_64             2/5 
  Installing : libgit2-0.19.0-2.fc20.x86_64                                 3/5 
  Installing : libgit2-glib-0.0.6-2.fc20.x86_64                             4/5 
  Installing : gedit-plugins-3.10.1-1.fc20.x86_64                           5/5 
  Verifying  : libgit2-0.19.0-2.fc20.x86_64                                 1/5 
  Verifying  : libgit2-glib-0.0.6-2.fc20.x86_64                             2/5 
  Verifying  : gedit-plugins-3.10.1-1.fc20.x86_64                           3/5 
  Verifying  : http-parser-2.0-5.20121128gitcd01361.fc20.x86_64             4/5 
  Verifying  : libxdiff-1.0-3.fc20.x86_64                                   5/5 
 
Installed:
  gedit-plugins.x86_64 0:3.10.1-1.fc20                                          
 
Dependency Installed:
  http-parser.x86_64 0:2.0-5.20121128gitcd01361.fc20                            
  libgit2.x86_64 0:0.19.0-2.fc20                                                
  libgit2-glib.x86_64 0:0.0.6-2.fc20                                            
  libxdiff.x86_64 0:1.0-3.fc20                                                  
 
Complete!

When you launch the gedit utility, you click on the

Gedit Plug-in Installation

GeditPref_01

  1. After you install the Gedit Plug-ins, you can configure the plug-ins by launching Gedit and then click on the gedit menu option. Then, click on the Preferences menu option to enable the new plugins, like the Embedded Terminal plug-in. The Embedded TerminClick the Linux 32 Bit or Linux 64 Bit link, as required for your operating system.

GeditPref_02

  1. You have four tab options when working with the Preferences menu. The first tab is the View tab, as shown to the left.

GeditPref_03

  1. The second tab is the Editor tab, as shown to the left.

GeditPref_04

  1. The third tab is the Font & Colors tab, as shown to the left.

GeditPref_05

  1. The fourth tab is the Plugins tab, as shown to the left. Scroll down the list and check the Embedded Terminal and Python Console plug-ins’ checkbox. The Embedded Terminal lets you edit a file and have command line access to a Terminal session from the gedit menu; and the Python Console session from the gedit menu.

GeditPref_06

  1. Click on the View menu, and then choose the Bottom Panel menu option.

GeditPref_07

  1. After enabling the Bottom Panel in the Gedit menu, you can edit a file and click on the Terminal by simply clicking on the subpanel. You can see the split image on the left. There’s also a set of bottom tabs that lets you switch from a Linux Terminal session to the Python console.

As always, I hope this helps those working with gedit on the Fedora operating system.


PlanetMySQL Voting: Vote UP / Vote DOWN

MySQL Repos for Debian 8

$
0
0
Hi, everyone. Just a quick note here to let you all know that we’ve just added Debian 8 support to our Apt repos. We have the latest MySQL Server 5.6 ready for you, as well as the latest 5.7 Development Milestone, and more of our products for Debian 8 are in our QA pipeline as […]
PlanetMySQL Voting: Vote UP / Vote DOWN

Re: MySQL Enterprise Backup 3.11.0 has been released!!

Using Perl and MySQL to automatically respond to retweets on twitter

$
0
0

In an earlier post titled Using Perl to send tweets stored in a MySQL database to twitter, I showed you a way to use MySQL to store tweets, and then use Perl to automatically send your tweets to twitter.

In this post, we will look at automatically sending a “thank you” to people who retweet your tweets – and we will be using Perl and MySQL again.

Just like in the first post, you will need to register your application with twitter via apps.twitter.com, and obtain the following:

consumer_key
consumer_secret
access_token
access_token_secret

One caveat: twitter has a rate limit on how often you may connect with your application – depending upon what you are trying to do. See Rate Limiting and Rate Limits for more information. So, if you are going to put this into a cron job, I wouldn’t run it more than once every 15 minutes.

We will also be using the same tables we created in the first post – tweets and history – as well as a new table, named retweets. The retweets table will contain all of the user names and tweet ID’s for those retweets we have discovered and already sent a thank-you tweet response.

The Perl script will connect to your tweet history table, and retrieve a set of your tweet ID’s, with the most recent tweet first. The script will then connect to twitter and check to see if there are any retweets for each ID. If a retweet is found, the script will check your retweets table to see if you have already thanked the tweeter for the retweet. If this is a new retweet, the script will connect to twitter and send a “thank-you” message to that user, and then insert the user name and tweet ID into the retweets table. This will ensure that you do not send a thank-you response more than one time.

Here is a flow chart that will attempt to explain what the script does:

We will be using the API call/method retweets(id) to see if a tweet ID was retweeted, and then we will send the thank-you tweet via the update call. More information about the Perl twitter API may be found at Net::Twitter::Lite::WithAPIv1_1.

First we will need to create the retweets table, where we will store the information about our tweets that were retweeted. Here is the CREATE TABLE statement for the retweets table:

CREATE TABLE `retweets` (
  `id` int(8) NOT NULL AUTO_INCREMENT,
  `tweet_id` bigint(24) DEFAULT NULL,
  `user_name` varchar(24) DEFAULT NULL,
  `retweet_update` varchar(36) DEFAULT NULL,
  PRIMARY KEY (`id`)
) ENGINE=InnoDB AUTO_INCREMENT=1 DEFAULT CHARSET=latin1

All you need to do is to use edit this script with your own consumer_key, consumer_secret, access_token and access_token_secret for your application, and edit the accessTweets file used by the subroutine ConnectToMySql. You may also comment-out the “print” commands.

#!/usr/bin/perl
 
use Net::Twitter::Lite::WithAPIv1_1;
use DBI;
use DBD::mysql;

my $Database = "tweets";

# Credentials for your twitter application
# you will need to subsitute your own application information for these four variables
my $nt = Net::Twitter::Lite::WithAPIv1_1->new(
      traits              => [qw/API::RESTv1_1/],
      consumer_key        => "$consumer_key",
      consumer_secret     => "$consumer_secret",
      access_token        => "$access_token",
      access_token_secret => "$access_token_secret",
      ssl                 => 1
);

# Grab the last X number of tweets to check for retweets
# - determined by the number after "limit"

$dbh = ConnectToMySql($Database);
$query = "select tweet_id, tweet_update FROM history order by tweet_update desc, id limit 10";	
$sth = $dbh->prepare($query);
$sth->execute();

# loop through our results - one tweet at a time
while (@data = $sth->fetchrow_array()) {

	$tweet_id = $data[0];
	$tweet_update = $data[1];

	print "----------------------------------------------------------------------\n";
	print "Checking:  $tweet_id $tweet_update\n";
	print "----------------------------------------------------------------------\n";

		# Connect to twitter and see if anyone retweeted this tweet
		my $results = eval { $nt->retweets($tweet_id)};

		for my $status ( @$results ) {
       
			$user_name = "$status->{user}{screen_name}";
			$retweet_update = "$status->{created_at}";

			# see if this person has retweeted this before, and we already
			# have a record of the retweet in our database
					
			$dbh2 = ConnectToMySql($Database);
			$query2 = "select tweet_id, user_name FROM retweets where tweet_id = '$tweet_id' and user_name = '$user_name' limit 1";	
			$sth2 = $dbh2->prepare($query2);
			$sth2->execute();
    
			@data2 = $sth2->fetchrow_array();
    
			# Uncomment if you want to see it in action
			# print "Query: $query\n";
		
			# Check to see if we had any results, and if not, then insert
			# tweet into database and send them a "thank you" tweet
			if (length($data2[0]) prepare($query3);
				$sth3->execute();

				# Uncomment if you want to see it in action
				# print "Query2: $query2\n";


				# ----------------------------------------------------------------------------
				# send tweet
				# ----------------------------------------------------------------------------

				# This pause is just to slow down the action - you can remove this line if you want
				sleep 5;
				
				my $nt = Net::Twitter::Lite::WithAPIv1_1->new(
					traits              => [qw/API::RESTv1_1/],
					consumer_key        => "$consumer_key",
					consumer_secret     => "$consumer_secret",
					access_token        => "$access_token",
					access_token_secret => "$access_token_secret",
					ssl                 => 1
					);
					
					# Here is the message you want to send - 
					# the thank-you to the user who sent the retweet
					$tweet = "\@$user_name thanks for the retweet!";

					# send thank-you tweet
					my $results = eval { $nt->update("$tweet") };

						undef @data2;
						undef @data3;
					}
		
					else
				
					{
  						# we have already thanked this user - as their name and this tweet-id was found in the database
    					print "----- Found tweet: $tweet_id\n";
    
						while (@data2) {

							print "----------------------------------------------------------------------\n";
							print "Checking retweet by $user_name for $tweet_id\n";
							print "Found retweet:  $tweet_id $user_name $retweet_update \n";

							$tweet_id = $data2[0];
							$user_name = $data2[1];
					
							print "***** Retweet by $user_name already in database \n";
							print "----------------------------------------------------------------------\n";
					
							#exit;
							undef @data2;
							undef @data3;

							# This pause is just to slow down the action - you can remove this line if you want
							sleep 5;

							# end while
							}
						
					# end else
					}

		# end for my $status ( @$results ) {
		}

# end while
}

exit;

#----------------------------------------------------------------------
sub ConnectToMySql {
#----------------------------------------------------------------------

   my ($db) = @_;

   open(PW, "<..\/accessTweets") || die "Can't access login credentials";
   my $db= ;
   my $host= ;
   my $userid= ;
   my $passwd= ;

   chomp($db);
   chomp($host);
   chomp($userid);
   chomp($passwd);
   
   my $connectionInfo="dbi:mysql:$db;$host:3306";
   close(PW);

   # make connection to database
   my $l_dbh = DBI->connect($connectionInfo,$userid,$passwd);
   return $l_dbh;

}

In the subroutine ConnectToMySql, I store the MySQL login credentials in a text file one directory below where my Perl script is located. This file – named accessTweets contains this information:

database_name
hostname or IP
MySQL user name
password

I tested this on two twitter accounts, and everything worked for me – but let me know if you have problems. I am not the best Perl programmer, nor am I an expert at the twitter API, so there is probably a better/easier way to do this.


Tony Darnell is a Principal Sales Consultant for MySQL, a division of Oracle, Inc. MySQL is the world’s most popular open-source database program. Tony may be reached at info [at] ScriptingMySQL.com and on LinkedIn.
Tony is the author of Twenty Forty-Four: The League of Patriots


Visit http://2044thebook.com for more information.


PlanetMySQL Voting: Vote UP / Vote DOWN

My thoughts on Architecture and Software Development with MySQL

$
0
0

Yesterday I was able to present to the Portland MySQL Users Group two presentations that are important foundations for effective development with MySQL.

With 26 years of architectural experience in RDBMS and 16 years of MySQL knowledge, my extensive exposure to large and small companies from consulting has lead to these presentations containing common obstacles I have seen an help organization with. All that can be easily avoided. The benefits of improved development and better processes leads to better quality software, better performance and a lower cost of ownership, that is saving companies money.

Thanks to Emily and Daniel for organizing and New Relic for hosting.


PlanetMySQL Voting: Vote UP / Vote DOWN
Viewing all 18789 articles
Browse latest View live


<script src="https://jsc.adskeeper.com/r/s/rssing.com.1596347.js" async> </script>