![]()
MySQL Resource Groups, introduced in MySQL 8, provide the ability to manipulate the assignment of running threads to specific resources, thereby allowing the DBA to manage application priorities. Essentially, you can assign a thread to a specific virtual CPU. In this post, I’m going to take a look at how these might work in practice.
Let us start with a disclaimer.
What I am going to discuss here is NOT common practice. This is advanced load optimization, and you should approach/implement it ONLY if you are 100% sure of what you are doing, and, more importantly, if you know what you are doing, and why you are doing it.
Overview
MySQL 8 introduced a feature that is explained only in a single documentation page. This feature can help a lot if used correctly, and hopefully they will not deprecate or remove it after five minutes. It is well hidden in the Optimization: Optimizing the MySQL Server chapter.
I am talking about resource groups. Resource groups permit assigning threads running within MySQL to particular groups so that threads execute according to the resources available to this group. Group attributes enable control over resources to enable or restrict resource consumption by threads in the group. DBAs can modify these attributes as appropriate for different workloads.
Currently, CPU affinity (i.e., assigning to a specific CPU) is a manageable resource, represented by the concept of “virtual CPU” as a term that includes CPU cores, hyperthreads, hardware threads, and so forth. MySQL determines, at startup, how many virtual CPUs are available. Database administrators with appropriate privileges can associate virtual CPUs with resource groups and assign threads to these groups.
In short, you can define that, this specific thread (ergo connection unless connection pooling OR ProxySQL with multiplexing), will use that usage CPU and will have the given priority.
Setting this by thread can be:
- Dangerous
- Not useful
Dangerous, because if you set this to a thread when using connection pooling OR ProxySQL and multiplexing, you may end up assigning a limitation to queries that instead, you wanted to run efficiently.
Not useful because unless you spend the time looking at the processlist (full), and/or have a script running all the time that catches what you need, 99% of the time you will not be able to assign the group efficiently.
So? Another cool useless feature???
Nope…
Resource groups can be referenced inside a single statement, which means I can have only that query utilizing that resource group. Something like this will do the magic:
SELECT /*+ RESOURCE_GROUP(NAME OF THE RG) */ id, millid, date,active,kwatts_s FROM sbtest29 WHERE id=44
But if I run:
SELECT id, millid, date,active,kwatts_s FROM sbtest29 WHERE id=44
No resource group utilization even if I am using the same connection.
This is cool, isn’t it?
What is the possible usage?
In general, you can see this as a way to limit the negative impact of queries that you know will be problematic for others.
Good examples are:
- ETL processes for data archiving, reporting, data consolidation and so on
- Applications that are not business critical and can wait, while your revenue generator application cannot
- GUI Client applications, used by some staff of your company, that mainly create problems for you while they claim they are working.
“Marco, that could make sense … but what should I do to have it working? Rewrite my whole application to add this feature?”
Good question! Thanks!
We can split the task of having a good Resource Group implementation into three steps:
- You must perform an analysis of what you want to control. You need to identify the source (like TCP/IP if it is fixed, username) and design which settings you want for your resource groups. Identify if you only want to reduce the CPU priority, or if you want to isolate the queries on a specific CPU, or a combination of the two.
- Implement the resource groups in MySQL.
- Implement a way to inject the string comment into the SQL.
About the last step, I will show you how to do this in a straightforward way with ProxySQL, but hey… this is really up to you. I will show you the easy way, but if you prefer a more difficult route, that’s good for me too.
The Setup
In my scenario, I have a very noisy secondary application written by a very, very bad developer that accesses my servers, mostly with read queries, and occasionally with write updates. Reads and writes are obsessive and create an impact on the MAIN application. My task is to limit the impact of this secondary application without having the main one affected.
To do that I will create two resource groups, one for WRITE and another for READ.
The first group, Write_app2, will have no cpu affiliation, but will have lowest (19) priority:
CREATE RESOURCE GROUP Write_app2 TYPE=USER THREAD_PRIORITY=19;
The second group, Select_app2, will have CPU affiliation AND lowest priority;
CREATE RESOURCE GROUP Select_app2 TYPE=USER VCPU=5 THREAD_PRIORITY=19;
Finally, I have identified that the application is connecting from several sources BUT it uses a common username APP2. Given that, I will use the user name to inject the instructions into the SQL using ProxySQL (I could have also used the IP, or the schema name, or destination port, or something in the submitted SQL. In short, any possible filter in the query rules).
To do that I will need four query rules:
insert into mysql_query_rules (rule_id,proxy_port,username,destination_hostgroup,active,retries,match_digest,apply,active) values(80,6033,'app1',80,1,3,'^SELECT.*FOR UPDATE',1,1);
insert into mysql_query_rules (rule_id,proxy_port,username,destination_hostgroup,active,retries,match_digest,apply,active) values(81,6033,'app1',81,1,3,'^SELECT.*',1,1);
insert into mysql_query_rules (rule_id,proxy_port,username,destination_hostgroup,active,retries,match_digest,apply,active) values(82,6033,'app2',80,1,3,'^SELECT.*FOR UPDATE',1,1);
insert into mysql_query_rules (rule_id,proxy_port,username,destination_hostgroup,active,retries,match_digest,apply,active) values(83,6033,'app2',81,1,3,'^SELECT.*',1,1);
To identify and redirect the query for R/W split.
INSERT INTO mysql_query_rules (rule_id,active,username,match_pattern,replace_pattern,apply,comment) VALUES (32,1,'app2',"(^SELECT)\s*(.*$)","\1 /*+ RESOURCE_GROUP(Select_app2) */ \2 ",0,"Lower prio and CPU bound on Reader");
INSERT INTO mysql_query_rules (rule_id,active,username,match_pattern,replace_pattern,apply,comment) VALUES (33,1,'app2',"^(INSERT|UPDATE|DELETE)\s*(.*$)","\1 /*+ RESOURCE_GROUP(Write_app2) */ \2 ",0,"Lower prio on Writer");
And a user definition like:
insert into mysql_users (username,password,active,default_hostgroup,default_schema,transaction_persistent) values ('app2','test',1,80,'mysql',1);
insert into mysql_users (username,password,active,default_hostgroup,default_schema,transaction_persistent) values ('app1','test',1,80,'mysql',1);
One important step you need to do ON ALL the servers you want to include in the Resource Group utilization, is to be sure you have
CAP_SYS_NICE
capability set.
On Linux, resource group thread priorities are ignored unless the CAP_SYS_NICE capability is set. MySQL package installers for Linux systems should set this capability. For installation using a compressed tar file binary distribution or from source, the CAP_SYS_NICE capability can be set manually using the setcap command, specifying the pathname to the mysqld executable (this requires sudo access). You can check the capabilities using getcap. For example:
shell> sudo setcap cap_sys_nice+ep <Path to you mysqld executable>
shell> getcap ./bin/mysqld
./bin/mysqld = cap_sys_nice+ep
If manual setting of CAP_SYS_NICE is required, then you will need to do it every time you perform a new install.
As a reference here is a table about CPU priority:
| Priority Range Windows |
Priority Level |
| -20 to -10 |
THREAD_PRIORITY_HIGHEST |
| -9 to -1 |
THREAD_PRIORITY_ABOVE_NORMAL |
| 0 |
THREAD_PRIORITY_NORMAL |
| 1 to 10 |
THREAD_PRIORITY_BELOW_NORMAL |
| 11 to 19 |
THREAD_PRIORITY_LOWEST |
Summarizing here the whole set of steps on my environment:
1) Check the CAP_SYS_NICE
getcap /opt/mysql_templates/mysql-8P/bin/mysqld
setcap cap_sys_nice+ep /opt/mysql_templates/mysql-8P/bin/mysqld
2) Create the user in MySQL and resource groups
create user app2@'%' identified by 'test';
GRANT ALL PRIVILEGES ON `windmills2`.* TO `app2`@`%`;
CREATE RESOURCE GROUP Select_app2 TYPE=USER VCPU=5 THREAD_PRIORITY=19;
CREATE RESOURCE GROUP Write_app2 TYPE=USER THREAD_PRIORITY=19;
To check :
SELECT * FROM INFORMATION_SCHEMA.RESOURCE_GROUPS;
3) Create ProxySQL user and rules
insert into mysql_users (username,password,active,default_hostgroup,default_schema,transaction_persistent) values ('app2','test',1,80,'mysql',1);
insert into mysql_users (username,password,active,default_hostgroup,default_schema,transaction_persistent) values ('app1,'test',1,80,'mysql',1);
LOAD MYSQL USERS TO RUNTIME;SAVE MYSQL USERS TO DISK;
insert into mysql_query_rules (rule_id,proxy_port,username,destination_hostgroup,active,retries,match_digest,apply,active) values(83,6033,'app2',80,1,3,'^SELECT.*FOR UPDATE',1,1);
insert into mysql_query_rules (rule_id,proxy_port,username,destination_hostgroup,active,retries,match_digest,apply,active) values(84,6033,'app2',81,1,3,'^SELECT.*',1,1);
insert into mysql_query_rules (rule_id,proxy_port,username,destination_hostgroup,active,retries,match_digest,apply,active) values(85,6033,'app2',80,0,3,'.',1,0);
INSERT INTO mysql_query_rules (rule_id,active,username,match_pattern,replace_pattern,apply,comment) VALUES (32,0,'app2',"(^SELECT)\s*(.*$)","\1 /*+ RESOURCE_GROUP(Select_app2) */ \2 ",0,"Lower prio and CPU bound on Reader");
INSERT INTO mysql_query_rules (rule_id,active,username,match_pattern,replace_pattern,apply,comment) VALUES (33,0,'app2',"^(INSERT|UPDATE|DELETE)\s*(.*$)","\1 /*+ RESOURCE_GROUP(Write_app2) */ \2 ",0,"Lower prio on Writer");
LOAD MYSQL QUERY RULES TO RUNTIME;SAVE MYSQL QUERY RULES TO DISK;
For several reasons I will add the resource groups query rules as INACTIVE for now.
Done…
Testing
Will this work?
We need to see the impact of the bad application on my production application.
Then we need to see IF implementing the tuning will work or not.
To do a basic check I run four tests:
-
test1 run both apps with read/write and rule disabled for RG
-
test2 run an application at a time without RG
-
test3 run only App2 with RG to see the cost on the execution
-
test4 run both to see what happen with RG
Test 1
Master
![Test 1 master 1 current CPU core utilization]()
Slave
![]()
This test aims to have an idea, right away, of what happens when both applications are running, without limits.
As we can see during the test, all cores are utilized, some more consistently and some a bit less so, but nothing huge.
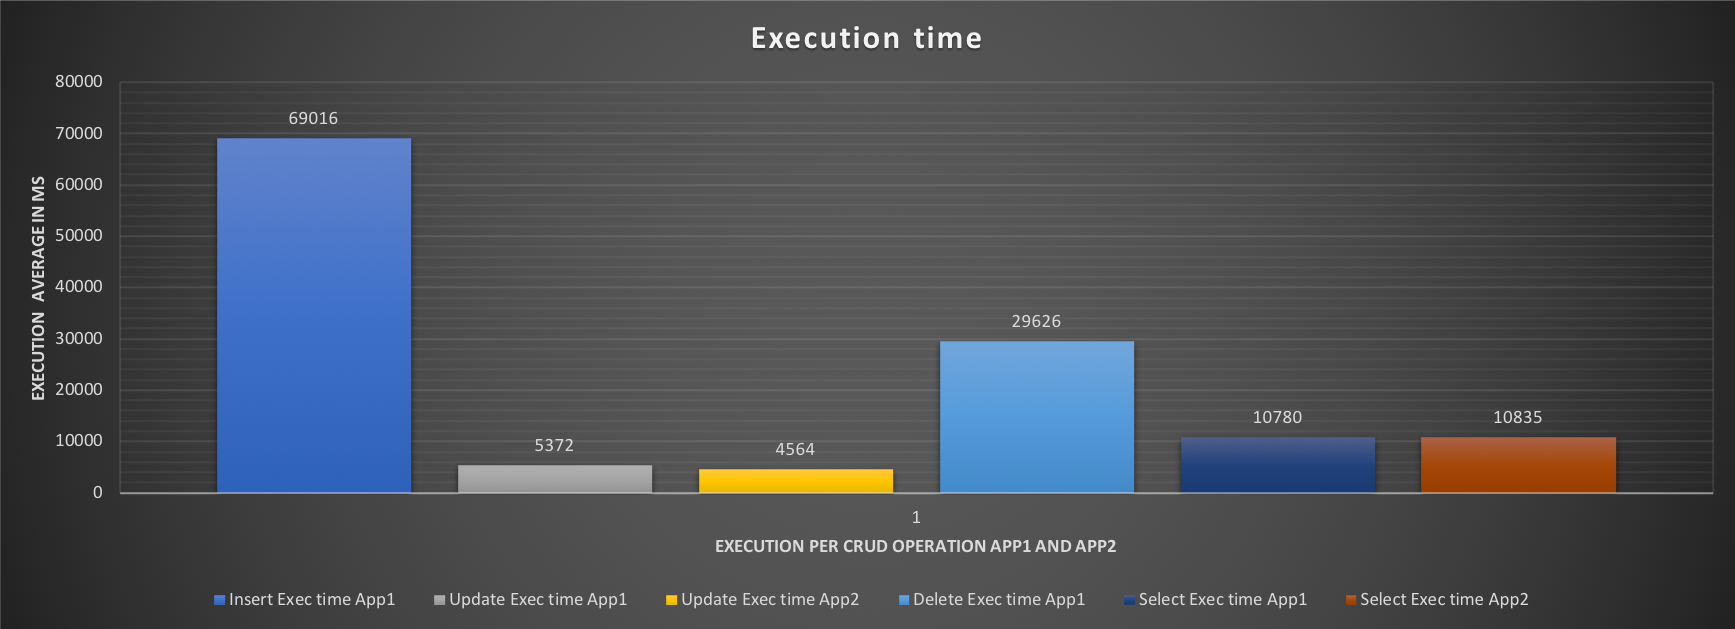
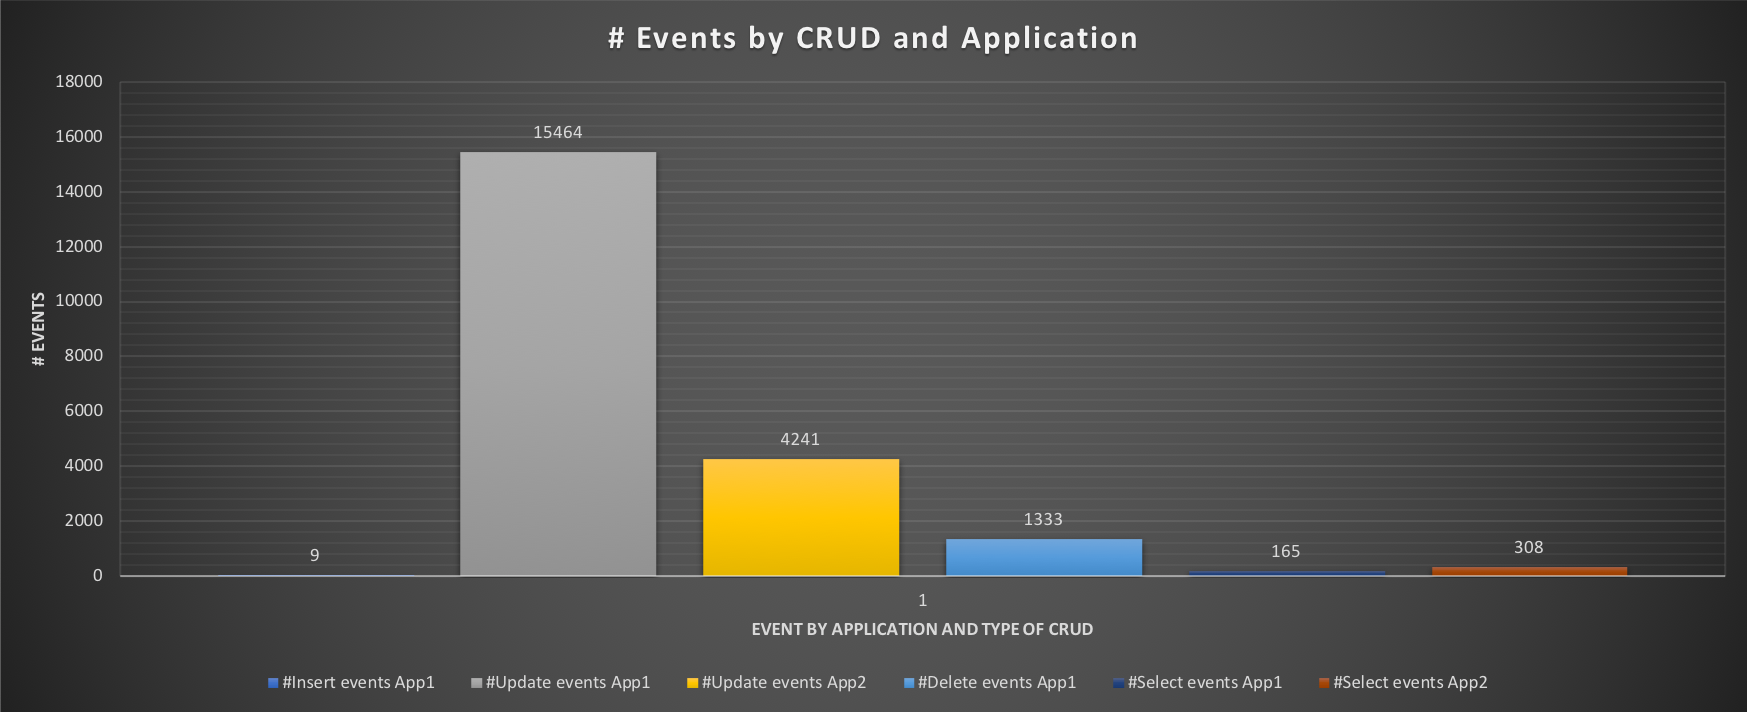
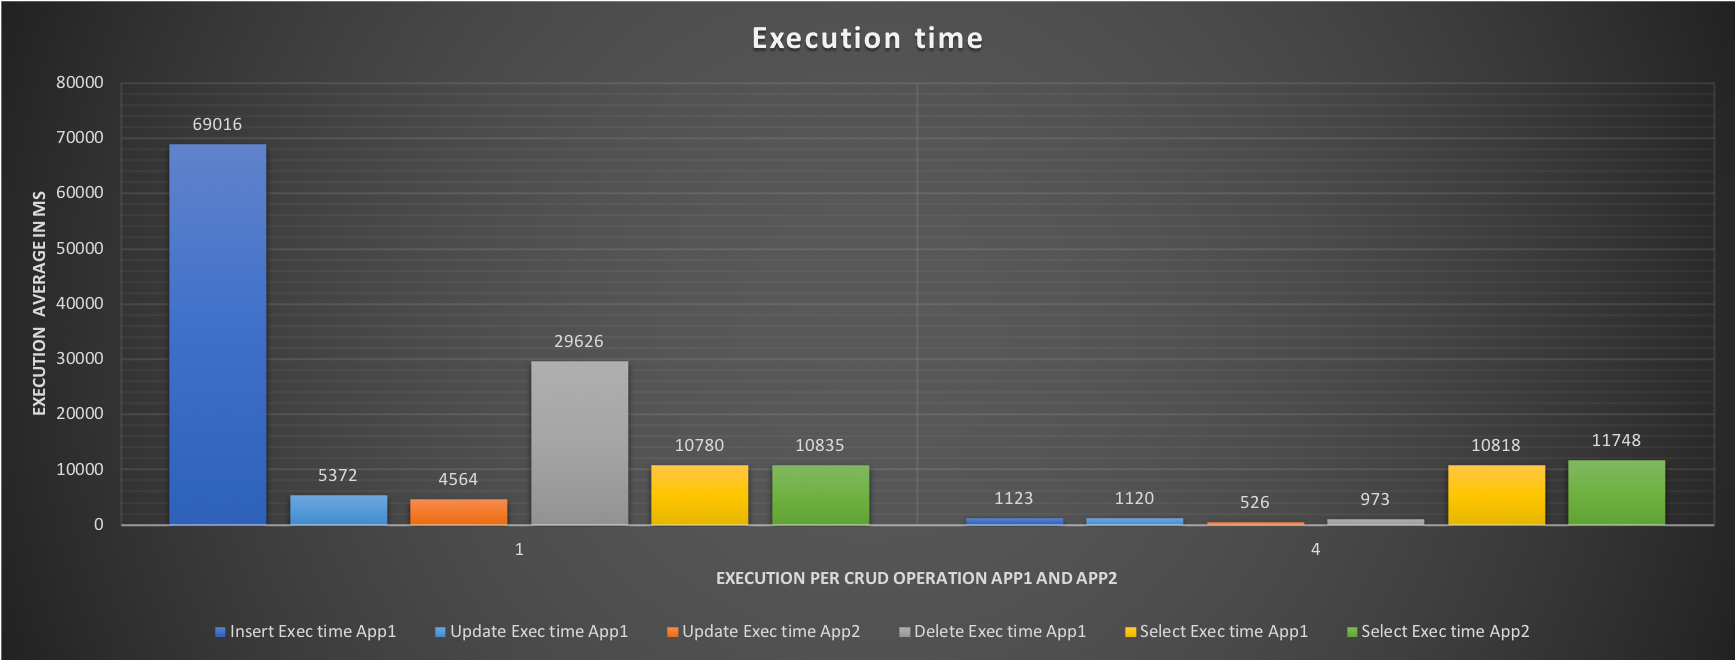
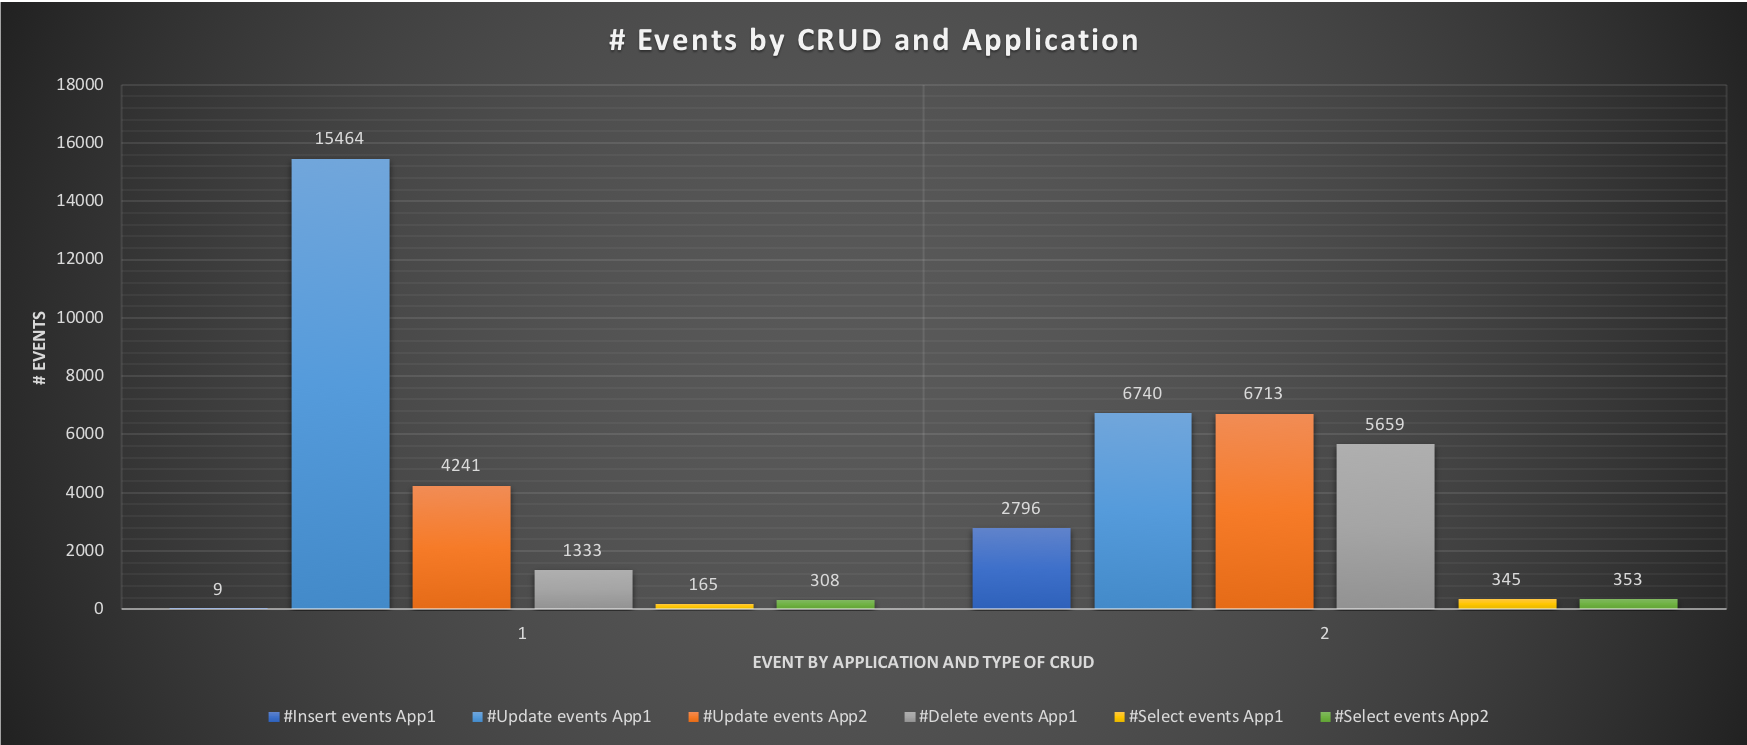
What is interesting is to see the effect on the response time and the number of events each application can execute:
![]()
The execution graph indicates a very high time in Insert, and Delete for App1, with the results showing very bad performance only nine inserts, 1333 deletes, and 165 selects.
![]()
But what is the application actually supposed to do? Test 2 will tell us, creating de facto our baseline.
Test 2
In this test I had run each application separately, so no interference.
Master App1
![Test 2 master 1 current CPU core utilization]()
Master App2
![]()
Slave App1
![Test 2 slave1 current CPU core utilization]()
Slave App2
![Test 2 slave 2 current CPU core utilization]()
Nothing significantly different in the CPU utilization when App1 was running, while we can see a bit less utilization in the case of App2.
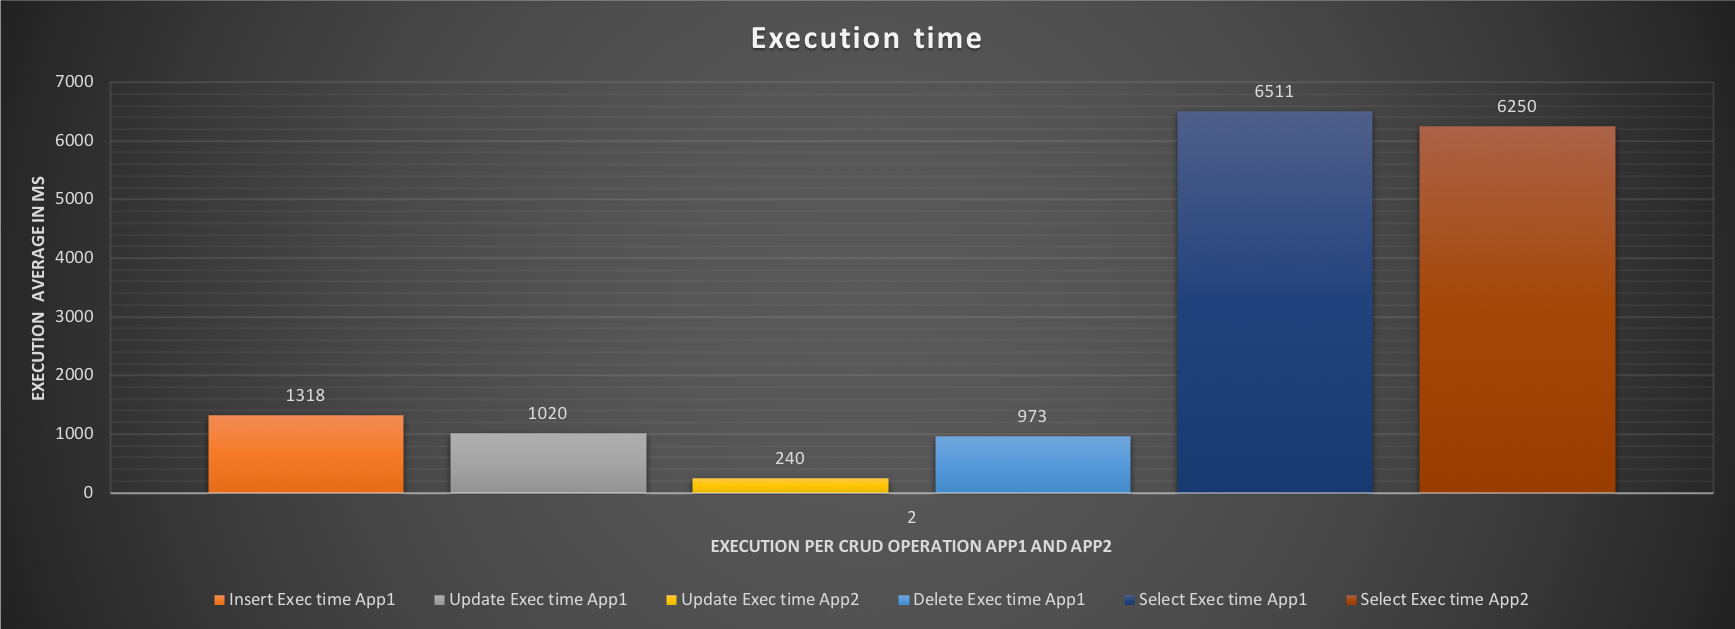
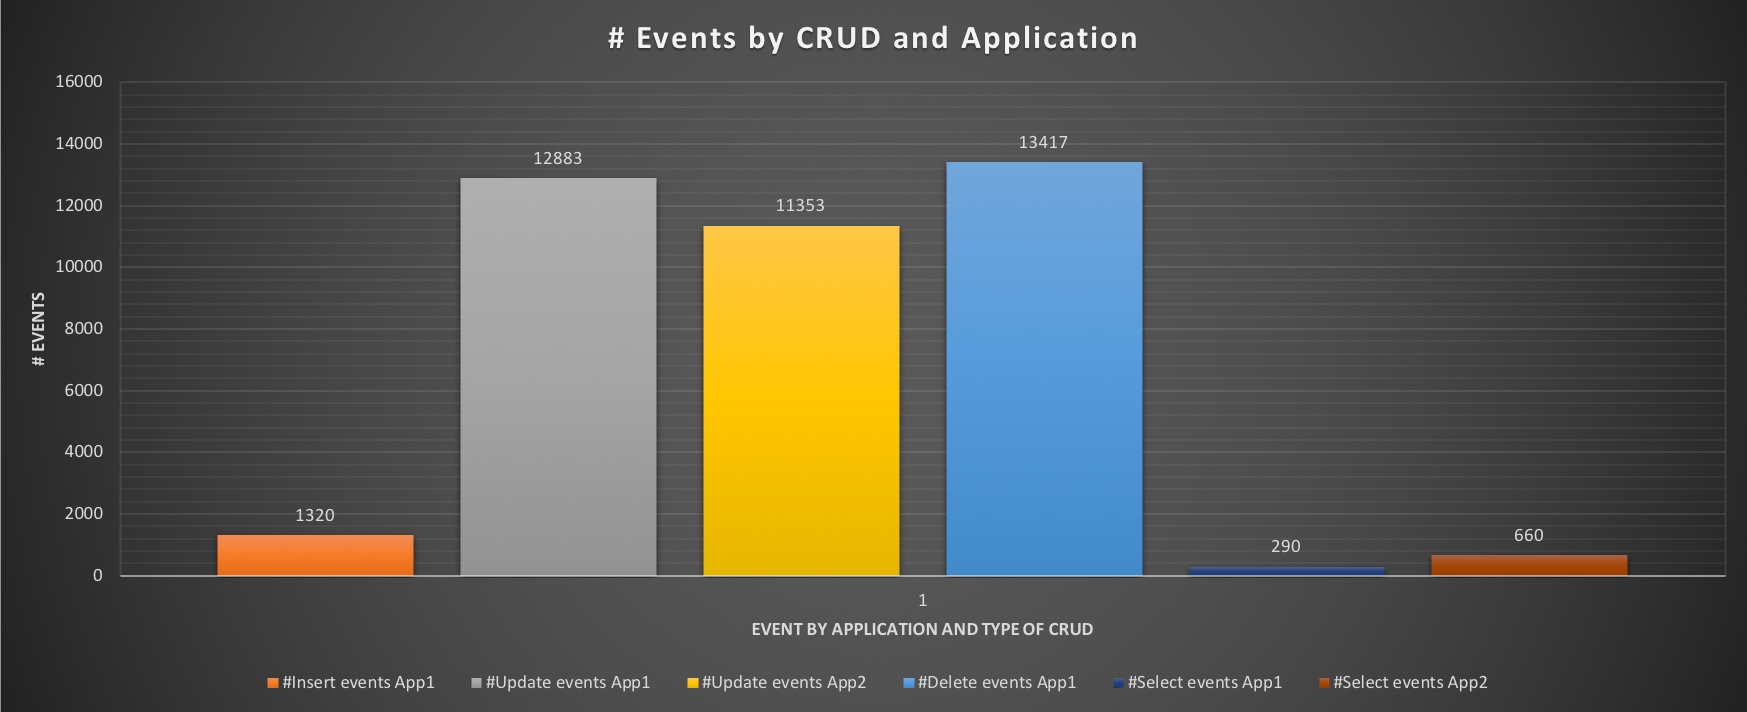
The impact on the performance is, however, more significant:
![]()
![]()
Execution time for insert, delete drops significantly for App1 and we can see that the application SHOULD be able to insert ~1320 events and perform a significantly higher number of operations. Same for App2, but here we care more about the OLTP than the ETL application.
So, what will happen IF we activate the Resource Group flags to the App2 (ETL) performance? Let’s see with test 3.
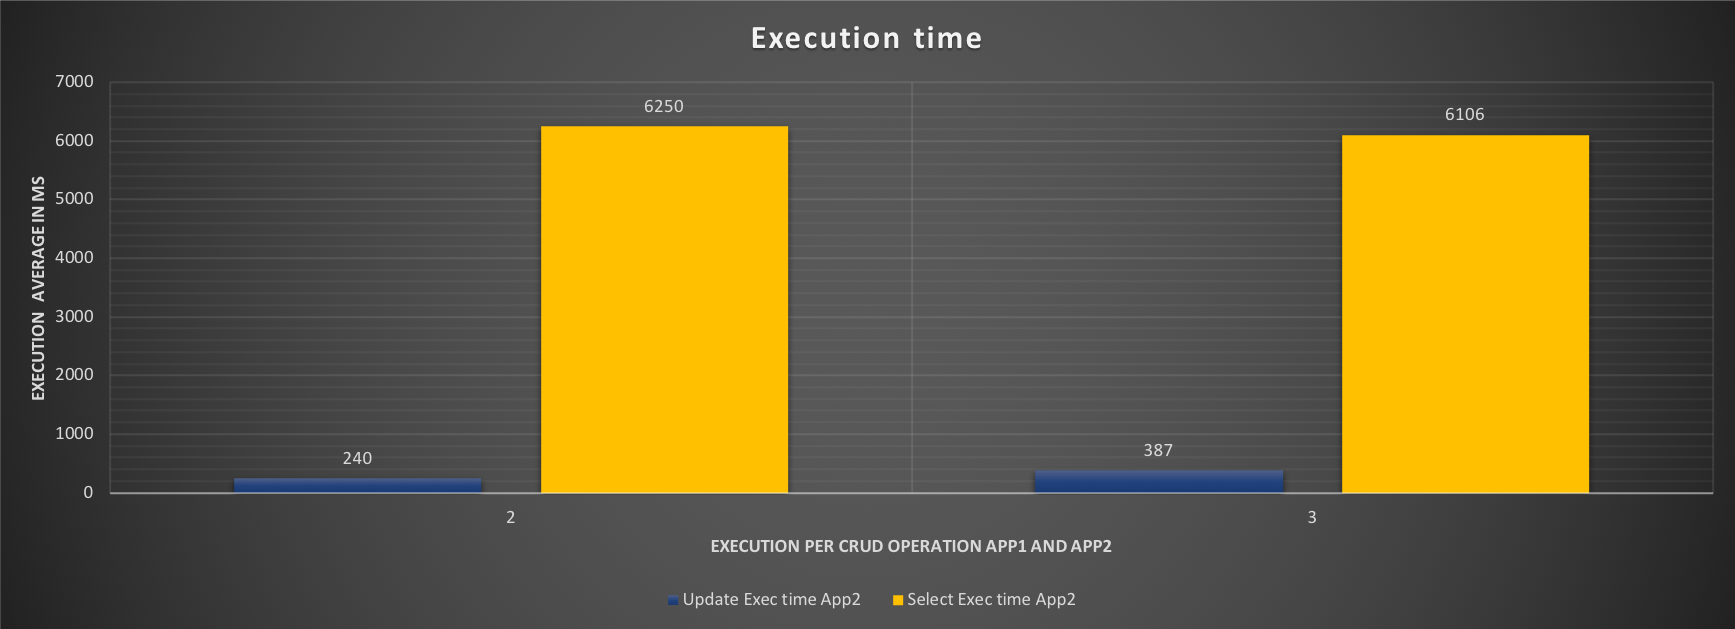
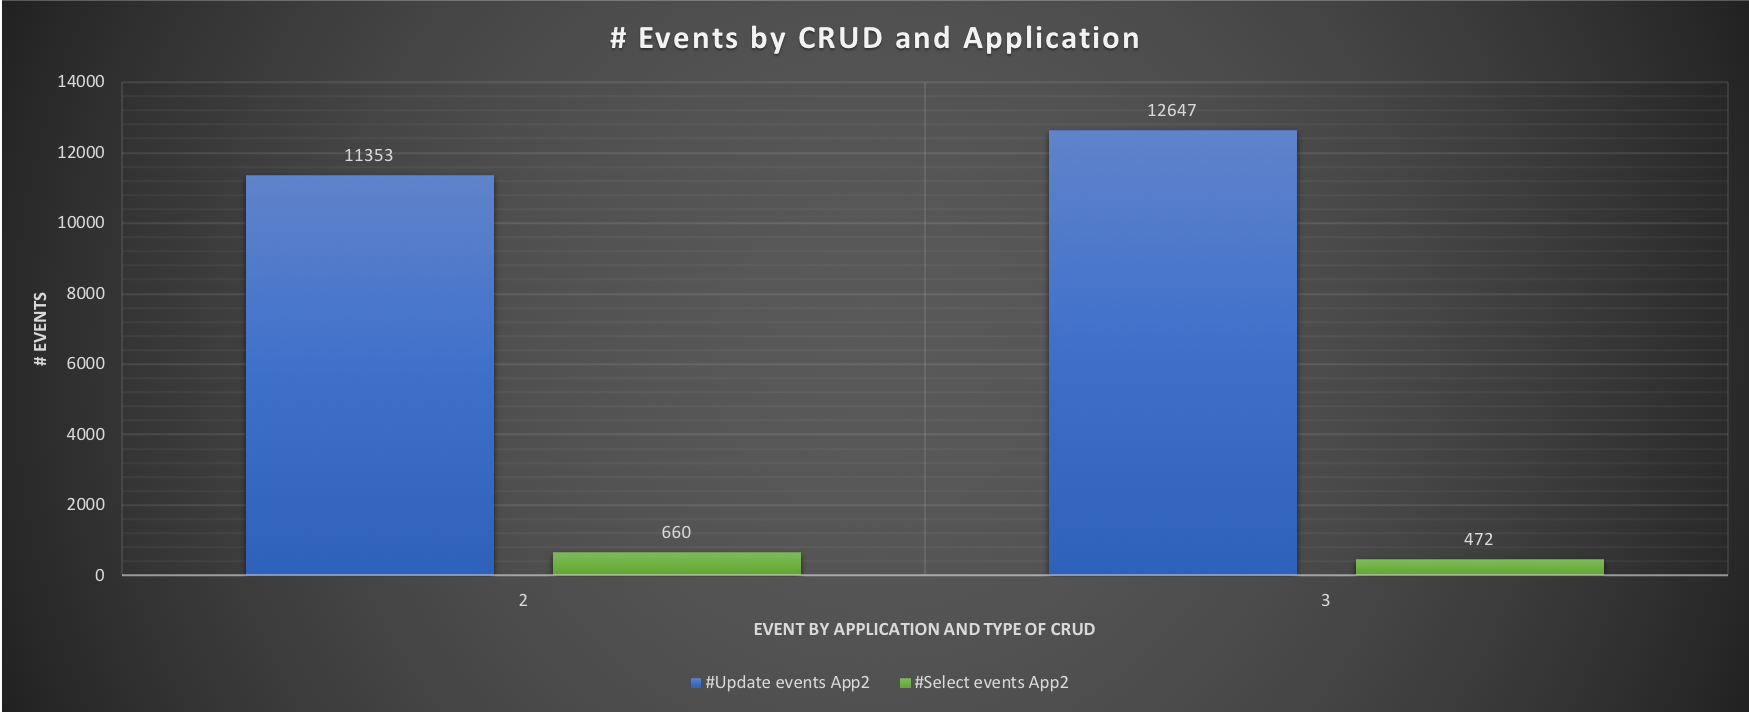
Test 3
Running only App2 with active resource groups
Master App2
![]()
Slave App2
![]()
On the master, what the RG settings will do is just reduce the priority, given that no other process is running and no other application is connected, the impact is not high.
On the other hand, on the slave we can clearly see that now App2 can only use core 5 as indicated in our configuration.
So far so good, what will be the performance loss? Let’s see:
![]()
Comparing the two tests 2 and 3, we can see that in applying the resource groups our ETL application has a minimal but existing impact. That is expected, desired and must be noted. The impact is not high in this test, but it can expand the running time in the real world.
![]()
It’s time to combine all and see what is going on.
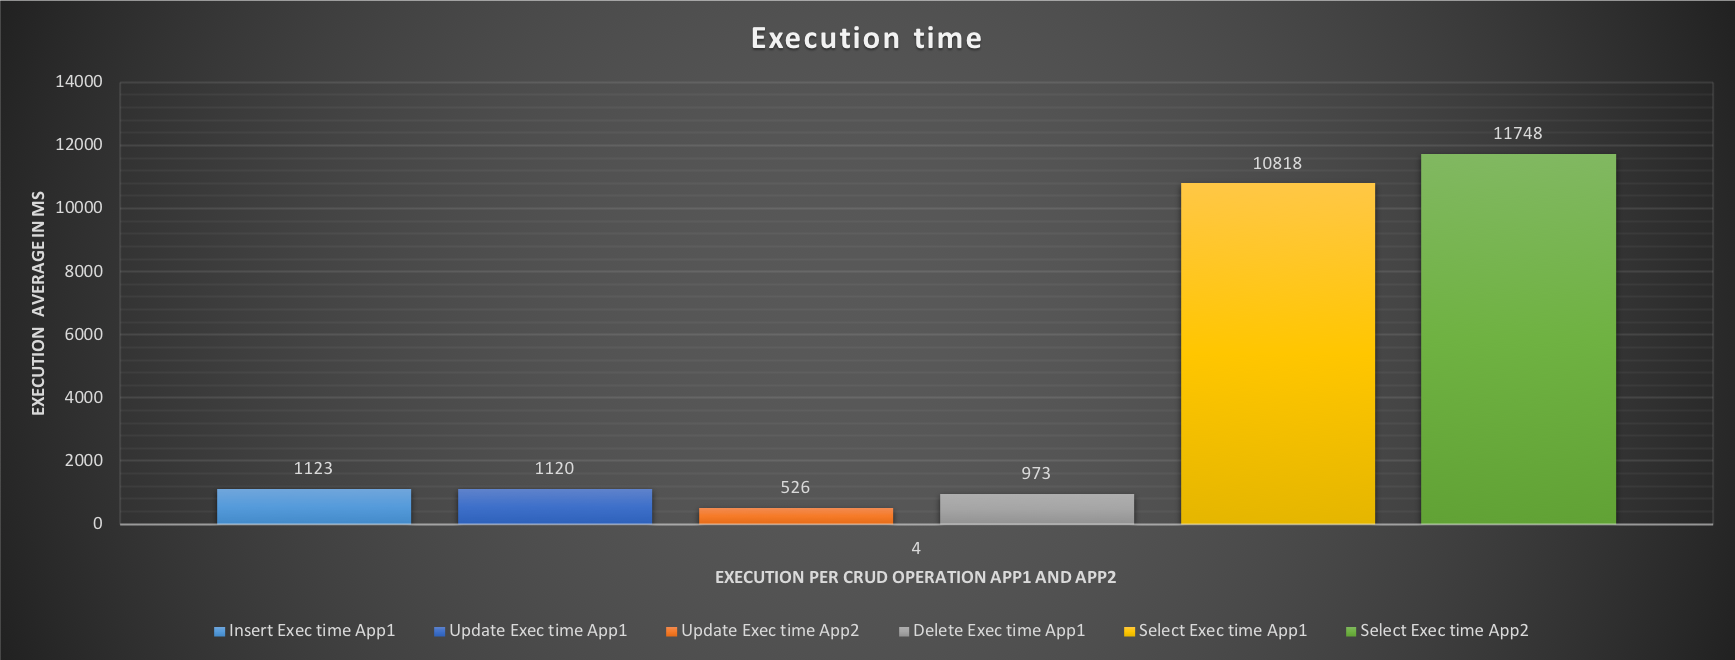
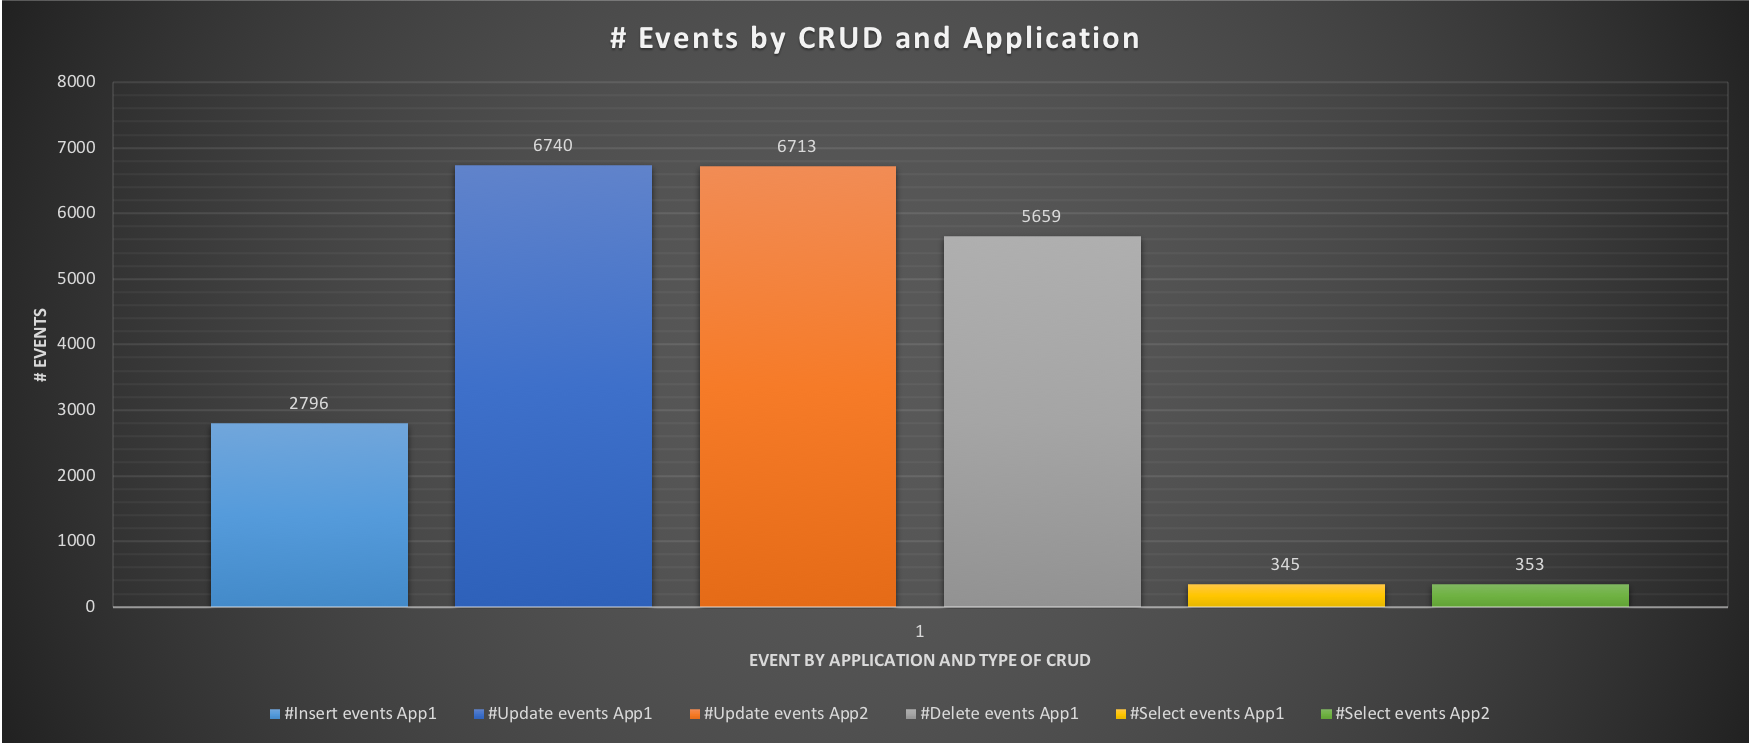
Test 4
Run our OLTP application while the ETL is running under Resource Group.
Master
![]()
Slave
![]()
Looking at the CPU utilization these graphs are very similar to the ones in test1, but the result is totally different:
![]()
The execution time for App1 (OLTP) has dropped significantly while the performance has increased almost as if nothing else is running. At the same time App2 has lost performance, and this must be taken into account, but it will not stop/prevent the ETL process to run.
![]()
It is possible to do more tuning in the case that ETL is too compromised. Or maybe modify the Servers layout such as adding a Slave and dedicating it to ETL reads. The combinations and possibilities are many.
Conclusion
Just looking to the final graphs will help us to reach our conclusions:
![]()
![]()
Comparing the two tests 1 and 4 we can see how using the Resource Group will help us to correctly balance the workload and optimize the performance in the case of unavoidable contention between different applications.
At the same time, using Resource Group alone as a blanket setting is not optimal because it can fail its purpose. Instead of providing some improvement, it can unpredictably affect all the traffic. It is also not desirable to modify the code in order to implement it at the query level, given the possible impact of doing that in cost and time.
The introduction of ProxySQL with query rewrite, allows us to utilize the per query option, without the need for any code modification, and allow us to specify what we want, with very high level of granularity.
Once more do not do this by yourself unless you are more than competent and know 100% what you are doing. In any case, remember that an ETL process may take longer and that you need to plan your work/schedule accordingly.
Good MySQL everyone.
References
The post MySQL 8: Load Fine Tuning With Resource Groups appeared first on Percona Database Performance Blog.

 I was recently asked a question by mail about
 Protecting the data stored in your database may have been at the top of your priorities recently, especially with the changes that were introduced earlier this year with


 Join Percona Chief Evangelist Colin Charles as he covers happenings, gives pointers and provides musings on the open source database community.