Quantcast
Channel: Planet MySQL
Viewing all 18783 articles
Browse latest View live

MySQL InnoDB Cluster – how to manage a split-brain situation

$
0
0

Everywhere I go to present MySQL InnoDB Cluster, during the demo of creating a cluster, many people doesn’t understand why when I’ve 2 members, my cluster is not yet tolerant to any failure.

Indeed when you create a MySQL InnoDB Cluster, as soon as you have added your second instance, you can see in the status:

    "status": "OK_NO_TOLERANCE",      
"statusText": "Cluster is NOT tolerant to any failures.",

Quorum

Why is that ? It’s because, to be part of primary partition (the partition that holds the service, the one having a Primary-Master in Single Primary Mode, the default mode), your partition must reach the majority of nodes (quorum). In MySQL InnoDB Cluster (and many other cluster solutions), to achieve quorum, the amount of members in a partition must be > (bigger) than 50%.

So when we have 2 nodes, if there is a network issue between the two servers, the cluster will be split in 2 partitions. And each of it will have 50% of the amount of total members (1 of 2). Is 50% > than 50% ?? No! That’s why none of the partition will reach quorum and none will allow queries in case of MySQL InnoDB Cluster.

Indeed, the first machine will see that it won’t be able to reach the second machine anymore… but why ? Is the second machine who died ? Am I having network interface issues ? We don’t know, so we cannot decide.

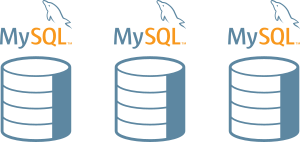
Let’s take a look at this cluster of 3 members (3/3 = 100%):


If we take a look in the cluster.status()output, we can see that with 3 nodes we can tolerate one failure:

    "status": "OK",      
"statusText": "Cluster is ONLINE and can tolerate up to ONE failure.",

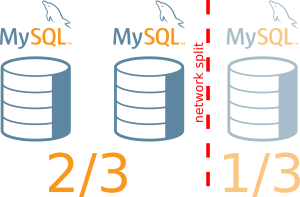
Now let’s imagine we have a network issue that will isolate one of the members:

We can see in cluster.status()output that the node is missing:

Our cluster will still be able to serve transactions has one partition still has quorum (2/3 = 66%, which is bigger than 50%).

        "mysql6:3306": {
"address": "mysql6:3306",
"mode": "n/a",
"readReplicas": {},
"role": "HA",
"status": "(MISSING)"
}

There is a very important concept I want to cover as this is not always obvious. The cluster is different in InnoDB Cluster and in Group Replication. Indeed, InnoDB Cluster relies on metadata created by the DBA using the MySQL Shell. Those metadata describes how the cluster has been set up. Group Replication sees the cluster differently. It sees it as it was last time it checked and how it’s right now… and updates that view. This is commonly called, the view of the world.

So in the example above, InnoDB Cluster sees 3 nodes: 2 online and 1 missing. For Group Replication, for a short moment, the partitioned node was UNREACHABLE and few second later, after being ejected from the Group by the majority (so only if there is still a majority), the node is not part of the cluster anymore. The Group size is now 2 of 2 (2/2 not 2/3). This information is exposed via performance_schema.replication_group_members

If our network issue would have been more serious and would split our cluster in 3 like the picture below, the cluster would be “offline” as none of the 3 partition would have reached quorum majority, 1/3 = 33% (<50%):

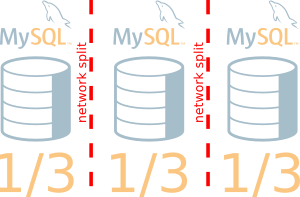
In this case the MySQL service won’t work properly until a human fixes the situation.

Fixing the situation

When there is no more primary partition in the cluster (like the example above), the DBA needs to restore the service. And as usual, there is already some information in the MySQL error log:

2019-04-10T13:34:09.051391Z 0 [Warning] [MY-011493] [Repl] Plugin group_replication 
reported: 'Member with address mysql4:3306 has become unreachable.'
2019-04-10T13:34:09.065598Z 0 [Warning] [MY-011493] [Repl] Plugin group_replication
reported: 'Member with address mysql5:3306 has become unreachable.'
2019-04-10T13:34:09.065615Z 0 [ERROR] [MY-011495] [Repl] Plugin group_replication
reported: 'This server is not able to reach a majority of members in
the group. This server will now block all updates. The server will
remain blocked until contact with the majority is restored. It is
possible to use group_replication_force_members to force a new group
membership.

From the message, we can see that this is exactly the situation we are explaining here. We can see in cluster.status()that the cluster is “blocked” :

    "status": "NO_QUORUM",      
"statusText": "Cluster has no quorum as visible from 'mysql4:3306'
and cannot process write transactions.
2 members are not active",

We have two solutions to fix the problem:

  1. using SQL and Group Replication variables
  2. using the MySQL Shell’s adminAPI

Fixing using SQL and Group Replication variables

This process is explained in the manual (Group Replication: Network Partitioning).

On the node the DBA wants to use to restore the service, if there is only one node left we can use the global variable group_replication_force_members and use the GCS address of the server that you can find in group_replication_local_address(if there are multiple servers online but not reaching the majority, all should be added to this variable):

SQL set global group_replication_force_members=@@group_replication_local_address;

Be careful that the best practice is to shutdown the other nodes to avoid any kind of conflicts if they reappear during the process of forcing quorum.

And the cluster will be again available. We can see in the error log that the situation has been resolved:

2019-04-10T14:41:15.232078Z 0 [Warning] [MY-011498] [Repl] Plugin group_replication 
reported:
'The member has resumed contact with a majority of the members in the group.
Regular operation is restored and transactions are unblocked.'

Don’t forget to remove the value of group_replication_force_members when you are back online:

SQL set global group_replication_force_members='';

When the network issue are resolved, the nodes will try to reconnect but has we forced the membership, those nodes will be rejected. You will need to rejoin the Group by:

  • restarting mysqld
  • or restarting again group replication (stop group_replication; start group_replication)
  • or using MySQL Shell (cluster.rejoinInstance())

Using the MySQL Shell’s adminAPI

The other option is to use the adminAPI from the MySQL Shell. This is the preferable option of course ! With the AdminAPI you don’t even need to know the port used for GCS to restore the quorum.

In the example below, we will use the server called mysql4 to re-activate our cluster:

JS cluster.forceQuorumUsingPartitionOf('clusteradmin@mysql4') 

And when the network issues are resolved, the Shell can also be used to rejoin other instances (in this case mysql6) :

JS cluster.rejoinInstance('clusteradmin@mysql6')

Conclusion

When for any reason you have lost quorum on your MySQL InnoDB Cluster, don’t panic. Choose the node (or list of nodes that can still communicate with each others) you want to use and if possible shutdown or stop mysqld on the other ones. Then MySQL Shell is again your friend and use the adminAPI to force the quorum and reactive your cluster in one single command !

Bonus

If you want to know if your MySQL server is part of the primary partition (the one having the majority), you can run this command:

mysql> SELECT IF( MEMBER_STATE='ONLINE' AND ((
SELECT COUNT() FROM performance_schema.replication_group_members
WHERE MEMBER_STATE NOT IN ('ONLINE', 'RECOVERING')) >=
((SELECT COUNT()
FROM performance_schema.replication_group_members)/2) = 0), 'YES', 'NO' )
in primary partition
FROM performance_schema.replication_group_members
JOIN performance_schema.replication_group_member_stats
USING(member_id) where member_id=@@global.server_uuid;
+----------------------+
| in primary partition |
+----------------------+
| NO |
+----------------------+

Or by using this addition to sys schema: addition_to_sys_GR.sql

SQL select gr_member_in_primary_partition();
+----------------------------------+
| gr_member_in_primary_partition() |
+----------------------------------+
| YES |
+----------------------------------+
1 row in set (0.0288 sec)


mysql database backup shell script with status email

$
0
0
This post is for the backup script for MySQL database on Linux. The backup shell script works as follows: – The script takes backup using mysqldump and compresses it. – Upon success, it will attempt to ship the backup to specified offsite location. – Upon detecting failure in any of the above step, it will […]

MySQL InnoDB Cluster – HowTo #1 – Monitor your cluster

$
0
0
MySQL InnoDB Cluster - HowTo #1 - Monitor your cluster Q: How do I monitor the status & the configuration of my cluster? A: Use status() or status({extended:true}) or status({queryMembers:true})?

MySQL 8.0 Architecture and Enhancement Webinar: Q & A

$
0
0
MySQL 8.0 Architecture and Enhancement

MySQL 8.0 Architecture and EnhancementIn this blog, I will provide answers to the Q & A for the MySQL 8.0 Architecture and Enhancement webinar.

First, I want to thank everybody for attending my April 9, 2019, webinar. The recording and slides are available here. Below is the list of your questions that I was unable to answer fully during the webinar.

Q: What kind of Encryption levels are provided into MySQL 8.0?

The MySQL data-at-rest encryption feature supports the Advanced Encryption Standard (AES) block-based encryption algorithm.

In MySQL block_encryption_mode variable controls the block encryption mode. The default setting is aes-128-ecb. Set this option to aes-256-cbc, for example, under the [mysqld] option group in the MySQL configuration file (/etc/my.cnf):

[mysqld]
block_encryption_mode=aes-256-cbc

Q: At what frequency does the redo log buffer flush the changes to disk? When is the commit variable set to zero?

Here’s an overview:

  • innodb_flush_log_at_trx_commit variable can be configured to set flush frequency in MySQL 5.7 and 8.0 it’s set to 1 by default.
  • innodb_flush_log_at_trx_commit =0  logs are written and flushed to disk once per second. Transactions for which logs have not been flushed can be lost in a crash.
  • innodb_flush_log_at_trx_commit =1 is required for full ACID compliance. Logs are written and flushed to disk at each transaction commit. Default Setting.
  • innodb_flush_log_at_trx_commit =2 logs are written after each transaction commit and flushed to disk once per second. Transactions for which logs have not been flushed can be lost in a crash.

Q: How are persistent variables reset?

Using the RESET PERSIST command we can remove persisted global system variable settings from the mysqld-auto.cnf.

Example:

mysql > SET PERSIST binlog_encryption=ON;
Query OK, 0 rows affected (0.00 sec)
$ cat data/mysqld-auto.cnf
{ "Version" : 1 , "mysql_server" : { "mysql_server_static_options" : { "binlog_encryption" : { "Value" : "ON" , "Metadata" : { "Timestamp" : 1554896858076255 , "User" : "msandbox" , "Host" : "localhost" } } } } }
MySQL > RESET PERSIST binlog_encryption;
Query OK, 0 rows affected (0.00 sec)
$ cat data/mysqld-auto.cnf
{ "Version" : 1 , "mysql_server" : { } }

To reset all persistent variables use following command.

mysql > RESET PERSIST;
Query OK, 0 rows affected (0.00 sec)

Q: Does pt-config-diff work with these persistent vs. my.cnf variable settings?

No, it will not work. Due to config format differences in these files.

$ pt-config-diff ./my.sandbox.cnf data/mysqld-auto.cnf
Cannot auto-detect the MySQL config format at /home/lalit/perl5/bin/pt-config-diff line 3010.

Q: Regarding the UNDO Tablespace, do we have any specific retention to follow?

This is not required because in MySQL 8.0, the innodb_undo_log_truncate variable is enabled by default. It will perform an automatic truncate operation on the UNDO tablespace. When undo tablespaces exceed the threshold value defined by innodb_max_undo_log_size (default value is 1024 MiB) they are marked for truncation.

Truncating the undo tablespace performs the following action:

  1. Performs deactivation of undo tablespace
  2. Truncation of undo tablespace
  3. Reactivation of undo tablespaces

NOTE:  Truncating undo logs that reside in the system tablespace is not supported. 

Q: Corrupted data on disk where the secondary indexes don’t match to the primary?

I’ll be happy to respond to this, but I’ll need a little bit more information… feel free to add more detail to the comments section and I’ll see if I can provide some insight.

Thanks for attending this webinar on MySQL 8.0 Architecture and Enhancement Webinar . You can find the slides and a recording here.


MySQL InnoDB Cluster : avoid split-brain while forcing quorum

$
0
0

We saw yesterday that when an issue (like network splitting), it’s possible to remain with a partitioned cluster where none of the partition have quorum (majority of members). For more info read how to manage a split-brain situation.

If your read the previous article you notice the red warning about forcing the quorum. As an advice is never too much, let me write it down again here : “Be careful that the best practice is to shutdown the other nodes to avoid any kind of conflicts if they reappear during the process of forcing quorum“.

But if some network problem is happening it might not be possible to shutdown those other nodes. Would it be really bad ?

YES !

Split-Brain

Remember, we were in this situation:

We decided to force the quorum on one of the nodes (maybe the only one we could connect to):

But what could happen if while we do this, or just after, the network problem got resolved ?

In fact we will have that split-brain situation we would like to avoid as much as possible.

Details

So what happen ? And why ?

When we ran cluster.forceQuorumUsingPartitionOf('clusteradmin@mysql1'), this is what we could read in the MySQL error log of that server:

[Warning] [MY-011498] [Repl] Plugin group_replication reported: 
'The member has resumed contact with a majority of the members in the group.
Regular operation is restored and transactions are unblocked.'
[Warning] [MY-011499] [Repl] Plugin group_replication reported:
'Members removed from the group: mysql2:3306, mysql3:3306'

The node ejected the other nodes of the cluster and of course no decision was communicate to these servers are they were not reachable anyway.

Now when the network situation was solved, this is what we could read on mysql2:

[Warning] [MY-011494] [Repl] Plugin group_replication reported: 
'Member with address mysql3:3306 is reachable again.'
[Warning] [MY-011498] [Repl] Plugin group_replication reported: 'The
member has resumed contact with a majority of the members in the group.
Regular operation is restored and transactions are unblocked.'
[Warning] [MY-011499] [Repl] Plugin group_replication reported:
'Members removed from the group: mysql1:3306

Same on mysql3, this means these two nodes reached majority together and ejected mysql1 from “their” cluster.

On mysql1, we can see in performance_schema:

mysql> select * from performance_schema.replication_group_members\G
************************** 1. row **************************
CHANNEL_NAME: group_replication_applier
MEMBER_ID: fb819b30-5b90-11e9-bf8a-08002718d305
MEMBER_HOST: mysql4
MEMBER_PORT: 3306
MEMBER_STATE: ONLINE
MEMBER_ROLE: PRIMARY
MEMBER_VERSION: 8.0.16
1 row in set (0.0013 sec)

An on mysql2 and mysql3:

mysql> select * from performance_schema.replication_group_members\G
************************** 1. row **************************
CHANNEL_NAME: group_replication_applier
MEMBER_ID: 4ff0a33f-5c49-11e9-abc9-08002718d305
MEMBER_HOST: mysql6
MEMBER_PORT: 3306
MEMBER_STATE: ONLINE
MEMBER_ROLE: SECONDARY
MEMBER_VERSION: 8.0.16
************************** 2. row **************************
CHANNEL_NAME: group_replication_applier
MEMBER_ID: f8ac8d14-5b90-11e9-a22a-08002718d305
MEMBER_HOST: mysql5
MEMBER_PORT: 3306
MEMBER_STATE: ONLINE
MEMBER_ROLE: PRIMARY
MEMBER_VERSION: 8.0.16

This is of course the worse situation that could happen when dealing with a cluster.

Solution

The solution is to prevent the nodes not being part of the the forced quorum partition to agree making their own group as they will have a majority.

This can be achieve by setting these variables on an majority of nodes (on two servers if your InnoDB Cluster is made of 3 nodes for example):

When I fixed again my cluster and all were again online, I changed these settings on mysql1 and mysql2:

set global group_replication_unreachable_majority_timeout=30;
set global group_replication_exit_state_action = 'ABORT_SERVER';

This means that if there a problem and the node is not able to join the majority after 30 seconds it will go in ERROR state and then shutdown `mysqld`.

Pay attention that the 30sec is only an example. The time should allow me to remove that timer on the node I want to use for forcing the quorum (mysql1 in the example) but also be sure that time is elapsed on some nodes I can’t access to be sure they removed themselves from the group (mysql2 in the example).

So, if we try again with our example, once the network problem is happening, after 30sec, we can see in mysql2‘s error log that is working as expected:

[ERROR] [MY-011711] [Repl] Plugin group_replication reported: 'This member could not reach 
a majority of the members for more than 30 seconds. The member will now leave
the group as instructed by the group_replication_unreachable_majority_timeout
option.'
[ERROR] [MY-011712] [Repl] Plugin group_replication reported: 'The server was automatically
set into read only mode after an error was detected.'
[Warning] [MY-013373] [Repl] Plugin group_replication reported: 'Started
auto-rejoin procedure attempt 1 of 1'
[ERROR] [MY-011735] [Repl] Plugin group_replication reported:
'[GCS] Timeout while waiting for the group communication engine to exit!'
[ERROR] [MY-011735] [Repl] Plugin group_replication reported:
'[GCS] The member has failed to gracefully leave the group.'
[System] [MY-010597] [Repl] 'CHANGE MASTER TO FOR CHANNEL 'group_replication_applier'
executed'. Previous state master_host='', master_port= 0,
master_log_file='', master_log_pos= 798,
master_bind=''. New state master_host='', master_port= 0,
master_log_file='', master_log_pos= 4, master_bind=''.
[ERROR] [MY-011735] [Repl] Plugin group_replication reported:
'[GCS] Error connecting to the local group communication engine instance.'
[ERROR] [MY-011735] [Repl] Plugin group_replication reported:
'[GCS] The member was unable to join the group. Local port: 33061'
[Warning] [MY-013374] [Repl] Plugin group_replication reported:
'Timeout while waiting for a view change event during the auto-rejoin procedure'
[Warning] [MY-013375] [Repl] Plugin group_replication reported:
'Auto-rejoin procedure attempt 1 of 1 finished.
Member was not able to join the group.'
[ERROR] [MY-013173] [Repl] Plugin group_replication reported:
'The plugin encountered a critical error and will abort:
Could not rejoin the member to the group after 1 attempts'
[System] [MY-013172] [Server] Received SHUTDOWN from user .
Shutting down mysqld (Version: 8.0.16).
[Warning] [MY-010909] [Server] /usr/sbin/mysqld:
Forcing close of thread 10 user: 'clusteradmin'.
[Warning] [MY-010909] [Server] /usr/sbin/mysqld:
Forcing close of thread 35 user: 'root'.
[ERROR] [MY-011735] [Repl] Plugin group_replication reported:
'[GCS] The member is leaving a group without being on one.'
[System] [MY-010910] [Server] /usr/sbin/mysqld:
Shutdown complete (mysqld 8.0.16) MySQL Community Server - GPL.
[Warning] [MY-010909] [Server] /usr/sbin/mysqld: Forcing close
of thread 10 user: 'clusteradmin'.
[Warning] [MY-010909] [Server] /usr/sbin/mysqld: Forcing close
of thread 35 user: 'root'.
[ERROR] [MY-011735] [Repl] Plugin group_replication reported:
'[GCS] The member is leaving a group without being on one.'
[System] [MY-010910] [Server] /usr/sbin/mysqld:
Shutdown complete (mysqld 8.0.16) MySQL Community Server - GPL

And when the quorum has been forced on mysql1, as soon as the network issue is resolved, none will join the Group and the DBA will have to use the shell to perform cluster.rejoinInstance(instance) or restart mysqld on the instances that shutdown themselves.

Conclusion

So as you can see, by default MySQL InnoDB Cluster and Group Replication is very protective for split-brain situation. And it can even be enforced to avoid problem when human interaction is needed.

The rule of the thumb to avoid problem is to set group_replication_unreachable_majority_timeoutto something you can deal with and group_replication_exit_state_action to ABORT_SERVER on (total amount of members in the cluster /2 )+1 as integer 😉

If you have 3 nodes, on 2 then ! Of course it might be much simpler to set it on all nodes.

Be aware that if you don’t react in the time frame defined by group_replication_unreachable_majority_timeout, all your servers will shutdown and you will have to restart one.

MySQL Tutorial: Create Database, Tables and Data Types

$
0
0
In this tutorial, you will learn about MySQL, how to create SQL databases, tables and various data types. Prerequisites You need to have MySQL server installed on your machine along with the MySQL client. Create DATABASE | Create schema in MySQL You can create a database in MySQL using the SQL instruction CREATE DATABASE . Open a new terminal and invoke the mysql client using the following command: $ mysql -u root -p Enter the password for your MySQL server when prompted. You can now execute SQL statments. Let's see an example of creating a database named mydb: mysql> create database mydb; Note: You can also use create schema for creating a database. You can also add other parameters. CREATE DATABASE IF NOT EXISTS You can create multiple databases in your MySQL server. When using the IF NOT EXISTS parameter, you tell MySQL to create the database if no database with the same name is alreay created. This is will only prevent MySQL for displaying an error and aborting the opeartion but if a database with the same name exists It will not be overwritten: mysql> create database if not exists mydb; This will create a database named mydb and fail silently if a database with the name already exists. SHOW DATABASES You can get the list of created databases in your MySQL server using the SHOW DATABASES SQL instruction. In your terminal, simply run: mysql> show databases; Create a MySQL Table and Columns After creating a database, the next thing that you would need is creating the database tables and their fields. In your MySQL client, run the following SQL insruction to create a table and columns: mysql> CREATE TABLE IF NOT EXISTS `Contacts` ( `id` INT AUTOINCREMENT , `first_name` VARCHAR(150) NOT NULL , `gender` VARCHAR(6) , `date_of_birth` DATE , `address` VARCHAR(255) , `postal_address` VARCHAR(255) , `phone` VARCHAR(75) , `email` VARCHAR(255) , PRIMARY KEY (`id`) ) ENGINE = InnoDB; Here is the format of the instruction we used: CREATE TABLE [IF NOT EXISTS] TableName (columnName dataType [optional parameters]) ENGINE = storage Engine; The CREATE TABLE part instructs MySQL to create a SQL table with the specified name in the database. The optional IF NOT EXISTS part insturcts MySQL to create the table only if no table with the same name exists in the database. columnName refers to the name of the column and data Type refers to the type of data that can be stored in the corresponding column. The optional parameters section contains options about a specific column such as PRIMARY KEY, AUTO_INCREMENT or NOT NULL, etc. MySQL DATA TYPES Let's now see the available types that can be used for table columns in MySQL. Simply put, a data types defines the nature of the data that can be stored in a particular column of a table. MySQL data types can be categorized in three categories: Numeric: TINYINT, SMALLINT, MEDIUMINT, INT, BIGINT, FLOAT, DOUBLE, DECIMAL, Text: CHAR, VARCHAR, TINYTEXT, TEXT, BLOB, MEDIUMTEXT, MEDIUMBLOB, LONGTEXT and LONGBLOB, Date and time: DATE, DATETIME, TIMESTAMP and TIME. Apart from above there are some other data types in MySQL: ENUM To store text value chosen from a list of predefined text values SET This is also used for storing text values chosen from a list of predefined text values. It can have multiple values. BOOL Synonym for TINYINT(1), used to store Boolean values BINARY Similar to CHAR, difference is texts are stored in binary format. VARBINARY Similar to VARCHAR, difference is texts are stor Conclusion In this post, we've seen how to create MySQL database and tables with columns and data types.

How to Manage Session using Node.js and Express

$
0
0

Session handling in any web application is very important and is a must-have feature, without it, we won’t be able to track user and it’s activity.

In this article, I am going to teach you how to handle Session in Node.js. We will use express as a framework and various other modules such as body-parser to handle form data.

YOUTUBE DEMO DOWNLOAD

At the time of writing article, the latest version of Express is 4.16.4.

What we are buiding

To demonstrate Session handling in Node, I have developed a basic Log-in and log-out System. In this User can log-in by providing their email, and that email will be used for further Session tracking. Once User log-out, Session will be destroyed and User will be redirected to home page.

Creating Node Project

Let’s create a new Node project. Create a new folder and switch to it using the terminal.

Run this command to create a new Node project.

npm init --y

This command will create a new package.json file. Let’s install the required dependency.

npm install --save express express-session body-parser

Once the dependencies are installed, we can proceed to code our app.

How to use Express Session ?

Before heading to actual code, i want to put few words about express-session module. to use this module, you must have to include express in your project. Like for all packages, we have to first include it.

server.js
const express = require('express');
const session = require('express-session');
const app = express();

After this, we have to initialize the session and we can do this by using following.

app.use(session({secret: 'ssshhhhh'}));

Here ‘secret‘ is used for cookie handling etc but we have to put some secret for managing Session in Express.

Now using ‘request‘ variable you can assign session to any variable. Just like we do in PHP using $_SESSION variable. for e.g

var sess;
app.get('/',function(req,res){
    sess=req.session;
    /*
    * Here we have assign the 'session' to 'sess'.
    * Now we can create any number of session variable we want.
    * in PHP we do as $_SESSION['var name'].
    * Here we do like this.
    */

    sess.email; // equivalent to $_SESSION['email'] in PHP.
    sess.username; // equivalent to $_SESSION['username'] in PHP.
});

After creating Session variables like sess.email , we can check whether this variable is set or not in other routers and can track the Session easily.

Tracking session in global variable won’t work with multiple users. This is just for the demonstration.

Project Structure

We are going to put all of Server side code in the server.js file. Front-end code will be placed inside the views folder.
session directory

Here is our Server side code.

server.js
const express = require('express');
const session = require('express-session');
const bodyParser = require('body-parser');
const router = express.Router();
const app = express();

app.use(session({secret: 'ssshhhhh',saveUninitialized: true,resave: true}));
app.use(bodyParser.json());      
app.use(bodyParser.urlencoded({extended: true}));
app.use(express.static(__dirname + '/views'));

var sess; // global session, NOT recommended

router.get('/',(req,res) => {
    sess = req.session;
    if(sess.email) {
        return res.redirect('/admin');
    }
    res.sendFile('index.html');
});

router.post('/login',(req,res) => {
    sess = req.session;
    sess.email = req.body.email;
    res.end('done');
});

router.get('/admin',(req,res) => {
    sess = req.session;
    if(sess.email) {
        res.write(`<h1>Hello ${sess.email} </h1><br>`);
        res.end('<a href='+'/logout'+'>Logout</a>');
    }
    else {
        res.write('<h1>Please login first.</h1>');
        res.end('<a href='+'/'+'>Login</a>');
    }
});

router.get('/logout',(req,res) => {
    req.session.destroy((err) => {
        if(err) {
            return console.log(err);
        }
        res.redirect('/');
    });

});

app.use('/', router);

app.listen(process.env.PORT || 3000,() => {
    console.log(`App Started on PORT ${process.env.PORT || 3000}`);
});

In the code shown above, there are four routers. First, which render the home page, the second router is used for login operation. We are not doing any authentication here for the sake of simplicity.

The third router is used for admin area where the user can only go if he/she is log-in. The fourth and the last router is for session destruction.

Each router checks whether the sess.emailvariable is set or not and that could be set only by logging in through front-end. Here is my HTML code which resides in views directory.

views/index.html
<html>
<head>
<title>Session Management in NodeJS using Node and Express</title>
<script src="//ajax.googleapis.com/ajax/libs/jquery/2.1.1/jquery.min.js"></script>
<script>
$(document).ready(function(){
    var email,pass;
    $("#submit").click(function(){
        email=$("#email").val();
        pass=$("#password").val();
        /*
        * Perform some validation here.
        */
        $.post("/login",{email:email,pass:pass},function(data){
            if(data==='done') {
                window.location.href="/admin";
            }
        });
    });
});
</script>
</head>
<body>
<input type="text" size="40" placeholder="Type your email" id="email"><br />
<input type="password" size="40" placeholder="Type your password" id="password"><br />
<input type="button" value="Submit" id="submit">
</body>
</html>

In jQuery code, we are calling our Router ‘/login’ and redirecting it to the ‘admin‘ if log-in is successful, you can add validation to fields as per your requirement, for demo purpose i have not added any.

The Bug Alert!

As I have mentioned earlier, using a global variable for the session won’t work for multiple users. You will receive the same session information for all of the users.

So how do we solve this? By using a session store.

We save every session in the store so that one session will belong to the one user only. I have explained and build session store using Redis in this article.

For the quick reference, he is how we can extend the code shown above using Redis as a session store.

First, you need to install Redis on your computer. Click here to learn how to install Redis.

Then, install these dependencies in your project.

npm i --S redis connect-redis

Here is the codebase after upgrading it to support Redis.

server.js
/*
 * Manage Session in Node.js and ExpressJS
 * Author : Shahid Shaikh
 * Version : 0.0.2
*/

const express = require('express');
const session = require('express-session');
const bodyParser = require('body-parser');
const redis = require('redis');
const redisStore = require('connect-redis')(session);
const client  = redis.createClient();
const router = express.Router();
const app = express();

app.use(session({
    secret: 'ssshhhhh',
    // create new redis store.
    store: new redisStore({ host: 'localhost', port: 6379, client: client,ttl : 260}),
    saveUninitialized: false,
    resave: false
}));

app.use(bodyParser.json());      
app.use(bodyParser.urlencoded({extended: true}));
app.use(express.static(__dirname + '/views'));

router.get('/',(req,res) => {
    let sess = req.session;
    if(sess.email) {
        return res.redirect('/admin');
    }
    res.sendFile('index.html');
});

router.post('/login',(req,res) => {
    req.session.email = req.body.email;
    res.end('done');
});

router.get('/admin',(req,res) => {
    if(req.session.email) {
        res.write(`<h1>Hello ${req.session.email} </h1><br>`);
        res.end('<a href='+'/logout'+'>Logout</a>');
    }
    else {
        res.write('<h1>Please login first.</h1>');
        res.end('<a href='+'/'+'>Login</a>');
    }
});

router.get('/logout',(req,res) => {
    req.session.destroy((err) => {
        if(err) {
            return console.log(err);
        }
        res.redirect('/');
    });

});

app.use('/', router);

app.listen(process.env.PORT || 3000,() => {
    console.log(`App Started on PORT ${process.env.PORT || 3000}`);
});

If you notice in the code shown above, we have removed the global variable. We are using Redis to store our session instead. Try this multiple users and you should see unique session for each user.

I highly recommend following this article for more detailed information.

How to run example code

Download code and extract the zip file. Open your command prompt or Terminal and switch to the directory. Install dependency first by using.

npm install

Then run code using

node server.js

Visit localhost:3000 to view the app.

Session Using Node and Redis

Conclusion:

Like I mentioned session is very important for any web application. Node.js allows us to create an HTTP server and HTTP is a stateless protocol. It stores no information about previous visit and Express solves this problem very beautifully.

Further reading

Nodejs tutorials
Node.js MySQL Tutorial
Programming a Voice Controlled Drone Using Node and ARDrone

MySQL InnoDB Cluster - Enabling MySQL TDE with Rolling Restart

$
0
0
MySQL InnoDB Cluster + Enabling Transparent Data Encryption

Always-On service is very important for Today businesses.   MySQL High Availability using MySQL InnoDB Cluster provides Easy-to-setup/configure/use to allow Data to be ALWAYS available.

Data Protection is also one of the Key elements for Today.

With MySQL InnoDB Cluster, the article is written to provide a Tour how to ENABLE MySQL Transparent Data Encryption (TDE) on a running 3-Nodes MySQL InnoDB Cluster.


The full setup/demo Video is posted on YOUTUBE
Video : MySQL InnoDB Cluster with TDE + Encrypted File KeyRing Plugin


Link :   https://youtu.be/_Mrnl7fE-KA


Demo Landscape  


MySQL Version : 8.0.15 Enterprise Edition
Operating System :  Oracle Linux 7.6
MySQL Shell : 8.0.15

MySQL TDE keyring Plugin : keyring-encrypted-file-plugin
https://dev.mysql.com/doc/mysql-security-excerpt/8.0/en/keyring-encrypted-file-plugin.html

3 Instances of MySQL Running on the same VM (hostname : node1)
Configuration Files (my1.cnf, my2.cnf and my3.cnf) are attached in this blog.


Instance A Instance B Instance C
Port 3310 3320 3330
DataDir data/3310 data/3320 data/3330
keyring_encrypted_file_data password password password


The diagram to show a 3-nodes MySQL InnoDB Cluster Status from 'MySQL Shell'


MySQL Router is setup to connect to the MySQL InnoDB Cluster where :

Port 6446 is for R/W Primary Node(s) access
A while-loop script is running at the TERMINAL to continuously access port 6446 for a Primary Node access :
# while [ 1 ]; do sleep 1; mysql -ugradmin -pgrpass -h127.0.0.1 -P6446 -e "select @@hostname, @@port;"; done


It shows the CONNECTION always connecting to the PRIMARY node [port :3310].

Port 6447 is for R/O Secondary Node(s) access 
A while-loop script is running at the TERMINAL to continuously access port 6447 for a Primary Node access :
# while [ 1 ]; do sleep 1; mysql -ugradmin -pgrpass -h127.0.0.1 -P6447 -e "select @@hostname, @@port;"; done


It shows the CONNECTION always connecting to the SECONDARY nodes [port :3320 and 3330].

Enabling Transparent Data Encryption
The concept is to RESTART the nodes with "keyring_encypted_file.so"  plugin from MySQL Enterprise Edition.   This is done by having the ROLLING RESTART from the R/O nodes first and finally the PRIMARY node.

Steps
1.   Shutdown the R/O node - 3330
2.   Modify the my3.cnf to add the following in [mysqld] section
early-plugin-load=keyring_encrypted_file.so
keyring_encrypted_file_data=/home/mysql/data/3330/mysql-keyring/keyring-encrypted
keyring_encrypted_file_password=password

3.  Start up the R/O node - 3330 [The node should rejoin the InnoDB Cluster AUTOMATICALLY ]

4.  Repeat the Step [2] and Step [3] for Node - 3320
my2.cnf changes :
early-plugin-load=keyring_encrypted_file.so
keyring_encrypted_file_data=/home/mysql/data/3320/mysql-keyring/keyring-encrypted
keyring_encrypted_file_password=password

5.  Repeat the Step [2] and Setp [3] for Node - 3310
my1.cnf changes :
early-plugin-load=keyring_encrypted_file.so
keyring_encrypted_file_data=/home/mysql/data/3320/mysql-keyring/keyring-encrypted
keyring_encrypted_file_password=password

At this point, the PRIMARY Node should be switched to another node because the Node1:3310 was 'shutdown'.   

 **** The 3 Nodes MySQL InnoDB Cluster with TDE enabled *****


Switching the PRIMARY node to node1:3310

mysqlsh>\connect gradmin:grpass@node1:3320
mysqlsh>var x = dba.getCluster()
mysqlsh> x.setPrimaryInstance('node1:3310')


Creating Table for TESTING 'TDE'
- Create ONE TABLE mydb.mytable - No TDE
- Create ONE TABLE mydb.mytable_enc - TDE enabled.

On PRIMARY Node (RW) :
mysql>  create database if not exists mydb;
mysql>  create table mydb.mytable (f1 int not null primary key, f2 varchar(200));
mysql>  create table mydb.mytable_enc (f1 int not null primary key, f2 varchar(200)) encryption='Y';

INSERTING few rows of data to both table.

mysql> insert into mydb.mytable values (1, 'hello world'), (2, 'hello world'), (3, 'hello world');


Checking the InnoDB Data File on mytable.ibd and mytable_enc.ibd
# strings <datafolder>/mydb/mytable_enc.ibd|grep hello


We can easily see data is actually exposed as plain text.

With MySQL Transparent Data Encryption (TDE) enabled for table : mytable_enc


A full screen shot with command
# strings <datafolder>/mydb/mytable_enc.ibd


What about the KEYS in the encrypted key store for 3 nodes

 The HEXDUMP for 3310 encrypted key file as shown :


 The HEXDUMP for 3320 encrypted key file as shown :


 The HEXDUMP for 3330 encrypted key file as shown :


ALL keys are different.   It means that those Data Files across different nodes will be physically different but LOGICALLY - they have the same data content.


Example Configuration files 

Configuration [my1.cnf]
[mysqld]
datadir=/home/mysql/data/3310
basedir=/usr/local/mysql
log-error=/home/mysql/data/3310/my.error
port=3310
socket=/home/mysql/data/3310/my.sock
mysqlx-port=33100
mysqlx-socket=/home/mysql/data/3310/myx.sock
log-bin=logbin
relay-log=logrelay
binlog-format=row
binlog-checksum=NONE
server-id=101

# enable gtid
gtid-mode=on
enforce-gtid-consistency=true
log-slave-updates=true

# Table based repositories
master-info-repository=TABLE
relay-log-info-repository=TABLE

# Extraction Algorithm
transaction-write-set-extraction=XXHASH64

secure-file-priv=NULL
early-plugin-load=keyring_encrypted_file.so
keyring_encrypted_file_data=/home/mysql/data/3310/mysql-keyring/keyring-encrypted
keyring_encrypted_file_password=password


Configuration [my2.cnf]
[mysqld]
datadir=/home/mysql/data/3320
basedir=/usr/local/mysql
log-error=/home/mysql/data/3320/my.error
port=3320
socket=/home/mysql/data/3320/my.sock
mysqlx-port=33200
mysqlx-socket=/home/mysql/data/3320/myx.sock
log-bin=logbin
relay-log=logrelay
binlog-format=row
binlog-checksum=NONE
server-id=102

# enable gtid
gtid-mode=on
enforce-gtid-consistency=true
log-slave-updates=true

# Table based repositories
master-info-repository=TABLE
relay-log-info-repository=TABLE

# Extraction Algorithm
transaction-write-set-extraction=XXHASH64

secure-file-priv=NULL
early-plugin-load=keyring_encrypted_file.so
keyring_encrypted_file_data=/home/mysql/data/3320/mysql-keyring/keyring-encrypted
keyring_encrypted_file_password=password


Configuration [my3.cnf]

[mysqld]
datadir=/home/mysql/data/3330
basedir=/usr/local/mysql
log-error=/home/mysql/data/3330/my.error
port=3330
socket=/home/mysql/data/3330/my.sock
mysqlx-port=33300
mysqlx-socket=/home/mysql/data/3330/myx.sock
log-bin=logbin
relay-log=logrelay
binlog-format=row
binlog-checksum=NONE
server-id=103

# enable gtid
gtid-mode=on
enforce-gtid-consistency=true
log-slave-updates=true

# Table based repositories
master-info-repository=TABLE
relay-log-info-repository=TABLE

# Extraction Algorithm
transaction-write-set-extraction=XXHASH64

secure-file-priv=NULL
early-plugin-load=keyring_encrypted_file.so
keyring_encrypted_file_data=/home/mysql/data/3330/mysql-keyring/keyring-encrypted
keyring_encrypted_file_password=password


Upcoming Webinar Wed 4/10: Extending and Customizing Percona Monitoring and Management

$
0
0
Percona Monitoring and Management 1.17.0

Percona Monitoring and Management 1.17.0Please join Percona’s Product Manager, Michael Coburn, as he presents his talk Extending and Customizing Percona Monitoring and Management on April 10th, 2019 at 10:00 AM PDT (UTC-7) / 1:00 PM EDT (UTC-4).

Register Now

Do you already run stock PMM in your environment and want to learn how you extend the PMM platform? If so, come learn about:

1. Dashboard Customizations
* How to create a custom dashboard from existing graphs, or build Cross Server Dashboards
2. External Exporters – Monitor any service, anywhere!
* Adding an exporter, view the data in data exploration, to deploying a working Dashboard
3. Working with custom queries (MySQL and PostgreSQL)
* Execute SELECT statements against your database and store in Prometheus
* Build Dashboards relevant to your environment
4. Customizing Exporter Options
* Enable deactivated functionality that applies to your environment
5. Using Grafana Alerting
* Moreover, how to set up channels (SMTP, Slack, etc)
* What’s more, how to configure thresholds and alerts
6. Using MySQL/PostgreSQL Data Source
* Also, execute SELECT statements against your database and plot your application metrics

In order to learn more, register for Extending and Customizing Percona Monitoring and Management.

Putting the 'Fun' In Functional Indexes

$
0
0
I gave a thirty minute talk at Drupalcon this week on the features in MySQL 8.0 that would be of interest to developers and for such a short talk (and I cut slides to allow for audience questions) I could only cover the highlights. One attendee gently chastised me over no including their favorite new MySQL 8.0 feature -- functional indexes.


What is a Functional Index?


The manual says MySQL 8.0.13 and higher supports functional key parts that index expression values rather than column or column prefix values. Use of functional key parts enables indexing of values not stored directly in the table.   

There are some cool examples in the documentation on setting up some functional indexes, as can seen below.

CREATE TABLE t1 (
  col1 INT, col2 INT, 
  INDEX func_index ((ABS(col1)))
);
CREATE INDEX idx1 ON t1 ((col1 + col2));
CREATE INDEX idx2 ON t1 ((col1 + col2), (col1 - col2), col1);
ALTER TABLE t1 ADD INDEX ((col1 * 40) DESC);

But there are no example queries or examples with query plans provided.  So let us add some data.

select * from t1 where (col1 + col2) ;
+------+------+
| col1 | col2 |
+------+------+
|   10 |   10 |
|   20 |   11 |
|   30 |   12 |
|   40 |   15 |
|   50 |   18 |
+------+------+
5 rows in set (0.0008 sec)

And then lets look at a query plan.

explain select * from t1 where (col1 + col2) > 40\G
*************************** 1. row ***************************
           id: 1
  select_type: SIMPLE
        table: t1
   partitions: NULL
         type: range
possible_keys: idx1
          key: idx1
      key_len: 9
          ref: NULL
         rows: 3
     filtered: 100
        Extra: Using where
1 row in set, 1 warning (0.0006 sec)
Note (code 1003): /* select#1 */ 
select `so`.`t1`.`col1` AS `col1`,
`so`.`t1`.`col2` AS `col2` 
from `so`.`t1` 
where ((`so`.`t1`.`col1` + `so`.`t1`.`col2`) > 40)

explain select * from t1 where (col1 * 40) > 90\G
*************************** 1. row ***************************
           id: 1
  select_type: SIMPLE
        table: t1
   partitions: NULL
         type: range
possible_keys: functional_index
          key: functional_index
      key_len: 9
          ref: NULL
         rows: 5
     filtered: 100
        Extra: Using where
1 row in set, 1 warning (0.0006 sec)
Note (code 1003): /* select#1 */ 
select `so`.`t1`.`col1` AS `col1`,`so`.`t1`.`col2` AS `col2` 
 from `so`.`t1` where ((`so`.`t1`.`col1` * 40) > 90)

It is interesting to note that in the above case we are told the key's name is 'functional_index' (this is the one created by the ALTER TABLE command and not explicitly given a name).  


Implementation


Functional indexes are implemented as hidden virtual generated columns which means you will have to follow the rules for virtual generated columns And while this functional index takes up no space because virtual generated columns are only computed at select time the index itself does take up space.

Be sure to read the manual for all the restrictions and limitations.


Do They Work With JSON Data?


Well, yes, functional indexes do work with JSON data.  Once again the manual provides an interesting example.

 CREATE TABLE employees (
data JSON, INDEX idx ((CAST(data->>"$.name" AS CHAR(30)) COLLATE utf8mb4_bin)));INSERT INTO employees VALUES ('{ "name": "james", "salary": 9000 }'), ('{ "name": "James", "salary": 10000 }'), ('{ "name": "Mary", "salary": 12000 }'), ('{ "name": "Peter", "salary": 8000 }');
EXPLAIN SELECT * FROM employees WHERE data->>'$.name' = 'James';
*************************** 1. row *************************** id: 1 select_type: SIMPLE table: employees partitions: NULL type: ref possible_keys: idx key: idx key_len: 123 ref: const rows: 1 filtered: 100 Extra: NULL 1 row in set, 1 warning (0.0008 sec) Note (code 1003): /* select#1 */
select `so`.`employees`.`data` AS `data`
from `so`.`employees`
where ((cast(json_unquote(json_extract(`so`.`employees`.`data`,_utf8mb4'$.name'))
as char(30) charset utf8mb4) collate utf8mb4_bin) = 'James')

And we can see that it does use the index idx that was defined.


States


One of the examples you will see from other databases for functional indexes include
forcing lower case names. So I created a table with US state names.

create table states (id int, name char(30), primary key (id));

I did find that the syntax was a little fussy on creating the index as it needed an extra set of
parenthesis more than I originally thought it would

create index state_name_lower on states ((lower(name)));


explain select name from states where name = 'texas'\G
*************************** 1. row ***************************
           id: 1
  select_type: SIMPLE
        table: states
   partitions: NULL
         type: ref
possible_keys: state_name
          key: state_name
      key_len: 121
          ref: const
         rows: 1
     filtered: 100
        Extra: Using where; Using index
1 row in set, 1 warning (0.0008 sec)
Note (code 1003): /* select#1 */
select `so`.`states`.`name` AS `name`
from `so`.`states` where (`so`.`states`.`name` = 'texas')

So please give functional indexes a try and please let me know if you find an interesting or unusual way to use them.


Install MySQL 8 on Linux with lower_case_table_names = 1

$
0
0

MySQL stores several files on disk. Even in MySQL 8 where the data dictionary is stored in InnoDB tables, there are still all the tablespace files. Different file system behave differently, and one particular challenge is case sensitivity. On Microsoft Windows, the case does not matter, on Linux the case is important, and on macOS the case of the file names is preserved but the operating system by default makes it look like it is case insensitive.

Which convention that is the correct depends on your personal preference and use case. Between case sensitivity and case insensitivity, it basically boils down to whether mydb, MyDB, and MYDB should be the same identifier or three different ones. Since MySQL originally relied on the file system for its data dictionary, the default was to rely on the case sensitivity of the file system. The option lower_case_table_names was introduced to override the behaviour. The most common use is to set lower_case_table_names to 1 on Linux to introduce case insensitive schema and table names.

Dolphin with lower_case_table_names

This blog will first discuss how lower_case_table_names work in MySQL 8 – it is not the same as in earlier versions. Then it will be shown how MySQL 8 can be initialized on Linux to use case insensitive identifiers.

Advice

To use case insensitive identifiers in MySQL 8, the main thing is that you must set lower_case_table_names = 1 in your MySQL configuration file before you initialize the data directory (this happens on the first start when using systemd).

MySQL 8 and lower_case_table_names

In MySQL 8, it is no longer allowed to change the value of the lower_case_table_names option after the data directory has been initialized. This is a safety feature – as described in the reference manual:

It is prohibited to start the server with a lower_case_table_names setting that is different from the setting used when the server was initialized. The restriction is necessary because collations used by various data dictionary table fields are based on the setting defined when the server is initialized, and restarting the server with a different setting would introduce inconsistencies with respect to how identifiers are ordered and compared.

https://dev.mysql.com/doc/refman/en/server-system-variables.html#sysvar_lower_case_table_names

If you try to start MySQL 8 with a different value of lower_case_table_names than MySQL was initialized, you will get an error like (from the MySQL error log):

2019-04-14T03:57:19.095459Z 1 [ERROR] [MY-011087] [Server] Different lower_case_table_names settings for server ('1') and data dictionary ('0').
2019-04-14T03:57:19.097773Z 0 [ERROR] [MY-010020] [Server] Data Dictionary initialization failed.
2019-04-14T03:57:19.098425Z 0 [ERROR] [MY-010119] [Server] Aborting
2019-04-14T03:57:20.784893Z 0 [System] [MY-010910] [Server] /usr/sbin/mysqld: Shutdown complete (mysqld 8.0.15)  MySQL Community Server - GPL.

So what are the steps to initialize MySQL 8 with lower_case_table_names = 1? Let’s go through them.

Installing MySQL 8 with Case Insensitive Identifier Names

There are several ways to install MySQL 8 on Linux. The steps that will be shown here are:

  1. Install the MySQL repository.
  2. Remove previous installations of MySQL or one of its forks.
  3. Clean the data directory.
  4. Install MySQL 8.
  5. Initialize with lower_case_table_names = 1.

The example commands are from Oracle Linux 7 and also works on Red Hat Enterprise Linux (RHEL) 7 and CentOS 7. The MySQL YUM repository will be used. On other Linux distributions the steps will in general be different, but related.

1. Install the MySQL Repository

MySQL provides repositories for several Linux distributions for the Community Edition. You can download the repository definition files from MySQL Community Downloads. The files can also be accessed directly. For this example the YUM repository definition will be downloaded using wget and then installed using yum:

shell$ wget https://dev.mysql.com/get/mysql80-community-release-el7-2.noarch.rpm
--2019-04-14 12:28:31--  https://dev.mysql.com/get/mysql80-community-release-el7-2.noarch.rpm
...
HTTP request sent, awaiting response... 200 OK
Length: 25892 (25K) [application/x-redhat-package-manager]
Saving to: ‘mysql80-community-release-el7-2.noarch.rpm’

100%[===========================================================>] 25,892      --.-K/s   in 0.01s   

2019-04-14 12:28:33 (1.76 MB/s) - ‘mysql80-community-release-el7-2.noarch.rpm’ saved [25892/25892]

shell$ yum install mysql80-community-release-el7-2.noarch.rpm
...

Dependencies Resolved

=====================================================================================================
 Package                      Arch      Version     Repository                                  Size
=====================================================================================================
Installing:
 mysql80-community-release    noarch    el7-2       /mysql80-community-release-el7-2.noarch     31 k

Transaction Summary
=====================================================================================================
Install  1 Package

Total size: 31 k
Installed size: 31 k
Is this ok [y/d/N]: y
Downloading packages:
...
  Installing : mysql80-community-release-el7-2.noarch                                            1/1 
  Verifying  : mysql80-community-release-el7-2.noarch                                            1/1 

Installed:
  mysql80-community-release.noarch 0:el7-2                                                           

Complete!

You can now remove the previous installation (if present) and its files.

2. Remove Previous Installations

MySQL or one of its forks may have been installed beforehand. This may even happen as a dependency of another package. You should never have more than one MySQL or fork installed using the package system (yum or rpm on Oracle Linux, RHEL, and CentOS).

Tip

If you need to install different versions of MySQL side by side, use the tarball distributions.

You want to uninstall the existing packages in such a way that you do not remove the programs that depend on it – otherwise you will have to re-install those later. One option is to use the rpm command with the --nodeps option. On Oracle Linux 7, RHEL 7, and CentOS 7 this may look like:

shell$ rpm -e --nodeps mariadb-server-5.5.56-2.el7.x86_64 mariadb-5.5.56-2.el7.x86_64 mariadb-libs-5.5.56-2.el7.x86_64

You can find out which packages are installed using rpm -qa and pass the output through grep to search for the packages of interest.

The next step is to clean out any existing files left behind.

3. Clean the Data Directory

In order to be able to initialize MySQL in step 5., the data directory must be empty. You can choose to use a non-default location for the data directory, or you can re-use the default location which use /var/lib/mysql. If you want to preserve your old data directory, make sure you back it up first!

Warning

Important: If you want to keep your old data files, make sure you back them up before proceeding! All existing files will be permanently lost during this step.

The data directory may have been removed in step 2., but if it has not, you can remove it using the following command:

shell$ rm -rf /var/lib/mysql

Optionally, you can also remove the error log, and if you store files outside the data directory (for example the binary log files or InnoDB log files), you should also remove those. The error log is located in /var/log/; for other files, you will need to check your configuration file (usually /etc/my.cnf).

You are now ready to install the MySQL 8.

4. Install MySQL 8

You can choose between several packages and patch releases (maintenance releases). It is recommended to install the latest patch release. You can see from the release notes which release is the latest. By default, yum will also install the latest release. Which packages you want to install depends on your requirements. The MySQL reference manual includes a list of the available packages with a description of what they include.

In this example, the following packages will be installed:

  • mysql-community-client: Client applications such as the mysql command-line client.
  • mysql-community-common: Some common files for MySQL programs.
  • mysql-community-libs: Shared libraries using the latest version of the API.
  • mysql-community-libs-compat: Shared libraries using the version of the API corresponding to what RPM packages from the Oracle Linux/RHEL/CentOS repositories that depend on MySQL uses. For Oracle Linux 7, RHEL 7, and CentOS 7 this means version 18 (e.g. libmysqlclient.so.18).
  • mysql-community-server: The actual MySQL Server.
  • mysql-shell: MySQL Shell – the second generation command-line client with devops support. This RPM is not listed in the above reference as it is not part of the MySQL Server RPM bundle, however when using the MySQL YUM repository, it can be installed in the same way as the other RPMs.

The yum command thus becomes:

shell$ yum install mysql-community-{client,common,libs,libs-compat,server} mysql-shell
...

Dependencies Resolved

=====================================================================================================
 Package                           Arch         Version            Repository                   Size
=====================================================================================================
Installing:
 mysql-community-client            x86_64       8.0.15-1.el7       mysql80-community            25 M
 mysql-community-common            x86_64       8.0.15-1.el7       mysql80-community           566 k
 mysql-community-libs              x86_64       8.0.15-1.el7       mysql80-community           2.2 M
 mysql-community-libs-compat       x86_64       8.0.15-1.el7       mysql80-community           2.1 M
 mysql-community-server            x86_64       8.0.15-1.el7       mysql80-community           360 M
 mysql-shell                       x86_64       8.0.15-1.el7       mysql-tools-community       9.0 M

Transaction Summary
=====================================================================================================
Install  6 Packages

Total download size: 400 M
Installed size: 1.8 G
Is this ok [y/d/N]: y
Downloading packages:
...
Retrieving key from file:///etc/pki/rpm-gpg/RPM-GPG-KEY-mysql
Importing GPG key 0x5072E1F5:
 Userid     : "MySQL Release Engineering <mysql-build@oss.oracle.com>"
 Fingerprint: a4a9 4068 76fc bd3c 4567 70c8 8c71 8d3b 5072 e1f5
 Package    : mysql80-community-release-el7-2.noarch (installed)
 From       : /etc/pki/rpm-gpg/RPM-GPG-KEY-mysql
Is this ok [y/N]: y
Running transaction check
Running transaction test
Transaction test succeeded
Running transaction
  Installing : mysql-community-common-8.0.15-1.el7.x86_64                                        1/6 
  Installing : mysql-community-libs-8.0.15-1.el7.x86_64                                          2/6 
  Installing : mysql-community-client-8.0.15-1.el7.x86_64                                        3/6 
  Installing : mysql-community-server-8.0.15-1.el7.x86_64                                        4/6 
  Installing : mysql-community-libs-compat-8.0.15-1.el7.x86_64                                   5/6 
  Installing : mysql-shell-8.0.15-1.el7.x86_64                                                   6/6 
  Verifying  : mysql-community-libs-compat-8.0.15-1.el7.x86_64                                   1/6 
  Verifying  : mysql-community-common-8.0.15-1.el7.x86_64                                        2/6 
  Verifying  : mysql-community-server-8.0.15-1.el7.x86_64                                        3/6 
  Verifying  : mysql-shell-8.0.15-1.el7.x86_64                                                   4/6 
  Verifying  : mysql-community-client-8.0.15-1.el7.x86_64                                        5/6 
  Verifying  : mysql-community-libs-8.0.15-1.el7.x86_64                                          6/6 

Installed:
  mysql-community-client.x86_64 0:8.0.15-1.el7   mysql-community-common.x86_64 0:8.0.15-1.el7       
  mysql-community-libs.x86_64 0:8.0.15-1.el7     mysql-community-libs-compat.x86_64 0:8.0.15-1.el7  
  mysql-community-server.x86_64 0:8.0.15-1.el7   mysql-shell.x86_64 0:8.0.15-1.el7                  

Complete!

Notice how the GPG key for the MySQL YUM repository is downloaded, and you are requested to verify it is the correct key. This happens, because it is the first time the repository is used. You can also manually add the GPG key using the instructions in Signature Checking Using GnuPG.

You are now ready to the final step: configuring and starting MySQL Server for the first time.

5. Initialize with lower_case_table_names = 1

As mentioned in the introduction to this blog, you need to ensure that lower_case_table_names is configured when MySQL initializes its data directory. When you use systemd to start MySQL, it will happen automatically when you start MySQL with an empty data directory. This means, you should update the MySQL configuration file with the desired value of lower_case_table_names before the first start.

The default location for the MySQL configuration file is /etc/my.cnf. Open this file with your favourite editor and ensure the line lower_case_table_names = 1 is listed in the [mysqld] group:

[mysqld]
lower_case_table_names = 1

Optionally, you can make other changes to the configuration as needed.

Tip

Other than a few capacity settings such as innodb_buffer_pool_size and the configuration of the InnoDB redo logs, the default configuration is a good starting point for most installations.

Now, you can start MySQL:

shell$ systemctl start mysqld

This will take a little time as it includes initializing the data directory. Once MySQL has started, you can retrieve the temporary password for the root account from the MySQL error log:

shell$ grep 'temporary password' /var/log/mysqld.log 
2019-04-14T03:29:00.122862Z 5 [Note] [MY-010454] [Server] A temporary password is generated for root@localhost: aLxwMUQr%7C,

The temporary password is randomly generated during the initialization to avoid MySQL being left with a known default password. Use this temporary password to log in and set your permanent root password:

shell$ mysql --user=root --host=localhost --password
Enter password: 
Welcome to the MySQL monitor.  Commands end with ; or \g.
Your MySQL connection id is 9
Server version: 8.0.15

Copyright (c) 2000, 2019, Oracle and/or its affiliates. All rights reserved.

Oracle is a registered trademark of Oracle Corporation and/or its
affiliates. Other names may be trademarks of their respective
owners.

Type 'help;' or '\h' for help. Type '\c' to clear the current input statement.

mysql> ALTER USER root@localhost IDENTIFIED BY 'n3w_$tr0ng_P@s$word';
Query OK, 0 rows affected (0.12 sec)

By default for RPM installations, MySQL has the password validation component installed using the MEDIUM strength policy. This means you will need to use a relatively strong password.

You can now verify that MySQL uses case insensitive schema and table identifiers:

mysql> SELECT @@global.lower_case_table_names;
+---------------------------------+
| @@global.lower_case_table_names |
+---------------------------------+
|                               1 |
+---------------------------------+
1 row in set (0.00 sec)

mysql> SELECT VARIABLE_SOURCE, VARIABLE_PATH
         FROM performance_schema.variables_info
        WHERE VARIABLE_NAME = 'lower_case_table_names';
+-----------------+---------------+
| VARIABLE_SOURCE | VARIABLE_PATH |
+-----------------+---------------+
| GLOBAL          | /etc/my.cnf   |
+-----------------+---------------+
1 row in set (0.01 sec)

mysql> CREATE SCHEMA db1;
Query OK, 1 row affected (0.03 sec)

mysql> use DB1;
Database changed
mysql> CREATE TABLE t1 (id int unsigned NOT NULL PRIMARY KEY);
Query OK, 0 rows affected (0.47 sec)

mysql> INSERT INTO T1 VALUES (1);
Query OK, 1 row affected (0.05 sec)

mysql> SELECT * FROM t1;
+----+
| id |
+----+
|  1 |
+----+
1 row in set (0.01 sec)

The query in lines 9-11 queries what the source of the value of the lower_case_table_names option is. This shows that the value of 1 (from the previous query) is picked up from the /etc/my.cnf file. The rest of the queries show how the db1 schema and the db1.t1 table can be accessed both using lower and upper case.

That is it. Now you can use MySQL Server without having to remember which case was used when a schema object was created.

Fun with Bugs #83 - On MySQL Bug Reports I am Subscribed to, Part XIX

$
0
0
I have not much yet to say on a popular topic of upgrading everything to MySQL 8, so let me just continue reviewing public MySQL bug reports that I've subscribed to recently. After my previous post at least one bug, Bug #94747, got enough comments and clarifications (up to specific commit that introduced this regression pointed out by Daniel Black!) to have it re-classified and verified as InnoDB code bug. So, I see good reasons to continue attracting wide public attention to selected MySQL bugs - this helps to make MySQL better eventually.

As usual, I start from the oldest bug reports:
  • Bug #94758 - "record with REC_INFO_MIN_REC_FLAG is not the min record on non-leaf page". It was reported by a well known person, Zhai Weixiang, who contributed a lot to MySQL code and quality. This time he added a function to the code to prove his point and show that data may be stored in an unexpected order on the root node of InnoDB table. For this very reason (Oracle's code modified to show the problem) this report was marked as "Not a Bug". This is weird, one may prove the point by checking memory with gdb if needed (or maybe by checking data pages on disk as well), without any code modifications.
  • Bug #94775 - "Innodb_row_lock_current_waits status variable incorrect values on idle server". If you read this bug report by Uday Sitaram you can find out a statement that some status variables, like Innodb_row_lock_current_waits, are designed to be "fuzzy", so no matter what value you may see it's probably not a bug. Very enlightening!
  • Bug #94777 - "Question about the redo log write_ahead_buffer". One may argue that public bugs database is not a proper place to ask questions, but in this case Chen Zongzhi actually proved that MySQL 8.0 works better and started up some discussion that reveal probably a real bug (see comments starting from this one, "[5 Apr 15:59] Inaam Rana "). So, even if "Not a Bug" status is correct for the original finding, it seems there is something to study and we have a hope this study happens elsewhere (although I'd prefer to see this or new public bug report for this "Verified").
  • Bug #94797 - "Auto_increment values may decrease when adding a generated column". I can not reproduce this problem reported by Fengchun Hua with MariaDB 10.1.x. My related comments in the bug remain hidden and I've already agreed not to make any such comments in the bugs database. So, for now we have a "Verified" bug in MySQL 5.7.
  • Bug #94800 - "Lost connection (for Debug version) or wrong result (for release version)". According to my tests, MariaDB 10.3.7 is not affected by this bug reported by Weidong Yu, who had also suggested a fix. See also his Bug #94802 - "The behavior between insert stmt and "prepare stmt and execute stmt" different ". (MariaDB 10.3.7 is also not affected).
  • Bug #94803 - "rpl sql_thread may broken due to XAER_RMFAIL error for unfinished xa transaction". This bug reported by Dennis Gao is verified based on code review, but we still do not know if any major version besides 5.7 is affected.
  • Bug #94814 - "slave replication lock wait timeout because of wrong trx order in binlog file". Yet another case when XA transactions may break replication was found by Zhenghu Wen. The bug is still "Open" and I am really interested to see it properly processed soon.
  • Bug #94816 - "Alter table results in foreign key error that appears to drop referenced table". From reading this report I conclude that MySQL 5.7.25 (and Percona Server 5.7.25-28, for that matter) is affected (src table disappears) and this was verified, but still the bug ends up as "Can't repeat" (?) with a statement that there is a fix in MySQL 8.0 that can not be back ported. This is rally weird, as we have plenty of bugs NOT affecting 8.0 but verified as valid 5.7.x bugs. Moreover, I've verified that in case of MySQL 8.0.x ref table just can not be created:
    mysql> create table ref (
        -> a_id int unsigned not null,
        -> b_id int unsigned not null,
        ->
        -> constraint FK_ref_a_b foreign key (b_id,a_id) references src (b_id,a_id)
        -> ) engine=InnoDB;
    ERROR 1822 (HY000): Failed to add the foreign key constraint. Missing index for constraint 'FK_ref_a_b' in the referenced table 'src'
    But it means the test case does not apply to 8.0 "as is", that MySQL 8.0 is not affected, but from the above it's not obvious if there is a fix to back port at all. As a next step I tried essentially the same test case on MariaDB 10.3 and ended up with a crash that I've reported as MDEV-19250. So, this bug report that was not even accepted by Oracle MySQL team ended up as a source of a useful check and bug report for MariaDB.
  • Bug #94835 - "debug-assert while restarting server post install component". This is a classical Percona style bug report from Krunal Bauskar. Percona engineers carefully work on debug builds and find many unique new bugs that way.
  • Bug #94850 - "Not able to import partitioned tablespace older than 8.0.14". This regression bug (for cases when lower_case_table_names=1) was reported by Sean Ren.
  • Bug #94858 - "Deletion count incorrect when rows deleted through multi-hop foreign keys". I've checked that MariaDB 10.3 is also affected by this bug reported by Sawyer Knoblich.
  • Bug #94862 - "MySQL optimizer scan full index for max() on indexed column." Nice bug report from Seunguck Lee. As one can easily check MariaDB is not affected:
    MariaDB [test]> explain select max(fd2) from test;
    +------+-------------+-------+------+---------------+------+---------+------+------+------------------------------+
    | id   | select_type | table | type | possible_keys | key  | key_len | ref  | rows | Extra                        |
    +------+-------------+-------+------+---------------+------+---------+------+------+------------------------------+
    |    1 | SIMPLE      | NULL  | NULL | NULL          | NULL | NULL    | NULL | NULL | Select tables optimized away |
    +------+-------------+-------+------+---------------+------+---------+------+------+------------------------------+
    1 row in set (0,001 sec)

    MariaDB [test]> explain select get_timestamp(max(fd2)) from test;
    +------+-------------+-------+------+---------------+------+---------+------+------+------------------------------+
    | id   | select_type | table | type | possible_keys | key  | key_len | ref  | rows | Extra                        |
    +------+-------------+-------+------+---------------+------+---------+------+------+------------------------------+
    |    1 | SIMPLE      | NULL  | NULL | NULL          | NULL | NULL    | NULL | NULL | Select tables optimized away |
    +------+-------------+-------+------+---------------+------+---------+------+------+------------------------------+
    1 row in set (0,001 sec)

    MariaDB [test]> select version();
    +-----------------+
    | version()       |
    +-----------------+
    | 10.3.14-MariaDB |
    +-----------------+
    1 row in set (0,000 sec)
  • Bug #94881 - "slave replication lock wait timeout because of supremum record". I fail to understand why this bug report from Zhenghu Wen ended up as "Closed". There is a detailed enough code analsys, but no test case to just copy/paste. The problem happens only with XA transactions and it's not clear if recent MySQL 5.7.25 is also affected. It means the bug can be in "Need Feedback" or even "Can't Repeat", but I see zero reasons to close it at the moment. Looks very wrong to me.
  • Bug #94903 - "optimizer chooses inefficient plan for order by + limit in subquery". It seems recently a lot of efforts from both bug reporter (Василий Лукьянчиков in this case) and even Oracle developer (Guilhem Bichot in this case) may be needed to force proper processing of the real bug.
It may take more than one drum of a good single malt to keep up with recent style of MySQL bugs processing...
* * *
To summarize:
  1. Attracting public attention of MySQL community users (via blog posts in this series or by any other means) to some MySQL bugs still helps to get them processed properly.
  2. Oracle MySQL engineers who work on bugs continue to refuse further processing of some valid bug reports based on formal and not entirely correct assumptions. In some cases I clearly miss checks for possible regressions vs older versions.
  3. As I already stated, Oracle does not seem to care much about bugs in XA transactions and possible replication problems they may cause.
  4. I encourage community users to share their findings and concerns in public MySQL bugs database. Even if they end up as "Not a Bug", they may still start useful discussions and fixes.
  5. By the way, my comment about the related discussion in MariaDB MDEV-15641 is still private in Bug #94610. This is unfortunate.

Simple KeepaliveD set up

$
0
0
So keepalived has been around for quite a while now .... however it is still a mystery to many.
So this is a very simple example of how keepalived can work with MySQL. Hopefully, this can help those with questions.

We will have a Simple master to slave set up. Meaning.. we write to one unless we have failover to the second for some event.

1st - install keepalived


# yum search keepalived
keepalived.x86_64 : Load balancer and high availability service

  Name and summary matches only, use "search all" for everything.
# yum -y install keepalived

You should now have an config file 

# ls -ltr /etc/keepalived/keepalived.conf 

Keep the original as you always backup .. right....
# cp /etc/keepalived/keepalived.conf /etc/keepalived/keepalived.conf.orig

So you need to figure out an ipaddress you can use for your virtual ip.  I picked 192.168.0.123 for this example. 

Next, we will set up a script to be used for our new config file. 

A few things I did here..
I left a .cnf file for keepalived and a log all in the /etc/keepalived.
This makes it simple for the example so you can do this or use your own cnf files.

A script:

cat /etc/keepalived/keepalived_check.sh 
#!/bin/bash

# monitor mysql status

# if this node mysql is dead

# and its slave is alive , then stop its keepalived. The other node will bind the IP.


export MYSQL_HOME=/etc/keepalived/

export PATH=$MYSQL_HOME/bin:$PATH


mysql="/usr/bin/mysql"

mysqladmin="/usr/bin/mysqladmin"

delay_file="$MYSQL_HOME/slave_delay_second.log"

slave_host=$1


ALIVE=$($mysqladmin --defaults-file=$MYSQL_HOME/.my.localhost.cnf  ping | grep alive | wc -l );

REMOTEALIVE=$($mysqladmin --defaults-file=$MYSQL_HOME/.my.remotehost.cnf  ping | grep alive | wc -l );


if [[ $ALIVE -ne 1 ]]

then

#echo "MySQL is down"

        if [[ $REMOTEALIVE -eq 1 ]]

        then

#        echo "Shutdown keep alive "

            systemctl stop keepalived  

#       echo " keepalived stop "

        fi

#else

#echo "MySQL is up"

#date

fi


exit 0 #all done

New config file

cat /etc/keepalived/keepalived.conf
global_defs {


      notification_email {

        anothermysqldba@gmail.com 

      }


      notification_email_from anothermysqldba@gmail.com 

      smtp_server localhost

      smtp_connect_timeout 30


      }


vrrp_script check_mysql {

   script "/etc/keepalived/keepalived_check.sh "

   interval 2

   weight 2

}


vrrp_instance VI_1 {


      state MASTER

      interface enp0s8  # <--- WHAT INTERFACE NAME HOLDS YOUR REAL IP /sbin/ifconfig

        # found with ip link show

      virtual_router_id 51

      priority 101

      advert_int 1

      nopreempt  # only needed on higher priority node

      authentication {

        auth_type PASS

        auth_pass 1111

      }


      track_script {

        check_mysql

      }


      virtual_ipaddress {

        192.168.0.123 

      }


}


This is all great but does it work....

So we have 2 hosts

[root@centosa keepalived]# hostname

centosa

[root@centosb keepalived]# hostname
centosb

Start keepalived  

[root@centosa keepalived]# systemctl status keepalived
● keepalived.service - LVS and VRRP High Availability Monitor
   Loaded: loaded (/usr/lib/systemd/system/keepalived.service; disabled; vendor preset: disabled)
   Active: inactive (dead)
[root@centosa keepalived]# systemctl restart keepalived
[root@centosa keepalived]# systemctl status keepalived
keepalived.service - LVS and VRRP High Availability Monitor
   Loaded: loaded (/usr/lib/systemd/system/keepalived.service; disabled; vendor preset: disabled)
   Active: active (running)

[root@centosa keepalived]# ssh 192.168.0.123 'hostname'
root@192.168.0.123's password: 

centosa

Prove the connections work already

[root@centosa keepalived]# mysql --defaults-file=.my.remotehost.cnf --host=192.168.0.101   -e "select @@hostname"
+------------+
| @@hostname |
+------------+
| centosb    |
+------------+
[root@centosa keepalived]# mysql --defaults-file=.my.remotehost.cnf --host=192.168.0.102   -e "select @@hostname"
+------------+
| @@hostname |
+------------+
| centosa    |
+------------+

Double check that it is running... 

[root@centosa keepalived]# systemctl status keepalived | grep active
   Active: active 

[root@centosb keepalived]# systemctl status keepalived | grep active
   Active: active 

Test current VIP .. stop mysql and watch same VIP change hosts ... 

[root@centosa keepalived]# mysql --defaults-file=.my.remotehost.cnf --host=192.168.0.123   -e "select @@hostname"
+------------+
| @@hostname |
+------------+
| centosa    |
+------------+
[root@centosa keepalived]# systemctl stop mysqld 
[root@centosa keepalived]# mysql --defaults-file=.my.remotehost.cnf --host=192.168.0.123   -e "select @@hostname"
+------------+
| @@hostname |
+------------+
| centosb    |
+------------+


Shows w/ MySQL this week

$
0
0

Just a friendly reminder for the busy week we have ahead of us... Please find below the shows you can find our MySQL staff at:

  • First show where you can fid us at is the Oracle Code in Shenzen, China 2019, April 16, 2019 
    • ​JSON is one of the flexible data for data exchange and storage today. MySQL X-DevAPI introduces a new modern and easy-to-learn way to work with JSON and Relational data. 
    • Do not miss the MySQL session scheduled for 4:05pm - 4:50pm as follows:
      • "NoSQL @ MySQL - Managing JSON Data with reliable and secured MySQL Database" by Ivan Ma, from Oracle MySQL Team & Zhou Yin Wei - Oracle MySQL ACE Director
  • ​Second show is OpenSource 101, Columbia, SC, US, April 18, 2019
    • ​MySQL & Oracle Back-end IT solutions group are together attending this show. Find us at the shared booth in the expo area as well as do not miss following MySQL talk:
      • "MySQL 8.0 New Features" by David Stokes, the MySQL Community Manager (Apr 16@1:30-2:15pm, 1C Conference Room)
  • ​Last conference with MySQL is OpenSource Conference Okinawa, Japan, April 20, 2019
    • ​Do not miss the MySQL talk focused on the newest trends in MySQL development and demonstration of MySQL Document Store with Java App. The talk is given by Yoshiaki Yamasaki, the MySQL GBU.
    • Come to talk to us at our MySQL booth in the expo area as well!
 

How to Deploy Open Source Databases - New Whitepaper

$
0
0

We’re happy to announce that our new whitepaper How to Deploy Open Source Databases is now available to download for free!

Choosing which DB engine to use between all the options we have today is not an easy task. An that is just the beginning. After deciding which engine to use, you need to learn about it and actually deploy it to play with it. We plan to help you on that second step, and show you how to install, configure and secure some of the most popular open source DB engines.

In this whitepaper we are going to explore the top open source databases and how to deploy each technology using proven methodologies that are battle-tested.

Topics included in this whitepaper are …

  • An Overview of Popular Open Source Databases
    • Percona
    • MariaDB
    • Oracle MySQL
    • MongoDB
    • PostgreSQL
  • How to Deploy Open Source Databases
    • Percona Server for MySQL
    • Oracle MySQL Community Server
      • Group Replication
    • MariaDB
      • MariaDB Cluster Configuration
    • Percona XtraDB Cluster
    • NDB Cluster
    • MongoDB
    • Percona Server for MongoDB
    • PostgreSQL
  • How to Deploy Open Source Databases by Using ClusterControl
    • Deploy
    • Scaling
    • Load Balancing
    • Management   

Download the whitepaper today!

ClusterControl
Single Console for Your Entire Database Infrastructure
Find out what else is new in ClusterControl

About ClusterControl

ClusterControl is the all-inclusive open source database management system for users with mixed environments that removes the need for multiple management tools. ClusterControl provides advanced deployment, management, monitoring, and scaling functionality to get your MySQL, MongoDB, and PostgreSQL databases up-and-running using proven methodologies that you can depend on to work. At the core of ClusterControl is it’s automation functionality that lets you automate many of the database tasks you have to perform regularly like deploying new databases, adding and scaling new nodes, running backups and upgrades, and more.

To learn more about ClusterControl click here.

About Severalnines

Severalnines provides automation and management software for database clusters. We help companies deploy their databases in any environment, and manage all operational aspects to achieve high-scale availability.

Severalnines' products are used by developers and administrators of all skill levels to provide the full 'deploy, manage, monitor, scale' database cycle, thus freeing them from the complexity and learning curves that are typically associated with highly available database clusters. Severalnines is often called the “anti-startup” as it is entirely self-funded by its founders. The company has enabled over 32,000 deployments to date via its popular product ClusterControl. Currently counting BT, Orange, Cisco, CNRS, Technicolor, AVG, Ping Identity and Paytrail as customers. Severalnines is a private company headquartered in Stockholm, Sweden with offices in Singapore, Japan and the United States. To see who is using Severalnines today visit, https://www.severalnines.com/company.


A Truly Open Source Database Conference

$
0
0
companies represented by speakers at percona live 2019

Percona Live 2019Many of our regular attendees already know that the Percona Live Open Source Database Conference is not all about Percona software or, indeed, all about Percona. However, with moving to a new city—Austin, TX— we have realized that it’s something we ought to shout out loud and clear. Our conference really is technology agnostic! As long as submissions were related to open source databases then they were candidate for selection.

We have thirteen tracks at this year’s conference including a track entitled “Other Open Source Databases” which we are presenting alongside tracks dedicated to MySQL®, MariaDB®, MongoDB®, and PostgreSQL. And that’s not all. While most talks are technology-oriented, we also have tracks that are highly relevant if you are managing technology aspects of your business. For those still considering the impact of GDPR you’ll be able to hear talks about other issues relating to compliance and data security that you might well want to get to grips with. Or perhaps consider the talks oriented towards business and enterprise. Maybe you are looking to minimize your license costs by moving from proprietary to open source databases? In which case our migration track might be for you. There are five more tracks for you to discover… why not take a look?

We’d like to thank the volunteer conference committee again for their contributions in developing this fantastic, diverse, and intriguing program!

Companies represented by speakers at Percona Live 2019

Also, of course, not all of the talks are given by Percona speakers. As you can see from this graphic at least sixty companies are represented by speakers at the event, including some huge names not just in the open source space but in the tech space as a whole. Anyone heard of Facebook? Uber? Oracle? Walmart? MailChimp? Alibaba… I won’t list all sixty names, but you get the idea! In fact, both Facebook and Alibaba are sponsoring their own tracks at this year’s conference, alongside PingCap presenting a track dedicated to TiDB. Don’t miss out! Our advanced rate registration ends on Sunday April 21 after which the price moves to standard registration rate. Don’t delay…

Register Now

companies represented by speakers at percona live 2019

Sponsors

We base Percona Live events in major cities, use premium venues, and sponsor our own staff to speak…Percona Live is an expensive production and we heavily subsidize the tickets. We are eternally grateful to our sponsors who share the costs of keeping Percona Live special. Without their support it would be very difficult to host an event of this quality and scale.

Diamond sponsors

continuent

VividCortex

Platinum sponsors

Veritas Logo

AWS

Gold sponsors

EnterpriseDB

Silver Sponsors

mysql
altinity
PingCAP
SmartStyle
Alibaba
facebook

Branding sponsors

bloomberg

Media sponsors

Austin Technology Council

Thanks again to all of our sponsors, we appreciate your support!

Shinguz: MariaDB Prepared Statements, Transactions and Multi-Row Inserts

$
0
0

Last week at the MariaDB/MySQL Developer Training we had one participant asking some tricky questions I did not know the answer by heart.

Also MariaDB documentation was not too verbose (here and here).

So time to do some experiments:

Prepared Statements and Multi-Row Inserts

SQL> PREPARE stmt1 FROM 'INSERT INTO `test`.`test` (`data`) VALUES (?), (?), (?)';
Statement prepared
SQL> SET @d1 = 'Bli';
SQL> SET @d2 = 'Bla';
SQL> SET @d3 = 'Blub';
SQL> EXECUTE stmt1 USING @d1, @d2, @d3;
Query OK, 3 rows affected (0.010 sec)
Records: 3  Duplicates: 0  Warnings: 0
SQL> DEALLOCATE PREPARE stmt1;
SQL> SELECT * FROM test;
+----+------+---------------------+
| id | data | ts                  |
+----+------+---------------------+
|  1 | Bli  | 2019-04-15 17:26:22 |
|  2 | Bla  | 2019-04-15 17:26:22 |
|  3 | Blub | 2019-04-15 17:26:22 |
+----+------+---------------------+

Prepared Statements and Transactions

SQL> SET SESSION autocommit=Off;
SQL> START TRANSACTION;
SQL> PREPARE stmt2 FROM 'INSERT INTO `test`.`test` (`data`) VALUES (?)';
Statement prepared

SQL> SET @d1 = 'BliTrx';
SQL> EXECUTE stmt2 USING @d1;
Query OK, 1 row affected (0.000 sec)

SQL> SET @d1 = 'BlaTrx';
SQL> EXECUTE stmt2 USING @d1;
Query OK, 1 row affected (0.000 sec)
SQL> COMMIT;

-- Theoretically we should do a START TRANSACTION; here again...
SQL> SET @d1 = 'BlubTrx';
SQL> EXECUTE stmt2 USING @d1;
Query OK, 1 row affected (0.000 sec)
SQL> ROLLBACK;

SQL> DEALLOCATE PREPARE stmt2;
SQL> SELECT * FROM test;
+----+---------+---------------------+
| id | data    | ts                  |
+----+---------+---------------------+
| 10 | BliTrx  | 2019-04-15 17:33:30 |
| 11 | BlaTrx  | 2019-04-15 17:33:39 |
+----+---------+---------------------+

Prepared Statements and Transactions and Multi-Row Inserts

SQL> SET SESSION autocommit=Off;
SQL> START TRANSACTION;
SQL> PREPARE stmt3 FROM 'INSERT INTO `test`.`test` (`data`) VALUES (?), (?), (?)';
Statement prepared

SQL> SET @d1 = 'Bli1Trx';
SQL> SET @d2 = 'Bla1Trx';
SQL> SET @d3 = 'Blub1Trx';
SQL> EXECUTE stmt3 USING @d1, @d2, @d3;
Query OK, 3 rows affected (0.000 sec)
SQL> COMMIT;

-- Theoretically we should do a START TRANSACTION; here again...
SQL> SET @d1 = 'Bli2Trx';
SQL> SET @d2 = 'Bla2Trx';
SQL> SET @d3 = 'Blub2Trx';
SQL> EXECUTE stmt3 USING @d1, @d2, @d3;
Query OK, 3 rows affected (0.000 sec)
SQL> ROLLBACK;

-- Theoretically we should do a START TRANSACTION; here again...
SQL> SET @d1 = 'Bli3Trx';
SQL> SET @d2 = 'Bla3Trx';
SQL> SET @d3 = 'Blub3Trx';
SQL> EXECUTE stmt3 USING @d1, @d2, @d3;
Query OK, 3 rows affected (0.001 sec)
SQL> COMMIT;

SQL> DEALLOCATE PREPARE stmt3;
SQL> SELECT * FROM test;
+----+----------+---------------------+
| id | data     | ts                  |
+----+----------+---------------------+
|  1 | Bli1Trx  | 2019-04-15 17:37:50 |
|  2 | Bla1Trx  | 2019-04-15 17:37:50 |
|  3 | Blub1Trx | 2019-04-15 17:37:50 |
|  7 | Bli3Trx  | 2019-04-15 17:38:38 |
|  8 | Bla3Trx  | 2019-04-15 17:38:38 |
|  9 | Blub3Trx | 2019-04-15 17:38:38 |
+----+----------+---------------------+

Seems all to work as expected. Now we know it for sure!

Exporting Masked and De-Identified Data from MySQL

$
0
0
In all likelihood your MySQL database contains valuable and sensitive information. Within that database, MySQL protects that data using features such as encryption, access controls, auditing, views, and more. However in many cases you may need to share some of this data, but must at the same time protect that sensitive information.  …

MySQL High Availability Framework Explained – Part III: Failover Scenarios

$
0
0

In this three-part blog series, we introduced a High Availability (HA) Framework for MySQL hosting in Part I, and discussed the details of MySQL semisynchronous replication in Part II. Now in Part III, we review how the framework handles some of the important MySQL failure scenarios and recovers to ensure high availability.

MySQL Failover Scenarios

Scenario 1 – Master MySQL Goes Down

  • The Corosync and Pacemaker framework detects that the master MySQL is no longer available. Pacemaker demotes the master resource and tries to recover with a restart of the MySQL service, if possible.
  • At this point, due to the semisynchronous nature of the replication, all transactions committed on the master have been received by at least one of the slaves.
  • Pacemaker waits until all the received transactions are applied on the slaves and lets the slaves report their promotion scores. The score calculation is done in such a way that the score is ‘0’ if a slave is completely in sync with the master, and is a negative number otherwise.
  • Pacemaker picks the slave that has reported the 0 score and promotes that slave which now assumes the role of master MySQL on which writes are allowed.
  • After slave promotion, the Resource Agent triggers a DNS rerouting module. The module updates the proxy DNS entry with the IP address of the new master, thus, facilitating all application writes to be redirected to the new master.
  • Pacemaker also sets up the available slaves to start replicating from this new master.

Thus, whenever a master MySQL goes down (whether due to a MySQL crash, OS crash, system reboot, etc.), our HA framework detects it and promotes a suitable slave to take over the role of the master. This ensures that the system continues to be available to the applications.

#MySQL High Availability Framework Explained – Part III: Failover ScenariosClick To Tweet

Scenario 2 – Slave MySQL Goes Down

  • The Corosync and Pacemaker framework detects that the slave MySQL is no longer available.
  • Pacemaker tries to recover the resource by trying to restart MySQL on the node. If it comes up, it is added back to the current master as a slave and replication continues.
  • If recovery fails, Pacemaker reports that resource as down – based on which alerts or notifications can be generated. If necessary, the ScaleGrid support team will handle the recovery of this node.
  • In this case, there is no impact on the availability of MySQL services.

Scenario 3 – Network Partition – Network Connectivity Breaks Down Between Master and Slave Nodes

This is a classical problem in any distributed system where each node thinks the other nodes are down, while in reality, only the network communication between the nodes is broken. This scenario is more commonly known as split-brain scenario, and if not handled properly, can lead to more than one node claiming to be a master MySQL which in turn leads to data inconsistencies and corruption.

Let’s use an example to review how our framework deals with split-brain scenarios in the cluster. We assume that due to network issues, the cluster has partitioned into two groups – master in one group and 2 slaves in the other group, and we will denote this as [(M), (S1,S2)].

  • Corosync detects that the master node is not able to communicate with the slave nodes, and the slave nodes can communicate with each other, but not with the master.
  • The master node will not be able to commit any transactions as the semisynchronous replication expects acknowledgement from at least one of the slaves before the master can commit. At the same time, Pacemaker shuts down MySQL on the master node due to lack of quorum based on the Pacemaker setting ‘no-quorum-policy = stop’. Quorum here means a majority of the nodes, or two out of three in a 3-node cluster setup. Since there is only one master node running in this partition of the cluster, the no-quorum-policy setting is triggered leading to the shutdown of the MySQL master.
  • Now, Pacemaker on the partition [(S1), (S2)] detects that there is no master available in the cluster and initiates a promotion process. Assuming that S1 is up to date with the master (as guaranteed by semisynchronous replication), it is then promoted as the new master.
  • Application traffic will be redirected to this new master MySQL node and the slave S2 will start replicating from the new master.

Thus, we see that the MySQL HA framework handles split-brain scenarios effectively, ensuring both data consistency and availability in the event the network connectivity breaks between master and slave nodes.

This concludes our 3-part blog series on the MySQL High Availability (HA) framework using semisynchronous replication and the Corosync plus Pacemaker stack. At ScaleGrid, we offer highly available hosting for MySQL on AWS and MySQL on Azure that is implemented based on the concepts explained in this blog series. Please visit the ScaleGrid Console for a free trial of our solutions.

Learn More About MySQL Hosting

PHP JWT Authentication Tutorial

$
0
0
In this tutorial, we'll learn how to add JWT authentication to our REST API PHP application. We'll see what JWT is and how it works. We'll also see how to get the authorization header in PHP. What is JWT JWT stands for JSON Web Token and comprised of user encrypted information that can be used to authenticate users and exchange information between clients and servers. When building REST API, instead of server sessions commonly used in PHP apps we tokens which are sent with HTTP headers from the server to clients where they are persisted (usually using local storage) then attached to every outgoing request originating from the client to the server. The server checks the token and allow or deny access to the request resource. RESTful APIs are stateless. This means that requests from clients should contain all the necessary information required to process the request. If you are building a REST API application using PHP, you are not going to use the $_SESSION variable to save data about the client's session. This means, we can not access the state of a client (such as login state). In order to solve the issue, the client is responsible for perisiting the state locally and send it to the sever with each request. Since these important information are now persisted in the client local storage we need to protect it from eyes dropping. Enter JWTs. A JWT token is simply a JSON object that has information about the user. For example: { "user": "bob", "email": "bob@email.com", "access_token": "at145451sd451sd4e5r4", "expire_at"; "11245454" } Since thos token can be tampered with to get access to protected resources. For example, a malicious user can change the previous token as follows to access admin only resources on the server: { "user": "administrator", "email": "admin@email.com" } To prevent this situation, we JWTs need to be signed by the server. If the token is changed on the client side, the token's signature will no longer be valid and the server will deny access to the requested resource. How JWT Works JWT tokens are simply encrypted user's information like identifier, username, email and password. When users are successfully logged in the server, the latter will produce and send a JWT token back to the client. This JWT token will be persisted by the client using the browser's local storage or cookies and attached with every outgoing request so if the user requests access to certain protected resources, the token needs to be checked first by the server to allow or deny access. What is PHP-JWT php-jwt is a PHP library that allows you to encode and decode JSON Web Tokens (JWT) in PHP, conforming to RFC 7519. Prerequisites You must have the following prerequsites to be able to follow this tutorial from scratch: You need PHP 7, Composer and MySQL database system installed on your development environment, You need to have basic knowledge of PHP and SQL. Creating the MySQL Database and Table(s) If you have the prerequisites, let's get started by creating the MySQL database. We'll be using the MySQL client installed with the server. Open a terminal and run the following command to invoke the client: $ mysql -u root -p You need to enter your MySQL password when prompted. Next, let's create a database using the following SQL instruction: mysql> create database db; Note: Here we assume you have a MySQL user called root. You need to change that to the name of an existing MySQL user. You can also use phpMyAdmin or any MySQL client you are comfortable with to create the database and SQL tables. Let's now select the db database and create a users table that will hold the users of our application: mysql> use db; mysql> CREATE TABLE IF NOT EXISTS `Users` ( `id` INT AUTO_INCREMENT , `first_name` VARCHAR(150) NOT NULL , `last_name` VARCHAR(150) NOT NULL , `email` VARCHAR(255), `password` VARCHAR(255), PRIMARY KEY (`id`) ); Creating the Project Directory Structure Let's create a simple directory strucutre for our project. In your terminal, navigate to your working directory and create a folder for our project: $ mkdir php-jwt-example $ cd php-jwt-example $ mkdir api && cd api $ mkdir config We first created the project's directory. Next, we created an api folder. Inside it, we created a config folder. Connecting to your MySQL Database in PHP Navigate to the config folder and create a database.php file with the following code: <?php // used to get mysql database connection class DatabaseService{ private $db_host = "localhost"; private $db_name = "mydb"; private $db_user = "root"; private $db_password = ""; private $connection; public function getConnection(){ $this->connection = null; try{ $this->connection = new PDO("mysql:host=" . $this->db_host . ";dbname=" . $this->db_name, $this->db_user, $this->db_password); }catch(PDOException $exception){ echo "Connection failed: " . $exception->getMessage(); } return $this->connection; } } ?> Installing php-jwt Let's now proceed to install the php-jwt library using Composer. In your terminal, run the following command from the root of your project's directory: $ composer require firebase/php-jwt This will donwload the php-jwt library into a vendor folder. You can require the php-jwt library to encode and decode JWT tokens using the following code: <?php require "vendor/autoload.php"; use \Firebase\JWT\JWT; Adding the User Registration API Endpoint Inside the api folder, create a register.php file and add the following code to create a new user in the MySQL database: <?php include_once './config/database.php'; header("Access-Control-Allow-Origin: * "); header("Content-Type: application/json; charset=UTF-8"); header("Access-Control-Allow-Methods: POST"); header("Access-Control-Max-Age: 3600"); header("Access-Control-Allow-Headers: Content-Type, Access-Control-Allow-Headers, Authorization, X-Requested-With"); $firstName = ''; $lastName = ''; $email = ''; $password = ''; $conn = null; $databaseService = new DatabaseService(); $conn = $databaseService->getConnection(); $data = json_decode(file_get_contents("php://input")); $firstName = $data->first_name; $lastName = $data->last_name; $email = $data->email; $password = $data->password; $table_name = 'Users'; $query = "INSERT INTO " . $table_name . " SET first_name = :firstname, last_name = :lastname, email = :email, password = :password"; $stmt = $conn->prepare($query); $stmt->bindParam(':firstname', $firstName); $stmt->bindParam(':lastname', $lastName); $stmt->bindParam(':email', $email); $password_hash = password_hash($password, PASSWORD_BCRYPT); $stmt->bindParam(':password', $password_hash); if($stmt->execute()){ http_response_code(200); echo json_encode(array("message" => "User was successfully registered.")); } else{ http_response_code(400); echo json_encode(array("message" => "Unable to register the user.")); } ?> Adding the User Login API Endpoint Inside the api folder, create a login.php file and add the following code to check the user credentials and return a JWT token to the client: <?php include_once './config/database.php'; require "../vendor/autoload.php"; use \Firebase\JWT\JWT; header("Access-Control-Allow-Origin: *"); header("Content-Type: application/json; charset=UTF-8"); header("Access-Control-Allow-Methods: POST"); header("Access-Control-Max-Age: 3600"); header("Access-Control-Allow-Headers: Content-Type, Access-Control-Allow-Headers, Authorization, X-Requested-With"); $email = ''; $password = ''; $databaseService = new DatabaseService(); $conn = $databaseService->getConnection(); $data = json_decode(file_get_contents("php://input")); $email = $data->email; $password = $data->password; $table_name = 'Users'; $query = "SELECT id, first_name, last_name, password FROM " . $table_name . " WHERE email = ? LIMIT 0,1"; $stmt = $conn->prepare( $query ); $stmt->bindParam(1, $email); $stmt->execute(); $num = $stmt->rowCount(); if($num > 0){ $row = $stmt->fetch(PDO::FETCH_ASSOC); $id = $row['id']; $firstname = $row['first_name']; $lastname = $row['last_name']; $password2 = $row['password']; if(password_verify($password, $password2)) { $secret_key = "YOUR_SECRET_KEY"; $issuer_claim = "THE_ISSUER"; $audience_claim = "THE_AUDIENCE"; $issuedat_claim = TIME_IN_SECONDS; // issued at $notbefore_claim = TIME_IN_SECONDS; //not before $token = array( "iss" => $issuer_claim, "aud" => $audience_claim, "iat" => $issuedat_claim, "nbf" => $notbefore_claim, "data" => array( "id" => $id, "firstname" => $firstname, "lastname" => $lastname, "email" => $email )); http_response_code(200); $jwt = JWT::encode($token, $secret_key); echo json_encode( array( "message" => "Successful login.", "jwt" => $jwt )); } else{ http_response_code(401); echo json_encode(array("message" => "Login failed.", "password" => $password, "password2" => $password2)); } } ?> We now have two restful endpoints for registering and log users in. At this point, you can use a REST client like Postman to intercat with the API. First, start your PHP server using the following command: $ php -S 127.0.0.1:8080 A development server will be running from the 127.0.0.1:8080 address. Let's now, create a user in the database by sending a POST request to the api/register.php endpoint with a JSON body that contains the first_name, last_name, email and password: You should get an 200 HTTP response with a User was successfully registered. message. Next, you need to send a POST request to the /api/login.php endpoint with a JSON body that contains the email and password used for registering the user: You should get a Successful login message with a JWT token. The JWT token needs to be persisted in your browser's local storage or cookies using JavaScript then attached to each send HTTP request to access a protected resource on your PHP server. Protecting an API Endpoint Using JWT Let's now see how we can protected our server endpoints using JWT tokens. Before accessing an endpoint a JWT token is sent with every request from the client. The server needs to decode the JWT and check if it's valid before allowing access to the endpoint. Inside the api folder, create a protected.php file and add the following code: <?php include_once './config/database.php'; require "../vendor/autoload.php"; use \Firebase\JWT\JWT; header("Access-Control-Allow-Origin: *"); header("Content-Type: application/json; charset=UTF-8"); header("Access-Control-Allow-Methods: POST"); header("Access-Control-Max-Age: 3600"); header("Access-Control-Allow-Headers: Content-Type, Access-Control-Allow-Headers, Authorization, X-Requested-With"); $secret_key = "YOUR_SECRET_KEY"; $jwt = null; $databaseService = new DatabaseService(); $conn = $databaseService->getConnection(); $data = json_decode(file_get_contents("php://input")); $authHeader = $_SERVER['HTTP_AUTHORIZATION']; $arr = explode(" ", $authHeader); /*echo json_encode(array( "message" => "sd" .$arr[1] ));*/ $jwt = $arr[1]; if($jwt){ try { $decoded = JWT::decode($jwt, $secret_key, array('HS256')); // Access is granted. Add code of the operation here echo json_encode(array( "message" => "Access granted:", "error" => $e->getMessage() )); }catch (Exception $e){ http_response_code(401); echo json_encode(array( "message" => "Access denied.", "error" => $e->getMessage() )); } } ?> You can now send a POST request with an Authorization header in the following formats: JWT <YOUR_JWT_TOKEN_HERE> Or also using the bearer format: Bearer <YOUR_JWT_TOKEN_HERE> Conclusion In this tutorial, we've seen how to implement JWT authentication in PHP and MySQL.
Viewing all 18783 articles
Browse latest View live


<script src="https://jsc.adskeeper.com/r/s/rssing.com.1596347.js" async> </script>