Laravel 6 CRUD Example | Laravel 6 Tutorial For Beginners is today’s topic. We can upgrade your Laravel’s 6 version by going to this link. Laravel 6 continues the improvements made in Laravel 5.8 by introducing the following features.
- Semantic versioning
- Compatibility with Laravel Vapor,
- Improved authorization responses,
- Job middleware,
- Lazy collections,
- Sub-query improvements,
- The extraction of frontend scaffolding to the laravel/ui Composer package
#Server Requirements For Laravel 6
See the following server requirements to run Laravel 6.
- PHP >= 7.2.0
- BCMath PHP Extension
- Ctype PHP Extension
- JSON PHP Extension
- Mbstring PHP Extension
- OpenSSL PHP Extension
- PDO PHP Extension
- Tokenizer PHP Extension
- XML PHP Extension
#Prerequisites
For this Laravel 6 crud project, I am using the Visual Studio Code as an editor for my project. If you do not know how to set the PHP on VSCode, then we have a perfect tutorial on this blog on how to configure Visual Studio Code For PHP Developers.
Laravel 6 CRUD Tutorial With Example
On this blog, we have already written Laravel 5.6 CRUD, Laravel 5.7 CRUD, Laravel 5.8 CRUD.
You can install Laravel 6 via global installer or using the Composer Create-Project command.
composer create-project --prefer-dist laravel/laravel laravel6
Now, go inside the laravel6 folder. You need to install the frontend dependencies using the following command.
npm install
Step 1: Configure the MySQL Database
I have created the MySQL database called laravel6 and now write the MySQL credentials inside a .env file.
Before creating migrations, we need to set up MySQL database, assuming you know how to create the database using phpmyadmin.
After creating a database, we will add database credentials in our application. Laravel has the .env environment file which will have all the sensitive data like database details, mail driver details, etc.
Because it’s not recommended to save such information directly inside a code (environment files are not limited to just PHP, they are used in all other frameworks).
Values inside a .env file are loaded inside the files from the config directory. A .env file is located at the root of our laravel project.
Whenever you make the changes to a .env file then don’t forget to restart a server ( if you are using laravel dev server) and if you are using the virtual host and changes don’t seem to take effect then just run the php artisan config:clear (This command will clear the configuration cache) in your terminal.
DB_CONNECTION=mysql
DB_HOST=127.0.0.1
DB_PORT=3306
DB_DATABASE=laravel6
DB_USERNAME=root
DB_PASSWORD=root
So now you will be able to connect a MySQL database.
Laravel always ships with the migration files, so you can able to generate the tables in the database using the following command.
php artisan migrate
You will see that three tables will create inside the MySQL Databases.
In Laravel 6, you see one more table called create_failed_jobs_table
![Laravel 6 CRUD Tutorial With Example]()
We will create a CRUD operation on Netflix shows. So a user can create, read, update, and delete the shows from a database. So, let’s create the model and migration files.
Step 2: Create the model and migration files
We have already set up our database, now let’s see at database migrations. Migration is used to save the details about the database table, and it’s the properties, so you don’t have to manually generate all of the tables by going to the database interface or something like phpmyadmin.
We can develop the migrations using artisan with “make: migration” command.
Type the following command to create a model and migration files.
php artisan make:model Show -m
In laravel, the name of a model has to be singular, and the name of the migration should be the plural so it can automatically find a table name.
You can find these migration files inside the database/migrations directory.
Laravel comes with three migrations, namely users, failed_jobs, and the password_resets (all migration files are prepended with a timestamp), which are used for authentication.
If you want to create the migration but have a different table name in mind, then you can explicitly define a table name with “ — create” flag.
It will create the Show.php file and [timestamp]create_shows_table.php migration file.
Now, open a migration file inside the database >> migrations >> [timestamp]create_shows_table file and add the following schema inside it.
When you open a create_books_table.php, you will see two methods, up() and down().
The up() function is used for creating/updating tables, columns, and indexes. The down() function is used for reversing an operation done by up() method.
Inside up() function, We have the Schema: create(‘table_name,’ callback) method which will be used for creating the new table.
Inside a callback, we have $table->bigIncrements(‘id’) which will create the auto_increment integer column with the primary key and argument ‘id’ is the name of a column.
Second is $table->timestamps() which will create the two timestamp columns created_at and updated_at. The created_at will be filled when the row is created and updated_at when the row is updated.
Now, add the following columns.
public function up()
{
        Schema::create('shows', function (Blueprint $table) {
            $table->bigIncrements('id');
            $table->string('show_name');
            $table->string('genre');
            $table->float('imdb_rating');
            $table->string('lead_actor');
            $table->timestamps();
        });
}
Now, create the table in the database using the following command.
php artisan migrate
The command will run the migrations and create defined tables. It will execute the up() function.
If you need to reverse the migrations, you can use the migrate: rollback command which will execute the down() function like php artisan migrate:rollback.
Now, add the fillable property inside Show.php file.
<?php

namespace App;

use Illuminate\Database\Eloquent\Model;

class Show extends Model
{
    protected $fillable = ['show_name', 'genre', 'imdb_rating', 'lead_actor'];
}
We can specify all the properties to modify the behavior of the model.
We can write a $table property which is used to determine a name of the table that this model will interact with in the future operations.
By default, It will define a table name as the plural of the model name, e.g., shows table for Show model and users table for User model.
When you don’t need to use timestamps on your table, then you will also have to specify the $timestamps property and set it to false value in your Model because Laravel expects your table to have the created_at and updated_at timestamp columns.
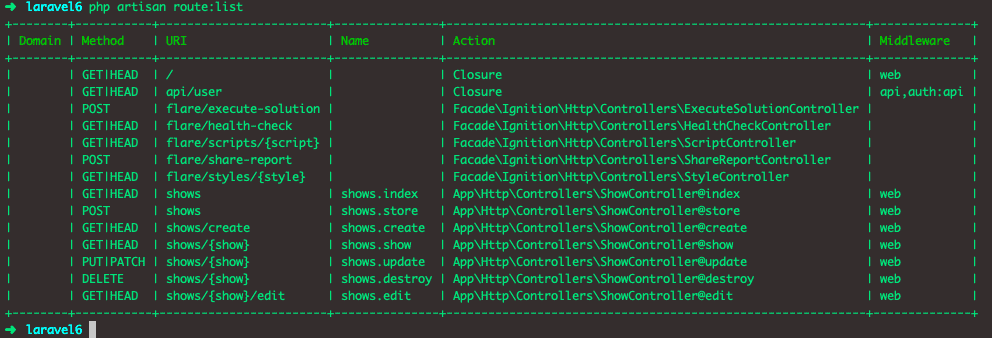
Step 3: Create routes and controller
First, create the ShowController using the following command.
Note that we have also added the — resource flag which will define six methods inside the ShowController namely:
- Index (used for displaying a list of Shows)
- Create (will show the view with a form for creating a Show)
- Store (used for creating a Show inside the database. Note: create method submits to store method)
- Show (will display a specified Show)
- Edit (will show the form for editing a Show. Form will be filled with the existing Show data)
- Update (Used for updating a Show inside the database. Note: edit submits to update method)
- Destroy (used for deleting a specified Show)
Now, inside the routes >> web.php file, add the following line of code.
<?php

// ShowController.php

Route::get('/', function () {
    return view('welcome');
});

Route::resource('shows', 'ShowController');
We can pass dynamic parameters with {} brackets, and you might have noticed that show, update, and destroy has the same url but different methods, so it’s legit.
Just like — resource flag, laravel has a method called resource() that will generate all the above routes. You can also use that method instead of specifying them individually like above.
Actually, by adding the following line, we have registered the multiple routes for our application. We can check it using the following command.
![Laravel 6 Tutorial For Beginners]()
Step 4: Configure Bootstrap 4
Right now, there are some issues, or somehow I do not see any code inside the public >> css >> app.css file. I have already compiled the CSS and JS file by the npm run dev command, but still, the app.css file is empty.
One possible solution is to copy the code of the previous version’s Laravel’s app.css file and paste it here inside the Laravel 6 folder’s public >> css >> app.css file like the following. I have put the link of the previous css file.
https://raw.githubusercontent.com/KrunalLathiya/Laravel58CRUD/master/public/css/app.css
Now, the second possible solution is this. This new scaffolding is only available in Laravel 6 and not in the earlier versions like Laravel 5.8 or 5.7.
While Laravel 6 does not dictate which JavaScript or CSS pre-processors you use, it does provide the essential starting point using Bootstrap and Vue that will be helpful for many projects.
By default, the Laravel uses the NPM to install both of these frontend packages.
Bootstrap and Vue scaffolding provided by Laravel is located in the laravel/ui Composer package, which you can install using Composer via the following command:
composer require laravel/ui --dev
![Configure Bootstrap 4]()
Once the laravel/ui package has been installed, and you may install the frontend scaffolding using the ui Artisan command:
// Generate basic scaffolding...
php artisan ui vue
php artisan ui react

// Generate login / registration scaffolding...
php artisan ui vue --auth
php artisan ui react --auth
Step 5: Create the views
Inside the resources >> views folder, create the following three-view files.
- create.blade.php
- edit.blade.php
- index.blade.php
Inside the views folder, we also need to create the layout file.
So create a file inside the views folder called layout.blade.php. Add the following code inside a layout.blade.php file.
<!DOCTYPE html>
<html lang="en">
<head>
  <meta charset="UTF-8">
  <meta name="viewport" content="width=device-width, initial-scale=1.0">
  <meta http-equiv="X-UA-Compatible" content="ie=edge">
  <title>Laravel 6 CRUD Example</title>
  <link href="{{ asset('css/app.css') }}" rel="stylesheet" type="text/css" />
</head>
<body>
  <div class="container">
    @yield('content')
  </div>
  <script src="{{ asset('js/app.js') }}" type="text/js"></script>
</body>
</html>
So basically, this is our main template file, and all the other view files will extend this layout.blade.php file.
Here, we have already included the Bootstrap 4 by adding the app.css.
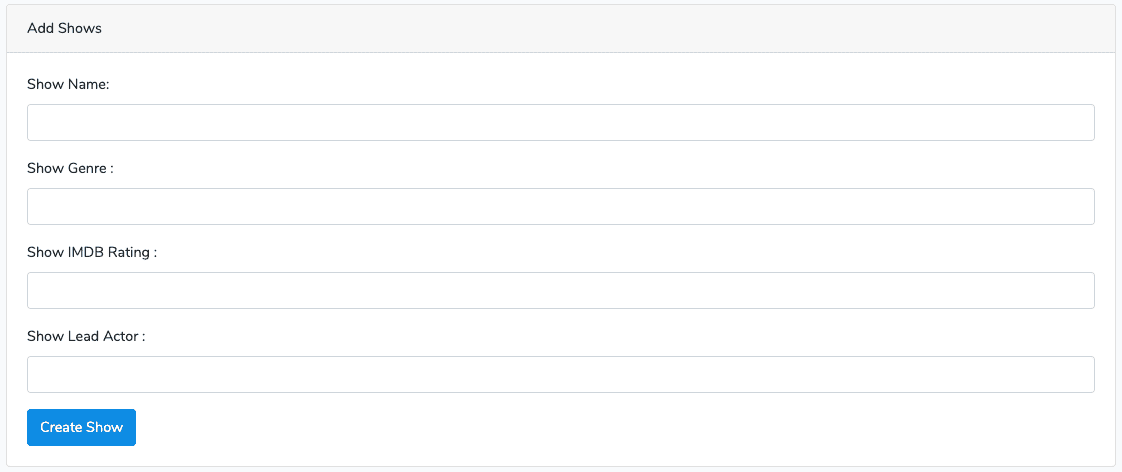
Next step would be to code a create.blade.php file. So write the following code inside it.
@extends('layout')
@section('content')
<style>
.uper {
margin-top: 40px;
}
</style>
<div class="card uper">
<div class="card-header">
Add Shows
</div>
<div class="card-body">
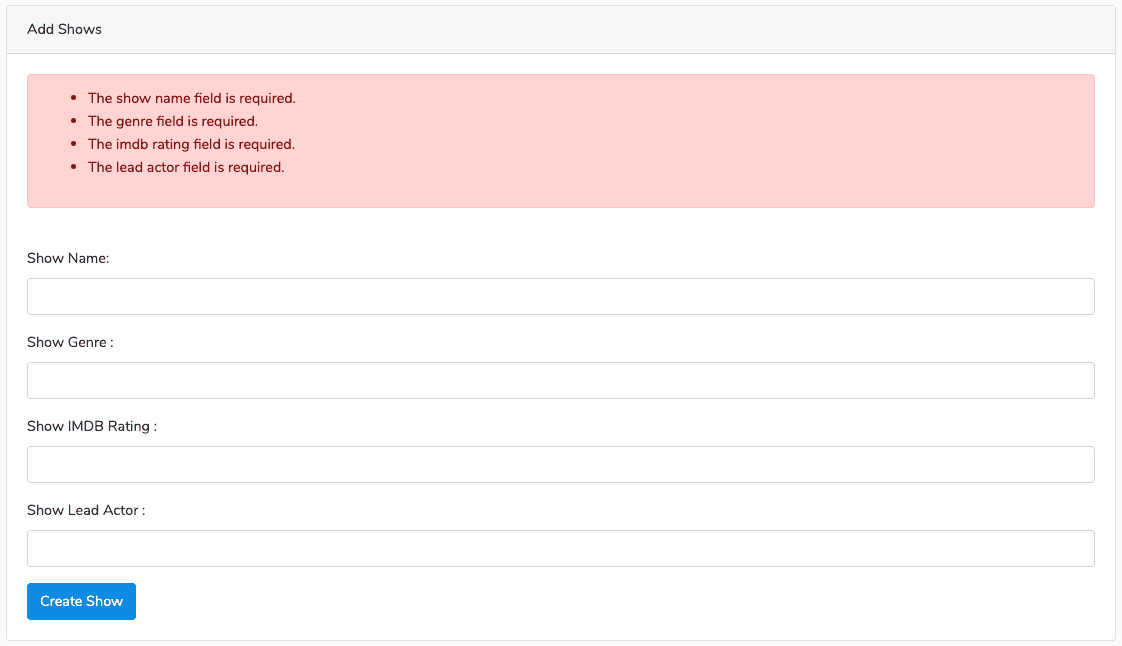
@if ($errors->any())
<div class="alert alert-danger">
<ul>
@foreach ($errors->all() as $error)
<li>{{ $error }}</li>
@endforeach
</ul>
</div><br />
@endif
<form method="post" action="{{ route('shows.store') }}">
<div class="form-group">
@csrf
<label for="name">Show Name:</label>
<input type="text" class="form-control" name="show_name"/>
</div>
<div class="form-group">
<label for="price">Show Genre :</label>
<input type="text" class="form-control" name="genre"/>
</div>
<div class="form-group">
<label for="price">Show IMDB Rating :</label>
<input type="text" class="form-control" name="imdb_rating"/>
</div>
<div class="form-group">
<label for="quantity">Show Lead Actor :</label>
<input type="text" class="form-control" name="lead_actor"/>
</div>
<button type="submit" class="btn btn-primary">Create Show</button>
</form>
</div>
</div>
@endsection
Okay, now we need to open the ShowController.php file, and on the create() function, we need to return the view, and that is a create.blade.php file.
// ShowController.php

public function create()
{
   return view('create');
}
Go to a http://localhost:8000/books/create or http://laravel6.test/shows/create
You will see something like following.
![Create the views]()
Step 6: Add Validation rules and save data
In this step, we will add a Laravel Validation.
Now, the first step inside the ShowController.php is that import the namespace of Show model inside the ShowController.php file.
<?php

// ShowController.php

namespace App\Http\Controllers;

use Illuminate\Http\Request;
use App\Show;
Now, write the following code inside the ShowController.php file’s store() function.
public function store(Request $request)
{
        $validatedData = $request->validate([
            'show_name' => 'required|max:255',
            'genre' => 'required|max:255',
            'imdb_rating' => 'required|numeric',
            'lead_actor' => 'required|max:255',
        ]);
        $show = Show::create($validatedData);

        return redirect('/books')->with('success', 'Show is successfully saved');
 }
Here, what we have done is first check for all four fields of the form.
If incoming data fail any of the rules, then it will directly go to the form with the error messages.
Store method has $request object as the parameter which will be used to access form data.
The first thing you want to do is validate a form of data.
We can use a $request->validate() function for validation, which will receive the array of validation rules.
Validation rules is an associative array.
Key will be the field_name and value with being the validation rules.
The second parameter is the optional array for custom validation messages.
Rules are separated with pipe sign “|.” We are using the most basic validation rules.
First is “required,” which means the field_name should not be empty. (“nullable” rule is vice versa), “string” means it should be the string value, “min” is the limit of minimum characters for a string in an input field and “max” is the maximum characters. “unique:table, column” with see if the same value does not exists in the database (comes handy for storing emails or any other unique data).
If the validation fails, then it will redirect us back. After the validation, we are creating a new book and save that book in the database.
We need to loop through that error messages inside the create.blade.php file which we have already done it.
If you leave all the form fields empty, then you will find an error message like this image.
![Add Validation rules and save data]()
Now, if you fill the form fields correctly, then it will create a new row in the database. I have created a new Show.
![created a new Show]()
Step 7: Display the data
Now, we need to write the ShowController’s index function to return an index view with a data fetched from a database. Write the following code inside the index() function.
// ShowController.php

public function index()
{
     $shows = Show::all();

     return view('index', compact('shows'));
}
Okay, now create a file called index.blade.php inside the views folder and add the following code.
@extends('layout')

@section('content')
<style>
  .uper {
    margin-top: 40px;
  }
</style>
<div class="uper">
  @if(session()->get('success'))
    <div class="alert alert-success">
      {{ session()->get('success') }}
    </div><br />
  @endif
  <table class="table table-striped">
    <thead>
        <tr>
          <td>ID</td>
          <td>Show Name</td>
          <td>Show Genre</td>
          <td>Show IMDB Rating</td>
          <td>Lead Actor</td>
          <td colspan="2">Action</td>
        </tr>
    </thead>
    <tbody>
        @foreach($shows as $show)
        <tr>
            <td>{{$show->id}}</td>
            <td>{{$show->show_name}}</td>
            <td>{{$show->genre}}</td>
            <td>{{number_format($show->imdb_rating,2)}}</td>
            <td>{{$show->lead_actor}}</td>
            <td><a href="{{ route('shows.edit', $show->id)}}" class="btn btn-primary">Edit</a></td>
            <td>
                <form action="{{ route('shows.destroy', $show->id)}}" method="post">
                  @csrf
                  @method('DELETE')
                  <button class="btn btn-danger" type="submit">Delete</button>
                </form>
            </td>
        </tr>
        @endforeach
    </tbody>
  </table>
<div>
@endsection
We have used the PHP number_format() function to print the IMDB Rating float value.
Here, we have looped through the show’s array and display the data in the table format.
Also, we have added two buttons for edit and delete operation.
Step 8: Create Edit and Update Operation
First, we need to add the following piece of code inside the ShowController.php file’s edit function.
// ShowController.php

public function edit($id)
{
     $show = Show::findOrFail($id);

     return view('edit', compact('show'));
}
Now, create the new file inside the views folder called edit.blade.php and add the following code.
@extends('layout')

@section('content')
<style>
  .uper {
    margin-top: 40px;
  }
</style>
<div class="card uper">
  <div class="card-header">
    Update Shows
  </div>
  <div class="card-body">
    @if ($errors->any())
      <div class="alert alert-danger">
        <ul>
            @foreach ($errors->all() as $error)
              <li>{{ $error }}</li>
            @endforeach
        </ul>
      </div><br />
    @endif
    <form method="post" action="{{ route('shows.update', $show->id) }}">
          <div class="form-group">
              @csrf
              @method('PATCH')
              <label for="name">Show Name:</label>
              <input type="text" class="form-control" name="show_name" value="{{ $show->show_name }}"/>
          </div>
          <div class="form-group">
              <label for="price">Show Genre :</label>
              <input type="text" class="form-control" name="genre" value="{{ $show->genre }}"/>
          </div>
          <div class="form-group">
              <label for="price">Show IMDB Rating :</label>
              <input type="text" class="form-control" name="imdb_rating" value="{{ number_format($show->imdb_rating, 2) }}"/>
          </div>
          <div class="form-group">
              <label for="quantity">Show Lead Actor :</label>
              <input type="text" class="form-control" name="lead_actor" value="{{ $show->lead_actor }}"/>
          </div>
          <button type="submit" class="btn btn-primary">Update Show</button>
      </form>
  </div>
</div>
@endsection
In this file, you can show the values of the particular row using its unique id inside the form fields.
So, when you hit this URL: http://localhost:8000/shows/1/edit or http://laravel6.test/shows/1/edit, you will see something like below image.
![Create Edit and Update Operation]()
Now, add the following code inside the ShowController’s update() function.
// ShowController.php

public function update(Request $request, $id)
{
        $validatedData = $request->validate([
            'show_name' => 'required|max:255',
            'genre' => 'required|max:255',
            'imdb_rating' => 'required|numeric',
            'lead_actor' => 'required|max:255',
        ]);
        Show::whereId($id)->update($validatedData);

        return redirect('/shows')->with('success', 'Show is successfully updated');
}
So now, you can edit and update all the data into the database successfully.
Step 9: Create Delete Functionality
Write the following code inside the ShowController’s destroy function.
// ShowController.php

public function destroy($id)
{
        $show = Show::findOrFail($id);
        $show->delete();

        return redirect('/shows')->with('success', 'Show is successfully deleted');
}
Go to the URL: http://localhost:8000/shows and try to remove the show.
You can see that you have successfully deleted the Show.
So, our complete ShowController.php code looks like below.
<?php

// ShowController.php

namespace App\Http\Controllers;

use Illuminate\Http\Request;
use App\Show;

class ShowController extends Controller
{
    /**
     * Display a listing of the resource.
     *
     * @return \Illuminate\Http\Response
     */
    public function index()
    {
        $shows = Show::all();

        return view('index', compact('shows'));
    }

    /**
     * Show the form for creating a new resource.
     *
     * @return \Illuminate\Http\Response
     */
    public function create()
    {
        return view('create');
    }

    /**
     * Store a newly created resource in storage.
     *
     * @param  \Illuminate\Http\Request  $request
     * @return \Illuminate\Http\Response
     */
    public function store(Request $request)
    {
        $validatedData = $request->validate([
            'show_name' => 'required|max:255',
            'genre' => 'required|max:255',
            'imdb_rating' => 'required|numeric',
            'lead_actor' => 'required|max:255',
        ]);
        $show = Show::create($validatedData);

        return redirect('/books')->with('success', 'Show is successfully saved');
    }

    /**
     * Display the specified resource.
     *
     * @param  int  $id
     * @return \Illuminate\Http\Response
     */
    public function show($id)
    {
        //
    }

    /**
     * Show the form for editing the specified resource.
     *
     * @param  int  $id
     * @return \Illuminate\Http\Response
     */
    public function edit($id)
    {
        $show = Show::findOrFail($id);

        return view('edit', compact('show'));
    }

    /**
     * Update the specified resource in storage.
     *
     * @param  \Illuminate\Http\Request  $request
     * @param  int  $id
     * @return \Illuminate\Http\Response
     */
    public function update(Request $request, $id)
    {
        $validatedData = $request->validate([
            'show_name' => 'required|max:255',
            'genre' => 'required|max:255',
            'imdb_rating' => 'required|numeric',
            'lead_actor' => 'required|max:255',
        ]);
        Show::whereId($id)->update($validatedData);

        return redirect('/shows')->with('success', 'Show is successfully updated');
    }

    /**
     * Remove the specified resource from storage.
     *
     * @param  int  $id
     * @return \Illuminate\Http\Response
     */
    public function destroy($id)
    {
        $show = Show::findOrFail($id);
        $show->delete();

        return redirect('/shows')->with('success', 'Show is successfully deleted');
    }
}
So, we have completed a Laravel 6 CRUD operations tutorial with the example from scratch.
If you are interested in the FrontEnd framework like Vue.js with Laravel or Angular with Laravel, then check out my Vue Laravel CRUD example and Angular Laravel Tutorial Example.
I have put this code on Github so you can check it out as well.
Github Code
The post Laravel 6 CRUD Example | Laravel 6 Tutorial For Beginners appeared first on AppDividend.


 Laravel Excel is intended at being Laravel-flavoured PhpSpreadsheet: a simple, but an elegant wrapper around PhpSpreadsheet to simplify the exports and imports.


 Is “that” time of the year … when autumn is just around the corner and temperature start to drop.
  Is “that” time of the year … when autumn is just around the corner and temperature start to drop.