For a long time, the only algorithm for executing a join in MySQL has been variations of the nested loop algorithm. With the release of MySQL 8.0.18, the server can now execute joins using hash join. This blog post will have a look at how it works, when it is used, and how it compares to the old join algorithms in MySQL in terms of performance.…
↧
Hash join in MySQL 8
↧
MySQL Clone Plugin Speed Test
In my previous blog, I have explained how the MySQL clone plugin works internally. In this blog, I am going to do a comparison of Backup and Recovery speed of MySQL clone plugin with other available mysql open source backup tools.
Below tools are used for speed comparison of Backup and Recovery,
- Clone-Plugin
- Xtrabackup
- mysqldump
- mydumper with myloader
- mysqlpump
Test cases:
Hardware Configuration:
Two standalone servers are picked up with identical configuration.
Server 1
   * IP: 172.23.26.127
   * CPU: 2 Cores
   * RAM: 4 GB
   * DISK: 200 GB SSD

Server 2
   * IP: 172.21.3.114
   * CPU: 2 Cores
   * RAM: 4 GB
   * DISK: 200 GB SSD
Workload Preparation:
- On Server 1 (172.23.26.127), We have loaded approx 122.40 GB data.
- Now, We want to restore the data from Server 1 (172.23.26.127) to Server 2 (172.21.3.114).
- MySQL Setup
- MySQL Version: 8.0.17
- InnoDB Buffer Pool Size: 1 GB
- InnoDB Log File Size: 16 MB
- Binary Logging: On
- Before starting every test, MySQL server is rebooted.
- Sysbench is setup to generate active writes across 10 tables.
# sysbench oltp_insert.lua --table-size=2000000 --num-threads=2 --rand-type=uniform --db-driver=mysql --mysql-db=sysbench --tables=10 --mysql-user=test --mysql-password=****** prepare

Initializing worker threads...

Creating table 'sbtest1'...
Creating table 'sbtest2'...
Inserting 2000000 records into 'sbtest1'
Inserting 2000000 records into 'sbtest2'
Creating a secondary index on 'sbtest1'...
Creating a secondary index on 'sbtest2'...
Case 1: (MySQL Clone Plugin)
- MySQL Clone Plugin is the first in the queue for testing.
- To read more on Clone Plugin Setup, Check out my Previous Blog
- Cloning can be initiated by firing a simple SQL as below.
mysql> clone instance from mydbops_clone_user@172.23.26.127:3306 identified by 'XXXX';
Query OK, 0 rows affected (7 min 47.39 sec)
Restoration:
- Once the clone is complete the plugin will be prepare the data and restart the mysql with in 1 minute.
Logs From Performance Schema:
| Stage | Status | Start time | End time |
| DROP DATA | Completed | 2019-10-24 14:16:19 | 2019-10-24 14:16:19 |
| FILE COPY | Completed | 2019-10-24 14:16:19 | 2019-10-24 14:23:56 |
| PAGE COPY | Completed | 2019-10-24 14:23:56 | 2019-10-24 14:23:57 |
| REDO COPY | Completed | 2019-10-24 14:23:57 | 2019-10-24 14:23:57 |
| FILE SYNC | Completed | 2019-10-24 14:23:57 | 2019-10-24 14:24:06 |
| RESTART | Completed | 2019-10-24 14:24:06 | 2019-10-24 14:24:11 |
| RECOVERY | Completed | 2019-10-24 14:24:11 | 2019-10-24 14:24:12 |
Overall Duration: 7 min 47 sec
Case 2: (Xtrabackup)
- Next one on the queue is Xtrabackup 8.0. Streaming backup has been initiated from Server 1 (172.23.26.127) to Server 2 (172.21.3.114).
# xtrabackup --user=XXX --password='XXXX' --backup --no-timestamp --no-lock --stream=xbstream | ssh root@172.21.3.114 "xbstream -x -C /var/backup"
start_time = 2019-10-24 07:53:02
end_time   = 2019-10-24 08:10:08
- It’s took around 16 min to complete.
Restoration:
- Once the backup is complete the preparation and restoration taking around 8 min to complete.
xtrabackup --prepare --target-dir /var/lib/mysql
.
.
.
FTS optimize thread exiting.
Starting shutdown...
Log background threads are being closed...
Shutdown completed; log sequence number 31714228528
191024 08:14:10 completed OK!
Overall Duration: 24 min
Case 3: (mysqldump)
- Now it’s turn for mysqldump and backup took around 43 mins to complete.
# mysqldump -u mydbops -h XXXXX -p'XXXXX' -P3306
--single-transaction --routines --events --triggers
--master-data=2 --all-databases > /backup/fullbackup.sql
Restoration:
- The backup restoration is taken around 52 min’s.
Overall Duration: 95 min
Case 4: (mydumper)
- The mydumper took 39 min to complete. mydumper is setup to run on 2 threads as it’s dual core machine.
# mydumper --host=xxxx --user=mydbops --password='XXXXX'
--triggers --events --routines -v 3 --outputdir=/backup/mydumper_backup
Restoration :
- The backup restoration is taken around 46 mins to complete.
# myloader --user=mydbops --password='XXXXX' --host=xxxx
--directory=/backup/mydumper_backup --queries-per-transaction=5000
--threads=2 --verbose=3 -e 2> /backup/restore_sep_26.log
Overall Duration: 85 min
Case 5: (mysqlpump)
- The mysqlpump is completed with in 37 mins to complete.
# mysqlpump --user=mydbops --password='XXXXX'
--host=xxxx --default-parallelism=2 > pump.sql
Restoration:
- The backup restoration is taken around 41 mins to complete
# mysql --user=mydbops --password='XXXX' < /home/vagrant/pump.sql
Overall Duration: 78 min
Test Observations:

Physical backups are faster as expected, Surprising to see clone plugin beats Xtrabackup. If you’re using MySQL 8.0, Clone plugin is worth a try, If you’re running older versions of MySQL, You can happily choose Xtrabackup.
MySQL Cloning and Xtrabackup Differences:
- Both the Cloning and xtrabackup are physical backups (copying of data files), It can be used to perform hot backup and recovery (can be used on live databases) and the principle of backup recovery is also similar.
- The permission of xtrabackup backup file is equal to the permission of the person who executes the command. When restoring the instance, it needs manual chown to return to the instance permission.
- After cloning and backup, the permission is identical with the original data permission, and no manual chown is needed to facilitate recovery.
- When restoring xtrabackup, reset master needs to be executed in mysql, then set global gtid_purged=”UUID:NUMBER”.
- The specific value of UUID:NUMBER is the content of xtrabackup_info file in backup file ,But cloning does not need this operation step, and by default cloning can establish replication.
- When the backup of xtrabackup is completed, scp is usually copied to another machine to recover. It takes port 22 and MySQL’s listening port is cloned.
- So when the directory permissions are correct, you don’t even need the permissions to log on to the Linux server at all.
- Do remember Clone is supported only from MySQL 8.0.17 and xtrabackup is a full fledge backup with more robust options.
Featured image by Pietro Mattia on Unsplash
↧
↧
MySQL InnoDB Cluster 8.0 - A Complete Deployment Walk-Through: Part One
MySQL InnoDB Cluster consists of 3 components:
- MySQL Group Replication (a group of database server which replicates to each other with fault tolerance).
- MySQL Router (query router to the healthy database nodes)
- MySQL Shell (helper, client, configuration tool)
In the first part of this walkthrough, we are going to deploy a MySQL InnoDB Cluster. There are a number of hands-on tutorial available online but this walkthrough covers all the necessary steps/commands to install and run the cluster in one place. We will be covering monitoring, management and scaling operations as well as some gotchas when dealing with MySQL InnoDB Cluster in the second part of this blog post.
The following diagram illustrates our post-deployment architecture:
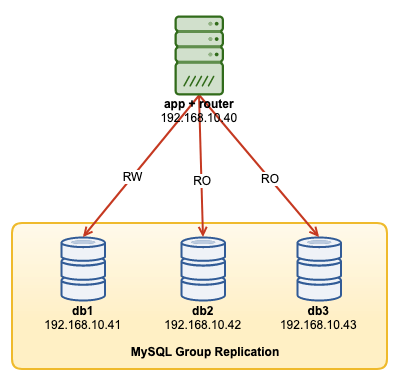
We are going to deploy a total of 4 nodes; A three-node MySQL Group Replication and one MySQL router node co-located within the application server. All servers are running on Ubuntu 18.04 Bionic.
Installing MySQL
The following steps should be performed on all database nodes db1, db2 and db3.
Firstly, we have to do some host mapping. This is crucial if you want to use hostname as the host identifier in InnoDB Cluster and this is the recommended way to do. Map all hosts as the following inside /etc/hosts:
$ vi /etc/hosts

192.168.10.40 router wordpress apps

192.168.10.41 db1 db1.local

192.168.10.42 db2 db2.local

192.168.10.43 db3 db3.local

127.0.0.1 localhost localhost.local
Stop and disable AppArmor:
$ service apparmor stop

$ service apparmor teardown

$ systemctl disable apparmor
Download the latest APT config repository from MySQL Ubuntu repository website at https://repo.mysql.com/apt/ubuntu/pool/mysql-apt-config/m/mysql-apt-config/. At the time of this writing, the latest one is dated 15-Oct-2019 which is mysql-apt-config_0.8.14-1_all.deb:
$ wget https://repo.mysql.com/apt/ubuntu/pool/mysql-apt-config/m/mysql-apt-config/mysql-apt-config_0.8.14-1_all.debInstall the package and configure it for "mysql-8.0":
$ dpkg -i mysql-apt-config_0.8.14-1_all.debInstall the GPG key:
$ apt-key adv --recv-keys --keyserver ha.pool.sks-keyservers.net 5072E1F5Update the repolist:
$ apt-get updateInstall Python and followed by MySQL server and MySQL shell:
$ apt-get -y install mysql-server mysql-shellYou will be presented with the following configuration wizards:
- Set a root password - Specify a strong password for the MySQL root user.
- Set the authentication method - Choose "Use Legacy Authentication Method (Retain MySQL 5.x Compatibility)"
MySQL should have been installed at this point. Verify with:
$ systemctl status mysqlEnsure you get an "active (running)" state.
Preparing the Server for InnoDB Cluster
The following steps should be performed on all database nodes db1, db2 and db3.
Configure the MySQL server to support Group Replication. The easiest and recommended way to do this is to use the new MySQL Shell:
$ mysqlshAuthenticate as the local root user and follow the configuration wizard accordingly as shown in the example below:
MySQL JS > dba.configureLocalInstance("root@localhost:3306");Once authenticated, you should get a number of questions like the following:
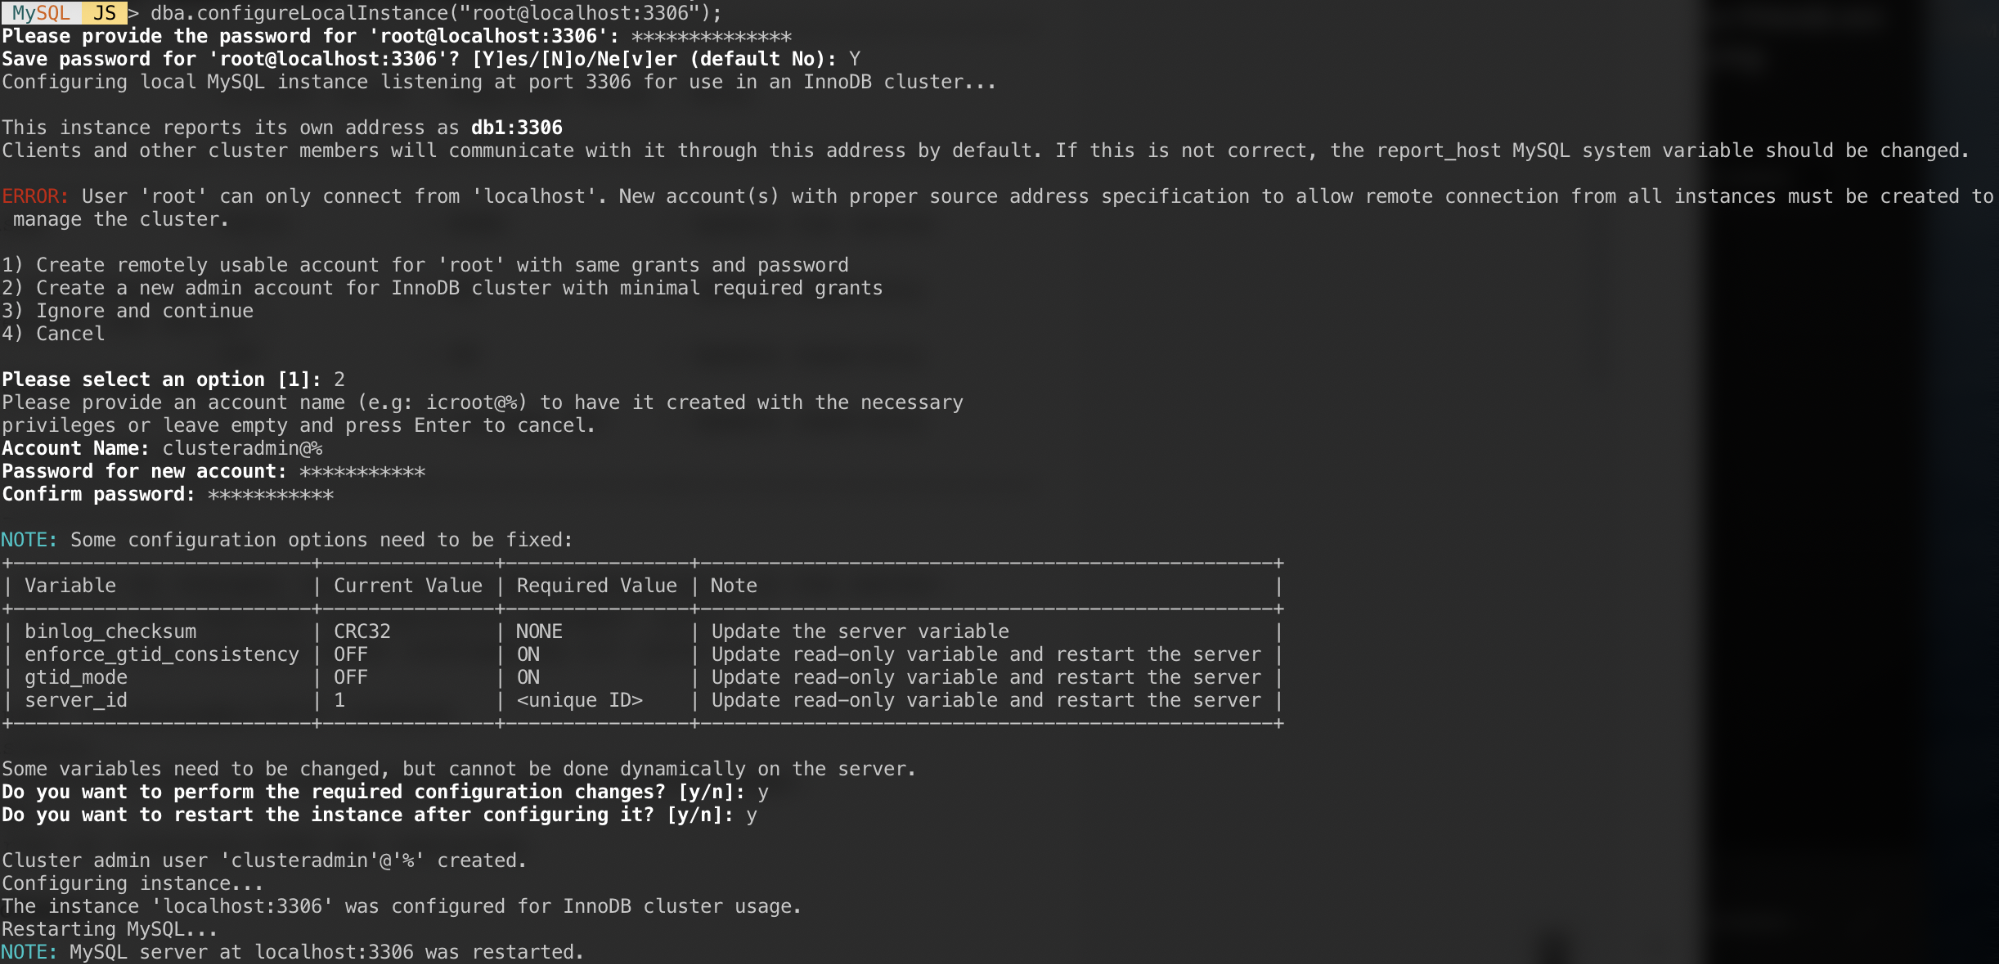
Responses to those questions with the following answers:
- Pick 2 - Create a new admin account for InnoDB cluster with minimal required grants
- Account Name: clusteradmin@%
- Password: mys3cret&&
- Confirm password: mys3cret&&
- Do you want to perform the required configuration changes?: y
- Do you want to restart the instance after configuring it?: y
Don't forget to repeat the above on the all database nodes. At this point, the MySQL daemon should be listening to all IP addresses and Group Replication is enabled. We can now proceed to create the cluster.
Creating the Cluster
Now we are ready to create a cluster. On db1, connect as cluster admin from MySQL Shell:
MySQL|JS> shell.connect('clusteradmin@db1:3306');

Creating a session to 'clusteradmin@db1:3306'

Please provide the password for 'clusteradmin@db1:3306': ***********

Save password for 'clusteradmin@db1:3306'? [Y]es/[N]o/Ne[v]er (default No): Y

Fetching schema names for autocompletion... Press ^C to stop.

Your MySQL connection id is 9

Server version: 8.0.18 MySQL Community Server - GPL

No default schema selected; type \use <schema> to set one.

<ClassicSession:clusteradmin@db1:3306>
You should be connected as clusteradmin@db1 (you can tell by looking at the prompt string before '>'). We can now create a new cluster:
MySQL|db1:3306 ssl|JS> cluster = dba.createCluster('my_innodb_cluster');Check the cluster status:
MySQL|db1:3306 ssl|JS> cluster.status()

{

    "clusterName": "my_innodb_cluster",

    "defaultReplicaSet": {

        "name": "default",

        "primary": "db1:3306",

        "ssl": "REQUIRED",

        "status": "OK_NO_TOLERANCE",

        "statusText": "Cluster is NOT tolerant to any failures.",

        "topology": {

            "db1:3306": {

                "address": "db1:3306",

                "mode": "R/W",

                "readReplicas": {},

                "replicationLag": null,

                "role": "HA",

                "status": "ONLINE",

                "version": "8.0.18"

            }

        },

        "topologyMode": "Single-Primary"

    },

    "groupInformationSourceMember": "db1:3306"

}
At this point, only db1 is part of the cluster. The default topology mode is Single-Primary, similar to a replica set concept where only one node is a writer at a time. The remaining nodes in the cluster will be readers.
Pay attention on the cluster status which says OK_NO_TOLERANCE, and further explanation under statusText key. In a replica set concept, one node will provide no fault tolerance. Minimum of 3 nodes is required in order to automate the primary node failover. We are going to look into this later.
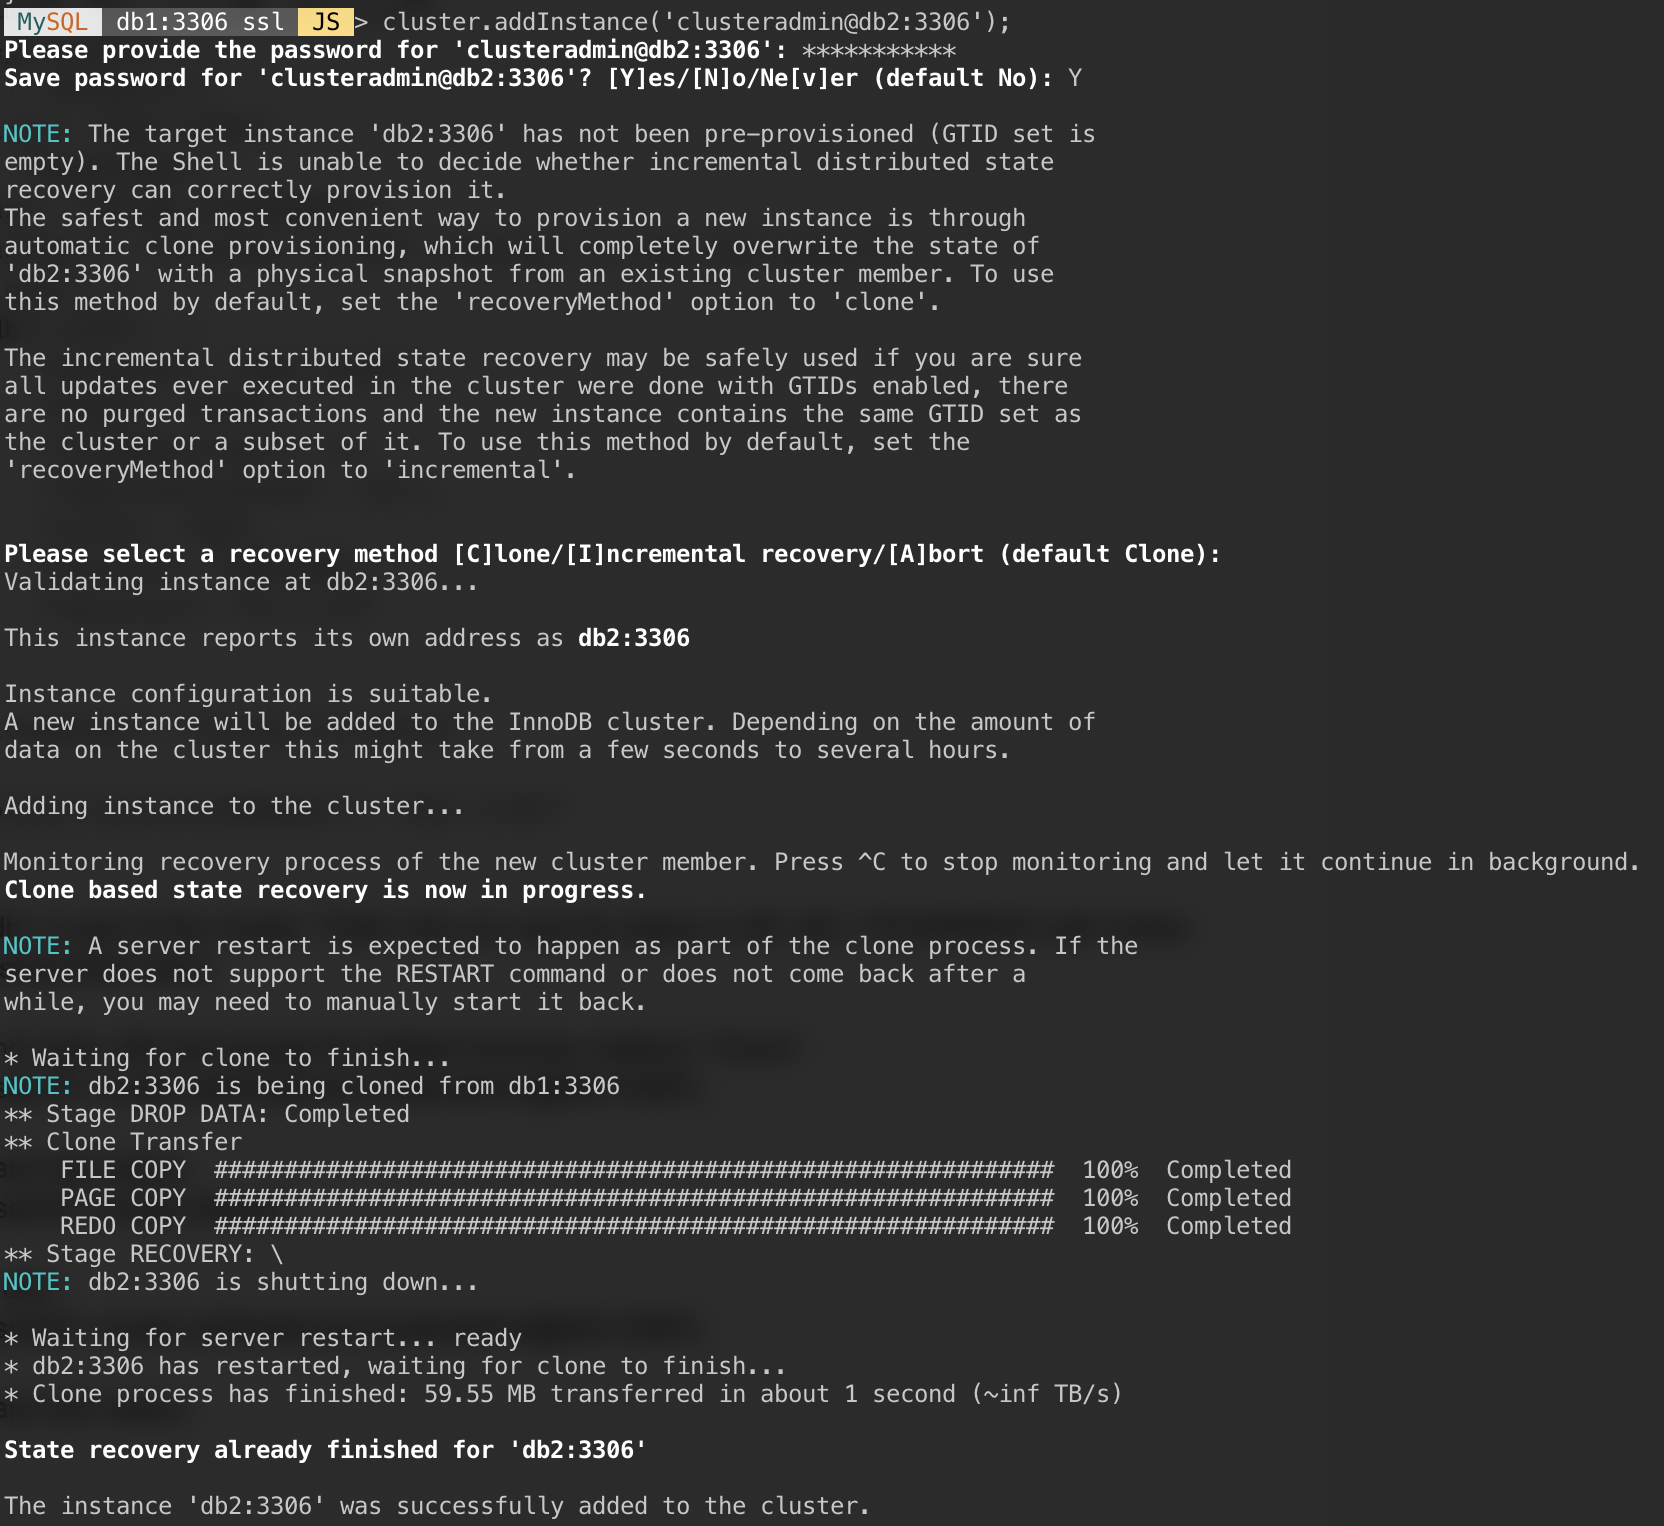
Now add the second node, db2 and accept the default recovery method, "Clone":
MySQL|db1:3306 ssl|JS> cluster.addInstance('clusteradmin@db2:3306');The following screenshot shows the initialization progress of db2 after we executed the above command. The syncing operation is performed automatically by MySQL:
Check the cluster and db2 status:
MySQL|db1:3306 ssl|JS> cluster.status()

{

    "clusterName": "my_innodb_cluster",

    "defaultReplicaSet": {

        "name": "default",

        "primary": "db1:3306",

        "ssl": "REQUIRED",

        "status": "OK_NO_TOLERANCE",

        "statusText": "Cluster is NOT tolerant to any failures.",

        "topology": {

            "db1:3306": {

                "address": "db1:3306",

                "mode": "R/W",

                "readReplicas": {},

                "replicationLag": null,

                "role": "HA",

                "status": "ONLINE",

                "version": "8.0.18"

            },

            "db2:3306": {

                "address": "db2:3306",

                "mode": "R/O",

                "readReplicas": {},

                "replicationLag": null,

                "role": "HA",

                "status": "ONLINE",

                "version": "8.0.18"

            }

        },

        "topologyMode": "Single-Primary"

    },

    "groupInformationSourceMember": "db1:3306"

}
At this point, we have two nodes in the cluster, db1 and db2. The status is still showing OK_NO_TOLERANCE with further explanation under statusText value. As stated above, MySQL Group Replication requires at least 3 nodes in a cluster for fault tolerance. That's why we have to add the third node as shown next.
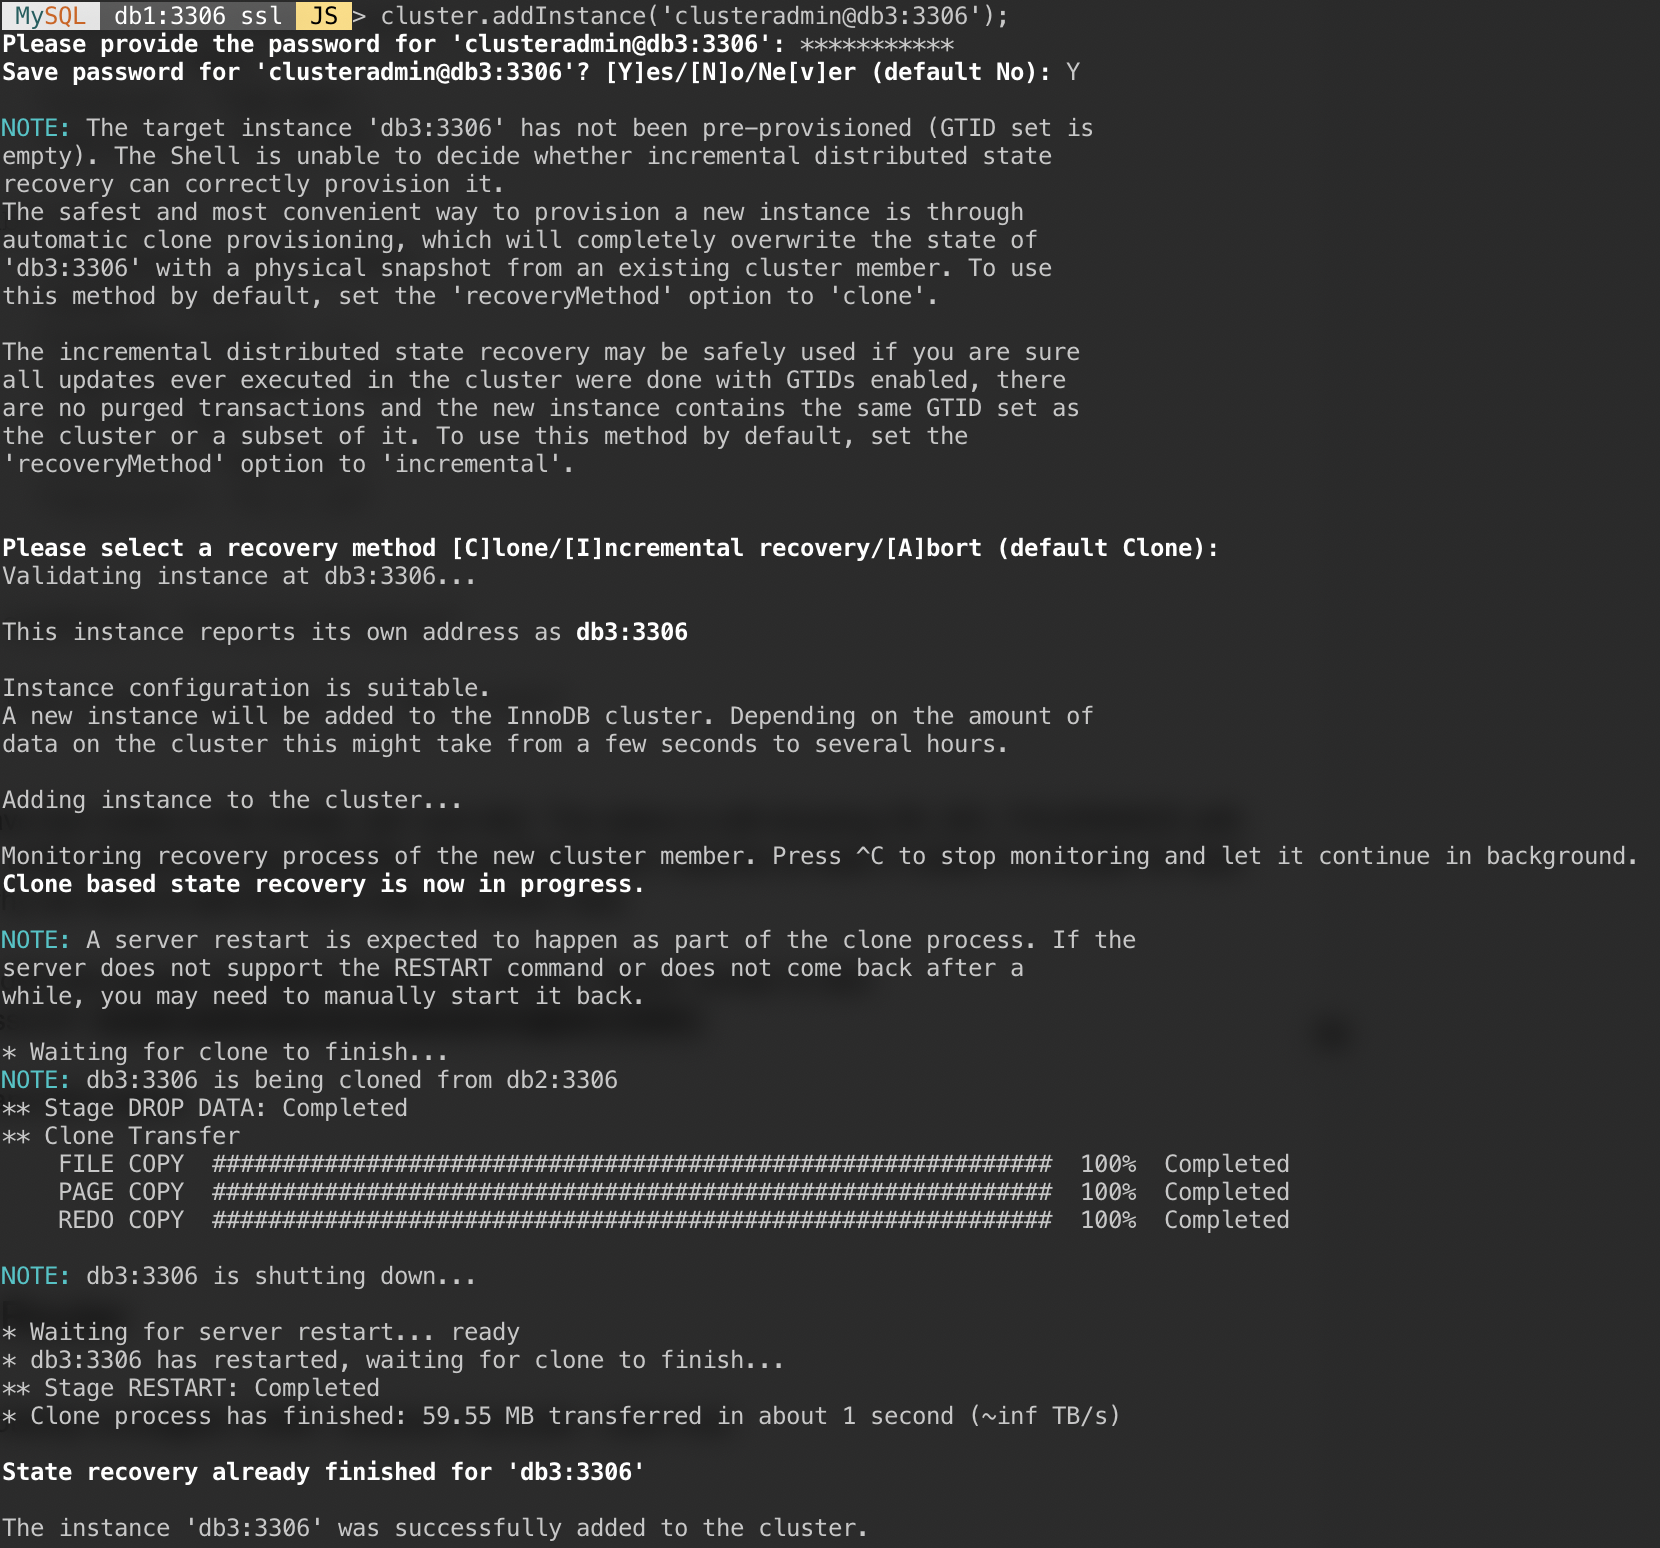
Add the last node, db3 and accept the default recovery method, "Clone" similar to db2:
MySQL|db1:3306 ssl|JS> cluster.addInstance('clusteradmin@db3:3306');The following screenshot shows the initialization progress of db3 after we executed the above command. The syncing operation is performed automatically by MySQL:
Check the cluster and db3 status:
MySQL|db1:3306 ssl|JS> cluster.status()

{

    "clusterName": "my_innodb_cluster",

    "defaultReplicaSet": {

        "name": "default",

        "primary": "db1:3306",

        "ssl": "REQUIRED",

        "status": "OK",

        "statusText": "Cluster is ONLINE and can tolerate up to ONE failure.",

        "topology": {

            "db1:3306": {

                "address": "db1:3306",

                "mode": "R/W",

                "readReplicas": {},

                "replicationLag": null,

                "role": "HA",

                "status": "ONLINE",

                "version": "8.0.18"

            },

            "db2:3306": {

                "address": "db2:3306",

                "mode": "R/O",

                "readReplicas": {},

                "replicationLag": null,

                "role": "HA",

                "status": "ONLINE",

                "version": "8.0.18"

            },

            "db3:3306": {

                "address": "db3:3306",

                "mode": "R/O",

                "readReplicas": {},

                "replicationLag": null,

                "role": "HA",

                "status": "ONLINE",

                "version": "8.0.18"

            }

        },

        "topologyMode": "Single-Primary"

    },

    "groupInformationSourceMember": "db1:3306"

}
Now the cluster looks good, where the status is OK and the cluster can tolerate up to one failure node at one time. The primary node is db1 where it shows "primary": "db1:3306" and "mode": "R/W", while other nodes are in "R/O" state. If you check the read_only and super_read_only values on RO nodes, both are showing as true.
Our MySQL Group Replication deployment is now complete and in synced.
Deploying the Router
On the app server that we are going to run our application, make sure the host mapping is correct:
$ vim /etc/hosts

192.168.10.40 router wordpress apps

192.168.10.41 db1 db1.local

192.168.10.42 db2 db2.local

192.168.10.43 db3 db3.local

127.0.0.1 localhost localhost.local
Stop and disable AppArmor:
$ service apparmor stop

$ service apparmor teardown

$ systemctl disable apparmor
Then install MySQL repository package, similar to what we have done when performing database installation:
$ wget https://repo.mysql.com/apt/ubuntu/pool/mysql-apt-config/m/mysql-apt-config/mysql-apt-config_0.8.14-1_all.deb

$ dpkg -i mysql-apt-config_0.8.14-1_all.deb
Add GPG key:
$ apt-key adv --recv-keys --keyserver ha.pool.sks-keyservers.net 5072E1F5Update the repo list:
$ apt-get updateInstall MySQL router and client:
$ apt-get -y install mysql-router mysql-clientMySQL Router is now installed under /usr/bin/mysqlrouter. MySQL router provides a bootstrap flag to automatically configure the router operation with a MySQL InnoDB cluster. What we need to do is to specify the string URI to one of the database node as the InnoDB cluster admin user (clusteradmin).
To simplify the configuration, we will run the mysqlrouter process as root user:
$ mysqlrouter --bootstrap clusteradmin@db1:3306 --directory myrouter --user=rootHere is what we should get after specifying the password for clusteradmin user:
The bootstrap command will assist us to generate the router configuration file at /root/myrouter/mysqlrouter.conf. Now we can start the mysqlrouter daemon with the following command from the current directory:
$ myrouter/start.shVerify if the anticipated ports are listening correctly:
$ netstat -tulpn | grep mysql

tcp        0 0 0.0.0.0:6446            0.0.0.0:* LISTEN   14726/mysqlrouter

tcp        0 0 0.0.0.0:6447            0.0.0.0:* LISTEN   14726/mysqlrouter

tcp        0 0 0.0.0.0:64470           0.0.0.0:* LISTEN   14726/mysqlrouter

tcp        0 0 0.0.0.0:64460           0.0.0.0:* LISTEN   14726/mysqlrouter
Now our application can use port 6446 for read/write and 6447 for read-only MySQL connections.
Connecting to the Cluster
Let's create a database user on the master node. On db1, connect to the MySQL server via MySQL shell:
$ mysqlsh root@localhost:3306Switch from Javascript mode to SQL mode:
MySQL|localhost:3306 ssl|JS> \sql

Switching to SQL mode... Commands end with ;
Create a database:
MySQL|localhost:3306 ssl|SQL> CREATE DATABASE sbtest;Create a database user:
MySQL|localhost:3306 ssl|SQL> CREATE USER sbtest@'%' IDENTIFIED BY 'password';Grant the user to the database:
MySQL|localhost:3306 ssl|SQL> GRANT ALL PRIVILEGES ON sbtest.* TO sbtest@'%';Now our database and user is ready. Let's install sysbench to generate some test data. On the app server, do:
$ apt -y install sysbench mysql-clientNow we can test on the app server to connect to the MySQL server via MySQL router. For write connection, connect to port 6446 of the router host:
$ mysql -usbtest -p -h192.168.10.40 -P6446 -e 'select user(), @@hostname, @@read_only, @@super_read_only'

+---------------+------------+-------------+-------------------+

| user()        | @@hostname | @@read_only | @@super_read_only |

+---------------+------------+-------------+-------------------+

| sbtest@router | db1        | 0 |   0 |

+---------------+------------+-------------+-------------------+
For read-only connection, connect to port 6447 of the router host:
$ mysql -usbtest -p -h192.168.10.40 -P6447 -e 'select user(), @@hostname, @@read_only, @@super_read_only'

+---------------+------------+-------------+-------------------+

| user()        | @@hostname | @@read_only | @@super_read_only |

+---------------+------------+-------------+-------------------+

| sbtest@router | db3        | 1 |   1 |

+---------------+------------+-------------+-------------------+
Looks good. We can now generate some test data with sysbench. On the app server, generate 20 tables with 100,000 rows per table by connecting to port 6446 of the app server:
$ sysbench \

/usr/share/sysbench/oltp_common.lua \

--db-driver=mysql \

--mysql-user=sbtest \

--mysql-db=sbtest \

--mysql-password=password \

--mysql-port=6446 \

--mysql-host=192.168.10.40 \

--tables=20 \

--table-size=100000 \

prepare
To perform a simple read-write test on port 6446 for 300 seconds, run:
$ sysbench \

/usr/share/sysbench/oltp_read_write.lua \

--report-interval=2 \

--threads=8 \

--time=300 \

--db-driver=mysql \

--mysql-host=192.168.10.40 \

--mysql-port=6446 \

--mysql-user=sbtest \

--mysql-db=sbtest \

--mysql-password=password \

--tables=20 \

--table-size=100000 \

run
For read-only workloads, we can send the MySQL connection to port 6447:
$ sysbench \

/usr/share/sysbench/oltp_read_only.lua \

--report-interval=2 \

--threads=1 \

--time=300 \

--db-driver=mysql \

--mysql-host=192.168.10.40 \

--mysql-port=6447 \

--mysql-user=sbtest \

--mysql-db=sbtest \

--mysql-password=password \

--tables=20 \

--table-size=100000 \

run
Conclusion
That's it. Our MySQL InnoDB Cluster setup is now complete with all of its components running and tested. In the second part, we are going to look into management, monitoring and scaling operations of the cluster as well as solutions to a number of common problems when dealing with MySQL InnoDB Cluster. Stay tuned!
↧
Installing MySQL on Oracle Cloud’s “Always Free” Compute Instance
At Oracle’s OpenWorld 2019, Oracle announced an Oracle Cloud Free Tier, which includes Oracle Cloud services that will always be free – as long as you use them or keep them active.
Most other hyperscale cloud vendors offer a free 12-month trial before they start charging you, so to see Oracle provide a “truly free” service is really great. And the free services are not just limited to one or two choices – you get a wide variety of free services to choose from. As of this blog post, here is a brief summary of free services (these are subject to change in the future):
Databases – Your choice of Autonomous Transaction Processing or Autonomous Data Warehouse. 2 databases total, each with 1 OCPU and 20 GB storage.
Storage – 2 Block Volumes, 100 GB total. 10 GB Object Storage. 10 GB Archive Storage.
Compute – 2 virtual machines with 1/8 OCPU and 1 GB memory each.
Additional Services – Load Balancer, 1 instance, 10 Mbps bandwidth. Monitoring, 500 million ingestion datapoints, 1 billion retrieval datapoints. Notifications, 1 million delivery options per month, 1,000 emails sent per month. Outbound Data Transfer, 10 TB per month.
For this post, I am going to show you how to create an Oracle Cloud Compute Instance (virtual machine) and install the MySQL Community Edition and MySQL Enterprise Edition (license required) of MySQL on it. Installation is a fairly simple process but there are a few things to note. If you follow these steps, you should be able to have a free cloud instance up and running with MySQL installed in less than a half-hour.
Creating your free Oracle Cloud instance
First, you need to go to Oracle’s Cloud Free Tier website, and register. Yes, this requires that you give them your email address and a method of payment, but you won’t be charged as long as you choose the Oracle Cloud free-tier products. I am not going to go through all of the steps to register your account, but it is fairly easy. Here are a few things to note:
When selecting your home region, be sure that the services you want to use are located in this region. This link will show you the available regions for the “Always Free Cloud Services”. (A region is a localized geographic area.)
After you have registered, you will be taken to the login page and then you will need to enter your email address and password. After a successful login, you will be directed to the dashboard page. At the top of the page, you should see a note that states something like this – “You are in a free trial. When your trial is over, your account will be limited to Always Free resources. Upgrade at any time.” If you are part of a free trial period, this period is for a set amount of money and for a limited time. In other words, if your free trial amount is $300 and one month of services, your free trial for normal (not free) services will expire after you have consumed $300 worth of services or after 30-days. So, you aren’t limited in your initial trial to only using the “Always Free Eligible” services. And, the “Always Free” services will continue to work after the trial period – these services are “always free”.
Note: Some of the images and words on the Oracle Cloud web page might change over time.
| Note: As you are creating your instances, be sure that you only select options that have the “Always Free Eligible” banner. |  |
Creating your compute instance
You are now ready to create your first Compute instance (Virtual Machine). Click on the “Create a VM instance” box.

Notice the “Always Free Eligible” banner at the top right of the box.
On the “Create Compute Instance” page, the first box allows you to name your instance. If you don’t want to keep the auto-generated instance name, you should change it here. (I am going to keep the default instance name.)

The default operating system or image source is Oracle Linux.

If you don’t want to use Oracle Linux, click on the “Change Image Source” button, and you will see a selection of available operating systems to use. Note that not all images are part of the free version.

Next, click on the “Show Shape, Network and Storage Options” to expand this selection.

The first option is to choose your Availability Domain, but the free option should already be selected. Do not change this option. An Availability Domain is one or more data centers located within a region.

Your Instance Type should be chosen for you, as a Virtual Machine is the only free option.

Your Instance Shape should also be chosen for you. The free Instance Shape version is VM.Standard.E2.1.Micro (Virtual Machine) with 1 Core OCPU and 1 GB Memory.

Under Configure Networking, you can change the virtual cloud network name if you want. I left mine as the default auto-generated name. Important – You will want to select “Assign a public IP address” to be able to connect to this instance from outside of the Oracle Cloud. If you choose “Do not assign a public IP address”, you won’t have a way to connect to this instance unless you connect through another instance from within Oracle Cloud.

You are allocated 100 gigabytes of free storage under the free tier. So, under Boot Volume, you can accept the default size of 46.6 GB, or click “Custom boot volume size (in GB) and enter a smaller or larger number. I am going with the default size. Note: You are limited to two free virtual machines per account under the “Always Free” option. So, if you want to create a separate block storage later, and you use the default sizes of 46.6 GB, you will only be limited to an additional 6.8 GB of block storage.

If you are going to connect to instances using Oracle Linux, CentOS or Ubuntu, you will need to create an SSH key pair. This is very simple to do.

Here is one example of how to create the SSH key pair. You might have to search for how to do it for your particular operating system. The file “id_rsa.pub” is what you will need to upload. You will need to place this file in the $HOME/.ssh directory of the computer you will use to access this compute instance. You can also share this file with others who will want to access this instance.
# ssh-keygen -t rsa
Generating public/private rsa key pair.
Enter file in which to save the key (/var/root/.ssh/id_rsa):
Enter passphrase (empty for no passphrase):
Enter same passphrase again:
Your identification has been saved in /var/root/.ssh/id_rsa.
Your public key has been saved in /var/root/.ssh/id_rsa.pub.
The key fingerprint is:
SHA256:od/ZPR2IcW+ml5mcWFa3ojK9c0eeTqsW9eH8T9AQzEI root@Hackintosh.local
The key's randomart image is:
+---[RSA 2048]----+
|           .Eo.  |
|            . o. |
|        .  . o. o|
|       . .  + o=+|
|      . S  . o=O+|
|       . ..o.oX*B|
|        .ooo.o*O=|
|          o..oo*o|
|           .+.+oo|
+----[SHA256]-----+
After you have created the key, you will want to drag-and-drop the SSH key file (it should be named id_rsa.pub) onto the “Drop files here” box. Or you can click “Choose Files” and navigate the window to the location of your SSH key file.

For this demo, I am not going to address any of the advanced options, so I will skip this part:

Finally, you need to click on the “Create” button to create your instance.

You should be directed to the Work Requests page under the Instance Details page, where you will see all of the information about your instance as it is being created.

Towards the bottom, you will see the progress of the instance creation:

It only took a couple of minutes for my instance to be created. The instance page should refresh automatically, but you can manually refresh it. Once the instance has been created, you should see something like this.

Under the Primary VNIC Information, you will see your Public IP Address. You will need this to be able to connect to the instance via SSH.
Now that my instance has been created and is running, I can connect to the Oracle Cloud Compute Instance via a terminal window. I have already placed my SSH key file in the .ssh directory under my $HOME directory.
$ pwd
/Users/tonydarnell
$ ls -l .ssh/*pub
-rw-------@ 1 tonydarnell  staff  403 Sep 12 10:58 .ssh/id_rsa.pub
I can connect using SSH and with the user named “opc“. You will probably get a warning about the authenticity of the host, but you can just answer “yes”.
$ ssh opc@150.136.167.48
The authenticity of host '150.136.167.48 (150.136.167.48)' can't be established.
ECDSA key fingerprint is SHA256:9ZE+AFYo7luYoBFZhJZ0YS/W6QdQPPJOP9xItnY17+c.
Are you sure you want to continue connecting (yes/no)? yes
Warning: Permanently added '150.136.167.48' (ECDSA) to the list of known hosts.
I am now connected to my Oracle Cloud Compute Instance. I can check to see which OS version I am running:
$ cat /etc/redhat-release
Red Hat Enterprise Linux Server release 7.7 (Maipo)
Installing the MySQL RPM packages via yum
I can now install MySQL but I have to be careful – as MariaDB is the default version of MySQL installed on Oracle Linux (even though MariaDB isn’t the same as MySQL). If you try to run the regular yum install command (sudo yum install mysql), you will see that it tries to install MariaDB:
Note: Be sure to type “N” at the end of this process when asked “Is this ok” so you don’t install MariaDB.
$ sudo yum install mysql
Loaded plugins: langpacks, ulninfo
ol7_UEKR5                                            | 2.8 kB  00:00:00
ol7_addons                                           | 2.8 kB  00:00:00
ol7_developer                                        | 2.8 kB  00:00:00
ol7_developer_EPEL                                   | 3.4 kB  00:00:00
ol7_ksplice                                          | 2.8 kB  00:00:00
ol7_latest                                           | 3.4 kB  00:00:00
ol7_oci_included                                     | 2.9 kB  00:00:00
ol7_optional_latest                                  | 2.8 kB  00:00:00
ol7_software_collections                             | 2.8 kB  00:00:00
(1/12): ol7_ksplice/primary_db                       | 257 kB  00:00:00
(2/12): ol7_addons/x86_64/updateinfo                 |  74 kB  00:00:00
(3/12): ol7_addons/x86_64/primary_db                 | 137 kB  00:00:00
(4/12): ol7_latest/x86_64/updateinfo                 | 2.6 MB  00:00:00
(5/12): ol7_oci_included/x86_64/primary_db           |  71 kB  00:00:00
(6/12): ol7_optional_latest/x86_64/updateinfo        | 868 kB  00:00:00
(7/12): ol7_software_collections/x86_64/updateinfo   | 8.7 kB  00:00:00
(8/12): ol7_developer/x86_64/primary_db              | 441 kB  00:00:00
(9/12): ol7_software_collections/x86_64/primary_db   | 4.7 MB  00:00:00
(10/12): ol7_latest/x86_64/primary_db                |  15 MB  00:00:00
(11/12): ol7_developer_EPEL/x86_64/primary_db        |  11 MB  00:00:01
(12/12): ol7_optional_latest/x86_64/primary_db       | 4.0 MB  00:00:00
Resolving Dependencies
--> Running transaction check
---> Package mariadb.x86_64 1:5.5.64-1.el7 will be installed
--> Finished Dependency Resolution

Dependencies Resolved
======================================================================
 Package       Arch       Version            Repository        Size
======================================================================
Installing:
 mariadb       x86_64     1:5.5.64-1.el7     ol7_latest        8.7 M

Transaction Summary
======================================================================
Install  1 Package

Total download size: 8.7 M
Installed size: 49 M
Is this ok [y/d/N]: N
Exiting on user command
Your transaction was saved, rerun it with:
 yum load-transaction /tmp/yum_save_tx.2019-11-04.21-11.NHFXMJ.yumtx
To install a real version of MySQL, you will need to download the release package for your platform. (Full instructions may be found at https://dev.mysql.com/doc/mysql-repo-excerpt/8.0/en/linux-installation-yum-repo.html)
Go to the Download MySQL Yum Repository page (https://dev.mysql.com/downloads/repo/yum/) in the MySQL Developer Zone.
Select and download the release package for your platform. You should see something like this on the Yum download page.

Since I am installing on Oracle Linux 7, I will want to download the RPM package for “Red Hat Enterprise Linux 7 / Oracle Linux 7 (Architecture Independent) RPM Package“. Downloading this package requires an Oracle account, so you can register for one if you don’t already have one.
I will now need to copy the package over to the Oracle Cloud instance I created. I can easily do this via SFTP. You will want to set up your FTP client with the user name of opc and you will also need to use the id_rsa.pub file to connect. I am on a Mac, and I use CyberDuck, so this is what my SFTP settings look like:

I created a directory in my $HOME directory and named it mysql-install-files. I placed the RPM package in this directory. You can place the files wherever you want.
[opc@instance-20191113-1544 ~]$ pwd
/home/opc
[opc@instance-20191113-1544 ~]$ ls -l
total 0
drwxrwxr-x. 2 opc opc 56 Nov 14 15:33 mysql-install-files
[opc@instance-20191113-1544 ~]$ cd mysql-install-files/
[opc@instance-20191113-1544 mysql-install-files]$ ls -l
total 28
-rw-rw-r--. 1 opc opc 26024 Nov 14 15:32 mysql80-community-release-el7-3.noarch.rpm
I can now install the downloaded release package. If you chose a different operating system, you will want to replace the platform-and-version-specific-package-name with the name of the downloaded RPM package. And, you will want to refer to the instructions for installing MySQL for your specific OS version.
[opc@instance-20191113-1544 mysql-install-files]$ sudo yum localinstall mysql80-community-release-el7-3.noarch.rpm
Loaded plugins: langpacks, ulninfo
Examining mysql80-community-release-el7-3.noarch.rpm: mysql80-community-release-el7-3.noarch
Marking mysql80-community-release-el7-3.noarch.rpm to be installed
Resolving Dependencies
--> Running transaction check
---> Package mysql80-community-release.noarch 0:el7-3 will be installed
--> Finished Dependency Resolution
ol7_UEKR5/x86_64                               | 2.8 kB  00:00:00
ol7_UEKR5/x86_64/updateinfo                    |  21 kB  00:00:00
ol7_UEKR5/x86_64/primary_db                    | 4.0 MB  00:00:00
ol7_addons/x86_64                              | 2.8 kB  00:00:00
ol7_addons/x86_64/updateinfo                   |  74 kB  00:00:00
ol7_addons/x86_64/primary_db                   | 137 kB  00:00:00
ol7_developer/x86_64                           | 2.8 kB  00:00:00
ol7_developer/x86_64/updateinfo                |   71 B  00:00:00
ol7_developer/x86_64/primary_db                | 444 kB  00:00:00
ol7_developer_EPEL/x86_64                      | 3.4 kB  00:00:00
ol7_developer_EPEL/x86_64/group_gz             |  87 kB  00:00:00
ol7_developer_EPEL/x86_64/updateinfo           | 4.9 kB  00:00:00
ol7_developer_EPEL/x86_64/primary_db           |  11 MB  00:00:00
ol7_ksplice                                    | 2.8 kB  00:00:00
ol7_ksplice/updateinfo                         | 4.8 kB  00:00:00
ol7_ksplice/primary_db                         | 257 kB  00:00:00
ol7_latest/x86_64                              | 3.4 kB  00:00:00
ol7_latest/x86_64/group_gz                     | 148 kB  00:00:00
ol7_latest/x86_64/updateinfo                   | 2.6 MB  00:00:00
ol7_latest/x86_64/primary_db                   |  15 MB  00:00:00
ol7_oci_included/x86_64                        | 2.9 kB  00:00:00
ol7_oci_included/x86_64/primary_db             |  71 kB  00:00:00
ol7_optional_latest/x86_64                     | 2.8 kB  00:00:00
ol7_optional_latest/x86_64/updateinfo          | 868 kB  00:00:00
ol7_optional_latest/x86_64/primary_db          | 4.0 MB  00:00:00
ol7_software_collections/x86_64                | 2.8 kB  00:00:00
ol7_software_collections/x86_64/updateinfo     | 8.7 kB  00:00:00
ol7_software_collections/x86_64/primary_db     | 4.7 MB  00:00:00

Dependencies Resolved

=============================================================================================
 Package                     Arch    Version  Repository                                Size
=============================================================================================
Installing:
 mysql80-community-release   noarch  el7-3    /mysql80-community-release-el7-3.noarch   31 k

Transaction Summary
=============================================================================================
Install  1 Package

Total size: 31 k
Installed size: 31 k
Is this ok [y/d/N]: y
Downloading packages:
Running transaction check
Running transaction test
Transaction test succeeded
Running transaction
  Installing : mysql80-community-release-el7-3.noarch                                                                                                       1/1
  Verifying  : mysql80-community-release-el7-3.noarch                                                                                                       1/1

Installed:
  mysql80-community-release.noarch 0:el7-3

Complete!
Installing the Community version
Now that I have the MySQL repository in place, I can install the MySQL Community edition server.
$ sudo yum install mysql-community-server
Loaded plugins: langpacks, ulninfo
mysql-connectors-community                               | 2.5 kB  00:00:00
mysql-tools-community                                    | 2.5 kB  00:00:00
mysql80-community                                        | 2.5 kB  00:00:00
(1/3): mysql-connectors-community/x86_64/primary_db      |  49 kB  00:00:00
(2/3): mysql-tools-community/x86_64/primary_db           |  66 kB  00:00:00
(3/3): mysql80-community/x86_64/primary_db               |  87 kB  00:00:00
Resolving Dependencies
--> Running transaction check
---> Package mysql-community-server.x86_64 0:8.0.18-1.el7 will be installed
--> Processing Dependency: mysql-community-common(x86-64) = 8.0.18-1.el7 for package: mysql-community-server-8.0.18-1.el7.x86_64
--> Processing Dependency: mysql-community-client(x86-64) >= 8.0.11 for package: mysql-community-server-8.0.18-1.el7.x86_64
--> Running transaction check
---> Package mysql-community-client.x86_64 0:8.0.18-1.el7 will be installed
--> Processing Dependency: mysql-community-libs(x86-64) >= 8.0.11 for package: mysql-community-client-8.0.18-1.el7.x86_64
---> Package mysql-community-common.x86_64 0:8.0.18-1.el7 will be installed
--> Running transaction check
---> Package mariadb-libs.x86_64 1:5.5.64-1.el7 will be obsoleted
--> Processing Dependency: libmysqlclient.so.18()(64bit) for package: 2:postfix-2.10.1-7.el7.x86_64
--> Processing Dependency: libmysqlclient.so.18(libmysqlclient_18)(64bit) for package: 2:postfix-2.10.1-7.el7.x86_64
---> Package mysql-community-libs.x86_64 0:8.0.18-1.el7 will be obsoleting
--> Running transaction check
---> Package mysql-community-libs-compat.x86_64 0:8.0.18-1.el7 will be obsoleting
--> Finished Dependency Resolution

Dependencies Resolved

======================================================================================
 Package                      Arch        Version         Repository            Size
======================================================================================
Installing:
 mysql-community-libs         x86_64      8.0.18-1.el7    mysql80-community     3.7 M
     replacing  mariadb-libs.x86_64 1:5.5.64-1.el7
 mysql-community-libs-compat  x86_64      8.0.18-1.el7    mysql80-community     1.3 M
     replacing  mariadb-libs.x86_64 1:5.5.64-1.el7
 mysql-community-server       x86_64      8.0.18-1.el7    mysql80-community     429 M
Installing for dependencies:
 mysql-community-client       x86_64      8.0.18-1.el7    mysql80-community      38 M
 mysql-community-common       x86_64      8.0.18-1.el7    mysql80-community     597 k

Transaction Summary
======================================================================================
Install  3 Packages (+2 Dependent packages)

Total download size: 473 M
Is this ok [y/d/N]: Y
Downloading packages:
warning: /var/cache/yum/x86_64/7Server/mysql80-community/packages/mysql-community-common-8.0.18-1.el7.x86_64.rpm: Header V3 DSA/SHA1 Signature, key ID 5072e1f5: NOKEY
Public key for mysql-community-common-8.0.18-1.el7.x86_64.rpm is not installed
(1/5): mysql-community-common-8.0.18-1.el7.x86_64.rpm           | 597 kB  00:00:00
(2/5): mysql-community-libs-8.0.18-1.el7.x86_64.rpm             | 3.7 MB  00:00:00
(3/5): mysql-community-libs-compat-8.0.18-1.el7.x86_64.rpm      | 1.3 MB  00:00:00
(4/5): mysql-community-client-8.0.18-1.el7.x86_64.rpm           |  38 MB  00:00:17
(5/5): mysql-community-server-8.0.18-1.el7.x86_64.rpm           | 429 MB  00:01:31
----------------------------------------------------------------------------------
Total                                                  5.1 MB/s | 473 MB  00:01:32
Retrieving key from file:///etc/pki/rpm-gpg/RPM-GPG-KEY-mysql
Importing GPG key 0x5072E1F5:
 Userid     : "MySQL Release Engineering "
 Fingerprint: a4a9 4068 76fc bd3c 4567 70c8 8c71 8d3b 5072 e1f5
 Package    : mysql80-community-release-el7-3.noarch (@/mysql80-community-release-el7-3.noarch)
 From       : /etc/pki/rpm-gpg/RPM-GPG-KEY-mysql
Is this ok [y/N]: y
Running transaction check
Running transaction test
Transaction test succeeded
Running transaction
  Installing : mysql-community-common-8.0.18-1.el7.x86_64        1/6
  Installing : mysql-community-libs-8.0.18-1.el7.x86_64          2/6
  Installing : mysql-community-client-8.0.18-1.el7.x86_64        3/6
  Installing : mysql-community-server-8.0.18-1.el7.x86_64        4/6
  Installing : mysql-community-libs-compat-8.0.18-1.el7.x86_64   5/6
  Erasing    : 1:mariadb-libs-5.5.64-1.el7.x86_64                6/6
  Verifying  : mysql-community-client-8.0.18-1.el7.x86_64        1/6
  Verifying  : mysql-community-common-8.0.18-1.el7.x86_64        2/6
  Verifying  : mysql-community-server-8.0.18-1.el7.x86_64        3/6
  Verifying  : mysql-community-libs-8.0.18-1.el7.x86_64          4/6
  Verifying  : mysql-community-libs-compat-8.0.18-1.el7.x86_64   5/6
  Verifying  : 1:mariadb-libs-5.5.64-1.el7.x86_64                6/6

Installed:
  mysql-community-libs.x86_64 0:8.0.18-1.el7
  mysql-community-libs-compat.x86_64 0:8.0.18-1.el7
  mysql-community-server.x86_64 0:8.0.18-1.el7

Dependency Installed:
  mysql-community-client.x86_64 0:8.0.18-1.el7
  mysql-community-common.x86_64 0:8.0.18-1.el7

Replaced:
  mariadb-libs.x86_64 1:5.5.64-1.el7

Complete!
Now that we have MySQL installed, we can start the server.
$ sudo service mysqld start
Redirecting to /bin/systemctl start mysqld.service
And I can check to make sure MySQL is running:
sudo service mysqld status
Redirecting to /bin/systemctl status mysqld.service
● mysqld.service - MySQL Server
   Loaded: loaded (/usr/lib/systemd/system/mysqld.service; enabled; vendor preset: disabled)
   Active: active (running) since Thu 2019-11-14 16:26:34 GMT; 41s ago
     Docs: man:mysqld(8)
           http://dev.mysql.com/doc/refman/en/using-systemd.html
  Process: 7344 ExecStartPre=/usr/bin/mysqld_pre_systemd (code=exited, status=0/SUCCESS)
 Main PID: 7426 (mysqld)
   Status: "Server is operational"
   CGroup: /system.slice/mysqld.service
           └─7426 /usr/sbin/mysqld

Nov 14 16:26:13 instance-20191113-1544 systemd[1]: Starting MySQL Server...
Nov 14 16:26:34 instance-20191113-1544 systemd[1]: Started MySQL Server.
During the installation process, the user ‘root’@’localhost’ is automatically created, along with a password which can be found in the MySQL error log file. To find the password, issue this command: Note: The location of the mysqld.log file may be different for your operating system.
sudo grep 'temporary password' /var/log/mysqld.log
2019-11-14T16:26:25.260720Z 5 [Note] [MY-010454] [Server]
 \ A temporary password is generated for root@localhost: i&wCaLKQf6Tm
I can now login to the MySQL server using this password. I will also need to change the password before I can do anything else within MySQL. I can do this with the ALTER USER command.
$ mysql -uroot -p
Enter password:
Welcome to the MySQL monitor.  Commands end with ; or \g.
Your MySQL connection id is 8
Server version: 8.0.18

Copyright (c) 2000, 2019, Oracle and/or its affiliates. All rights reserved.

Oracle is a registered trademark of Oracle Corporation and/or its
affiliates. Other names may be trademarks of their respective
owners.

Type 'help;' or '\h' for help. Type '\c' to clear the current input statement.

mysql> ALTER USER 'root'@'localhost' IDENTIFIED BY 'N3wP4ssW0rd678!';
Query OK, 0 rows affected (0.01 sec)
If you don’t specify a password that matches the default password policy, you will get an error message like this:
mysql> ALTER USER 'root'@'localhost' IDENTIFIED BY 'HeyThere!';
ERROR 1819 (HY000): Your password does not satisfy the current policy requirements
MySQL is now installed and ready to use.
mysql> show databases;
+--------------------+
| Database           |
+--------------------+
| information_schema |
| mysql              |
| performance_schema |
| sys                |
+--------------------+
4 rows in set (0.01 sec)
Enterprise Edition
MySQL’s Enterprise Edition (which requires a license) may be installed in the same way, except you must download the the Enterprise Edition files via Oracle’s eDelivery web site.
You will want to download at least the following files: (relative to your operating system)
-rw-rw-r--. 1 opc opc  40154652 Nov  4 21:53 mysql-commercial-client-8.0.18-1.1.el7.x86_64.rpm
-rw-rw-r--. 1 opc opc    623112 Nov  4 21:50 mysql-commercial-common-8.0.18-1.1.el7.x86_64.rpm
-rw-rw-r--. 1 opc opc   3890924 Nov  4 21:49 mysql-commercial-libs-8.0.18-1.1.el7.x86_64.rpm
-rw-rw-r--. 1 opc opc   1377676 Nov  4 21:48 mysql-commercial-libs-compat-8.0.18-1.1.el7.x86_64.rpm
-rw-rw-r--. 1 opc opc 477137056 Nov  4 21:34 mysql-commercial-server-8.0.18-1.1.el7.x86_64.rpm
To install, use this command:
$ sudo yum install mysql-community-{server,client,common,libs}-*
During the installation process, you should see something like this:
$ sudo yum install mysql-commercial*{server,client,common,libs}-*
Loaded plugins: langpacks, ulninfo
Examining mysql-commercial-server-8.0.18-1.1.el7.x86_64.rpm: mysql-commercial-server-8.0.18-1.1.el7.x86_64
Marking mysql-commercial-server-8.0.18-1.1.el7.x86_64.rpm to be installed
Examining mysql-commercial-client-8.0.18-1.1.el7.x86_64.rpm: mysql-commercial-client-8.0.18-1.1.el7.x86_64
Marking mysql-commercial-client-8.0.18-1.1.el7.x86_64.rpm to be installed
Examining mysql-commercial-common-8.0.18-1.1.el7.x86_64.rpm: mysql-commercial-common-8.0.18-1.1.el7.x86_64
Marking mysql-commercial-common-8.0.18-1.1.el7.x86_64.rpm to be installed
Examining mysql-commercial-libs-8.0.18-1.1.el7.x86_64.rpm: mysql-commercial-libs-8.0.18-1.1.el7.x86_64
Marking mysql-commercial-libs-8.0.18-1.1.el7.x86_64.rpm to be installed
Examining mysql-commercial-libs-compat-8.0.18-1.1.el7.x86_64.rpm: mysql-commercial-libs-compat-8.0.18-1.1.el7.x86_64
Marking mysql-commercial-libs-compat-8.0.18-1.1.el7.x86_64.rpm to be installed
Resolving Dependencies
--> Running transaction check
---> Package mysql-commercial-client.x86_64 0:8.0.18-1.1.el7 will be installed
---> Package mysql-commercial-common.x86_64 0:8.0.18-1.1.el7 will be installed
---> Package mysql-commercial-libs.x86_64 0:8.0.18-1.1.el7 will be installed
---> Package mysql-commercial-libs-compat.x86_64 0:8.0.18-1.1.el7 will be installed
---> Package mysql-commercial-server.x86_64 0:8.0.18-1.1.el7 will be installed
--> Finished Dependency Resolution

Dependencies Resolved

==========================================================================================================================
 Package                           Arch     Version           Repository                                            Size
==========================================================================================================================
Installing:
 mysql-commercial-client           x86_64   8.0.18-1.1.el7    /mysql-commercial-client-8.0.18-1.1.el7.x86_64        177 M
 mysql-commercial-common           x86_64   8.0.18-1.1.el7    /mysql-commercial-common-8.0.18-1.1.el7.x86_64        8.5 M
 mysql-commercial-libs             x86_64   8.0.18-1.1.el7    /mysql-commercial-libs-8.0.18-1.1.el7.x86_64           17 M
 mysql-commercial-libs-compat      x86_64   8.0.18-1.1.el7    /mysql-commercial-libs-compat-8.0.18-1.1.el7.x86_64   6.4 M
 mysql-commercial-server           x86_64   8.0.18-1.1.el7     /mysql-commercial-server-8.0.18-1.1.el7.x86_64       2.0 G

Transaction Summary
==========================================================================================================================
Install  5 Packages

Total size: 2.2 G
Installed size: 2.2 G
Is this ok [y/d/N]: y
Downloading packages:
Running transaction check
Running transaction test
Transaction test succeeded
Running transaction
  Installing : mysql-commercial-common-8.0.18-1.1.el7.x86_64             1/5
  Installing : mysql-commercial-libs-8.0.18-1.1.el7.x86_64               2/5
  Installing : mysql-commercial-client-8.0.18-1.1.el7.x86_64             3/5
  Installing : mysql-commercial-server-8.0.18-1.1.el7.x86_64             4/5
  Installing : mysql-commercial-libs-compat-8.0.18-1.1.el7.x86_64        5/5
  Verifying  : mysql-commercial-server-8.0.18-1.1.el7.x86_64             1/5
  Verifying  : mysql-commercial-libs-8.0.18-1.1.el7.x86_64               2/5
  Verifying  : mysql-commercial-common-8.0.18-1.1.el7.x86_64             3/5
  Verifying  : mysql-commercial-libs-compat-8.0.18-1.1.el7.x86_64        4/5
  Verifying  : mysql-commercial-client-8.0.18-1.1.el7.x86_64             5/5

Installed:
  mysql-commercial-client.x86_64 0:8.0.18-1.1.el7
  mysql-commercial-common.x86_64 0:8.0.18-1.1.el7
  mysql-commercial-libs.x86_64 0:8.0.18-1.1.el7
  mysql-commercial-libs-compat.x86_64 0:8.0.18-1.1.el7
  mysql-commercial-server.x86_64 0:8.0.18-1.1.el7

Complete!
You will need to change the password for root as explained above.
Now you have a free Oracle Cloud compute instance with MySQL running on it. The “Always Free” tier allows you to create two free instances.
 |
Tony Darnell is a Principal Sales Consultant for MySQL, a division of Oracle, Inc. MySQL is the world’s most popular open-source database program. Tony may be reached at info [at] ScriptingMySQL.com and on LinkedIn. |
 |
Tony is the author of Twenty Forty-Four: The League of Patriots Visit http://2044thebook.com for more information. |
 |
Tony is the editor/illustrator for NASA Graphics Standards Manual Remastered Edition Visit https://amzn.to/2oPFLI0 for more information. |
↧
MySQL: Check who’s trying to access data they should not
To illustrate how easy it’s to see who’s trying to access data they have not been granted for, we will first create a schema with two tables:
mysql> create database mydata;
mysql> use mydata
mysql> create table table1 (id int auto_increment primary key,
              name varchar(20), something varchar(20));
mysql> create table table2 (id int auto_increment primary key,
              name varchar(20), something varchar(20));
Now, let’s create a user :
mysql> create user myuser identified by 'mypassword';
And as it’s always good to talk about SQL ROLES, let’s define 3 roles for our user:
- myrole1: user has access to both tables in their entirety, reads and writes
- myrole2: user has access only to `table2`, reads and writes
- myrole3: user has only access to the column `name`of `table1` and just for reads
mysql> create role myrole1;
mysql> grant select, insert, update on mydata.* to myrole1;

mysql> create role myrole2;
mysql> grant select, insert, update on mydata.table2 to myrole2;

mysql> create role myrole3;
mysql> grant select(name) on mydata.table1 to myrole3;
Now let’s try to connect using our new user that doesn’t have any roles assigned yet:
$ mysqlsh myuser@localhost Please provide the password for 'myuser@localhost': ***** MySQL localhost:33060+ SQL
Perfect we are connected, can we see the schema and use it ?
MySQL localhost:33060+ SQL show databases; +--------------------+ | Database | +--------------------+ | information_schema | +--------------------+ 1 row in set (0.0018 sec) MySQL localhost:33060+ SQL use mydata MySQL Error ERROR 1044: Access denied for user 'myuser'@'%' to database 'mydata
So far, so good. Let’s assigned the first role to our user:
mysql> grant myrole1 to myuser;
Now the user can use the role:
MySQL localhost:33060+ SQL set role 'myrole1'; Query OK, 0 rows affected (0.0007 sec) MySQL localhost:33060+ SQL show databases; +--------------------+ | Database | +--------------------+ | information_schema | | mydata | +--------------------+
Now I will add some data in both tables:
SQL> insert into table1 values (0, 'fred', 'aaa'),
                               (0, 'kenny', 'bbb');
SQL> insert into table2 values (0, 'dave', 'ccc'),
                               (0, 'miguel', 'ddd');
Of course the user can select and see everything:
MySQL localhost:33060+ mydata SQL select * from table1; +----+-------+-----------+ | id | name | something | +----+-------+-----------+ | 1 | fred | aaa | | 2 | kenny | bbb | +----+-------+-----------+ 2 rows in set (0.0011 sec) MySQL localhost:33060+ mydata SQL select * from table2; +----+--------+-----------+ | id | name | something | +----+--------+-----------+ | 1 | dave | ccc | | 2 | miguel | ddd | +----+--------+-----------+ 2 rows in set (0.0010 sec)
If you remember it, before we assigned any role to our user, we tried to use the schema and it failed. Let’s see if as the DBA having access to performance_schema we can see it:
mysql> select * from performance_schema.events_errors_summary_by_user_by_error
where sum_error_raised>=1  and user='myuser'
and ERROR_NAME like '%DENIED%' order by LAST_SEEN desc\G
******************* 1. row *******************
              USER: myuser
      ERROR_NUMBER: 1044
        ERROR_NAME: ER_DBACCESS_DENIED_ERROR
         SQL_STATE: 42000
  SUM_ERROR_RAISED: 1
 SUM_ERROR_HANDLED: 0
        FIRST_SEEN: 2019-11-15 03:25:17
         LAST_SEEN: 2019-11-15 03:25:17
Now let’ s change the role for the user, for example the most restrictive one and do some operations, but before that, we need to grant all remaining roles to our user:
mysql> grant myrole2, myrole3 to myuser;
MySQL localhost:33060+ mydata SQL set role 'myrole3'; Query OK, 0 rows affected (0.0008 sec) MySQL localhost:33060+ mydata SQL select current_role(); +----------------+ | current_role() | +----------------+ |myrole3@%| +----------------+ 1 row in set (0.0008 sec)
And now let’s do some queries…
MySQL localhost:33060+ mydata SQL select * from table1; ERROR: 1143: SELECT command denied to user 'myuser'@'localhost' for column 'id' in table 'table1' MySQL localhost:33060+ mydata SQL select * from table2; ERROR: 1142: SELECT command denied to user 'myuser'@'localhost' for table 'table2' MySQL localhost:33060+ mydata SQL select name from table1; +-------+ | name | +-------+ | fred | | kenny | +-------+ 2 rows in set (0.0010 sec)
And running the same query as above, we can now very all those access attempts that were not granted:
 mysql> select * from performance_schema.events_errors_summary_by_user_by_error
where sum_error_raised>=1  and user='myuser'
and ERROR_NAME like '%DENIED%' order by LAST_SEEN desc\G
 ******************* 1. row *******************
              USER: myuser
      ERROR_NUMBER: 1142
        ERROR_NAME: ER_TABLEACCESS_DENIED_ERROR
         SQL_STATE: 42000
  SUM_ERROR_RAISED: 1
 SUM_ERROR_HANDLED: 0
        FIRST_SEEN: 2019-11-15 03:40:50
         LAST_SEEN: 2019-11-15 03:41:43
 ******************* 2. row *******************
              USER: myuser
      ERROR_NUMBER: 1143
        ERROR_NAME: ER_COLUMNACCESS_DENIED_ERROR
         SQL_STATE: 42000
  SUM_ERROR_RAISED: 1
 SUM_ERROR_HANDLED: 0
        FIRST_SEEN: 2019-11-15 03:41:38
         LAST_SEEN: 2019-11-15 03:41:38
 ******************* 3. row *******************
              USER: myuser
      ERROR_NUMBER: 1044
        ERROR_NAME: ER_DBACCESS_DENIED_ERROR
         SQL_STATE: 42000
  SUM_ERROR_RAISED: 1
 SUM_ERROR_HANDLED: 0
        FIRST_SEEN: 2019-11-15 03:25:17
         LAST_SEEN: 2019-11-15 03:25:17
In summary, it’s very easy to very who’s trying to access unauthorized data and when it happened.
And don’t forget, it’s time to upgrade to MySQL 8 ! #MySQL8isGreat 
Related links to SQL ROLES:
- https://lefred.be/content/how-to-grant-privileges-to-users-in-mysql-8-0/
- https://lefred.be/content/some-queries-related-to-mysql-roles/
- https://lefred.be/content/mysql-8-0-roles-and-graphml/
Credits for the icons:
- Security Camera by Anton Barbarov from the Noun Project
- computer access control by monkik from the Noun Project
↧
↧
The joy of database configuration
I am wary of papers with performance results for too many products.Too many means including results from systems for which you lack expertise. Wary means I have less faith in the comparison even when the ideas in the paper are awesome. I have expertise in MySQL, MongoDB, RocksDB, WiredTiger and InnoDB but even for them I have made and acknowledged ridiculous mistakes.
Database configuration is too hard. There are too many options, most of them aren't significant and the approach is bottom-up. I an expert on this -- in addition to years of tuning I have added more than a few options to RocksDB and MySQL.
This post was motivated by PostgreSQL. I want to run the insert benchmark for it and need a good configuration. I have nothing against PG with the exception of a few too many why not Postgres comments. The community is strong, docs are great and the product is still improving. But I think PostgreSQL configuration has room to improve -- just like RocksDB (here, here) and MySQL/InnoDB.
Too many options
A non-expert user lacks both the ability to choose good values for options and the ability to understand which options might be useful to set. My solution to too many options and most aren't significant is to use good defaults and split the option name space into two parts -- regular and expert. Regular options are set by most users because they matter for performance and don't have good default values. The amount of memory the DBMS can use is one such option - the default will be small.
Everything else is an expert option. These include options for which the default is great and options that rarely impact performance. There is a reason for expert options -- some workloads benefit from their existence and being able to set that option at runtime might avoid downtime. Options are also added early in the lifecycle of new features to allow developers to evaluate the new feature and choose good default values. But such options don't need to be exposed to all users.
The benefit from doing this is to avoid presenting a new user with tens or hundreds of options to consider. That is a lousy experience. And while X is too hard isn't always a valid complaint -- language (human and database query) is complex because they let us express complex idea -- I don't think we gain much from the current approach.
RocksDB has added functions that simplify configuration and even split the option namespace into two parts -- regular and advanced. This is a step in the right direction but I hope for more. I confirmed that most RocksDB options either have good defaults or aren't significant for my workloads and then published advice on tuning RocksDB.
The performance configurations I use for MongoDB/WiredTiger and MySQL/InnoDB are similar to my experience with RocksDB. I don't have to set too many options to get great performance. Alas, it took a long time to figure that out.
Top-down configuration
Top-down configuration is another approach that can help. The idea is simple - tell the DBMS about the hardware it can use and optionally state a few constraints.
The basic hardware configuration is empty which implies the DBMS gets everything it can find -- all memory, all CPU cores, all IO capacity. When a host does more than run a DBMS it should be easy to enforce that limit with one option for memory consumption, one for CPU, etc. The user shouldn't have to set ten options for ten different memory consumers. It is even worse when these limits are per instance -- limiting how much memory each sort buffer gets is a lousy way to manage total memory usage. IO capacity is interesting. AFAIK there was a tool included in RethinkDB that characterized IO capacity, PostgreSQL has a tool for fsync performance and we can't forget fio. But it is easy to be mislead about SSD performance.
The constraints cover things that are subjective. What is the max recovery time objective? How do you rank read, write, space and memory efficiency?
A great example of this is SQL Memory Management in Oracle 9i -- tell the DBMS how much memory it can use and let it figure out the best way to use it.
What about ML
I hope that ML makes it easier to discover the options that aren't significant and can be moved into the expert options namespace. But I prefer a solution with fewer tuning knobs, or at least fewer visible tuning knobs. I hope to avoid too many knobs (status quota) combined with ML. Lets make smarter database algorithms. If nothing else this should be a source of research funding, interesting PhDs and many papers worth reading.
↧
What's new in MySQL Cluster 8.0.18
MySQL Cluster 8.0.18 RC2 was released a few weeks back packed with a set of
new interesting things.
One major change we have done is to increase the number of data nodes from 48 to
144. There is also ongoing work to fully support 3 and 4 replicas in MySQL
Cluster 8.0. NDB has actually always been designed to handle up to 4 replicas.
But the test focus have previously been completely focused on 2 replicas. Now we
expanded our test focus to also verify that 3 and 4 replicas work well. This means
that with NDB 8.0 we will be able to confidently support 3 and 4 replicas.
This means that with NDB 8.0 it will be possible to have 48 node
groups with 3 replicas in each node group in one cluster.
The higher number of nodes in a cluster gives the possibility to store even more
data in the cluster. So with 48 node groups it is possible to store 48 TByte of
in-memory data in one NDB Cluster and on top of that one can also have
about 10x more data in disk data columns. Actually we have successfully
managed to load 5 TByte of data into a single node using the DBT2 benchmark,
so with 8.0 we will be able to store a few hundred TBytes of replicated
in-memory and petabytes of data in disk data columns for key-value stores
with high demands on storage space.
Given that we now support so much bigger data sets it is natural that we focus
on the ability to load data at high rates, both into in-memory data and into
disk data columns. For in-memory data this was solved already in 7.6 and
there is even more work in this area ongoing in 8.0.
We also upped one limitation in NDB where 7.6 have a limitation on row sizes
up to 14000 bytes, with NDB 8.0 we can handle 30000 byte row sizes.
Another obvious fact is that with so much data in the cluster it is important to
be able to analyze the data as well. Already in MySQL Cluster 7.2 we
implemented a parallel join operator inside of NDB Cluster available
from the MySQL Server for NDB tables. We made several important
improvements of this in 7.6 and even more has happened in NDB 8.0.
This graph shows the improvement made to TPC-H queries in 7.6 and in
8.0 up until 8.0.18. So chances are good that you will find that some of
your queries will be executed substantially faster in NDB 8.0 compared to
earlier versions. NDB is by design a parallel database machine, so what
we are doing here is ensuring that this parallel database machine can now
also be applied for more real-time analytics. We currently have parallel
filtering, parallel projection and parallel join in the data nodes. With
NDB 8.0 we also get all the new features of MySQL 8.0 that provides a
set of new features in the query processing area.
![]() The main feature added in 8.0.18 for query processing is the ability to pushdown
The main feature added in 8.0.18 for query processing is the ability to pushdown
join execution of queries where we have conditions of the type t1.a = t2.b.
Previously this was only possible for the columns handled by the choosen index
in the join. Now it can be handled for any condition in the query.
8.0.18 also introduces a first step of improved memory management where the goal
is to make more efficient use of the memory available to NDB data nodes and also
to make configuration a lot simpler.
In NDB 8.0 we have also introduced a parallel backup feature. This means that taking
a backup will be much faster than previously and load will be shared on all LDM threads.
new interesting things.
One major change we have done is to increase the number of data nodes from 48 to
144. There is also ongoing work to fully support 3 and 4 replicas in MySQL
Cluster 8.0. NDB has actually always been designed to handle up to 4 replicas.
But the test focus have previously been completely focused on 2 replicas. Now we
expanded our test focus to also verify that 3 and 4 replicas work well. This means
that with NDB 8.0 we will be able to confidently support 3 and 4 replicas.
This means that with NDB 8.0 it will be possible to have 48 node
groups with 3 replicas in each node group in one cluster.
The higher number of nodes in a cluster gives the possibility to store even more
data in the cluster. So with 48 node groups it is possible to store 48 TByte of
in-memory data in one NDB Cluster and on top of that one can also have
about 10x more data in disk data columns. Actually we have successfully
managed to load 5 TByte of data into a single node using the DBT2 benchmark,
so with 8.0 we will be able to store a few hundred TBytes of replicated
in-memory and petabytes of data in disk data columns for key-value stores
with high demands on storage space.
Given that we now support so much bigger data sets it is natural that we focus
on the ability to load data at high rates, both into in-memory data and into
disk data columns. For in-memory data this was solved already in 7.6 and
there is even more work in this area ongoing in 8.0.
We also upped one limitation in NDB where 7.6 have a limitation on row sizes
up to 14000 bytes, with NDB 8.0 we can handle 30000 byte row sizes.
Another obvious fact is that with so much data in the cluster it is important to
be able to analyze the data as well. Already in MySQL Cluster 7.2 we
implemented a parallel join operator inside of NDB Cluster available
from the MySQL Server for NDB tables. We made several important
improvements of this in 7.6 and even more has happened in NDB 8.0.
This graph shows the improvement made to TPC-H queries in 7.6 and in
8.0 up until 8.0.18. So chances are good that you will find that some of
your queries will be executed substantially faster in NDB 8.0 compared to
earlier versions. NDB is by design a parallel database machine, so what
we are doing here is ensuring that this parallel database machine can now
also be applied for more real-time analytics. We currently have parallel
filtering, parallel projection and parallel join in the data nodes. With
NDB 8.0 we also get all the new features of MySQL 8.0 that provides a
set of new features in the query processing area.

join execution of queries where we have conditions of the type t1.a = t2.b.
Previously this was only possible for the columns handled by the choosen index
in the join. Now it can be handled for any condition in the query.
8.0.18 also introduces a first step of improved memory management where the goal
is to make more efficient use of the memory available to NDB data nodes and also
to make configuration a lot simpler.
In NDB 8.0 we have also introduced a parallel backup feature. This means that taking
a backup will be much faster than previously and load will be shared on all LDM threads.
↧
My theory on technical debt and OSS
This is a hypothesis, perhaps it is true. I am biased given that I spent 15 years acknowledging tech debt on a vendor-based project (MySQL) and not much time on community-based projects.
My theory on tech debt and OSS is that there is more acknowledgement of tech debt in vendor-based projects than community-based ones. This is an advantage for vendor-based projects assuming you are more likely to fix acknowledged problems. Of course there are other advantages for community-based projects.
I think there is more acknowledgement of tech debt in vendor-based projects because the community is criticizing someone else's effort rather than their own. This is human nature, even if the effect and behavior aren't always kind. I spent many years marketing bugs that needed to be fixed -- along with many years leading teams working to fix those bugs.
↧
MySQL high availability with ProxySQL, Consul and Orchestrator
In this post, we will explore one approach to MySQL high availability with ProxySQL, Consul and Orchestrator.
This is a follow up to my previous post about a similar architecture but using HAProxy instead. I’ve re-used some of the content from that post so that you don’t have to go read through that one, and have everything you need in here.
Let’s briefly go over each piece of the puzzle:
– ProxySQL is in charge of connecting the application to the appropriate backend (reader or writer).
It can be installed on each application server directly or we can have an intermediate connection layer with one or more ProxySQL servers. The former probably makes sense if you have a small number of application servers; as the number grows, the latter option becomes more attractive. Another scenario for the latter would be to have a “shared” ProxySQL layer that connects applications to different database clusters.
– Orchestrator’s role is to monitor the servers and perform automatic (or manual) topology changes as needed.
– Consul is used to decouple Orchestrator from ProxySQL, and serves as the source of truth for the topology. Orchestrator will be in charge of updating the identity of the master in Consul when there are topology changes. Why not have Orchestrator update ProxySQL directly? Well, for one, Orchestrator hooks are fired only once… what happens if there is any kind of error or network partition? Also, Orchestrator would need to know ProxySQL admin credentials which might introduce a security issue.
– Consul-template runs locally on ProxySQL server(s) and is subscribed to Consul K/V store, and when it detects a change in any value, it will trigger an action. In this case, the action is to propagate the information to ProxySQL by rendering and executing a template (more on this later).
Proof of concept
With the goal of minimizing the number of servers required for the POC, I installed three servers which run MySQL and Consul servers: mysql1, mysql2 and mysql3. On mysql3, I also installed ProxySQL, Orchestrator and Consul-template. In a real production environment, you’d have servers separated more like this:
- ProxySQL + consul-template + Consul (client mode)
- MySQL
- Orchestrator + Consul (client mode)
- Consul (server mode)
If you have Consul infrastructure already in use in your organization, it is possible to leverage it. A few new K/V pairs is all that’s required. If you are not using Consul already, and don’t plan to use it for anything else, it is often installed on the same servers where Orchestrator will run. This helps reduce the number of servers required for this architecture.
Installing Consul
- Install Consul on mysql1, mysql2 and mysql3:
$ sudo yum -y install unzip
$ sudo useradd consul
$ sudo mkdir -p /opt/consul
$ sudo touch /var/log/consul.log
$ cd /opt/consul
$ sudo wget https://releases.hashicorp.com/consul/1.0.7/consul_1.0.7_linux_amd64.zip
$ sudo unzip consul_1.0.7_linux_amd64.zip
$ sudo ln -s /opt/consul/consul /usr/local/bin/consul
$ sudo chown consul:consul -R /opt/consul* /var/log/consul.log
- Bootstrap the Consul cluster from one node. I’ve picked mysql3 here:
$ sudo vi /etc/consul.conf.json

{
  "datacenter": "dc1",
  "data_dir": "/opt/consul/",
  "log_level": "INFO",
  "node_name": "mysql3",
  "server": true,
  "ui": true,
  "bootstrap_expect": 3,
  "retry_join": [
    "192.168.56.100",
    "192.168.56.101",
    "192.168.56.102"
  ],
  "client_addr": "0.0.0.0",
  "advertise_addr": "192.168.56.102"
}

$ sudo su - consul -c 'consul agent -config-file=/etc/consul.conf.json -config-dir=/etc/consul.d > /var/log/consul.log &'
- Start Consul on mysql1 and have it join the cluster:
$ sudo vi /etc/consul.conf.json
{
  "datacenter": "dc1",
  "data_dir": "/opt/consul/",
  "log_level": "INFO",
  "node_name": "mysql1",
  "server": true,
  "ui": true,
  "bootstrap_expect": 3,
  "retry_join": [
    "192.168.56.100",
    "192.168.56.101",
    "192.168.56.102"
  ],
  "client_addr": "0.0.0.0",
  "advertise_addr": "192.168.56.100"
}

$ sudo su - consul -c 'consul agent -config-file=/etc/consul.conf.json -config-dir=/etc/consul.d > /var/log/consul.log &'
$ consul join 192.168.56.102
- Start Consul on mysql2 and have it join the cluster:
$ sudo vi /etc/consul.conf.json
{
  "datacenter": "dc1",
  "data_dir": "/opt/consul/",
  "log_level": "INFO",
  "node_name": "mysql2",
  "server": true,
  "ui": true,
  "bootstrap_expect": 3,
  "retry_join": [
    "192.168.56.100",
    "192.168.56.101",
    "192.168.56.102"
  ],
  "retry_join": ,
  "client_addr": "0.0.0.0",
  "advertise_addr": "192.168.56.101"
}

$ sudo su - consul -c 'consul agent -config-file=/etc/consul.conf.json -config-dir=/etc/consul.d > /var/log/consul.log &'
$ consul join 192.168.56.102
At this point we have a working three-node Consul cluster. We can test writing k/v pairs to it and retrieving them back:
$ consul kv put foo bar
Success! Data written to: foo

$ consul kv get foo
bar
Configuring Orchestrator to write to Consul
Orchestrator has built-in support for Consul. If Consul lives on separate servers you should still install the Consul agent/client on the Orchestrator machine. This allows for local communication between Orchestrator and the Consul cluster (via the API) to prevent issues during network partitioning scenarios. In our lab example, this is not required as the Consul servers are already present on the local machine.
- Configure Orchestrator to write to Consul on each master change. Add the following lines to Orchestrator configuration:
  $ vi /etc/orchestrator.conf.json

  "KVClusterMasterPrefix": "mysql/master",
  "ConsulAddress": "127.0.0.1:8500",
- Restart Orchestrator:
$ service orchestrator restart
- Populate the current master value manually. We need to tell Orchestrator to populate the values in Consul while bootstrapping the first time. This is accomplished by calling orchestrator-client. Orchestrator will update the values automatically if there is a master change.
$ orchestrator-client -c submit-masters-to-kv-stores
- Check the stored values from command line:
$ consul kv get mysql/master/testcluster
mysql1:3306
Slave servers can also be stored in Consul; however, they will not be maintained automatically by Orchestrator. We’d need to create an external script that can make use of the Orchestrator API and put this in cron, but this is out of scope for this post. The template I am using below assumes they are kept under mysql/slave/testcluster prefix.
Using Consul template to manage ProxySQL
We have ProxySQL running on mysql3. The idea is to have the Consul template dynamically update ProxySQL configuration when there are changes to the topology.
- Install Consul template on mysql3:
$ mkdir /opt/consul-template
$ cd /opt/consul-template
$ sudo wget https://releases.hashicorp.com/consul-template/0.19.4/consul-template_0.19.4_linux_amd64.zip
$ sudo unzip consul-template_0.19.4_linux_amd64.zip
$ sudo ln -s /opt/consul-template/consul-template /usr/local/bin/consul-template
- Create a template for ProxySQL config file. Note this template also deals with slave servers.
$ vi /opt/consul-template/templates/proxysql.ctmpl

{{ if keyExists "mysql/master/testcluster/hostname" }}
DELETE FROM mysql_servers where hostgroup_id=0;
REPLACE into mysql_servers (hostgroup_id, hostname) values ( 0, "{{ key "mysql/master/testcluster/hostname" }}" );
{{ end }}
{{ range tree "mysql/slave/testcluster" }}
REPLACE into mysql_servers (hostgroup_id, hostname) values ( 1, "{{ .Key }}{{ .Value }}" );
{{ end }}
LOAD MYSQL SERVERS TO RUNTIME;
SAVE MYSQL SERVERS TO DISK;
- Create consul-template config file. Note that we need Consul agent, which will provide us with a Consul API endpoint at port 8500, installed locally in order for consul template to subscribe to 127.0.0.1:8500.
$ vi /opt/consul-template/config/consul-template.cfg

consul {
  auth {
    enabled = false
  }

  address = "127.0.0.1:8500"

  retry {
    enabled = true
    attempts = 12
    backoff = "250ms"
    max_backoff = "1m"
  }

  ssl {
    enabled = false
  }
}

reload_signal = "SIGHUP"
kill_signal = "SIGINT"
max_stale = "10m"
log_level = "info"

wait {
  min = "5s"
  max = "10s"
}

template {
  source = "/opt/consul-template/templates/proxysql.ctmpl"
  destination = "/opt/consul-template/templates/proxysql.sql"

# log in to proxysql and execute the template file containing sql statements to set the new topology
  command = "/bin/bash -c 'mysql --defaults-file=/etc/proxysql-admin.my.cnf < /opt/consul-template/templates/proxysql.sql'"
  command_timeout = "60s"
  perms = 0644
  backup = true
  wait = "2s:6s"
}
- Start consul-template
$ nohup /usr/local/bin/consul-template -config=/opt/consul-template/config/consul-template.cfg > /var/log/consul-template/consul-template.log 2>&1 &
The next step is doing a master change (e.g. via Orchestrator GUI) and seeing the effects. Something like this should be present on the logs:
[root@mysql3 config]$ tail -f /var/log/consul-template/consul-template.log

[INFO] (runner) rendered "/opt/consul-template/templates/proxysql.ctmpl" => "/opt/consul-template/templates/proxysql.sql"
[INFO] (runner) executing command "/bin/bash -c 'mysql --defaults-file=/etc/proxysql-admin.my.cnf < /opt/consul-template/templates/proxysql.sql'" from "/opt/consul-template/templates/proxysql.ctmpl" => "/opt/consul-template/templates/proxysql.sql"
What happened? Orchestrator updated the K/V in Consul, and Consul template detected the change and generated a .sql file with the commands to update ProxySQL, then executed them.
Conclusion
ProxySQL, Orchestrator and Consul are a great solution to put together for highly available MySQL clusters. Some assembly is required, but the results will definitely pay off in the long term.
If you want to read more about how the benefits of a setup like this, make sure to check out my post about graceful switchover without returning any errors to the application. Also Matthias’ post about autoscaling ProxySQL in the cloud.
↧
↧
Database Load Balancing in the Cloud - MySQL Master Failover with ProxySQL 2.0: Part Two (Seamless Failover)
In the previous blog we showed you how to set up an environment in Amazon AWS EC2 that consists of a Percona Server 8.0 Replication Cluster (in Master - Slave topology). We deployed ProxySQL and we configured our application (Sysbench).
We also used ClusterControl to make the deployment easier, faster and more stable. This is the environment we ended up with...

This is how it looks in ClusterControl:

In this blog post we are going to review the requirements and show you how, in this setup, you can seamlessly perform master switches.
Seamless Master Switch with ProxySQL 2.0
We are going to benefit from ProxySQL ability to queue connections if there are no nodes available in a hostgroup. ProxySQL utilizes hostgroups to differentiate between backend nodes with different roles. You can see the configuration on the screenshot below.

In our case we have two host groups - hostgroup 10 contains writers (master) and hostgroup 20 contains slaves (and also it may contain master, depends on the configuration). As you may know, ProxySQL uses SQL interface for configuration. ClusterControl exposes most of the configuration options in the UI but some settings cannot be set up via ClusterControl (or they are configured automatically by ClusterControl). One of such settings is how the ProxySQL should detect and configure backend nodes in replication environment.
mysql> SELECT * FROM mysql_replication_hostgroups;

+------------------+------------------+------------+-------------+

| writer_hostgroup | reader_hostgroup | check_type | comment     |

+------------------+------------------+------------+-------------+

| 10               | 20 | read_only  | host groups |

+------------------+------------------+------------+-------------+

1 row in set (0.00 sec)
Configuration stored in mysql_replication_hostgroups table defines if and how ProxySQL will automatically assign master and slaves to correct hostgroups. In short, the configuration above tells ProxySQL to assign writers to HG10, readers to HG20. If a node is a writer or reader is determined by the state of variable ‘read_only’. If read_only is enabled, node is marked as reader and assigned to HG20. If not, node is marked as writer and assigned to HG10. On top of that we have a variable:

Which determines if writer should also show up in the readers’ hostgroup or not. In our case it is set to ‘True’ thus our writer (master) is also a part of HG20.
ProxySQL does not manage backend nodes but it does access them and check the state of them, including the state of the read_only variable. This is done by monitoring user, which has been configured by ClusterControl according to your input at the deployment time for ProxySQL. If the state of the variable changes, ProxySQL will reassign it to proper hostgroup, based on the value for read_only variable and based on the settings in mysql-monitor_writer_is_also_reader variable in ProxySQL.
Here enters ClusterControl. ClusterControl monitors the state of the cluster. Should master is not available, failover will occur. It is more complex than that and we explained this process in detail in one of our earlier blogs. What is important for us is that, as long as it is safe, ClusterControl will execute the failover and in the process it will reconfigure read_only variables on old and new master. ProxySQL will see the change and modify its hostgroups accordingly. This will also happen in case of the regular slave promotion, which can easily be executed from ClusterControl by starting this job:

The final outcome will be that the new master will be promoted and assigned to HG10 in ProxySQL while the old master will be reconfigured as a slave (and it will be a part of HG20 in ProxySQL). The process of master change may take a while depending on environment, application and traffic (it is even possible to failover in 11 seconds, as my colleague has tested). During this time database (master) will not be reachable in ProxySQL. This leads to some problems. For starters, the application will receive errors from the database and user experience will suffer - no one likes to see errors. Luckily, under some circumstances, we can reduce the impact. The requirement for this is that the application does not use (at all or at that particular time) multi-statement transactions. This is quite expected - if you have a multi-statement transaction (so, BEGIN; … ; COMMIT;) you cannot move it from server to server because this will no longer be a transaction. In such cases the only safe way is to rollback the transaction and start once more on a new master. Prepared statements are also a no-no: they are prepared on a particular host (master) and they do not exist on slaves so once one slave will be promoted to a new master, it is not possible for it to execute prepared statements which has been prepared on old master. On the other hand if you run only auto-committed, single-statement transactions, you can benefit from the feature we are going to describe below.
One of the great features ProxySQL has is an ability to queue incoming transactions if they are directed to a hostgroup that does not have any nodes available. This is defined by following two variables:

ClusterControl increases them to 20 seconds, allowing even for quite some long failovers to perform without any error being sent to the application.
Testing the Seamless Master Switch
We are going to run the test in our environment. As the application we are going to use SysBench started as:
while true ; do sysbench /root/sysbench/src/lua/oltp_read_write.lua --threads=4 --events=0 --time=3600 --reconnect=1 --mysql-socket=/tmp/proxysql.sock --mysql-user=sbtest --mysql-password=sbtest --tables=32 --report-interval=1 --skip-trx=on --table-size=100000 --db-ps-mode=disable --rate=5 run ; doneBasically, we will run sysbench in a loop (in case an error show up). We will run it in 4 threads. Threads will reconnect after every transaction. There will be no multi-statement transactions and we will not use prepared statements. Then we will trigger the master switch by promoting a slave in the ClusterControl UI. This is how the master switch looks like from the application standpoint:
[ 560s ] thds: 4 tps: 5.00 qps: 90.00 (r/w/o: 70.00/20.00/0.00) lat (ms,95%): 18.95 err/s: 0.00 reconn/s: 5.00

[ 560s ] queue length: 0, concurrency: 0

[ 561s ] thds: 4 tps: 5.00 qps: 90.00 (r/w/o: 70.00/20.00/0.00) lat (ms,95%): 17.01 err/s: 0.00 reconn/s: 5.00

[ 561s ] queue length: 0, concurrency: 0

[ 562s ] thds: 4 tps: 7.00 qps: 126.00 (r/w/o: 98.00/28.00/0.00) lat (ms,95%): 28.67 err/s: 0.00 reconn/s: 7.00

[ 562s ] queue length: 0, concurrency: 0

[ 563s ] thds: 4 tps: 3.00 qps: 68.00 (r/w/o: 56.00/12.00/0.00) lat (ms,95%): 17.95 err/s: 0.00 reconn/s: 3.00

[ 563s ] queue length: 0, concurrency: 1
We can see that the queries are being executed with low latency.
[ 564s ] thds: 4 tps: 0.00 qps: 42.00 (r/w/o: 42.00/0.00/0.00) lat (ms,95%): 0.00 err/s: 0.00 reconn/s: 0.00

[ 564s ] queue length: 1, concurrency: 4
Then the queries paused - you can see this by the latency being zero and transactions per second being equal to zero as well.
[ 565s ] thds: 4 tps: 0.00 qps: 0.00 (r/w/o: 0.00/0.00/0.00) lat (ms,95%): 0.00 err/s: 0.00 reconn/s: 0.00

[ 565s ] queue length: 5, concurrency: 4

[ 566s ] thds: 4 tps: 0.00 qps: 0.00 (r/w/o: 0.00/0.00/0.00) lat (ms,95%): 0.00 err/s: 0.00 reconn/s: 0.00

[ 566s ] queue length: 15, concurrency: 4
Two seconds in queue is growing, still no response coming from the database.
[ 567s ] thds: 4 tps: 20.00 qps: 367.93 (r/w/o: 279.95/87.98/0.00) lat (ms,95%): 3639.94 err/s: 0.00 reconn/s: 20.00

[ 567s ] queue length: 1, concurrency: 4
After three seconds application was finally able to reach the database again. You can see the traffic is now non-zero and the queue length has been reduced. You can see the latency around 3.6 seconds - this is for how long the queries have been paused
[ 568s ] thds: 4 tps: 10.00 qps: 116.04 (r/w/o: 84.03/32.01/0.00) lat (ms,95%): 539.71 err/s: 0.00 reconn/s: 10.00

[ 568s ] queue length: 0, concurrency: 0

[ 569s ] thds: 4 tps: 4.00 qps: 72.00 (r/w/o: 56.00/16.00/0.00) lat (ms,95%): 16.12 err/s: 0.00 reconn/s: 4.00

[ 569s ] queue length: 0, concurrency: 0

[ 570s ] thds: 4 tps: 8.00 qps: 144.01 (r/w/o: 112.00/32.00/0.00) lat (ms,95%): 24.83 err/s: 0.00 reconn/s: 8.00

[ 570s ] queue length: 0, concurrency: 0

[ 571s ] thds: 4 tps: 5.00 qps: 98.99 (r/w/o: 78.99/20.00/0.00) lat (ms,95%): 21.50 err/s: 0.00 reconn/s: 5.00

[ 571s ] queue length: 0, concurrency: 1

[ 572s ] thds: 4 tps: 5.00 qps: 80.98 (r/w/o: 60.99/20.00/0.00) lat (ms,95%): 17.95 err/s: 0.00 reconn/s: 5.00

[ 572s ] queue length: 0, concurrency: 0

[ 573s ] thds: 4 tps: 2.00 qps: 36.01 (r/w/o: 28.01/8.00/0.00) lat (ms,95%): 14.46 err/s: 0.00 reconn/s: 2.00

[ 573s ] queue length: 0, concurrency: 0
Everything is stable again, total impact for the master switch was 3.6 second increase in the latency and no traffic hitting database for 3.6 seconds. Other than that the master switch was transparent to the application. Of course, whether it will be 3.6 seconds or more depends on the environment, traffic and so on but as long as the master switch can be performed under 20 seconds, no error will be returned to the application.
Conclusion
As you can see, with ClusterControl and ProxySQL 2.0 you are just a couple of clicks from achieving a seamless failover and master switch for your MySQL Replication clusters.
↧
Oracle’s “Always Free” Cloud Instance – Adding a web server to your free MySQL compute instance with zero monthly charges
In a previous post, I explained how you can take advantage of Oracle’s “Always Free” Cloud instance to obtain a free Oracle Cloud compute instance (virtual machine) and install a copy of MySQL – without having to pay a setup fee and without incurring any monthly charges. And, you can have two free compute instances per account.
This free Cloud option from Oracle is great. I can think of a lot of ways to utilize a free Oracle Cloud compute instance – but the first one that came to mind is by using it as a web server. Part of Oracle’s “Always Free” offering falls under their “Additional Services” category – which includes 10 TB of outbound data transfer each month. If you have a small web site without a ton of graphics or one where you don’t have a million hits per month, using this free Oracle Cloud instance could save you a little bit of money versus paying to host your web site with a web hosting company.
To get started, go back and read the post I mentioned, to get your “Always Free” Oracle Cloud account and to install MySQL (if you need a database for your web site). If you don’t need MySQL, just follow the post to set up your cloud account and create your first compute instance.
Once you have created your first compute instance, you only have three small tasks to complete:
1. You will need to install a web server
2. Setup a security rule to allow traffic over port 80
3. Connect your Oracle public IP address to your domain name by editing the domain name service (DNS) entry for your domain name.
The first two tasks should take you less than ten minutes to complete. Updating your DNS entry shouldn’t take but a few minutes – if you know how to do it with your domain name provider.
Installing a web server
Depending upon which operating system (OS) you chose when you created your compute instances, you should be able to install the default web server that comes with that OS. For my compute instance, I chose to install the default OS of Oracle Linux, so I can install the Apache web server via yum. Your OS might be different, but for most Linux versions, the command is “sudo yum install httpd“. If you want yum to automatically answer any install questions with a “yes”, you can add the -y option. (Click here for more yum options)
Note: Remember that with an Oracle compute instance, you will need to run most tasks via sudo (as root).
$ sudo yum install httpd -y
Loaded plugins: langpacks, ulninfo
mysql-connectors-community                        | 2.5 kB  00:00:00
mysql-tools-community                             | 2.5 kB  00:00:00
mysql80-community                                 | 2.5 kB  00:00:00
ol7_UEKR5                                         | 2.8 kB  00:00:00
ol7_addons                                        | 2.8 kB  00:00:00
ol7_developer                                     | 2.8 kB  00:00:00
ol7_developer_EPEL                                | 3.4 kB  00:00:00
ol7_ksplice                                       | 2.8 kB  00:00:00
ol7_latest                                        | 3.4 kB  00:00:00
ol7_oci_included                                  | 2.9 kB  00:00:00
ol7_optional_latest                               | 2.8 kB  00:00:00
ol7_software_collections                          | 2.8 kB  00:00:00
(1/5): ol7_optional_latest/x86_64/updateinfo      | 869 kB  00:00:00
(2/5): ol7_latest/x86_64/updateinfo               | 2.6 MB  00:00:00
(3/5): ol7_optional_latest/x86_64/primary_db      | 4.0 MB  00:00:00
(4/5): ol7_latest/x86_64/primary_db               |  17 MB  00:00:01
(5/5): ol7_ksplice/primary_db                     | 276 kB  00:00:00
Resolving Dependencies
--> Running transaction check
---> Package httpd.x86_64 0:2.4.6-90.0.1.el7 will be installed
--> Processing Dependency: httpd-tools = 2.4.6-90.0.1.el7 for package: httpd-2.4.6-90.0.1.el7.x86_64
--> Processing Dependency: /etc/mime.types for package: httpd-2.4.6-90.0.1.el7.x86_64
--> Processing Dependency: libaprutil-1.so.0()(64bit) for package: httpd-2.4.6-90.0.1.el7.x86_64
--> Processing Dependency: libapr-1.so.0()(64bit) for package: httpd-2.4.6-90.0.1.el7.x86_64
--> Running transaction check
---> Package apr.x86_64 0:1.4.8-5.el7 will be installed
---> Package apr-util.x86_64 0:1.5.2-6.0.1.el7 will be installed
---> Package httpd-tools.x86_64 0:2.4.6-90.0.1.el7 will be installed
---> Package mailcap.noarch 0:2.1.41-2.el7 will be installed
--> Finished Dependency Resolution

Dependencies Resolved

==============================================================================
 Package                       Arch     Version            Repository    Size
==============================================================================
Installing:
 httpd                         x86_64   2.4.6-90.0.1.el7   ol7_latest    1.2 M
Installing for dependencies:
 apr                           x86_64   1.4.8-5.el7        ol7_latest    103 k
 apr-util                      x86_64   1.5.2-6.0.1.el7    ol7_latest     91 k
 httpd-tools                   x86_64   2.4.6-90.0.1.el7   ol7_latest     90 k
 mailcap                       noarch   2.1.41-2.el7       ol7_latest     30 k

Transaction Summary
==============================================================================
Install  1 Package (+4 Dependent packages)

Total download size: 1.5 M
Installed size: 4.3 M
Downloading packages:
(1/5): apr-util-1.5.2-6.0.1.el7.x86_64.rpm        |  91 kB  00:00:00
(2/5): apr-1.4.8-5.el7.x86_64.rpm                 | 103 kB  00:00:00
(3/5): httpd-tools-2.4.6-90.0.1.el7.x86_64.rpm    |  90 kB  00:00:00
(4/5): mailcap-2.1.41-2.el7.noarch.rpm            |  30 kB  00:00:00
(5/5): httpd-2.4.6-90.0.1.el7.x86_64.rpm          | 1.2 MB  00:00:00
-------------------------------------------------------------------------------
Total                                    2.8 MB/s | 1.5 MB  00:00:00
Running transaction check
Running transaction test
Transaction test succeeded
Running transaction
  Installing : apr-1.4.8-5.el7.x86_64                1/5
  Installing : apr-util-1.5.2-6.0.1.el7.x86_64       2/5
  Installing : httpd-tools-2.4.6-90.0.1.el7.x86_64   3/5
  Installing : mailcap-2.1.41-2.el7.noarch           4/5
  Installing : httpd-2.4.6-90.0.1.el7.x86_64         5/5
  Verifying  : httpd-tools-2.4.6-90.0.1.el7.x86_64   1/5
  Verifying  : mailcap-2.1.41-2.el7.noarch           2/5
  Verifying  : apr-util-1.5.2-6.0.1.el7.x86_64       3/5
  Verifying  : httpd-2.4.6-90.0.1.el7.x86_64         4/5
  Verifying  : apr-1.4.8-5.el7.x86_64                5/5

Installed:
  httpd.x86_64 0:2.4.6-90.0.1.el7

Dependency Installed:
  apr.x86_64 0:1.4.8-5.el7
  apr-util.x86_64 0:1.5.2-6.0.1.el7
  httpd-tools.x86_64 0:2.4.6-90.0.1.el7
  mailcap.noarch 0:2.1.41-2.el7

Complete!
With Apache installed, I can go ahead and start the web server, and I can also configure it to start after the system reboots.
$ sudo apachectl start
$ sudo systemctl enable httpd
Created symlink from /etc/systemd/system/multi-user.target.wants/httpd.service to /usr/lib/systemd/system/httpd.service.
If you want, you can run a quick check on the Apache configuration.
$ sudo apachectl configtest
Syntax OK
Next, you will want to create the firewall rules to allow access to the ports on which the HTTP server listens.
$ sudo firewall-cmd --permanent --zone=public --add-service=http
success
$ sudo firewall-cmd --reload
success
Create an initial web page
And finally, create a starter web page so you can test the web server later.
sudo bash -c 'echo This is my new web page running on Oracle Cloud Always Free compute instance > /var/www/html/index.html'
Note: The web page files are stored in /var/www/html.
Monitor your usage and potential fees
WARNING: I have not fully tested Oracle’s “Always Free” service yet, and while there shouldn’t be any hidden “gotchas” when it comes to Oracle’s Cloud billing, I am not entirely sure if this use case will fall under their “Always Free” usage. I will be setting up a web page and testing it to make sure I don’t run into any hidden problems as far as being charged for using the cloud network. Therefore, you will want to also monitor your usage.
To monitor your instance’s usage, from the Oracle Cloud menu (top left of your screen), go to Account Management -> Cost Analysis after your web site has been running for a day or two – and you can see if this is truly an “Always Free” option for your web site.

Creating a security rule
You will need to create a stateless security rule to allow ingress traffic on port 80. From the Oracle Cloud menu (top left of your screen), go down to Networking and over to Virtual Cloud Networks.

You will be presented with a list of the Virtual Cloud Networks (VCN) you have already created, and if you are doing this from the beginning, you should only have one VCN listed. Click on the VCN name that begins with VirtualCloudNetwork.

On the left, you will see a menu like this. Click on “Security Lists”:

To the right of the above menu, you will be see a list of the security lists you have already created, and if you are doing this from the beginning, you should only have one security list available. Click on the security list name that begins with Default Security List for VirtualCloudNetwork – where the VirtualCloudNetwork name matches your VirtualCloudNetwork name.

You are going to need to add an Ingress Rule, so click on the “Add Ingress Rules” button:

Fill out the form like this, and then click on “Add Ingress Rules”.

Note: You do not want to click on the “Stateless” box. A stateless rule means that you will also need to create an egress rule for the outbound port 80 traffic. If you leave this unchecked, the rule that is created will be a “stateful” rule, which means that if you allow inbound traffic on port 80, outbound traffic is also automatically allowed.
From Oracle’s documentation:
“Marking a security rule as stateful indicates that you want to use connection tracking for any traffic that matches that rule. This means that when an instance receives traffic matching the stateful ingress rule, the response is tracked and automatically allowed back to the originating host, regardless of any egress rules applicable to the instance. And when an instance sends traffic that matches a stateful egress rule, the incoming response is automatically allowed, regardless of any ingress rules. For more details, see Connection Tracking Details for Stateful Rules.
You should now see a list of Ingress Rules that looks something like this, with your new Ingress Rule at the bottom.

Testing the web server
After you have completed the steps above, you can put your public IP address into a browser window and you should see the web page you created above.

Connecting your domain name to the Oracle Cloud IP address
If you have a domain name for your web site, you will need to go to your domain name hosting company, edit the DNS entry for your domain name and use your Oracle Cloud Public IP address. I can’t really provide you with instructions on how to do this specific to your hosting site. But, if you need an inexpensive domain name and website hosting company, I would recommend www.ionos.com (formerly www.1and1.com). I have used them for over 15 years and they have great products and customer service. And they have special prices for first-year domain names. I just registered a .us domain name for $7.50 for the first year, and $15 for each year after that.
The DNS changes will take anywhere from 24-48 hours to propagate across the Internet. But you can test your web site using the Oracle Cloud public IP address.
Now you have a free Oracle Cloud compute instance with MySQL and a web server running on it. Remember – the “Always Free” tier allows you to create two free compute instances (or virtual machines).
|
Tony Darnell is a Principal Sales Consultant for MySQL, a division of Oracle, Inc. MySQL is the world’s most popular open-source database program. Tony may be reached at info [at] ScriptingMySQL.com and on LinkedIn. |
|
Tony is the author of Twenty Forty-Four: The League of Patriots Visit http://2044thebook.com for more information. |
|
Tony is the editor/illustrator for NASA Graphics Standards Manual Remastered Edition Visit https://amzn.to/2oPFLI0 for more information. |
↧
Installing MySQL with Docker

 I often need to install a certain version of MySQL, MariaDB, or Percona Server for MySQL to run some experiments, whether to check for behavior differences or to provide tested instructions. In this blog series, I will look into how you can install MySQL, MariaDB, or Percona Server for MySQL with Docker. This post, part one, is focused on MySQL Server.
Docker is actually not my most preferred way as it does not match a typical production install, and if you look at service control behavior or file layout it is quite different. What is great about Docker though is that it allows installing the latest MySQL version – as well as any other version – very easily.
Docker also is easy to use when you need a simple, single instance. If you’re looking into some replication-related behaviors, DBDeployer may be a better tool for that.
These instructions are designed to get a test instance running quickly and easily; you do not want to use these for production deployments. All instructions below assume Docker is already installed.
First, you should know there are not one but two “official” MySQL Docker Repositories. One of them is maintained by the Docker Team and is available by a simple docker run mysql:latest. The other one is maintained by the MySQL Team at Oracle and would use a docker run mysql/mysql-server:latest syntax. In the examples below, we will use MySQL Team’s Docker images, though the Docker Team’s work in a similar way.
Installing the Latest MySQL Version with Docker
docker run --name mysql-latest  \
-p 3306:3306 -p 33060:33060  \
-e MYSQL_ROOT_HOST='%' -e MYSQL_ROOT_PASSWORD='strongpassword'   \
-d mysql/mysql-server:latest
This will start the latest version of MySQL instance, which can be remotely accessible from anywhere with specified root password. This is easy for testing, but not a good security practice (which is why it is not the default).
Connecting to MySQL Server Docker Container
Installing with Docker means you do not get any tools, utilities, or libraries available on your host directly, so you either install these separately, access created instance from a remote host, or use command lines shipped with docker image.
To Start MySQL Command Line Client with Docker Run:
docker exec -it mysql-latest mysql -uroot -pstrongpassword
To Start MySQL Shell with Docker Run:
docker exec -it mysql-latest mysqlsh -uroot -pstrongpassword
Managing MySQL Server in Docker Container
When you want to stop the MySQL Server Docker Container run:
docker stop mysql-latest
If you want to restart a stopped MySQL Docker container, you should not try to use docker run to start it again. Instead, you should use:
docker start mysql-latest
If something is not right, for example, if the container is not starting, you can access its logs using this command:
docker logs mysql-latest
If you want to re-create a fresh docker container from scratch you can run:
docker stop mysql-latest
docker rm mysql-latest
Followed by the docker run
command described above.
Passing Command Line Options to MySQL Server in Docker Container
If you want to pass some command line options to MySQL Server, you can do it this way:
docker run --name mysql-latest  \
-p 3306:3306 -p 33060:33060  \
-e MYSQL_ROOT_HOST='%' -e MYSQL_ROOT_PASSWORD='strongpassword'   \
-d mysql/mysql-server:latest \
--innodb_buffer_pool_size=256M \
--innodb_flush_method=O_DIRECT \
Running Different MySQL Server Versions in Docker
If you just want to run one MySQL version at a time in Docker container, it is easy – you can just pick the version you want with Docker Image Tag and change the Name to be different in order to avoid name conflict:
docker run --name mysql-8.0.17  \
-p 3306:3306 -p 33060:33060  \
-e MYSQL_ROOT_HOST='%' -e MYSQL_ROOT_PASSWORD='strongpassword'   \
-d mysql/mysql-server:8.0.17
This will start MySQL 8.0.17 in Docker Container.
docker run --name mysql-5.7  \
-p 3306:3306 -p 33060:33060  \
-e MYSQL_ROOT_HOST='%' -e MYSQL_ROOT_PASSWORD='strongpassword'   \
-d mysql/mysql-server:5.7
And this will start the latest MySQL 5.7 in Docker.
Running Multiple MySQL Server Versions at the Same Time in Docker
The potential problem of running multiple MySQL Versions in Docker at the same time is TCP port conflict. If you do not access Docker Container from outside, and just run utilities included in the same container, you can just remove port mapping (-p option) and you can run multiple containers:
docker run --name mysql-latest  \
-e MYSQL_ROOT_HOST='%' -e MYSQL_ROOT_PASSWORD='strongpassword'   \
-d mysql/mysql-server:latest

docker run --name mysql-8.0.17  \
-e MYSQL_ROOT_HOST='%' -e MYSQL_ROOT_PASSWORD='strongpassword'   \
-d mysql/mysql-server:8.0.17
In more common cases when you need to access Docker containers externally, you will want to map them to use different external port names. For example, to start the latest MySQL 8 at ports 3306/33060 and MySQL 8.0.17 at 3307/33070, we can use:
docker run --name mysql-latest  \
-p 3306:3306 -p 33060:33060  \
-e MYSQL_ROOT_HOST='%' -e MYSQL_ROOT_PASSWORD='strongpassword'   \
-d mysql/mysql-server:latest


docker run --name mysql-8.0.17  \
-p 3307:3306 -p 33070:33060  \
-e MYSQL_ROOT_HOST='%' -e MYSQL_ROOT_PASSWORD='strongpassword'   \
-d mysql/mysql-server:8.0.17
There are a lot more things to consider if you’re going to use MySQL on Docker for anything beyond testing. For more information check-out the MySQL Server Page on Docker Hub and MySQL Manual.
↧
MySQL Shell Plugins: audit
As you may know, it’s now possible to create your own plugins for MySQL Shell. See the following posts:
- https://lefred.be/content/overview-on-mysql-shell-8-0-17-extensions-plugins-and-how-to-write-yours/
- https://lefred.be/content/mysql-router-8-0-17s-rest-api-mysql-shell-extensions/
- https://lefred.be/content/how-to-integrate-proxysql-in-mysql-innodb-cluster/
- https://lefred.be/content/mysql-innodb-disk-space/
I’ve created several plugins that you can find on github. My colleague Bernt already contributed too.
You are more than welcome to comment, fill bugs, feature requests and pull requests of course !
I want to start a series of article covering those plugins. Their goal and how to use them.
Audit Plugin
I will start today with the audit one and particularly the methods/functions related to the binary logs.
Let’s first see the help of that plugin:
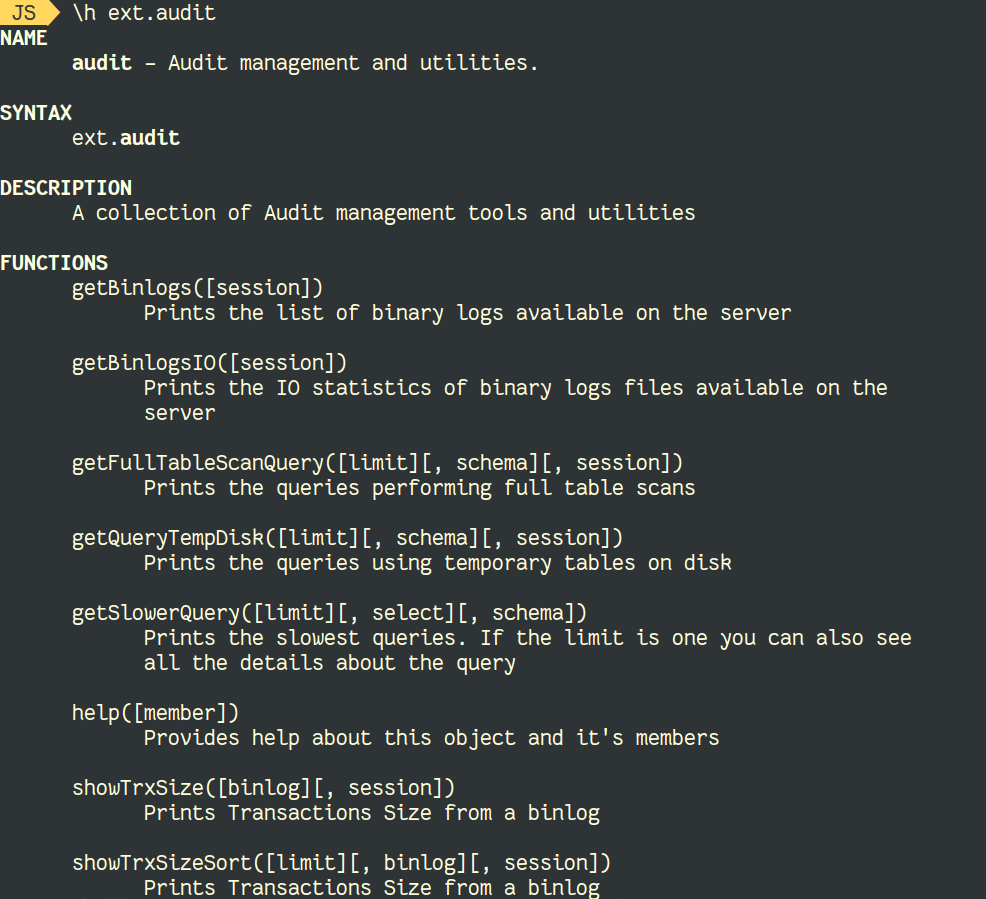
getBinlogs()
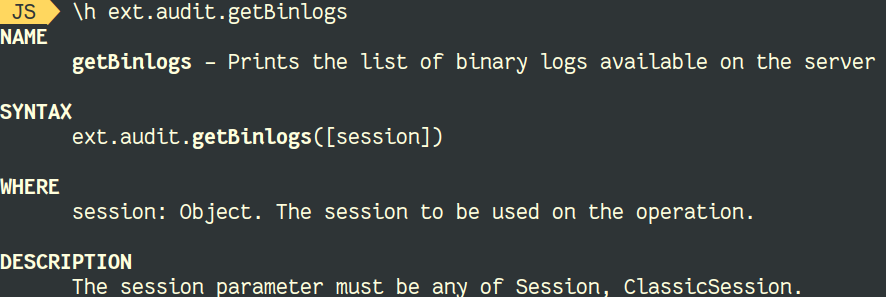
Let’s see an example of the execution of that method:
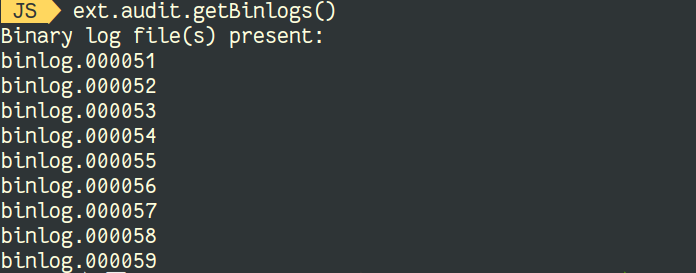
So on my server we can see that currently we have 9 binlog files available.
getBinlogsIO()
This method prints the IO statistics of binary logs files available on the server:
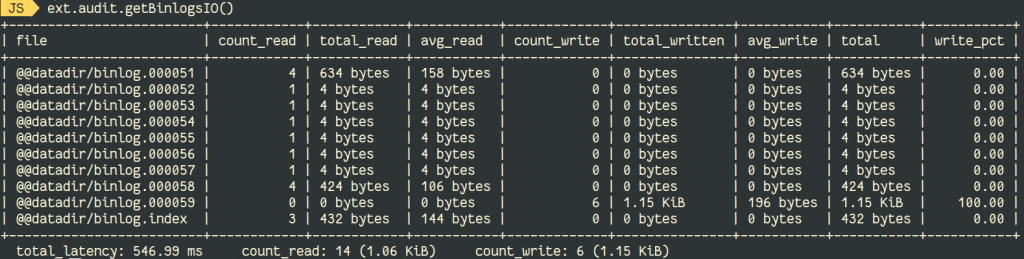
Let’s run show binlog events in 'binlog.000052'; and see the new output:

showTrxSize() and showTrxSizeSort()
And finally, let’s verify the size of transactions in the binary logs. We have two methods, one showing the transactions from the end to the start of the last binary log or the one provided as argument. The other one sort them by size descending and limit it to 10 by default:
Let’s see the last one in action:

This is a good way to see if your don’t have transaction size bigger than group_replication_transaction_size_limit when you want to migrate to MySQL InnoDB Cluster.
In the next post, I will cover the remaining methods of the audit plugin.
↧
↧
Best Practice for Creating Indexes on your MySQL Tables
By having appropriate indexes on your MySQL tables, you can greatly enhance the performance of SELECT queries. But, did you know that adding indexes to your tables in itself is an expensive operation, and may take a long time to complete depending on the size of your tables? During this time, you are also likely to experience a degraded performance of queries as your system resources are busy in index-creation work as well. In this blog post, we discuss an approach to optimize the MySQL index creation process in such a way that your regular workload is not impacted.
MySQL Rolling Index Creation
We call this approach a ‘Rolling Index Creation’ - if you have a MySQL master-slave replica set, you can create the index one node at a time in a rolling fashion. You should create the index only on the slave nodes so the master’s performance is not impacted. When index creation is completed on the slaves, we demote the current master and promote one of the slaves that is up-to-date as the new master. At this time, the index building continues on the original master node (which is a slave now). There will be a short duration (tens of seconds) during which you will lose connectivity to your database due to the failover, but this can be overcome by having application-level retries.
Performance Benefits of Rolling Index Creation
We did a small experiment to understand the performance benefits of Rolling Index Creation.
The test utilized a MySQL dataset created using Sysbench which had 3 tables with 50 million rows each. We generated load on the MySQL master with 30 clients running a balanced workload (50% reads and 50% writes) for 10 minutes, and at the same time, built a simple secondary index on one of the tables in two scenarios:
- Creating the index directly on the master
- Creating the index on the slave
MySQL Test Bed Configuration
| MySQL Instance Type | EC2 instance m4.large with 8GB RAM |
|---|---|
| Deployment Type | 2 Node Master-Slave Set with Semisynchronous Replication |
| MySQL Version | 5.7.25 |
Performance Results
| Scenario | Workload Throughput (Queries Per Second) | 95th Percentile Latency |
|---|---|---|
| Index Creation on Master | 453.63 | 670 ms |
| Rolling Index Creation | 790.03 | 390 ms |
Takeaway
By running index creation directly on the MySQL master, we could experience only 60% of the throughput that was achieved by running index creation on the MySQL slave through a rolling operation. The 95th percentile latency of queries was also 1.8 times higher when the index creation happened on the master server.
Best Practice for Creating Indexes on your #MySQL TablesClick To TweetAutomating the Rolling Index Creation
ScaleGrid automates the Rolling Index Creation for your MySQL deployment with a simple user interface to initiate it.

In the UI above, you can select your Database and Table name, and ‘Add Index’ as the Alter Table Operation. Then, specify a Column Name and Index Name, and an Alter Table Command will be generated and displayed for you. Once you click to Create, the index creation will happen one node at a time in a rolling fashion.
Additionally, ScaleGrid also supports other simple Alter Table operations like adding a new column to your table in a rolling fashion. Stay tuned for my follow-on blog post with more details!

↧
Profiling Software Using perf and Flame Graphs

In this blog post, we will see how to use perf (a.k.a.: perf_events) together with Flame Graphs. They are used to generate a graphical representation of what functions are being called within our software of choice. Percona Server for MySQL is used here, but it can be extended to any software you can take a resolved stack trace from.
Before moving forward, a word of caution. As with any profiling tool, DON’T run this in production systems unless you know what you are doing.
Installing Packages Needed
For simplicity, I’ll use commands for CentOS 7, but things should be the same for Debian-based distros (apt-get install linux-tools-$(uname -r) instead of the yum command is the only difference in the steps).
To install perf, simply issue:
SHELL> sudo yum install -y perf
To get Flame Graphs project:
SHELL> mkdir -p ~/src
SHELL> cd ~/src
SHELL> git clone https://github.com/brendangregg/FlameGraph
That’s it! We are good to go.
Capturing Samples
Flame Graphs are a way of visualizing data, so we need to have some samples we can base off of. There are three ways in which we can do this. (Note that we will use the -p flag to only capture data from our process of interest, but we can potentially capture data from all the running processes if needed.)
1- Capture for a set amount of time only (ten seconds here):
SHELL> sudo perf record -a -F 99 -g -p $(pgrep -x mysqld) -- sleep 10
2- Capture until we send the interrupt signal (CTRL-C):
SHELL> sudo perf record -a -F 99 -g -p $(pgrep -x mysqld)
3- Capture for the whole lifetime of the process:
SHELL> sudo perf record -a -F 99 -g -- /sbin/mysqld \
--defaults-file=/etc/percona-server.conf.d/mysqld.cnf --user=mysql
or
SHELL> sudo perf record -a -F 99 -g -p $(pgrep -x mysqld) -- mysql -e "SELECT * FROM db.table"
We are forced to capture data from all processes in the first case of the third variant since it’s impossible to know the process ID (PID) number beforehand (with the command executed, we are actually starting the MySQL service). This type of command comes in handy when you want to have data from the exact beginning of the process, which is not possible otherwise.
In the second variant, we are running a query on an already-running MySQL service, so we can use the -p flag to capture data on the server process. This is handy if you want to capture data at the exact moment a job is running, for instance.
Preparing the Samples
After the initial capture, we will need to make the collected data “readable”. This is needed because it is stored in binary format by perf record. For this we will use:
SHELL> sudo perf script > perf.script
It will read perf.data by default, which is the same default perf record uses for its output file. It can be overridden by using the -i flag and -o flag, respectively.
We will now be able to read the generated text file, as it will be in a human-readable form. However, when doing so, you will quickly realize why we need to aggregate all this data into a more intelligible form.
Generating the Flame Graphs
We can do the following in a one-liner, by piping the output of the first as input to the second. Since we didn’t add the FlameGraph git folder to our path, we will need to use full paths.
SHELL> ~/src/FlameGraph/stackcollapse-perf.pl | perf.script ~/src/FlameGraph/flamegraph.pl > flamegraph.svg
We can now open the .svg file in any browser and start analyzing the information-rich graphs.
How Does it Look?
As an example, I will leave full commands, their outputs, and a screenshot of a flame graph generated by the process using data capture method #2. We will run an INSERT INTO … SELECT query to the database, so we can then analyze its execution.
SHELL> time sudo perf record -a -F 99 -g \
-p $(pgrep -x mysqld) \
-- mysql test -e "INSERT INTO joinit SELECT NULL, uuid(), time(now()),  (FLOOR( 1 + RAND( ) *60 )) FROM joinit;"
Warning:
PID/TID switch overriding SYSTEM
[ perf record: Woken up 7 times to write data ]
[ perf record: Captured and wrote 1.909 MB perf.data (8214 samples) ]

real 1m24.366s
user 0m0.133s
sys 0m0.378s
SHELL> sudo perf script | \
~/src/FlameGraph/stackcollapse-perf.pl perf.script | \
~/src/FlameGraph/flamegraph.pl > mysql_select_into_flamegraph.svg
The keen-eyed reader will notice we went one step further here and joined steps #2 and #3 via a pipe (|) to avoid writing to and reading from the perf.script output file. Additionally, there are time outputs so we can get an estimation on the amount of data the tool generates (~2Mb in 1min 25secs); this will, of course, vary depending on many factors, so take it with a pinch of salt, and test in your own environment.
The resulting flame graph is:

One clear candidate for optimization is work around write_record: if we can make that function faster, there is a lot of potential for reducing overall execution time (squared in blue in the bottom left corner, we can see a total of ~60% of the samples were taken in this codepath). In the last section below we link to a blog post explaining more on how to interpret a Flame Graph, but for now, know you can mouse-over the function names and it will dynamically change the information shown at the bottom left corner. You may also visualize it better with the following guides in place:

Conclusion
For the Support team, we use this procedure in many cases where we need to have an in-depth view of what MySQL is executing, and for how long. This way, we can have a better insight into what operations are behind a specific workload and act accordingly. This procedure can be used either for optimizing or troubleshooting and is a very powerful tool in our tool belt! It’s known that humans are better at processing images rather than text, and this tool exploits that brilliantly, in my opinion.
Related links
Interpreting Flame Graphs (scroll down to the “Flame Graph Interpretation” section)
Flame Graphs 201, a great webinar by Marcos, if you want to dig deeper into this
Of course, Brendan Gregg (the mastermind behind the Flame Graph project) has even more information on this
↧
How to Connect Golang with MySQL
Today, I will describe MySQL database connectivity with golang. MySQL is most popular open source relational database. I will let you know step by step how to golang connect with MySQL database. I assumed you have configured golang environment within your system, if not please configure golang environment into your system. The golang have MySQL […]
The post How to Connect Golang with MySQL appeared first on Phpflow.com.
↧
Upgrade to MySQL 8.0 Webinar!
LIVE WEBINAR: Wednesday, November 27, 2019. 9AM PDT. Migrating to MySQL 8.0 from 5.6 or 5.7. Planning to upgrade to 8.0? Join us to learn the easy steps and best practices for a smooth upgrade. Register now!
↧
↧
MySQL InnoDB Cluster 8.0 - A Complete Operation Walk-through: Part Two
In the first part of this blog, we covered a deployment walkthrough of MySQL InnoDB Cluster with an example on how the applications can connect to the cluster via a dedicated read/write port.
In this operation walkthrough, we are going to show examples on how to monitor, manage and scale the InnoDB Cluster as part of the ongoing cluster maintenance operations. We’ll use the same cluster what we deployed in the first part of the blog. The following diagram shows our architecture:

We have a three-node MySQL Group Replication and one application server running with MySQL router. All servers are running on Ubuntu 18.04 Bionic.
MySQL InnoDB Cluster Command Options
Before we move further with some examples and explanations, it's good to know that you can get an explanation of each function in MySQL cluster for cluster component by using the help() function, as shown below:
$ mysqlsh

MySQL|localhost:3306 ssl|JS> shell.connect("clusteradmin@db1:3306");

MySQL|db1:3306 ssl|JS> cluster = dba.getCluster();

<Cluster:my_innodb_cluster>

MySQL|db1:3306 ssl|JS> cluster.help()
The following list shows the available functions on MySQL Shell 8.0.18, for MySQL Community Server 8.0.18:
- addInstance(instance[, options]) - Adds an Instance to the cluster.
- checkInstanceState(instance) - Verifies the instance gtid state in relation to the cluster.
- describe() - Describe the structure of the cluster.
- disconnect() - Disconnects all internal sessions used by the cluster object.
- dissolve([options]) - Deactivates replication and unregisters the ReplicaSets from the cluster.
- forceQuorumUsingPartitionOf(instance[, password]) - Restores the cluster from quorum loss.
- getName() - Retrieves the name of the cluster.
- help([member])- Provides help about this class and it's members
- options([options]) - Lists the cluster configuration options.
- rejoinInstance(instance[, options]) - Rejoins an Instance to the cluster.
- removeInstance(instance[, options]) - Removes an Instance from the cluster.
- rescan([options]) - Rescans the cluster.
- resetRecoveryAccountsPassword(options) - Reset the password of the recovery accounts of the cluster.
- setInstanceOption(instance, option, value) - Changes the value of a configuration option in a Cluster member.
- setOption(option, value) - Changes the value of a configuration option for the whole cluster.
- setPrimaryInstance(instance) - Elects a specific cluster member as the new primary.
- status([options]) - Describe the status of the cluster.
- switchToMultiPrimaryMode() - Switches the cluster to multi-primary mode.
- switchToSinglePrimaryMode([instance]) - Switches the cluster to single-primary mode.
We are going to look into most of the functions available to help us monitor, manage and scale the cluster.
Monitoring MySQL InnoDB Cluster Operations
Cluster Status
To check the cluster status, firstly use the MySQL shell command line and then connect as clusteradmin@{one-of-the-db-nodes}:
$ mysqlsh

MySQL|localhost:3306 ssl|JS> shell.connect("clusteradmin@db1:3306");
Then, create an object called "cluster" and declare it as "dba" global object which provides access to InnoDB cluster administration functions using the AdminAPI (check out MySQL Shell API docs):
MySQL|db1:3306 ssl|JS> cluster = dba.getCluster();

<Cluster:my_innodb_cluster>
Then, we can use the object name to call the API functions for "dba" object:
MySQL|db1:3306 ssl|JS> cluster.status(){
"clusterName": "my_innodb_cluster",
"defaultReplicaSet": {
"name": "default",
"primary": "db1:3306",
"ssl": "REQUIRED",
"status": "OK",
"statusText": "Cluster is ONLINE and can tolerate up to ONE failure.",
"topology": {
"db1:3306": {
"address": "db1:3306",
"mode": "R/W",
"readReplicas": {},
"replicationLag": null,
"role": "HA",
"status": "ONLINE",
"version": "8.0.18"
},
"db2:3306": {
"address": "db2:3306",
"mode": "R/O",
"readReplicas": {},
"replicationLag": "00:00:09.061918",
"role": "HA",
"status": "ONLINE",
"version": "8.0.18"
},
"db3:3306": {
"address": "db3:3306",
"mode": "R/O",
"readReplicas": {},
"replicationLag": "00:00:09.447804",
"role": "HA",
"status": "ONLINE",
"version": "8.0.18"
}
},
"topologyMode": "Single-Primary"
},
"groupInformationSourceMember": "db1:3306"
}The output is pretty long but we can filter it out by using the map structure. For example, if we would like to view the replication lag for db3 only, we could do like the following:
MySQL|db1:3306 ssl|JS> cluster.status().defaultReplicaSet.topology["db3:3306"].replicationLag

00:00:09.447804
Note that replication lag is something that will happen in group replication, depending on the write intensivity of the primary member in the replica set and the group_replication_flow_control_* variables. We are not going to cover this topic in detail here. Check out this blog post to understand further on the group replication performance and flow control.
Another similar function is the describe() function, but this one is a bit more simple. It describes the structure of the cluster including all its information, ReplicaSets and Instances:
MySQL|db1:3306 ssl|JS> cluster.describe(){
"clusterName": "my_innodb_cluster",
"defaultReplicaSet": {
"name": "default",
"topology": [
{
"address": "db1:3306",
"label": "db1:3306",
"role": "HA"
},
{
"address": "db2:3306",
"label": "db2:3306",
"role": "HA"
},
{
"address": "db3:3306",
"label": "db3:3306",
"role": "HA"
}
],
"topologyMode": "Single-Primary"
}
}Similarly, we can filter the JSON output using map structure:
MySQL|db1:3306 ssl|JS> cluster.describe().defaultReplicaSet.topologyMode

Single-Primary
When the primary node went down (in this case, is db1), the output returned the following:
MySQL|db1:3306 ssl|JS> cluster.status()
{

    "clusterName": "my_innodb_cluster",

    "defaultReplicaSet": {

        "name": "default",

        "primary": "db2:3306",

        "ssl": "REQUIRED",

        "status": "OK_NO_TOLERANCE",

        "statusText": "Cluster is NOT tolerant to any failures. 1 member is not active",

        "topology": {

            "db1:3306": {

                "address": "db1:3306",

                "mode": "n/a",

                "readReplicas": {},

                "role": "HA",

                "shellConnectError": "MySQL Error 2013 (HY000): Lost connection to MySQL server at 'reading initial communication packet', system error: 104",

                "status": "(MISSING)"

            },

            "db2:3306": {

                "address": "db2:3306",

                "mode": "R/W",

                "readReplicas": {},

                "replicationLag": null,

                "role": "HA",

                "status": "ONLINE",

                "version": "8.0.18"

            },

            "db3:3306": {

                "address": "db3:3306",

                "mode": "R/O",

                "readReplicas": {},

                "replicationLag": null,

                "role": "HA",

                "status": "ONLINE",

                "version": "8.0.18"

            }

        },

        "topologyMode": "Single-Primary"

    },

    "groupInformationSourceMember": "db2:3306"

}
Pay attention to the status OK_NO_TOLERANCE, where the cluster is still up and running but it can't tolerate any more failure after one over three node is not available. The primary role has been taken over by db2 automatically, and the database connections from the application will be rerouted to the correct node if they connect through MySQL Router. Once db1 comes back online, we should see the following status:
MySQL|db1:3306 ssl|JS> cluster.status(){
"clusterName": "my_innodb_cluster",
"defaultReplicaSet": {
"name": "default",
"primary": "db2:3306",
"ssl": "REQUIRED",
"status": "OK",
"statusText": "Cluster is ONLINE and can tolerate up to ONE failure.",
"topology": {
"db1:3306": {
"address": "db1:3306",
"mode": "R/O",
"readReplicas": {},
"replicationLag": null,
"role": "HA",
"status": "ONLINE",
"version": "8.0.18"
},
"db2:3306": {
"address": "db2:3306",
"mode": "R/W",
"readReplicas": {},
"replicationLag": null,
"role": "HA",
"status": "ONLINE",
"version": "8.0.18"
},
"db3:3306": {
"address": "db3:3306",
"mode": "R/O",
"readReplicas": {},
"replicationLag": null,
"role": "HA",
"status": "ONLINE",
"version": "8.0.18"
}
},
"topologyMode": "Single-Primary"
},
"groupInformationSourceMember": "db2:3306"
}It shows that db1 is now available but served as secondary with read-only enabled. The primary role is still assigned to db2 until something goes wrong to the node, where it will be automatically failed over to the next available node.
Check Instance State
We can check the state of a MySQL node before planning to add it into the cluster by using the checkInstanceState() function. It analyzes the instance executed GTIDs with the executed/purged GTIDs on the cluster to determine if the instance is valid for the cluster.
The following shows instance state of db3 when it was in standalone mode, before part of the cluster:
MySQL|db1:3306 ssl|JS> cluster.checkInstanceState("db3:3306")

Cluster.checkInstanceState: The instance 'db3:3306' is a standalone instance but is part of a different InnoDB Cluster (metadata exists, instance does not belong to that metadata, and Group Replication is not active).
If the node is already part of the cluster, you should get the following:
MySQL|db1:3306 ssl|JS> cluster.checkInstanceState("db3:3306")

Cluster.checkInstanceState: The instance 'db3:3306' already belongs to the ReplicaSet: 'default'.
Monitor Any "Queryable" State
With MySQL Shell, we can now use the built-in \show and \watch command to monitor any administrative query in real-time. For example, we can get the real-time value of threads connected by using:
MySQL|db1:3306 ssl|JS> \show query SHOW STATUS LIKE '%thread%';Or get the current MySQL processlist:
MySQL|db1:3306 ssl|JS> \show query SHOW FULL PROCESSLISTWe can then use \watch command to run a report in the same way as the \show command, but it refreshes the results at regular intervals until you cancel the command using Ctrl + C. As shown in the following examples:
MySQL|db1:3306 ssl|JS> \watch query SHOW STATUS LIKE '%thread%';

MySQL|db1:3306 ssl|JS> \watch query --interval=1 SHOW FULL PROCESSLIST
The default refresh interval is 2 seconds. You can change the value by using the --interval flag and specified a value from 0.1 up to 86400.
MySQL InnoDB Cluster Management Operations
Primary Switchover
Primary instance is the node that can be considered as the leader in a replication group, that has the ability to perform read and write operations. Only one primary instance per cluster is allowed in single-primary topology mode. This topology is also known as replica set and is the recommended topology mode for Group Replication with protection against locking conflicts.
To perform primary instance switchover, login to one of the database nodes as the clusteradmin user and specify the database node that you want to promote by using the setPrimaryInstance() function:
MySQL|db1:3306 ssl|JS> shell.connect("clusteradmin@db1:3306");

MySQL|db1:3306 ssl|JS> cluster.setPrimaryInstance("db1:3306");

Setting instance 'db1:3306' as the primary instance of cluster 'my_innodb_cluster'...

Instance 'db2:3306' was switched from PRIMARY to SECONDARY.

Instance 'db3:3306' remains SECONDARY.

Instance 'db1:3306' was switched from SECONDARY to PRIMARY.

WARNING: The cluster internal session is not the primary member anymore. For cluster management operations please obtain a fresh cluster handle using <Dba>.getCluster().

The instance 'db1:3306' was successfully elected as primary.
We just promoted db1 as the new primary component, replacing db2 while db3 remains as the secondary node.
Shutting Down the Cluster
The best way to shut down the cluster gracefully by stopping the MySQL Router service first (if it's running) on the application server:
$ myrouter/stop.shThe above step provides cluster protection against accidental writes by the applications. Then shutdown one database node at a time using the standard MySQL stop command, or perform system shutdown as you wish:
$ systemctl stop mysqlStarting the Cluster After a Shutdown
If your cluster suffers from a complete outage or you want to start the cluster after a clean shutdown, you can ensure it is reconfigured correctly using dba.rebootClusterFromCompleteOutage() function. It simply brings a cluster back ONLINE when all members are OFFLINE. In the event that a cluster has completely stopped, the instances must be started and only then can the cluster be started.
Thus, ensure all MySQL servers are started and running. On every database node, see if the mysqld process is running:
$ ps -ef | grep -i mysqlThen, pick one database server to be the primary node and connect to it via MySQL shell:
MySQL|JS> shell.connect("clusteradmin@db1:3306");Run the following command from that host to start them up:
MySQL|db1:3306 ssl|JS> cluster = dba.rebootClusterFromCompleteOutage()You will be presented with the following questions:
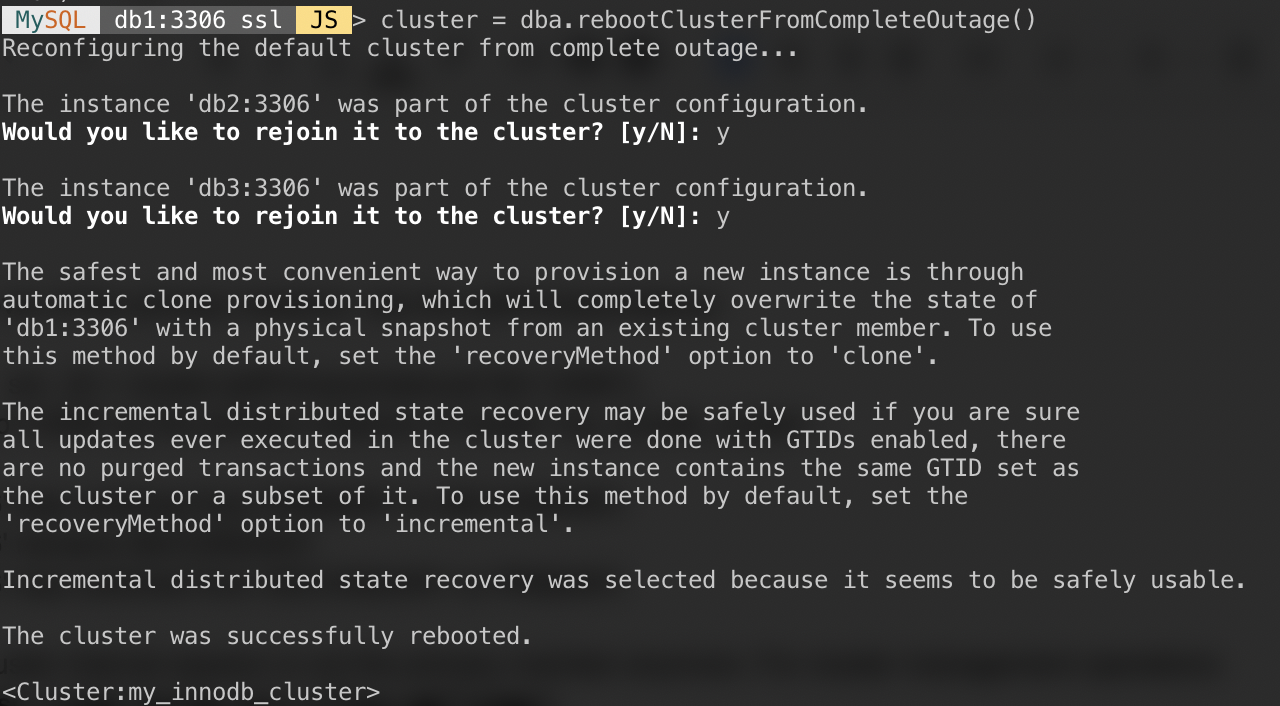
After the above completes, you can verify the cluster status:
MySQL|db1:3306 ssl|JS> cluster.status()At this point, db1 is the primary node and the writer. The rest will be the secondary members. If you would like to start the cluster with db2 or db3 as the primary, you could use the shell.connect() function to connect to the corresponding node and perform the rebootClusterFromCompleteOutage() from that particular node.
You can then start the MySQL Router service (if it's not started) and let the application connect to the cluster again.
Setting Member and Cluster Options
To get the cluster-wide options, simply run:
MySQL|db1:3306 ssl|JS> cluster.options()The above will list out the global options for the replica set and also individual options per member in the cluster. This function changes an InnoDB Cluster configuration option in all members of the cluster. The supported options are:
- clusterName: string value to define the cluster name.
- exitStateAction: string value indicating the group replication exit state action.
- memberWeight: integer value with a percentage weight for automatic primary election on failover.
- failoverConsistency: string value indicating the consistency guarantees that the cluster provides.
- consistency: string value indicating the consistency guarantees that the cluster provides.
- expelTimeout: integer value to define the time period in seconds that cluster members should wait for a non-responding member before evicting it from the cluster.
- autoRejoinTries: integer value to define the number of times an instance will attempt to rejoin the cluster after being expelled.
- disableClone: boolean value used to disable the clone usage on the cluster.
Similar to other function, the output can be filtered in map structure. The following command will only list out the options for db2:
MySQL|db1:3306 ssl|JS> cluster.options().defaultReplicaSet.topology["db2:3306"]You can also get the above list by using the help() function:
MySQL|db1:3306 ssl|JS> cluster.help("setOption")The following command shows an example to set an option called memberWeight to 60 (from 50) on all members:
MySQL|db1:3306 ssl|JS> cluster.setOption("memberWeight", 60)

Setting the value of 'memberWeight' to '60' in all ReplicaSet members ...

Successfully set the value of 'memberWeight' to '60' in the 'default' ReplicaSet.
We can also perform configuration management automatically via MySQL Shell by using setInstanceOption() function and pass the database host, the option name and value accordingly:
MySQL|db1:3306 ssl|JS> cluster = dba.getCluster()

MySQL|db1:3306 ssl|JS> cluster.setInstanceOption("db1:3306", "memberWeight", 90)
The supported options are:
- exitStateAction: string value indicating the group replication exit state action.
- memberWeight: integer value with a percentage weight for automatic primary election on failover.
- autoRejoinTries: integer value to define the number of times an instance will attempt to rejoin the cluster after being expelled.
- label a string identifier of the instance.
Switching to Multi-Primary/Single-Primary Mode
By default, InnoDB Cluster is configured with single-primary, only one member capable of performing reads and writes at one given time. This is the safest and recommended way to run the cluster and suitable for most workloads.
However, if the application logic can handle distributed writes, it's probably a good idea to switch to multi-primary mode, where all members in the cluster are able to process reads and writes at the same time. To switch from single-primary to multi-primary mode, simply use the switchToMultiPrimaryMode() function:
MySQL|db1:3306 ssl|JS> cluster.switchToMultiPrimaryMode()

Switching cluster 'my_innodb_cluster' to Multi-Primary mode...


Instance 'db2:3306' was switched from SECONDARY to PRIMARY.

Instance 'db3:3306' was switched from SECONDARY to PRIMARY.

Instance 'db1:3306' remains PRIMARY.


The cluster successfully switched to Multi-Primary mode.
Verify with:
MySQL|db1:3306 ssl|JS> cluster.status(){
"clusterName": "my_innodb_cluster",
"defaultReplicaSet": {
"name": "default",
"ssl": "REQUIRED",
"status": "OK",
"statusText": "Cluster is ONLINE and can tolerate up to ONE failure.",
"topology": {
"db1:3306": {
"address": "db1:3306",
"mode": "R/W",
"readReplicas": {},
"replicationLag": null,
"role": "HA",
"status": "ONLINE",
"version": "8.0.18"
},
"db2:3306": {
"address": "db2:3306",
"mode": "R/W",
"readReplicas": {},
"replicationLag": null,
"role": "HA",
"status": "ONLINE",
"version": "8.0.18"
},
"db3:3306": {
"address": "db3:3306",
"mode": "R/W",
"readReplicas": {},
"replicationLag": null,
"role": "HA",
"status": "ONLINE",
"version": "8.0.18"
}
},
"topologyMode": "Multi-Primary"
},
"groupInformationSourceMember": "db1:3306"
}In multi-primary mode, all nodes are primary and able to process reads and writes. When sending a new connection via MySQL Router on single-writer port (6446), the connection will be sent to only one node, as in this example, db1:
(app-server)$ for i in {1..3}; do mysql -usbtest -p -h192.168.10.40 -P6446 -e 'select @@hostname, @@read_only, @@super_read_only'; done

mysql: [Warning] Using a password on the command line interface can be insecure.

+------------+-------------+-------------------+

| @@hostname | @@read_only | @@super_read_only |

+------------+-------------+-------------------+

| db1        | 0 |                 0 |

+------------+-------------+-------------------+
If the application connects to the multi-writer port (6447), the connection will be load balanced via round robin algorithm to all members:
(app-server)$ for i in {1..3}; do mysql -usbtest -ppassword -h192.168.10.40 -P6447 -e 'select @@hostname, @@read_only, @@super_read_only'; done

mysql: [Warning] Using a password on the command line interface can be insecure.

+------------+-------------+-------------------+

| @@hostname | @@read_only | @@super_read_only |

+------------+-------------+-------------------+

| db2        | 0 |                 0 |

+------------+-------------+-------------------+

mysql: [Warning] Using a password on the command line interface can be insecure.

+------------+-------------+-------------------+

| @@hostname | @@read_only | @@super_read_only |

+------------+-------------+-------------------+

| db3        | 0 |                 0 |

+------------+-------------+-------------------+

mysql: [Warning] Using a password on the command line interface can be insecure.

+------------+-------------+-------------------+

| @@hostname | @@read_only | @@super_read_only |

+------------+-------------+-------------------+

| db1        | 0 |                 0 |

+------------+-------------+-------------------+
As you can see from the output above, all nodes are capable of processing reads and writes with read_only = OFF. You can distribute safe writes to all members by connecting to the multi-writer port (6447), and send the conflicting or heavy writes to the single-writer port (6446).
To switch back to the single-primary mode, use the switchToSinglePrimaryMode() function and specify one member as the primary node. In this example, we chose db1:
MySQL|db1:3306 ssl|JS> cluster.switchToSinglePrimaryMode("db1:3306");

Switching cluster 'my_innodb_cluster' to Single-Primary mode...


Instance 'db2:3306' was switched from PRIMARY to SECONDARY.

Instance 'db3:3306' was switched from PRIMARY to SECONDARY.

Instance 'db1:3306' remains PRIMARY.


WARNING: Existing connections that expected a R/W connection must be disconnected, i.e. instances that became SECONDARY.


The cluster successfully switched to Single-Primary mode.
At this point, db1 is now the primary node configured with read-only disabled and the rest will be configured as secondary with read-only enabled.
MySQL InnoDB Cluster Scaling Operations
Scaling Up (Adding a New DB Node)
When adding a new instance, a node has to be provisioned first before it's allowed to participate with the replication group. The provisioning process will be handled automatically by MySQL. Also, you can check the instance state first whether the node is valid to join the cluster by using checkInstanceState() function as previously explained.
To add a new DB node, use the addInstances() function and specify the host:
MySQL|db1:3306 ssl|JS> cluster.addInstance("db3:3306")The following is what you would get when adding a new instance:
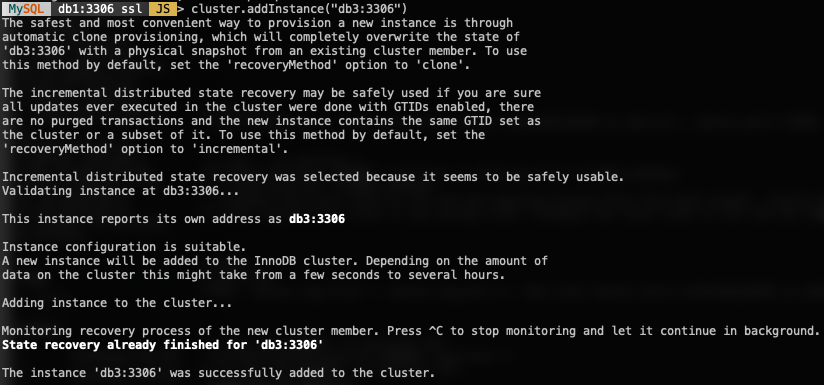
Verify the new cluster size with:
MySQL|db1:3306 ssl|JS> cluster.status() //or cluster.describe()MySQL Router will automatically include the added node, db3 into the load balancing set.
Scaling Down (Removing a Node)
To remove a node, connect to any of the DB nodes except the one that we are going to remove and use the removeInstance() function with the database instance name:
MySQL|db1:3306 ssl|JS> shell.connect("clusteradmin@db1:3306");

MySQL|db1:3306 ssl|JS> cluster = dba.getCluster()

MySQL|db1:3306 ssl|JS> cluster.removeInstance("db3:3306")
The following is what you would get when removing an instance:
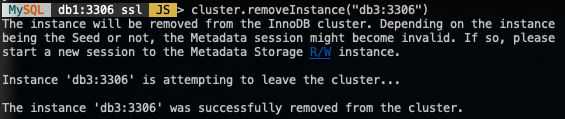
Verify the new cluster size with:
MySQL|db1:3306 ssl|JS> cluster.status() //or cluster.describe()MySQL Router will automatically exclude the removed node, db3 from the load balancing set.
Adding a New Replication Slave
We can scale out the InnoDB Cluster with asynchronous replication slave replicates from any of the cluster nodes. A slave is loosely coupled to the cluster, and will be able to handle a heavy load without affecting the performance of the cluster. The slave can also be a live copy of the Galera cluster for disaster recovery purposes. In multi-primary mode, you can use the slave as the dedicated MySQL read-only processor to scale out the reads workload, perform analytices operation, or as a dedicated backup server.
On the slave server, download the latest APT config package, install it (choose MySQL 8.0 in the configuration wizard), install the APT key, update repolist and install MySQL server.
$ wget https://repo.mysql.com/apt/ubuntu/pool/mysql-apt-config/m/mysql-apt-config/mysql-apt-config_0.8.14-1_all.deb

$ dpkg -i mysql-apt-config_0.8.14-1_all.deb

$ apt-key adv --recv-keys --keyserver ha.pool.sks-keyservers.net 5072E1F5

$ apt-get update

$ apt-get -y install mysql-server mysql-shell
Modify the MySQL configuration file to prepare the server for replication slave. Open the configuration file via text editor:
$ vim /etc/mysql/mysql.conf.d/mysqld.cnfAnd append the following lines:
server-id = 109 # must be unique across all nodes

gtid-mode = ON

enforce-gtid-consistency = ON

log-slave-updates = OFF

read-only = ON

super-read-only = ON
Restart MySQL server on the slave to apply the changes:
$ systemctl restart mysqlOn one of the InnoDB Cluster servers (we chose db3), create a full dump:
$ mysqldump -uroot -p --single-transaction --master-data=1 --all-databases --triggers --routines --events > dump.sqlTransfer the dump file from db3 to the slave:
$ scp dump.sql root@slave:~And perform the restoration on the slave:
$ mysql -uroot -p < dump.sqlWith master-data=1, our MySQL dump file will automatically configure the GTID executed and purged value. We can verify it with the following statement on the slave server after the restoration:
$ mysql -uroot -p

mysql> show global variables like '%gtid%';

+----------------------------------+----------------------------------------------+

| Variable_name                    | Value             |

+----------------------------------+----------------------------------------------+

| binlog_gtid_simple_recovery      | ON             |

| enforce_gtid_consistency         | OFF             |

| gtid_executed                    | d4790339-0694-11ea-8fd5-02f67042125d:1-45886 |

| gtid_executed_compression_period | 1000                                         |

| gtid_mode                        | OFF             |

| gtid_owned                       |             |

| gtid_purged                      | d4790339-0694-11ea-8fd5-02f67042125d:1-45886 |

| session_track_gtids              | OFF             |

+----------------------------------+----------------------------------------------+
Looks good. We can then configure the replication link and start the replication threads on the slave:
mysql> CHANGE MASTER TO MASTER_HOST = '192.168.10.42', MASTER_USER = 'repl_user', MASTER_PASSWORD = 'password', MASTER_AUTO_POSITION = 1;

mysql> START SLAVE;
Verify the replication state and ensure the following status return 'Yes':
mysql> show slave status\G

...

             Slave_IO_Running: Yes

            Slave_SQL_Running: Yes

...
At this point, our architecture is now looking like this:
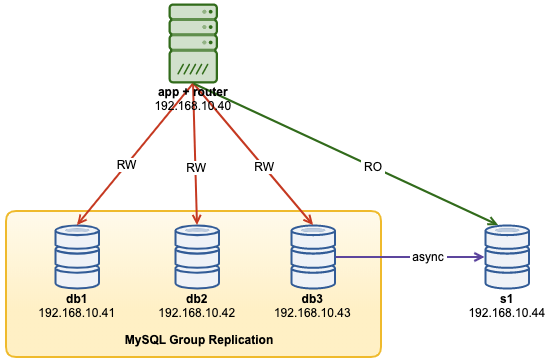
Common Issues with MySQL InnoDB Clusters
Memory Exhaustion
When using MySQL Shell with MySQL 8.0, we were constantly getting the following error when the instances were configured with 1GB of RAM:
Can't create a new thread (errno 11); if you are not out of available memory, you can consult the manual for a possible OS-dependent bug (MySQL Error 1135)Upgrading each host's RAM to 2GB of RAM solved the problem. Apparently, MySQL 8.0 components require more RAM to operate efficiently.
Lost Connection to MySQL Server
In case the primary node goes down, you would probably see the "lost connection to MySQL server error" when trying to query something on the current session:
MySQL|db1:3306 ssl|JS> cluster.status()

Cluster.status: Lost connection to MySQL server during query (MySQL Error 2013)

MySQL|db1:3306 ssl|JS> cluster.status()

Cluster.status: MySQL server has gone away (MySQL Error 2006)
The solution is to re-declare the object once more:
MySQL|db1:3306 ssl|JS> cluster = dba.getCluster()

<Cluster:my_innodb_cluster>

MySQL|db1:3306 ssl|JS> cluster.status()
At this point, it will connect to the newly promoted primary node to retrieve the cluster status.
Node Eviction and Expelled
In an event where communication between nodes is interrupted, the problematic node will be evicted from the cluster without any delay, which is not good if you are running on a non-stable network. This is what it looks like on db2 (the problematic node):
2019-11-14T07:07:59.344888Z 0 [ERROR] [MY-011505] [Repl] Plugin group_replication reported: 'Member was expelled from the group due to network failures, changing member status to ERROR.'

2019-11-14T07:07:59.371966Z 0 [ERROR] [MY-011712] [Repl] Plugin group_replication reported: 'The server was automatically set into read only mode after an error was detected.'
Meanwhile from db1, it saw db2 was offline:
2019-11-14T07:07:44.086021Z 0 [Warning] [MY-011493] [Repl] Plugin group_replication reported: 'Member with address db2:3306 has become unreachable.'

2019-11-14T07:07:46.087216Z 0 [Warning] [MY-011499] [Repl] Plugin group_replication reported: 'Members removed from the group: db2:3306'
To tolerate a bit of delay on node eviction, we can set a higher timeout value before a node is being expelled from the group. The default value is 0, which means expel immediately. Use the setOption() function to set the expelTimeout value:
MySQL|db1:3306 ssl|JS> cluster.setOption("expelTimeout", 30)

Setting the value of 'expelTimeout' to '30' in all ReplicaSet members ...
Successfully set the value of 'expelTimeout' to '30' in the 'default' ReplicaSet.
The above will increase the eviction time to 30 seconds, where cluster members should wait for a non-responding member before evicting it from the cluster.
Conclusion
For MySQL InnoDB Cluster, most of the management and monitoring operations can be performed directly via MySQL Shell (only available from MySQL 5.7.21 and later).
↧
MySQL Shell Plugins: check (part 2)
In the first part of this article related to the check plugin, we discovered information retrieved from the binary logs. This part, is about what Performance_Schema and SYS can provide us about the queries hitting the MySQL database.
Currently, 3 methods are available:
getSlowerQuery()getQueryTempDisk()getFullTableScanQuery()
The method’s name should be self explaining.
This is an overview of the parameters for each methods:
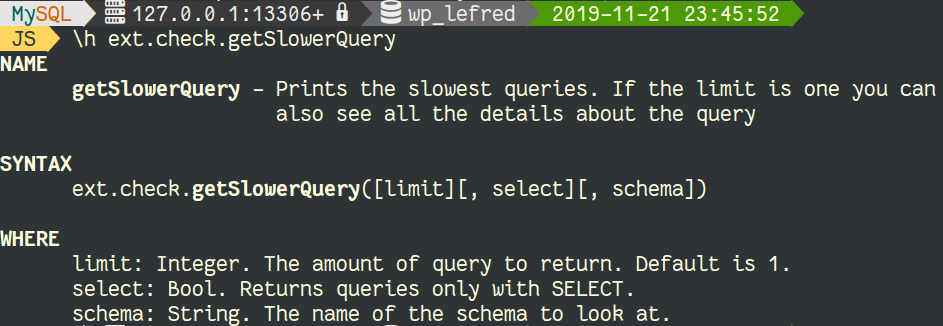
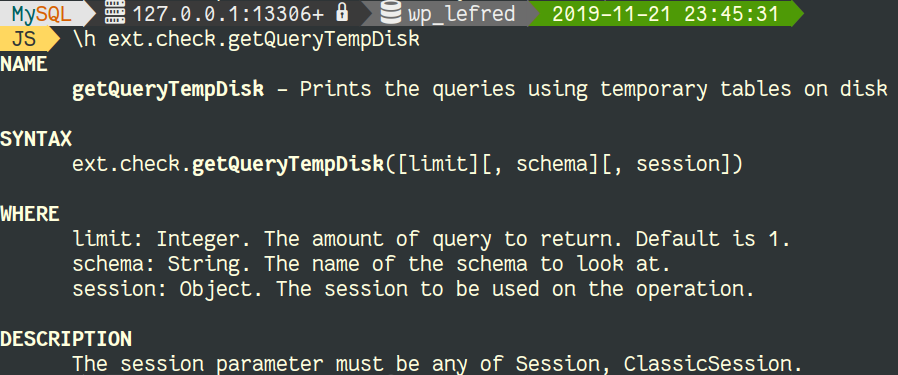
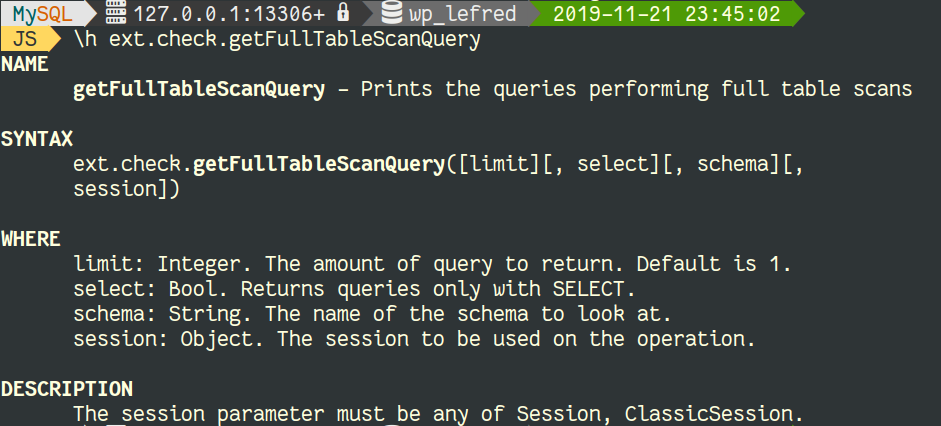
Some methods allow a select parameter if only SELECT statements should be returned.
When only one query is returned (default), it’s also possible to interactively run several actions:
- EXPLAIN (Traditional MySQL Query Execution Plan)
- EXPLAIN FORMAT=JSON
- EXPLAIN FORMAT=TREE
- EXPLAIN ANALYZE
This is a video illustrating these operations:
Don’t hesitate to try those plugins and a report eventual bugs, enhancements, feature requests and your own plugins !
The github repository is https://github.com/lefred/mysqlshell-plugins
↧
Tips for Designing Grafana Dashboards

As Grafana powers our star product – Percona Monitoring and Management (PMM) – we have developed a lot of experience creating Grafana Dashboards over the last few years. In this article, I will share some of the considerations for designing Grafana Dashboards. As usual, when it comes to questions of design they are quite subjective, and I do not expect you to chose to apply all of them to your dashboards, but I hope they will help you to think through your dashboard design better.
Design Practical Dashboards
Grafana features many panel types, and even more are available as plugins. It may be very attractive to use many of them in your dashboards using many different visualization options. Do not! Stick to a few data visualization patterns and only add additional visualizations when they provide additional practical value not because they are cool. Graph and Singlestat panel types probably cover 80% of use cases.
Do Not Place Too Many Graphs Side by Side
This probably will depend a lot on how your dashboards are used. If your dashboard is designed for large screens placed on the wall you may be able to fit more graphs side by side, if your dashboard needs to scale down to lower resolution small laptop screen I would suggest sticking to 2-3 graphs in a row.
Use Proper Units
Grafana allows you to specify a unit for the data type displayed. Use it! Without type set values will not be properly shortened and very hard to read:

Compare this to

Mind Decimals
You can specify the number of values after decimal points you want to display or leave it default. I found default picking does not always work very well, for example here:

For some reason on the panel Axis, we have way too many values displayed after the decimal point. Grafana also often picks three values after decimal points as in the table below which I find inconvenient – from the glance view, it is hard to understand if we’re dealing with a decimal point or with “,” as a “thousands” separator, so I may be looking at 2462 GiB there. While it is not feasible in this case, there are cases such as data rate where a 1000x value difference is quite possible. Instead, I prefer setting it to one decimal (or one if it is enough) which makes it clear that we’re not looking at thousands.
Label your Axis
You can label your axis (which especially makes sense) if the presentation is something not as obvious as in this example; we’re using a negative value to lot writes to a swap file.

Use Shared Crosshair or Tooltip
In Dashboard Settings, you will find “Graph Tooltip” option and set it to “Default”,
“Shared Crosshair” or “Share Tooltip” This is how these will look:


Shared crosshair shows the line matching the same time on all dashboards while Tooltip shows the tooltip value on all panels at the same time. You can pick what makes sense for you; my favorite is using the tooltip setting because it allows me to visually compare the same time without making the dashboard too slow and busy.
Note there is handy shortcut CTRL-O which allows you to cycle between these settings for any dashboard.
Pick Colors
If you’re displaying truly dynamic information you will likely have to rely on Grafana’s automatic color assignment, but if not, you can pick specific colors for all values being plotted. This will prevent colors from potentially being re-assigned to different values without you planning to do so.

Picking colors you also want to make sure you pick colors that make logical sense. For example, I think for free memory “green” is a better color than “red”. As you pick the colors, use the same colors for the same type of information when you show it on the different panels if possible, because it makes it easier to understand.
I would even suggest sticking to the same (or similar) color for the Same Kind of Data – if you have many panels which show disk Input and Output using similar colors, this can be a good idea.
Fill Stacking Graphs
Grafana does not require it, but I would suggest you use filling when you display stacking data and don’t use filling when you’re plotting multiple independent values. Take a look at these graphs:


In the first graph, I need to look at the actual value of the plotted value to understand what I’m looking at. At the same time, in the second graph, that value is meaningless and what is valuable is the filled amount. I can see on the second graph what amount of the Cache, blue value, has shrunk.
I prefer using a fill factor of 6+ so it is easier to match the fill colors with colors in the table. For the same reason, I prefer not to use the fill gradient on such graphs as it makes it much harder to see the color and the filled volume.

Do Not Abuse Double Axis
Graphs that use double axis are much harder to understand. I used to use it very often, but now I avoid it when possible, only using it when I absolutely want to limit the number of panels.

Note in this case I think gradient fits OK because there is only one value displayed as the line, so you can’t get confused if you need to look at total value or “filled volume”.
Separate Data of Different Scales on Different Graphs
I used to plot Innodb Rows Read and Written at the same graph. It is quite common to have reads to be 100x higher in volume than writes, crowding them out and making even significant changes in writes very hard to see. Splitting them to different graphs solved this issue.

Consider Staircase Graphs
In the monitoring applications, we often display average rates computed over a period of time. If this is the case, we do not know how the rate was changing within that period and it would be misleading to show that. This especially makes sense if you’re displaying only a few data points.
Let’s look at this graph which is being viewed with one-hour resolution:

This visually shows what amount of rows read was falling from 16:00 to 18:00, and if we compare it to the staircase graph:

It simply shows us that the value at 18 am was higher than 17 am, but does not make any claim about the change.
This display, however, has another issue. Let’s look at the same data set with 5min resolution:

We can see the average value from 16:00 to 17:00 was lower than from 17:00 to 18:00, but this is however NOT what the lower resolution staircase graph shows – the value for 17 to 18 is actually lower!
The reason for that is if we compute on Prometheus side rate() for 1 hour at 17:00 it will be returned as a data point for 17:00 where this average rate is really for 16:00 to 17:00, while staircase graph will plot it from 17:00 to 18:00 until a new value is available. It is off by one hour.
To fix it, you need to shift the data appropriately. In Prometheus, which we use in PMM, I can use an offset operator to shift the data to be displayed correctly:

Provide Multiple Resolutions
I’m a big fan of being able to see the data on the same dashboard with different resolutions, which can be done through a special dashboard variable of type “Interval”. High-resolution data can provide a great level of detail but can be very volatile.

While lower resolution can hide this level of detail, it does show trends better.

Multiple Aggregates for the Same Metrics
To get even more insights, you can consider plotting the same metrics with different aggregates applied to it:

In this case, we are looking at the same variable – threads_running – but at its average value over a period of time versus max (peak) value. Both of them are meaningful in a different way.
You can also notice here that points are used for the Max value instead of a line. This is in general good practice for highly volatile data, as a plottings line for something which changes wildly is messy and does not provide much value.

Use Help and Panel Links
If you fill out a description for the panel, it will be visible if you place your mouse over the tiny “i” sign. This is very helpful to explain what the panel shows and how to use this data. You can use Markup for formatting. You can also provide one or more panel links, that you can use for additional help or drill down.


With newer Grafana versions, you can even define a more advanced drill-down, which can contain different URLs based on the series you are looking at, as well as other templating variables:

Summary
This list of considerations for designing Grafana Dashboards and best practices is by no means complete, but I hope you pick up an idea or two which will allow you to create better dashboards!
↧