Quantcast
Channel: Planet MySQL
Viewing all 18798 articles
Browse latest View live

MySQL Connector/ODBC 5.3.14 has been released

$
0
0

Dear MySQL users,

MySQL Connector/ODBC 5.3.14, a new version of the ODBC driver for the
MySQL database management system, has been released.

The available downloads include both a Unicode driver and an ANSI
driver based on the same modern codebase. Please select the driver
type you need based on the type of your application – Unicode or ANSI.
Server-side prepared statements are enabled by default. It is suitable
for use with any MySQL version from 5.6.

This is the sixth release of the MySQL ODBC driver conforming to the
ODBC 3.8 specification. It contains implementations of key 3.8
features, including self-identification as a ODBC 3.8 driver,
streaming of output parameters (supported for binary types only), and
support of the SQL_ATTR_RESET_CONNECTION connection attribute (for the
Unicode driver only).

The release is now available in source and binary form for a number of
platforms from our download pages at

http://dev.mysql.com/downloads/connector/odbc/5.3.html

For information on installing, please see the documentation at

http://dev.mysql.com/doc/connector-odbc/en/connector-odbc-installation.html

Changes in MySQL Connector/ODBC 5.3.14 (2019-10-30, General Availability)

Bugs Fixed

* On EL7, and only when using the generic Linux packages, SQLSetPos usage caused an unexpected shutdown. (Bug #29630465)

On Behalf of Oracle/MySQL Release Engineering Team,
Hery Ramilison


MySQL Random Password Generation

$
0
0
Many years ago I was working at a university and had to create accounts for students every semester.  Each account needed a random password and there were several hacks used to do that.  One of the new features in MySQL 8.0.18 is the ability to have the system generate a random password.

Example

  SQL > create user 'Foo'@'%' IDENTIFIED BY RANDOM PASSWORD;
+------+------+----------------------+
| user | host | generated password   |
+------+------+----------------------+
| Foo  | %    | Ld]5/Fkn[Kk29/g/M;>n |
+------+------+----------------------+
1 row in set (0.0090 sec)

Another Example

SQL > ALTER USER 'Foo'@'%' IDENTIFIED BY RANDOM PASSWORD;
+------+------+----------------------+
| user | host | generated password   |
+------+------+----------------------+
| Foo  | %    | !rN<NCxjE5ncC6mB*2:@ |
+------+------+----------------------+
1 row in set (0.0102 sec)

Yet Another Example

 SQL > SET PASSWORD FOR 'Foo'@'%' TO RANDOM;
+------+------+----------------------+
| user | host | generated password   |
+------+------+----------------------+
| Foo  | %    | o{EC-pniUAapyzUjE0sn |
+------+------+----------------------+
1 row in set (0.0102 sec)

This will be handy for many and works with your auth_string setting.  Details can be found at https://dev.mysql.com/doc/refman/8.0/en/password-management.html#random-password-generation


Use MySQL Without a Password (And Still Be Secure)

$
0
0
Use MySQL Without a Password

Use MySQL Without a PasswordSome say that the best password is the one you don’t have to remember. That’s possible with MySQL, thanks to the auth_socket plugin and its MariaDB version unix_socket.

Neither of these plugins is new, and some words have been written about the auth_socket on this blog before, for example: how to change passwords in MySQL 5.7 when using plugin: auth_socket. But while reviewing what’s new with MariaDB 10.4, I saw that the unix_socket now comes installed by default and is one of the authentication methods (one of them because in MariaDB 10.4 a single user can have more than one authentication plugin, as explained in the Authentication from MariaDB 10.4 document).

As already mentioned this is not news, and even when one installs MySQL using the .deb packages maintained by the Debian team, the root user is created so it uses the socket authentication. This is true for both MySQL and MariaDB:

root@app:~# apt-cache show mysql-server-5.7 | grep -i maintainers
Original-Maintainer: Debian MySQL Maintainers <pkg-mysql-maint@lists.alioth.debian.org>

Using the Debian packages of MySQL, the root is authenticated as follows:

root@app:~# whoami
root=
root@app:~# mysql
Welcome to the MySQL monitor.  Commands end with ; or \g.
Your MySQL connection id is 4
Server version: 5.7.27-0ubuntu0.16.04.1 (Ubuntu)

Copyright (c) 2000, 2019, Oracle and/or its affiliates. All rights reserved.
Oracle is a registered trademark of Oracle Corporation and/or its
affiliates. Other names may be trademarks of their respective
owners.

Type 'help;' or '\h' for help. Type '\c' to clear the current input statement.

mysql> select user, host, plugin, authentication_string from mysql.user where user = 'root';
+------+-----------+-------------+-----------------------+
| user | host      | plugin | authentication_string |
+------+-----------+-------------+-----------------------+
| root | localhost | auth_socket |                       |
+------+-----------+-------------+-----------------------+
1 row in set (0.01 sec)

Same for the MariaDB .deb package:

10.0.38-MariaDB-0ubuntu0.16.04.1 Ubuntu 16.04

MariaDB [(none)]> show grants;
+------------------------------------------------------------------------------------------------+
| Grants for root@localhost                                                                      |
+------------------------------------------------------------------------------------------------+
| GRANT ALL PRIVILEGES ON *.* TO 'root'@'localhost' IDENTIFIED VIA unix_socket WITH GRANT OPTION |
| GRANT PROXY ON ''@'%' TO 'root'@'localhost' WITH GRANT OPTION                                  |
+------------------------------------------------------------------------------------------------+
2 rows in set (0.00 sec)

For Percona Server, the .deb packages from the official Percona Repo are also setting the root user authentication to auth_socket. Here is an example of Percona Server for MySQL 8.0.16-7 and Ubuntu 16.04:

root@app:~# whoami
root
root@app:~# mysql
Welcome to the MySQL monitor.  Commands end with ; or \g.
Your MySQL connection id is 9
Server version: 8.0.16-7 Percona Server (GPL), Release '7', Revision '613e312'

Copyright (c) 2009-2019 Percona LLC and/or its affiliates
Copyright (c) 2000, 2019, Oracle and/or its affiliates. All rights reserved.
Oracle is a registered trademark of Oracle Corporation and/or its
affiliates. Other names may be trademarks of their respective
owners.

Type 'help;' or '\h' for help. Type '\c' to clear the current input statement.

mysql> select user, host, plugin, authentication_string from mysql.user where user ='root';
+------+-----------+-------------+-----------------------+
| user | host      | plugin | authentication_string |
+------+-----------+-------------+-----------------------+
| root | localhost | auth_socket |                       |
+------+-----------+-------------+-----------------------+
1 row in set (0.00 sec)

So, what’s the magic? The plugin checks that the Linux user matches the MySQL user using the SO_PEERCRED socket option to obtain information about the user running the client program. Thus, the plugin can be used only on systems that support the SO_PEERCRED option, such as Linux. The SO_PEERCRED socket option allows retrieving the uid of the process that is connected to the socket. It is then able to get the user name associated with that uid.

Here’s an example with the user “vagrant”:

vagrant@mysql1:~$ whoami
vagrant
vagrant@mysql1:~$ mysql
ERROR 1698 (28000): Access denied for user 'vagrant'@'localhost'

Since no user “vagrant” exists in MySQL, the access is denied. Let’s create the user and try again:

MariaDB [(none)]> GRANT ALL PRIVILEGES ON *.* TO 'vagrant'@'localhost' IDENTIFIED VIA unix_socket;
Query OK, 0 rows affected (0.00 sec)

vagrant@mysql1:~$ mysql
Welcome to the MariaDB monitor.  Commands end with ; or \g.
Your MariaDB connection id is 45
Server version: 10.0.38-MariaDB-0ubuntu0.16.04.1 Ubuntu 16.04
Copyright (c) 2000, 2018, Oracle, MariaDB Corporation Ab and others.
Type 'help;' or '\h' for help. Type '\c' to clear the current input statement.

MariaDB [(none)]> show grants;
+---------------------------------------------------------------------------------+
| Grants for vagrant@localhost                                                    |
+---------------------------------------------------------------------------------+
| GRANT ALL PRIVILEGES ON *.* TO 'vagrant'@'localhost' IDENTIFIED VIA unix_socket |
+---------------------------------------------------------------------------------+
1 row in set (0.00 sec)

Success!

Now, what about on a non-debian distro, where this is not the default? Let’s try it on Percona Server for MySQL 8 installed on a CentOS 7:

mysql> show variables like '%version%comment';
+-----------------+---------------------------------------------------+
| Variable_name   | Value                                   |
+-----------------+---------------------------------------------------+
| version_comment | Percona Server (GPL), Release 7, Revision 613e312 |
+-----------------+---------------------------------------------------+
1 row in set (0.01 sec)

mysql> CREATE USER 'percona'@'localhost' IDENTIFIED WITH auth_socket;
ERROR 1524 (HY000): Plugin 'auth_socket' is not loaded

Failed. What is missing? The plugin is not loaded:

mysql> pager grep socket
PAGER set to 'grep socket'
mysql> show plugins;
47 rows in set (0.00 sec)

Let’s add the plugin in runtime:

mysql> nopager
PAGER set to stdout
mysql> INSTALL PLUGIN auth_socket SONAME 'auth_socket.so';
Query OK, 0 rows affected (0.00 sec)

mysql> pager grep socket; show plugins;
PAGER set to 'grep socket'
| auth_socket                     | ACTIVE | AUTHENTICATION | auth_socket.so | GPL     |
48 rows in set (0.00 sec)

We got all we need now. Let’s try again:

mysql> CREATE USER 'percona'@'localhost' IDENTIFIED WITH auth_socket;
Query OK, 0 rows affected (0.01 sec)
mysql> GRANT ALL PRIVILEGES ON *.* TO 'percona'@'localhost';
Query OK, 0 rows affected (0.01 sec)

And now we can log in as the OS user “percona”.

[percona@ip-192-168-1-111 ~]$ whoami
percona
[percona@ip-192-168-1-111 ~]$ mysql -upercona
Welcome to the MySQL monitor.  Commands end with ; or \g.
Your MySQL connection id is 19
Server version: 8.0.16-7 Percona Server (GPL), Release 7, Revision 613e312


Copyright (c) 2009-2019 Percona LLC and/or its affiliates
Copyright (c) 2000, 2019, Oracle and/or its affiliates. All rights reserved.


Oracle is a registered trademark of Oracle Corporation and/or its
affiliates. Other names may be trademarks of their respective
owners.


Type 'help;' or '\h' for help. Type '\c' to clear the current input statement.


mysql> select user, host, plugin, authentication_string from mysql.user where user ='percona';
+---------+-----------+-------------+-----------------------+
| user    | host   | plugin   | authentication_string |
+---------+-----------+-------------+-----------------------+
| percona | localhost | auth_socket |                       |
+---------+-----------+-------------+-----------------------+
1 row in set (0.00 sec)

Success again!

Question: Can I try to log as the user percona from another user?

[percona@ip-192-168-1-111 ~]$ logout
[root@ip-192-168-1-111 ~]# mysql -upercona
ERROR 1698 (28000): Access denied for user 'percona'@'localhost'

No, you can’t.

Conclusion

MySQL is flexible enough in several aspects, one being the authentication methods. As we see in this post, one can achieve access without passwords by relying on OS users. This is helpful in several scenarios, but just to mention one: when migrating from RDS/Aurora to regular MySQL and using IAM Database Authentication to keep getting access without using passwords.

Using MySQL Community Repository with OL 8/RHEL 8/CentOS 8

$
0
0

MySQL 8.0 is now part of RedHat Enterprise 8 and other distros based on it like CentOS and Oracle Linux.. This is a very good thing !

However if for any reason you want to use the latest version of MySQL from the Community Repository, you may encounter some frustration if you are not familiar with the new way the package manager works.

Let’s start by verifying our system:

LSB Version:    :core-4.1-amd64:core-4.1-noarch
Distributor ID:    OracleServer
Description:    Oracle Linux Server release 8.0
Release:    8.0
Codename:    n/a

We can see that we are on Oracle Linux 8.0. So now let’s try to install MySQL Server:

[root@localhost ~]# dnf install mysql-server
Last metadata expiration check: 0:08:15 ago on Sat 02 Nov 2019 09:54:07 AM UTC.
Dependencies resolved.
============================================================================================
  Package                 Arch   Version                                Repository      Size
============================================================================================
Installing:
  mysql-server            x86_64 8.0.17-3.module+el8.0.0+5253+1dce7bb2  ol8_appstream  22 M
Installing dependencies:
  mysql-errmsg            x86_64 8.0.17-3.module+el8.0.0+5253+1dce7bb2  ol8_appstream  557 k
  mysql-common            x86_64 8.0.17-3.module+el8.0.0+5253+1dce7bb2  ol8_appstream  143 k
  protobuf-lite           x86_64 3.5.0-7.el8                            ol8_appstream  150 k
  mysql                   x86_64 8.0.17-3.module+el8.0.0+5253+1dce7bb2  ol8_appstream  11 M
  mariadb-connector-c-config
 …
Enabling module streams:
  mysql                          8.0                                                           
Transaction Summary
============================================================================================
Install  44 Packages
Total download size: 48 M
Installed size: 257 M

Note that in RedHat and CentOS, the repository is called AppStream

We can see that the package manager wants to install by default MySQL 8.0.17 ! Pretty recent, good !

We can also see that there is a module stream called mysql that is used. Let’s take a look at it:

[root@localhost ~]# dnf module list mysql
Last metadata expiration check: 0:00:53 ago on Sat 02 Nov 2019 10:17:51 AM UTC.
 Oracle Linux 8 Application Stream (x86_64)
 Name              Stream              Profiles                      Summary                
 mysql             8.0 [d]             client, server [d]            MySQL Module           
 Hint: [d]efault, [e]nabled, [x]disabled, [i]nstalled

The module is indeed enabled at set to default.

Now we will install our Community Repository from https://dev.mysql.com/downloads/repo/yum/:

[root@localhost ~]# rpm -ivh https://dev.mysql.com/get/mysql80-community-release-el8-1.noarch.rpm
Retrieving https://dev.mysql.com/get/mysql80-community-release-el8-1.noarch.rpm
warning: /var/tmp/rpm-tmp.hxFUWs: Header V3 DSA/SHA1 Signature, key ID 5072e1f5: NOKEY
Verifying…                          ################# [100%]
Preparing…                          ################# [100%]
Updating / installing…
    1:mysql80-community-release-el8-1  ################# [100%]

But if we try to install MySQL Community Server, the system one from AppStream is always selected. Whatever the package name used: mysql-server or mysql-community-server.

We need to disable the mysql module from the package manager:

[root@localhost ~]# dnf module disable mysql
Last metadata expiration check: 0:01:24 ago on Sat 02 Nov 2019 10:17:51 AM UTC.
Dependencies resolved.
===========================================================================================
 Package              Arch                Version               Repository            Size
===========================================================================================
Disabling module streams:
 mysql                                                                                    
Transaction Summary
===========================================================================================
Is this ok [y/N]: y
Complete!

And now it’s possible to install the lastest MySQL (8.0.18 at this moment):

[root@localhost ~]# dnf install mysql-server
Last metadata expiration check: 0:01:42 ago on Sat 02 Nov 2019 10:17:51 AM UTC.
Dependencies resolved.
===========================================================================================
 Package                    Arch       Version                 Repository             Size
===========================================================================================
Installing:
  mysql-community-server     x86_64     8.0.18-1.el8            mysql80-community      52 M
 Installing dependencies:
  mysql-community-client     x86_64     8.0.18-1.el8            mysql80-community      12 M
  mysql-community-common     x86_64     8.0.18-1.el8            mysql80-community     601 k
  mysql-community-libs       x86_64     8.0.18-1.el8            mysql80-community     1.4 M
  perl-constant              noarch     1.33-396.el8            ol8_baseos_latest      25 k
  …
  perl-parent                noarch     1:0.237-1.el8           ol8_baseos_latest      20 k
Transaction Summary
===========================================================================================
Install  36 Packages
Total download size: 77 M
Installed size: 394 M
Is this ok [y/N]: 

Note that you can now also use mysql-community-server as package name.

We are very happy to see that MySQL 8.0 is now available with a very updated version by default in these major distribution. And now you also know how to enable the MySQL repository if you want to use it too.

Manage InnoDB Cluster using MySQL Shell Extensions

$
0
0
At times, when playing with different InnoDB Clusters for testing (I usually deploy all Group Replication instances on the same host on different ports) I find myself stopping the group and doing operations on every instance (e.g. a static reconfiguration). Or I may need to shutdown all instances at once. Scripting is the usual approach, but in addition, MySQL Shell offers a very nice (and powerful) way to integrate custom scripts into the Shell itself to manage an InnoDB Cluster. This is the purpose of MySQL Shell extensions, to create new custom reports and functions and have the flexibility to manage one or more instances at once. I found particularly practical the new plugin feature, introduced in MySQL 8.0.17, that can aggregare reports and functions under the same umbrella: the plugin.

As an example of the things that are possible, I have modified Rene's great example so to stop Group Replication in a shot from MySQL Shell, and it's particularly easy, check the following script.

  1. Create directory  ~/.mysqlsh/plugins/ext/idc/
  2. Create there init.js script as follows, it will be loaded at MySQL Shell startup.

// Get cluster object, only if session is created
function get_cluster(session, context) {
  if (session) {
    try {
      return dba.getCluster();
    } catch (err) {
      throw "A session to a cluster instance is required: " + err.message
    }
  } else {
    throw "A session must be established to execute this " + context
  }
}


function stop_cluster() {
  var cluster = get_cluster(shell.getSession(), "function");
  var data = cluster.status();
  var topology = data.defaultReplicaSet.topology;
  var sess = shell.getSession()
  var uri = sess.getUri()
  var user = (uri.split('//')[1]).split('@')[0]

  // iterate through members in the cluster
  for (index in topology) {
if (topology[index].status=="ONLINE")
print("\n-----> " + topology[index].address + " is ONLINE and will be evicted from GR\n")

var sess = shell.connect(user + "@" + topology[index].address)
var result = sess.runSql("STOP GROUP_REPLICATION;")

//print(JSON.stringify(result, null, 4))
  }

  // Reconnect original session
  shell.connect(uri)
  return;
}

// Creates the extension object
var idc = shell.createExtensionObject()

// Adds the desired functionality into it
shell.addExtensionObjectMember(idc, "stopCluster", stop_cluster, {
  brief: "Stops GR on all nodes, secondaries first, primary instance the last.",
  details: [
    "This function will stop GR on all nodes.",
    "The information is retrieved from the cluster topology."]});

// Register the extension object as a global object
shell.registerGlobal("idc", idc, {
  brief:"Utility functions for InnoDB Cluster."})


The script defines stop_cluster function that is invoked with idc.stopCluster() and:

  1. Get the cluster object from the session (session against any member must be created beforehand)
  2. Fetch topology from cluster object
  3. Iterate through members belonging to the topology and get the address
  4. For every member, establish a session using same session user (e.g. root or whatever, it is a prerequisite to administer a cluster with the same user)
  5. Send command to stop Group Replication
  6. After iterating through all members, reset the original session
The script also creates an extension object, registers it as global object and adds the function so it can be invoked as follows:


It is also possible to restart the cluster with the built-in dba global object, with function dba.rebootClusterFromCompleteOutage(); 


So in short, it is possible to start and stop the cluster with one command and from the same MySQL Shell session. This is only a quick skeleton (can be improved e.g. like stopping GR starting by secondary instances, and the primary at last) to connect to instances and do operations, there is no limit to the number of things that are possible. Read more on LeFred's blog here

Choose Your EC2 Instance Type Wisely on AWS

$
0
0
EC2 Instance Type on AWS

Recently I was doing some small testing by using EC2 instances on AWS and I noticed the execution time and performance highly depend on which time of the day I am running my scripts. I was using t3.xlarge instance type as I didn’t need many CPUs and memory for my tests, but from time to time I planned to use all the resources for a short time (few minutes), and this is when I noticed the difference.

First, let’s see what AWS says about T3 instances:

T3 instances start in Unlimited mode by default, giving users the ability to sustain high CPU performance over any desired time frame while keeping cost as low as possible.

In theory, I should not have any issues or performance differences. I have also monitored the CPU credit balance and there was no correlation between the balance and the performance at all, and because these were unlimited instances the balance should not have any impact.

I have decided to start a longer sysbench test on 3 threads to see how the QPS changes over the day.

As you can see, the Query Per Second could go down by almost 90%, which is a lot. It’s important to highlightthat the sysbench script should have generated a very steady workload. So what is this big difference? After checking all the graphs I found this:

Stealing! A lot of stealing! Here is a good article which explains stealing very well. So probably, I have a noisy neighbor. This instance was running in N. California. I have stopped it and tried to start new instances to repeat the test but I have always gotten very similar results. There was a lot of stealing which was hurting the performance a lot, probably because that region is very popular and resources are limited.

Out of curiosity, I have started two similar instances in the Stockholm region and repeated the same test and I got very steady performance as you can see here:

I guess this region is not that popular or filled yet, and we can see there is a huge difference between where you start your instance.

I also repeated the tests with the m5.xlarge instance type to see if it has the same behavior or not.

N. California

Stockholm

After I changed the instance type, we can see that both regions give very similar, steady performance, but if we take a closer look:

N. California

Stockholm

The instance in Stockholm still performs almost 5% more QPS as in N. California, and uses more CPU as well.

Conclusion

If you are using T2 and T3 instance types, you should monitor the CPU usage very closely because noisy neighbors can hurt your performance a lot.  If you need stable performance, T2 and T3 are not recommended but if you only need a short burst it might work but still, you have to monitor the steal. Other instance types can give you a much more stable performance but you could still see some difference between the regions.

MySQL Day in Austin November 12th! RSVP Today!!

$
0
0
Attend this half-day event to hear why MySQL is the open source database of choice for business leaders, developers and system architects. Please RSVP here!


With the official release of version 8.0, MySQL now offers SQL and NoSQL capabilities.  We ill
demonstrate how MySQL helps our customers shorten time to market, reduce IT costs, and increase revenue growth – all while providing enterprise grade security via advanced encryption authentication, firewall, and more.


Takeaway tips and techniques on:

  • Containers
  • Securing your data - GDPR
  • MySQL without the SQL

Date and Time: Tue, November 12, 2019  9:30 AM – 1:00 PM CST
Location: Oracle 2300 Cloud Way Austin, TX 78741 

I hope to see all y'all there!


Spring Boot performance tuning

$
0
0

Introduction While developing a Spring Boot application is rather easy, tuning the performance of a Spring Boot application is a more challenging task, as, not only it requires you to understand how the Spring framework works behind the scenes, but you have to know what is the best way to use the underlying data access framework, like Hibernate for instance. In a previous article, I showed you how easily to optimize the performance of the Petclinic demo application. However, by default, the Petclinic Spring Boot application uses the in-memory HSQLDB database, which... Read More

The post Spring Boot performance tuning appeared first on Vlad Mihalcea.


Database Load Balancing in the Cloud - MySQL Master Failover with ProxySQL 2.0: Part One (Deployment)

$
0
0

The cloud provides very flexible environments to work with. You can easily scale it up and down by adding or removing nodes. If there’s a need, you can easily create a clone of your environment. This can be used for processes like upgrades, load tests, disaster recovery. The main problem you have to deal with is that applications have to connect to the databases in some way, and flexible setups can be tricky for databases - especially with master-slave setups. Luckily, there are some options to make this process easier. 

One way is to utilize a database proxy. There are several proxies to pick from, but in this blog post we will use ProxySQL, a well known proxy available for MySQL and MariaDB. We are going to show how you can use it to efficiently move traffic between MySQL nodes without visible impact for the application. We are also going to explain some limitations and drawbacks of this approach.

Initial Cloud Setup

At first, let’s discuss the setup. We will use AWS EC2 instances for our environment. As we are only testing, we don’t really care about high availability other than what we want to prove to be possible - seamless master changes. Therefore we will use a single application node and a single ProxySQL node. As per good practices, we will collocate ProxySQL on the application node and the application will be configured to connect to ProxySQL through Unix socket. This will reduce overhead related to TCP connections and increase security - traffic from the application to the proxy will not leave the local instance, leaving only ProxySQL - > MySQL connection to encrypt. Again, as this is a simple test, we will not setup SSL. In production environments you want to do that, even if you use VPC.

The environment will look like in the diagram below:

As the application, we will use Sysbench - a synthetic benchmark program for MySQL. It has an option to disable and enable the use of transactions, which we will use to demonstrate how ProxySQL handles them.

Installing a MySQL Replication Cluster Using ClusterControl

To make the deployment fast and efficient, we are going to use ClusterControl to deploy the MySQL replication setup for us. The installation of ClusterControl requires just a couple of steps. We won’t go into details here but you should open our website, register and installation of ClusterControl should be pretty much straightforward. Please keep in mind that you need to setup passwordless SSH between ClusterControl instance and all nodes that we will be managing with it.

Once ClusterControl has been installed, you can log in. You will be presented with a deployment wizard:

As we already have instances running in cloud, therefore we will just go with “Deploy” option. We will be presented with the following screen:

We will pick MySQL Replication as the cluster type and we need to provide connectivity details. It can be connection using root user or it can as well be a sudo user with or without a password.

In the next step, we have to make some decisions. We will use Percona Server for MySQL in its latest version. We also have to define a password for the root user on the nodes we will deploy.

In the final step we have to define a topology - we will go with what we proposed at the beginning - a master and three slaves.

ClusterControl will start the deployment - we can track it in the Activity tab, as shown on the screenshot above.

Once the deployment has completed, we can see the cluster in the cluster list:

Installing ProxySQL 2.0 Using ClusterControl

The next step will be to deploy ProxySQL. ClusterControl can do this for us.

We can do this in Manage -> Load Balancer.

As we are just testing things, we are going to reuse the ClusterControl instance for ProxySQL and Sysbench. In real life you would probably want to use your “real” application server. If you can’t find it in the drop down, you can always write the server address (IP or hostname) by hand.

We also want to define credentials for monitoring and administrative user. We also double-checked that ProxySQL 2.0 will be deployed (you can always change it to 1.4.x if you need).

On the bottom part of the wizard we will define the user which will be created in both MySQL and ProxySQL. If you have an existing application, you probably want to use an existing user. If you use numerous users for your application you can always import the rest of them later, after ProxySQL will be deployed.

We want to ensure that all the MySQL instances will be configured in ProxySQL. We will use explicit transactions so we set the switch accordingly. This is all we needed to do - the rest is to click on the “Deploy ProxySQL” button and let ClusterControl does its thing.

When the installation is completed, ProxySQL will show up on the list of nodes in the cluster. As you can see on the screenshot above, it already detected the topology and distributed nodes across reader and writer hostgroups.

Installing Sysbench

The final step will be to create our “application” by installing Sysbench. The process is fairly simple. At first we have to install prerequisites, libraries and tools required to compile Sysbench:

root@ip-10-0-0-115:~# apt install git automake libtool make libssl-dev pkg-config libmysqlclient-dev

Then we want to clone the sysbench repository:

root@ip-10-0-0-115:~# git clone https://github.com/akopytov/sysbench.git

Finally we want to compile and install Sysbench:

root@ip-10-0-0-115:~# cd sysbench/

root@ip-10-0-0-115:~/sysbench# ./autogen.sh && ./configure && make && make install

This is it, Sysbench has been installed. We now need to generate some data. For that, at first, we need to create a schema. We will connect to local ProxySQL and through it we will create a ‘sbtest’ schema on the master. Please note we used Unix socket for connection with ProxySQL.

root@ip-10-0-0-115:~/sysbench# mysql -S /tmp/proxysql.sock -u sbtest -psbtest

mysql> CREATE DATABASE sbtest;

Query OK, 1 row affected (0.01 sec)

Now we can use sysbench to populate the database with data. Again, we do use Unix socket for connection with the proxy:

root@ip-10-0-0-115:~# sysbench /root/sysbench/src/lua/oltp_read_write.lua --threads=4 --events=0 --time=3600 --mysql-socket=/tmp/proxysql.sock --mysql-user=sbtest --mysql-password=sbtest --tables=32 --report-interval=1 --skip-trx=on --table-size=100000 --db-ps-mode=disable prepare

Once the data is ready, we can proceed to our tests. 

Conclusion

In the second part of this blog, we will discuss ProxySQL’s handling of connections, failover and its settings that can help us to manage the master switch in a way that will be the least intrusive to the application.

London Open Source DB: MySQL 2020

$
0
0
The London Open Source Database Meetup is hosting me on December 4th -RSVP
and I will be talking about  New MySQL Features and a Brief Look into 2020!

MySQL has made lot of progress with version 8.0 and it has become the fasted adopted new version of MySQL in history. The new CI/CD release pattern had been delivering a lot of new features on a regular basis that you may have not noticed. There is JSON Document Validation thanks to the good people at JSON-schema.org, random passwords, hash joins, explain analyze, constraint checks, and more. So if you need to caught up this is you chance and if you are wondering what is in the near term future this is your opportunity.

SQL Upper Function Example | MySQL And SQL Server Upper()

$
0
0
SQL Upper Function Example | MySQL And SQL Server Upper()

SQL UPPER function is used for converting all the characters in the source string to Uppercase characters. If any number is present in the string, then it remains unaffected. SQL UPPER() function converts a string to the upper-case.

SQL upper() Function

Suppose you have the online shopping website. Customers visit the website and provide the necessary information while creating the login account.

Each customer provides few compulsory information such as first name, last name, phone number, email address, and residential address.

Each customer is different, so you cannot expect the similar format for all inputs.

For example, you get a following entries in an SQL table.

We do not see all words following the consistent pattern.

It does not look good as well if you have to share the report daily to higher management for all newly enrolled customers.

The SQL UPPER function converts all the letters in a string into uppercase. If you want to convert the string to lowercase, you use the LOWER function instead.

Syntax

SELECT UPPER (String);

Parameters

String: The source string whose characters have to be replaced with Uppercase characters. It can be any literal character string, variable, character expression, or any table column.

Example

Query 1

SELECT UPPER (‘AppDividend.Com’);

Output

APPDIVIDEND.COM

Query 2

SELECT UPPER (‘sql123sql’);

Output

SQL123SQL

As discussed above, numbers remain unaffected to UPPER function.

Let’s apply the UPPER function to a table.

Table: Employee

Emp_id Emp_name City State Salary
101 Rohit Patna Bihar 30000
201 Shivam Jalandhar Punjab 20000
301 Karan Allahabad Uttar Pradesh 40000
401 Suraj Kolkata West Bengal 60000
501 Akash Vizag Andhra Pradesh 70000


Suppose we want to change the characters of the City of each employee to Uppercase, then the following query has to be written.

Query 3

SELECT Emp_name, City, UPPER (City) 
AS UPPER_CITY from Employee;

Output

Emp_name City UPPER_CITY
Rohit Patna PATNA
Shivam Jalandhar JALANDHAR
Karan Allahabad ALLAHABAD
Suraj Kolkata KOLKATA
Akash Vizag VIZAG


As you can see above, the name of the city is converted to Uppercase characters.

MySQL UPPER() Function

In MySQL, the UPPER() function converts a string to upper-case.

Syntax

UPPER(text)

In this syntax, the text parameter can be a literal character string, variable, character string expression, or table column.

SQL Server UPPER() Function

The UPPER() function converts an input string into uppercase.

Syntax

The following shows the syntax of the UPPER() function:

UPPER(string)

In this syntax, the string parameter can be a literal character string, variable, character string expression, or table column.

The type of the string must be implicitly convertible to VARCHAR. Otherwise, you must use the CAST() function to convert the string explicitly.

SQL Server UPPER() function returns the uppercase form of the input string.

Using the UPPER() function with literal strings

See the following query.

SELECT 
    UPPER('appdividend') result;

See the output.

result

APPDIVIDEND

Finally, SQL Upper Function Example | MySQL And SQL Server Upper() Tutorial is over.

Recommended Posts

SQL UNICODE Function

SQL Replicate Function

SQL Left Function Example

SQL Format Function

SQL LTRIM Function

The post SQL Upper Function Example | MySQL And SQL Server Upper() appeared first on AppDividend.

Want to talk about MySQL at SCaLE 18x?

$
0
0
The Call For Papers for SCaLE 18x ends soon and I would love to have your talk on MySQL be part of the MySQL track! The track is usually on the Friday of the show!

I am 'curating' the MySQL track again and would love to have you talk on MySQL.  Do you have a story about using MySQL, some trick admin skills you would like to share, a beginners guide to X & MySQL, or a case study? Well then, please submit.

What is SCaLE?  Well it is roughly 5,000 people in Pasadena, California next March 5-8 2020 at the convention center in the heart of the City.  It is the only big open source in Southern California and features multiple tracks on subjects ranging from AI to how to work remotely.  The expo hall is a few acres of the best tech and projects that you will find anywhere.

Do I really have to write a paper? Well, no.  You do need to fill out a form online on your proposal that you would like to talk and make sure that you mark it for the MySQL track if it is MySQL related!  The dead line is the end of November!

Fear of public speaking? Well, this is a great event if you are timid or think you might be. This is like the large user group with techies who want to hear your story, see you succeed, and want to hear you opinion.

What else do I get?  Well you get a badge that says 'speaker' along with the ability to go to as many sessions as you can at the most exciting open source show.  And if you are on the MySQL track maybe I will get you some specialized MySQL swag!

So if you have an idea for a talk please submit it before November 30th!

Need help or want an extra set of eyes for you proposal -- then contact me! Please! I want you MySQL talk next March!

InnoDB : Tablespace Space Management

$
0
0

A user defined table and its corresponding  index data, in InnoDB, is  stored in files that have an extension .ibd. There are two types of tablespaces, general (or shared) tablespace and file-per-table.  For shared  tablespaces, data from many different  tables and their corresponding indexes may reside in a single .ibd file.…

New Fusion with Visual Studio 2019 Support

$
0
0
dbForge Fusion is a line of Visual Studio plugins designed to simplify database development and enhance data management capabilities. This line comprises three tools: Fusion for SQL Server, Fusion for MySQL, and Fusion for Oracle. We are happy to announce new updates for each of these tools which come with many improvements and fixes. But […]

Time in Performance Schema

$
0
0
I've seen questions like this:
"Is there a way to know when (date and time) the last statement captured in ... was actually ran?"
more than once in some discussions (and customer issues) related to Performance Schema. I've seen answers provided by my colleagues and me after some limited testing. I've also noticed statements that it may not be possible.

Indeed, examples of wall clock date and time in the output of queries from the performance_schema are rare (and usually come from tables in the information_schemasys.format_time() function converts time to a nice, human readable format, but it still remains relative - it is not a date and time when something recorded in performance_schema happened.

In this post I'd like to document the answer I've seen and have in mind (and steps to get it) here, to save time for readers and myself faced with similar questions in the future. I'll also show the problem with this answer that I've noticed after testing for more than few minutes.

Let's start with simple setup of testing environment. In my case it is good old MariaDB 10.3.7 running on this netbook under Windows. First, let's check if Performance Schema is enabled:
 MariaDB [test]> select version(), @@performance_schema;
+--------------------+----------------------+
| version()          | @@performance_schema |
+--------------------+----------------------+
| 10.3.7-MariaDB-log |                    1 |
+--------------------+----------------------+
1 row in set (0.233 sec)
Then let's enable recording of time for everything and enable all consumers:
MariaDB [test]> update performance_schema.setup_instruments set enabled='yes', timed='yes';
Query OK, 459 rows affected (0.440 sec)
Rows matched: 707  Changed: 459  Warnings: 0

MariaDB [test]> update performance_schema.setup_consumers set enabled='yes';
Query OK, 8 rows affected (0.027 sec)
Rows matched: 12  Changed: 8  Warnings: 0
Now we can expect recently executed statements to be recorded, like this:
MariaDB [test]> select now(), event_id, timer_start, timer_end, sql_text from performance_schema.events_statements_current\G*************************** 1. row ***************************
      now(): 2019-11-03 17:42:51
   event_id: 46
timer_start: 22468653162059216
  timer_end: 22468697203533224
   sql_text: select now(), event_id, timer_start, timer_end, sql_text from performance_schema.events_statements_current
1 row in set (0.045 sec)
Good, but how we can get a real time when the statement was executed (like now() reports)? We all know from the fine manual that timer_start and timer_end values are in "picoseconds". So we can easily convert them into seconds (or whatever units we prefer):
MariaDB [test]> select now(), event_id, timer_start/1000000000000, sql_text from performance_schema.events_statements_current\G
*************************** 1. row ***************************
                    now(): 2019-11-03 17:54:02
                 event_id: 69
timer_start/1000000000000: 23138.8159
                 sql_text: select now(), event_id, timer_start/1000000000000, sql_text from performance_schema.events_statements_current
1 row in set (0.049 sec)
This value is related startup time one might assume, and we indeed can expect that timer in Performance Schema is initialized at some very early stage of startup. But how to get date and time of server startup with SQL statement?

This also seems to be easy, as we have a global status variable called Uptime measured in seconds. Depending on fork and version used we can get the value of Uptime either from the Performance Schema (in MySQL 5.7+) or from the Information Schema (in MariaDB and older MySQL versions). For example:
MariaDB [test]> select variable_value from information_schema.global_status where variable_name = 'Uptime';
+----------------+
| variable_value |
+----------------+
| 23801          |
+----------------+
1 row in set (0.006 sec)
So, server startup time is easy to get with a date_sub() function:
MariaDB [test]> select @start := date_sub(now(), interval (select variable_value from information_schema.global_status where variable_name = 'Uptime') second) as start;
+----------------------------+
| start                      |
+----------------------------+
| 2019-11-03 11:28:18.000000 |
+----------------------------+
1 row in set (0.007 sec)
In the error log of MariaDB server I see:
2019-11-03 11:28:18 0 [Note] mysqld (mysqld 10.3.7-MariaDB-log) starting as process 5636 ...
So, I am sure the result is correct. Now, if we use date_add() to add timer value converted to seconds, for example to the server startup time, we can get the desired answer, date and time when the statement recorded in performance_schema was really executed:
MariaDB [test]> select event_id, @ts := date_add(@start, interval timer_start/1000000000000 second) as ts, sql_text, now(), timediff(now(), @ts) from performance_schema.events_statements_current\G
*************************** 1. row ***************************
            event_id: 657
                  ts: 2019-11-03 18:24:00.501654
            sql_text: select event_id, @ts := date_add(@start, interval timer_start/1000000000000 second) as ts, sql_text, now(), timediff(now(), @ts) from performance_schema.events_statements_current
               now(): 2019-11-03 18:24:05
timediff(now(), @ts): 00:00:04.498346
1 row in set (0.002 sec)
I was almost ready to publish this blog post a week ago, before paying more attention to the result (that used to be perfectly correct in earlier simple tests) and executing a variation of statement presented above. The problem I noticed is that when Uptime of the server is not just few minutes (as it often happens in quick test environments), but hours or days, timestamp that we get for a recent event from the performance_schema using the approach suggested may differ from current timestamp notably (we see 4.5+ seconds difference highlighted above). Moreover, this difference seem to fluctuate:
MariaDB [test]> select event_id, @ts := date_add(@start, interval timer_start/1000000000000 second) as ts, sql_text, now(), timediff(now(), @ts) from performance_schema.events_statements_current\G
*************************** 1. row ***************************
            event_id: 682
                  ts: 2019-11-03 18:24:01.877763
            sql_text: select event_id, @ts := date_add(@start, interval timer_start/1000000000000 second) as ts, sql_text, now(), timediff(now(), @ts) from performance_schema.events_statements_current
               now(): 2019-11-03 18:24:07
timediff(now(), @ts): 00:00:05.122237
1 row in set (0.002 sec)
and tend to grow with Uptime. This make the entire idea of converting timer_start and timer_end Performance Schema "counters" in "picoseconds" questionable and unreliable for the precise real timestamp matching and comparing with other timestamp information sources in production.
Same as with this photo of sunset at Brighton taken with my Nokia dumb phone back in June, I do not see a clear picture of time measurement in Performance Schema...

After spending some more time thinking about this I decided to involve MySQL team somehow and created the feature request, Bug #97558 - "Add function (like sys.format_time) to convert TIMER_START to timestamp", that ended up quickly "Verified" (so I have small hope that I had not missed anything really obvious - correct me if I am wrong). I'd be happy to see further comments there and, surely, the function I asked about implemented. But I feel there is some internal problem with this and some new feature at server side may be needed to take the "drift" of time in Performance Schema into account.

There is also a list of currently open questions that I may try to answer in followup posts:
  1. Is the problem of time drift I noticed a MariaDB 10.3.7-specific, or recent MySQL 5..x and 8.0.x are also affected?
  2. Is this difference in time growing monotonically with time or really fluctuating?
  3. When exactly Performance Schema time "counter" starts, where is it in the code?
  4. Are there any other, better or at least more precise and reliable ways to get timestamps of some specific events that happen during MySQL server work? I truly suspect that gdb and especially dynamic tracing on Linux with tools like bpftrace may give us more reliable results...

Database Tab Sweep

$
0
0

I miss a proper database related newsletter for busy people. There’s so much happening in the space, from tech, to licensing, and even usage. Anyway, quick tab sweep.

Paul Vallée (of Pythian fame) has been working on Tehama for sometime, and now he gets to do it full time as a PE firm, bought control of Pythian’s services business. Pythian has more than 350 employees, and 250 customers, and raised capital before. More at Ottawa’s Pythian spins out software platform Tehama.

Database leaks data on most of Ecuador’s citizens, including 6.7 million children – ElasticSearch.

Percona has launched Percona Distribution for PostgreSQL 11. This means they have servers for MySQL, MongoDB, and now PostgreSQL. Looks very much like a packaged server with tools from 3rd parties (source).

Severalnines has launched Backup Ninja, an agent-based SaaS service to backup popular databases in the cloud. Backup.Ninja (cool URL) supports MySQL (and variants), MongoDB, PostgreSQL and TimeScale. No pricing available, but it is free for 30 days.

Comparing Database Types: How Database Types Evolved to Meet Different Needs

New In PostgreSQL 12: Generated Columns – anyone doing a comparison with MariaDB Server or MySQL?

Migration Complete – Amazon’s Consumer Business Just Turned off its Final Oracle Database – a huge deal as they migrated 75 petabytes of internal data to DynamoDB, Aurora, RDS and Redshift. Amazon, powered by AWS, and a big win for open source (a lot of these services are built-on open source).

MongoDB and Alibaba Cloud Launch New Partnership – I see this as a win for the SSPL relicense. It is far too costly to maintain a drop-in compatible fork, in a single company (Hi Amazon DocumentDB!). Maybe if the PostgreSQL layer gets open sourced, there is a chance, but otherwise, all good news for Alibaba and MongoDB.

MySQL 8.0.18 brings hash join, EXPLAIN ANALYZE, and more interestingly, HashiCorp Vault support for MySQL Keyring. (Percona has an open source variant).

New Continuent Tungsten Replicator (AMI): The Advanced Replication Engine For MySQL, MariaDB, Percona Server & AWS Aurora

$
0
0

Discover the new Continuent Tungsten Replicator (AMI) – the most advanced & flexible replication engine for MySQL, MariaDB & Percona Server, including Amazon RDS MySQL and Amazon Aurora

We’re excited to announce the availability on the Amazon Marketplace of a new version of the Tungsten Replicator (AMI).

Tungsten Replicator (AMI) is a replication engine that provides high-performance and improved replication functionality over the native MySQL replication solution and provides the ability to apply real-time MySQL data feeds into a range of analytics and big data databases.

Tungsten Replicator (AMI) builds upon the well-established, commercial stand-alone product Tungsten Replicator and offers the exact same functionality, but with the convenience that comes with an ad-hoc online service: cost-effective, rapid and automated deployment.

How to get started – 14-Day Free Trial

Users can start with the new Tungsten Replicator by trying one instance of the AMI for free for 14 days (AWS infrastructure charges still apply). Free trials will automatically convert to a paid hourly subscription upon expiration.

What’s new in this release?

  • New Targets: The new Tungsten Replicator (AMI) now supports the full range of targets in line with the stand-alone Tungsten Replicator product.
  • Latest Tungsten Replicator: The new AMI launches the latest 6.1.1 release of Tungsten Replicator.
  • Improved Installation Wizard: The installation wizard now provides an easier way to configure additional advanced options such as SSL and filtering.
  • Cluster-Slave Support: If you are an existing Tungsten Clustering user, the AMI will now enable you to configure a Cluster-Slave to replicate, in real-time, from your existing Tungsten cluster to any of the available targets.
  • Simplified Pricing: With Tungsten Replicator (AMI) you can now easily mix and match source/target combinations. We have split out the Extractor into its own dedicated AMI; you can then pick and choose the target AMI suitable for your environment. This enables much easier configuration and simplified management. In addition, this allows for easier configuration of fan-out topologies.

Replication Extraction from Operational Databases

  • MySQL (all versions, on-premises and in the cloud)
  • MariaDB (all versions, on-premises and in the cloud)
  • Percona Server (all versions, on-premises and in the cloud)
  • AWS Aurora
  • AWS RDS MySQL
  • Azure MySQL
  • Google Cloud SQL

Replication Target Databases Available as of Today

OLTP

Analytics

Also

Top Product Benefits

  • Multiple Targets: Enabling users to replicate directly into popular analytic repositories such as MySQL (all variations), PostgreSQL, AWS RedShift, Kafka, Vertica​, Hadoop, Oracle, Cassandra, Elasticsearch and Clickhouse.
  • Advanced Filtering: Filter your replication in flight at schema, object or even row/column level. Filter at extraction, or during apply.
  • Cost not tied to transaction volume: Unlimited real-time transactional data transfer to eliminate escalating replication costs of ETL-based alternatives.
  • Multi-master: Global, real-time transaction processing with flexible multimaster replication configurations between clusters (MySQL as source and target only).

Top Product Highlights

  1. Tungsten Replicator (AMI) features: platform agnostic, real-time replication between database instances, filtering of data down to row-level, parallel replication and SSL for added security.
  2. Tungsten Replicator (AMI) includes the ability to apply data into many replication targets in addition to MySQL (all flavors and versions) such as PostgreSQL, AWS RedShift, Kafka and Vertica, by enabling the replicated information to be transformed after it has been read from the data server to match the functionality or structure in the target server.
  3. For MySQL users the enhanced functionality and information provided by Tungsten Replicator (AMI) allows for global transaction IDs, advanced topology support such as multi-master, star, and fan-in, and enhanced latency identification, as well as filtering and transforming data in-flight​.

Replicate from AWS Aurora, AWS RDS MySQL, MySQL, MariaDB & Percona Server from as little as $0.50/hour

With Tungsten Replicator (AMI) on AWS, users can replicate GB’s of data from as little as 50c/hour:

  1. Go to the AWS Marketplace, and search for Tungsten, or click here
  2. Choose and Subscribe to the Tungsten Replicator for MySQL Source Extraction
  3. Choose and Subscribe to the target Tungsten Replicator AMI of your choice
  4. Pay by the hour
  5. When launched, the host will have all the prerequisites in place and a simple “wizard” runs on first launch and asks the user questions about the source and/or target and then configures it all for them

Users can also start by trying one instance of the AMI for 14 days. There will be no hourly software charges for that instance, but AWS infrastructure charges still apply. Free Trials will automatically convert to a paid hourly subscription upon expiration.

Tungsten Replicator OSS

For those of you who might wonder: Tungsten Replicator OSS is, for all practical purposes, obsolete. ​While Tungsten Replicator OSS may still be available in various repositories, all OSS versions are outdated.

We recommend you try out the new Tungsten Replicator (AMI); or contact us to find out more about the stand-alone, commercial product.

We look forward to your feedback on the new Tungsten Replicator (AMI) – please comment below!

Using an LSM for analytics

$
0
0
How do you use an LSM for analytics? I haven't thought much about it because my focus has been small data -- web-scale OLTP since 2006. It is a great question given that other RocksDB users (Yugabyte, TiDB, Rockset, CockroachDB) support analytics.

This post isn't a list of everything that is needed for an analytics engine. That has been described elsewhere. It is a description of problems that must be solved when trying to use well-known techniques with an LSM. I explain the LSM challenges for a vectorized query engine, columnar storage, analytics indexes and bitmap indexes.

There is much speculation in this post. Some of it is informed -- I used to maintain bitmap indexes at Oracle. There is also big opportunity for research and for R&D in this space. I am happy to be corrected and be told of papers that I should read.

Vectorized query engine

See MonetDB and X100 to understand the remarkable performance a vectorized query engine can provide. CockroachDB has recently explained the performance improvement from a vectorized engine even when remaining on row-wise storage.

Anything for a rowid

Columnar encoding and vectorized processing benefit from an engine that uses rowids and even more so when the rowid space isn't sparse. In the most compact form a vector of columns has a start rowid and the offset of a value in the vector is added to the start rowid to compute the rowid for a value. It is less efficient but feasible to have a vector of values and a vector of rowids when the rowid space is sparse.

But an LSM doesn't use rowids as each row has a unique key and that key can be variable length and more than 8 bytes. Rowids are easier to do with heap storage as the rowid can be <pageID>.<pageOffset>. For an LSM it might be possible to use the WAL LSN as the rowid. I propose something different for per-SST rowids, rowids that are unique within an SST. Rows in an SST are static and ordered so the rowid is the offset of the row in the SST. When there are N rows in the SST then the per-SST rowid is a value between 1 and N (or 0 and N-1). A rowid that works across SSTs might be <SST number>.<per-SST rowid>.

To use the per-SST rowid there must be an efficient way to get the key for a given rowid within an SST. That can be solved by a block index in the SST that stores the minimum rowid per block.

Columnar storage

The benefits from columnar storage are compression and processing. Datatype specific compression over a sequence of column values provides excellent compression ratios. There have been many interesting papers on that including Facebook Gorilla and C-Store. The processing benefit comes from iterating over possibly compressed vectors of column values while minimizing data movement.

I assume a vectorized query engine is easier to implement than write-optimized columnar storage but Vertica and Kudu are proof that it is possible to do both. However neither Vertica nor Kudu use an LSM and this blog post is about LSM. First I explain how to do columnar storage and then how to do vectorized processing.

While fully columnar storage can be done I explain a PAX approach that is columnar within an SST -- all columns are in the SST but stored separately. Each column gets its own data blocks and data block index. The block index in this case has the minimum rowid per data block. Similar to Kudu, the primary key (whether composite or not) is also stored in its own data blocks with a block index. That can also be used to map a PK to a rowid. Optionally, the PK data blocks can store the full rows. Otherwise a row can be reconstructed from the per-column data blocks. The LSM must know the schema and WiredTiger shows how to do that.

Columnar processing

The solution above shows how to get the compression benefits from columnar storage but an LSM range query does a scan of each level of the LSM tree that is processed by a merge iterator to filter rows that have been deleted while also respecting visibility. For example with the same key on levels 1, 3 and 5 of the LSM tree it might be correct to return the value from level 1, level 3 or level 5 depending on the query timestamp and per-key timestamps. But it is hard to decide which version of the key to keep in isolation -- the merge iterator needs to see all of the keys at the same time.

While the merge iterator output can be put back into a columnar format, a lot of work has been done by that point. It would be better to push some processing below (or before) the merge iterators. It is easier to push filtering and projection. It is harder to push anything else such as aggregation.

A recent blog post from CockroachDB shows how to get significant benefits from vectorized processing without using columnar storage. I don't want to diminish the value of their approach, but I am curious if it can be enhanced by columnar storage.

Filters are safe to push below a merge iterator. Assume there is a predicate like column < 3 then that can be evaluated by scanning the column in an SST to find the rowids that satisfy the predicate, using the found rowid set to reconstruct the rows, or projected columns from the rows, and returning that data. Multiple filters on the same or multiple columns can also be evaluated in this fashion.

MySQL has options to push non-index predicates to the storage engine. While the original use case was Cluster where storage is across the network from the SQL/compute this feature can also be used for analytics with MySQL.

Aggregation is harder to push below a merge iterator because you need to know whether a given key would be visible to the query while processing an SST and that requires knowing whether there was a tombstone for that key at a smaller level of the LSM tree. That might use too much state and CPU.

Analytics indexes

Analytics indexes are another way to prune the amount of data that must be searched for scan-heavy queries. There was an interesting paper at SIGMOD 2018 that evaluated this approach for LSM. The BRIN in Postgres is another example of this. These can be described as local secondary indexes (local to an SST or data block) as opposed to a global secondary index as provided by MyRocks. The idea is to maintain some attributes per data block or per SST about columns that aren't in the LSM index. This could be the min and max value of that column or a bloom filter. This can be used to prune that data block or SST during a scan.

Bitmap indexes

Has there been any work on bitmap indexes for LSM as in a paper, proof-of-concept or real system? Once per-SST rowids are implemented as described above then per-SST bitmap indexes can also be provided. These would index columns not in the LSM index. Use of the bitmap indexes would determine the found rowid set within each SST.

The cost of per-SST

There is much speculation in this blog post. In several places above I mention that special indexes can be maintained per SST. How many SSTs, and thus how many per-SST indexes, will there be in a typical setup? I assume that an LSM for analytics would use larger SSTs. There are 2^12 SSTs per 1TB of data when the SST size is 256GB. I am not sure whether that would be a problem.

Testing a 99.999% Availability Distributed In-Memory Database

$
0
0

MySQL Cluster is an open-source distributed in-memory database. It combines linear scalability with high availability, providing in-memory real-time access with transactional consistency across partitioned and distributed datasets. It was developed to support scenarios requiring high-availability (99.999% or more) and predictable query time. Testing such a system is achieved via many interconnected pieces ranging from a large set of automated tests and manual exploratory testing. This post explores an overview of the testing methodologies we use and the current challenges we face.

Gaming, banking, telcos, and online services all are powered by fully-redundant and fault-tolerant software systems. At the heart of those systems, you can find MySQL Cluster — a distributed in-memory database having a minimum of five-9s availability (around 5 minutes a year). This open-source database provides nearly-linear scalability and real-time querying predictability at the microsecond level.

To achieve such higher availability it’s crucial to ensure that each release is thoroughly validated. Thousands of automated tests are run daily, for different versions and platforms to ensure defects are detected early and fixed. Testing is everyone’s responsibility and we rely on manual exploratory testing when validating releases or selected critical features.

This paper provides a birds-eye view of the software testing process of MySQL Cluster and the challenges we’re addressing.

MySQL Cluster

MySQL Cluster was born in the early 90s as part of Mikael Ronström PhD studies. It was designed to meet predictability and high availability requirements of the telecommunications industry. Initially developed at Ericsson, it became part of MySQL in 2003, later acquired by Sun MicroSystems and currently under Oracle ownership.

MySQL Cluster can be used stand-alone or together with MySQL Server. On the first option, a cluster is setup by running management and data nodes, and accessed via a low-level NdbAPI (C++, Java, or NodeJS). On the second option, we additionally have one or more MySQL Servers which provide the convenience of the SQL language (for data definition, manipulation, and query) and replication features.

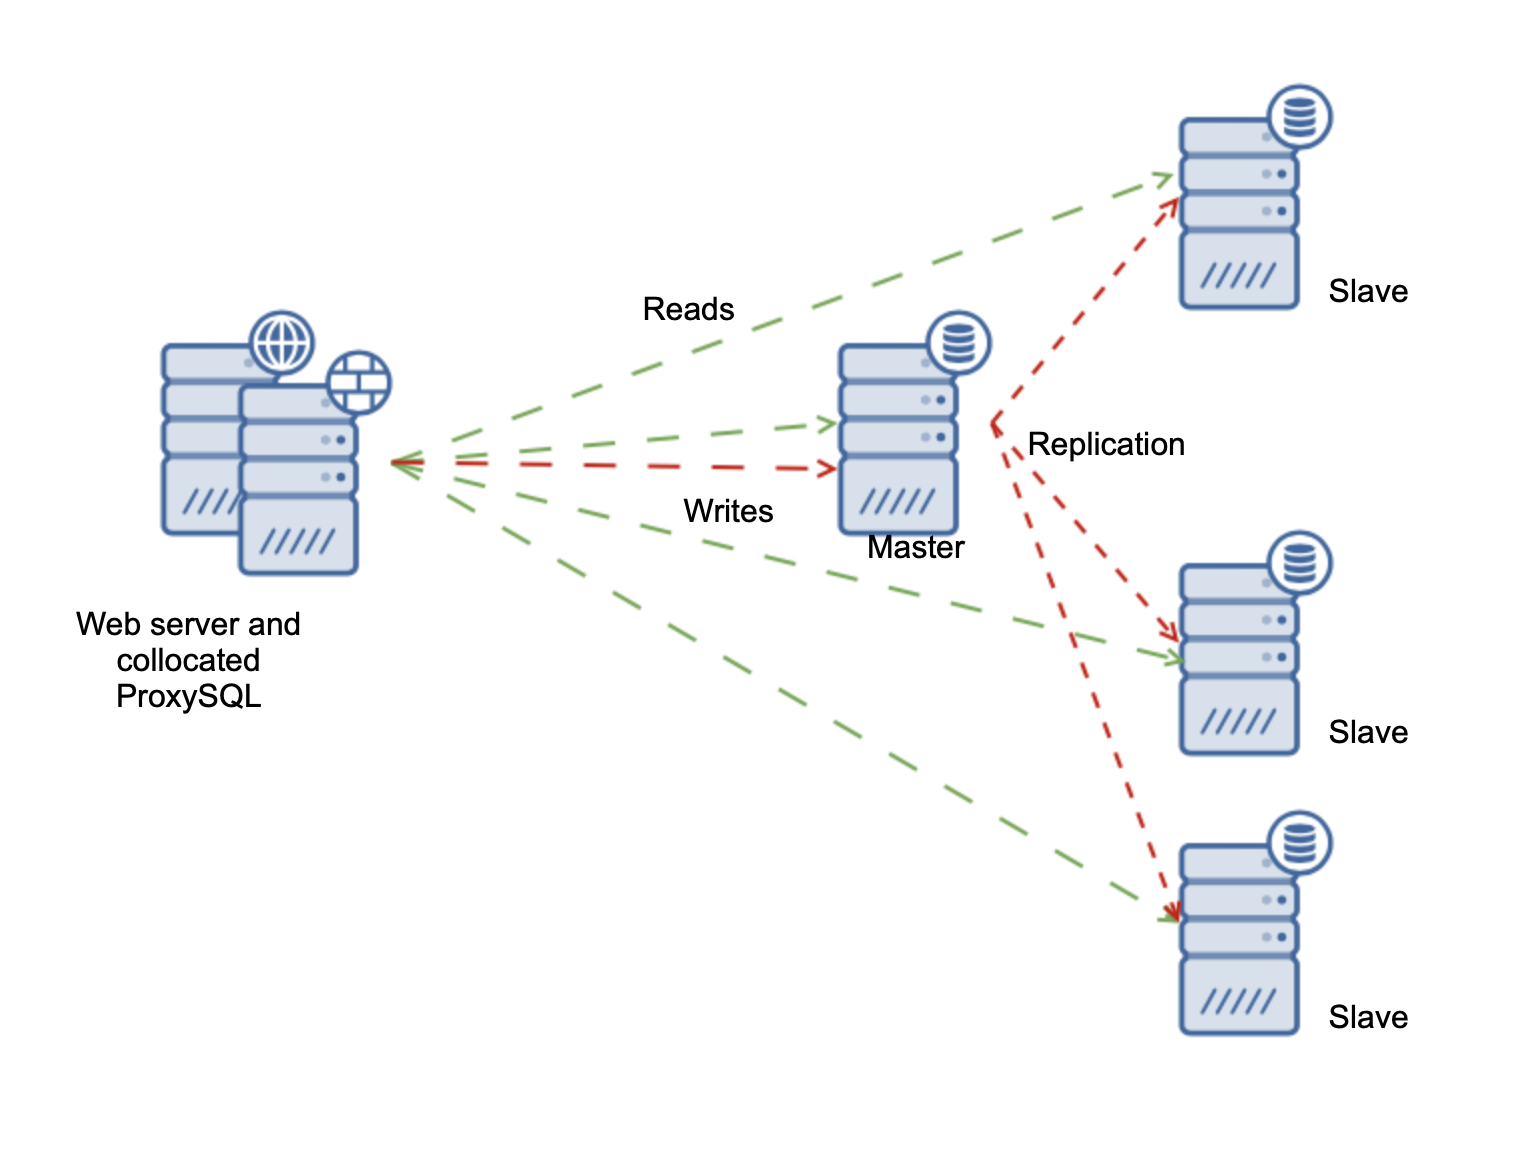
99.999% availability is achieved with a single cluster via an architecture where there’s no single point of failure (e.g. multiple management nodes handling connections/monitoring and multiple data nodes storing/processing data) and by a design that ensures all operations can be ran online (e.g. upgrades, configuration changes, or backups). If we use a setup with multiple clusters connected via replication more than five-9s of availability can be achieved.

Current usage and status

MySQL Cluster is used in telecommunications, banking, gaming, and online services. The requirements leading to this product are predictable response times, high-availability, and linear scaling.

Since 2017, MySQL Server has adopted a 3-months release cycle and MySQL Cluster has been following suit. At the time of writing, version 8.0.18 is under preparation. MySQL Cluster supported platforms is a subset of those of MySQL Server: Linux is the prime supported/recommended platform but additional support for Mac OS X, Solaris, and Windows exists.

Development

Development is undertaken by a team of 22 people, from 6 different countries (from GMT-7 to GMT+5:30 timezones). A significant part of the team works remotely from home. The main technology is C++ accounting to ~700K lines of code as of version 8.0.18. Communication is mostly handled by Slack and Zoom.

Trunk-based development is used across the MySQL organization. Changes are implemented and tested in feature branches before pushed to the main branch. Code reviews are done via Gerrit, ReviewBoard, or by sharing patches by e-mail. Daily and weekly automated regression tests are executed in multiple platforms to ensure failures are detected early.

Testing MySQL Cluster

Testing is a fundamental activity to ensure MySQL Cluster availability requirements.

During the delivery of new functionalities or bug fixes, developers are expected to create tests to cover the changes done. Those tests typically fall in one of two categories: (i) single-host system tests; or (ii) multi-host scenario-based testing. There are no unit or integration tests. All tests are automated and can be run on-demand (either in testing servers or in local dev machine). Error-handling and automatic recovery cases are validated through error injection functionality. This is directly supported in MySQL Cluster by enabling error insert codes.

Automated regression testing is complemented with manual exploratory testing. This testing is always done during the time-frames preceding an official release and after the development of selected critical features.

Manual exploratory testing

Manual exploratory testing plays a fundamental role to ensure the product’s quality. It focuses on two interconnected areas: random execution of operations (e.g. traffic, maintenance); and exploiting corner case scenarios. Because MySQL Cluster is built to be highly-available, the testing goal is to make it unavailable. Invariably, this type of testing uncovers many potential issues and ultimately it’s what determines if the changes are stable enough to be released.

This testing starts by taking a build from a feature or pre-release branch, installing it in a multitude of servers, and running the cluster. A mix of automated scripts and manual procedures are then executed. Automatic scripts normally handle traffic operation (i.e. random creating/dropping of databases/tables and insertion/update/deletion of records). Operations include backup/restore of data, upgrade/downgrade of processes, and configuration changes.

MySQL Cluster has been built to support a minimum of 99.999% availability and that all operations can be executed online. For example, operations such as upgrade of cluster processes can be executed while running traffic and performing a backup. Processes can also be manually crashed allowing automatic-handover to occur. In all cases, any combination of operations should maintain the cluster operational.

The choice of operations to be executed depends a lot on the specific features being tested or the product areas that have been changed. Some times it just boils down to intuition/guessing. Still, the combination of operations should be sensible to be meaningful. All this means, that this kind of testing is very dependent on highly skilled people with a deep understanding of the product.

Often we find that exploratory testing goes hand-in-hand with exploiting corner-case scenarios in which we touch MySQL Cluster limits. When there are no crashes (expected), it’s often much harder to interpret these results leading to many discussions. It’s by far a simple process but immensely valuable as it helps to clarify behavior expectations and, consequently, the implementation of a better product.

Single-host system testing

Most of the tests fall into this category (accounting to 8,000 tests). The most common setup to run these tests consists of the simplest cluster configuration: 1 management node, 2 data nodes, and a MySQL Server. All processes run on the same host. Tests are written in a very simple language called mysqltest consisting of a mix of SQL, Perl, and command-execution. Tests are run by a tool developed and maintained by MySQL Server team called MTR (MySQL Test Runner).

MTR-based tests cover a broad range of functionality from database-specific operations to MySQL Cluster specific operations. Database specific operations are data definition operations (CREATE, ALTER, DROP), data manipulation operations (INSERT, UPDATE, DELETE), data querying operations (SELECT, SHOW), data control operations (GRANT, REVOKE), and data transaction operations (START TRANSACTION, COMMIT, etc.). Examples of MySQL Cluster specific operations are backup/restore, nodes restart. Because these tests are executed by running SQL queries via MySQL Server, they also act as integration tests between MySQL Server and MySQL Cluster. Simple replication scenarios using both MySQL Server and MySQL Cluster are also tested in this category.

There are three main reasons why the majority of tests fall into this category. First, test creation is extremely simple — a test can consist of a few lines of SQL code. Second, although starting all MySQL Cluster and Server processes takes a few seconds, it’s fairly easy to run such tests in a developer machine. Third, there is a good infrastructure which is maintained by the MySQL organization to run these tests.

Multi-host scenario-based testing

MySQL Cluster is meant to run in multiple hosts, being four hosts the minimum recommended deployment for full redundancy and fault tolerance. This configuration consists of 2 management nodes, 2 data nodes, and two MySQL servers. However, many other configurations can be used (e.g. up to 144 data nodes).

In addition to multi-host setups, there are other advanced testing functionalities required. For instance, MySQL Cluster supports online upgrade/downgrade between all supported versions (7.4, 7.5, 7.6, and 8.0) which requires setting up all these different versions, start a cluster in one of the versions and then restart different processes in other versions. Also, NdbAPI has been designed to be binary compatible between versions (i.e. a client compiled against version 7.4 can be used against 8.0) which is also tested automatically. Setting up replicated clusters requires starting multiple clusters and configuring replication between them. Finally, performance testing requires setting up the test hosts CPU affinity to specific MySQL Cluster’s processes.

The need to support the above testing requirements in a fully automated manner led to the development of own tooling. We call “Autotest” to the set of tools, scripts, automation server, and front-end to explore test results. Autotest is responsible to run over 1,000 tests using different cluster configurations leading to thousands of different combinations.

Autotest tests are implemented in C++ with the support of our testing library (NDBT). Tests directly access MySQL Cluster via NdbAPI or manipulate processes via the test orchestrator. One particularity of these tests is that they can be used to validate MySQL Cluster behavior independently of the used configuration covering a broad range of functionality. Because these tests typically reproduce customer scenarios combining non-trivial operations, they fall under the category of scenario-based testing. Tests are executed using ATRT (AutoTest Run Test). This tool is responsible for orchestrating the deployment and setup of arbitrary clusters, starting all processes, running tests, manipulating processes (e.g. downgrade), and detect cluster failures. Test results are available via custom front-ends, showing individual test run results, statistics and trend information.

Testing Challenges

The development and maintenance of testing tools/libraries and support for test execution have many challenges. The first challenge is that testing tools/libraries require constant development to accompany the testing needs. Also, similarly to the development of any other software, this requires planning, developing, and testing which is only possible having a team with clear responsibility for this. Hence, in the middle of 2018, a dedicated 5-people team has been created. The second challenge is to ensure that a complex test infrastructure like Autotest that handles multi-host software deployment and test execution works correctly reporting only test failures. After almost a year of work, we not only managed to stabilize test execution but also built-in features to support new test cases and clean up some of the existent functionality. Having achieved that, we’re now looking at the next challenges ahead.

Testing Ice Cream Cone

The test ice cream cone is an analogy depicting a large number of systems tests (ice cream part) and a minority of integration and unit tests (cone). This is to contrast with the test pyramid that defends the opposite — a large number of unit tests at the bottom and then a smaller number of integration and system tests at the pyramid top.

The challenges of the test ice cream cone are well documented: noisy test results due to the test flakiness, long testing rounds, difficulty to understand the root cause of failures. Preliminary work has been done to optimize the long testing rounds by parallelizing test execution and build mechanisms to cope with test flakiness by retrying test execution.

A significant effort is still spent on determining if a test failure is due to flakiness or not. This issue is exacerbated due to MTR and Autotest tests running in separate environments hence requiring going over test failures in two different systems. Automation has been built to analyze test failures, determine its flakiness likelihood, and check if there are bugs already assigned to these failures or if developers’ input is needed — this effort is still on-going.

Looking forward, the introduction of test selection and reduction techniques is being considered to help to identify which tests can be skipped while preserving the same test coverage.

Test segmentation

As the number of tests grows it’s important to categorize them into different groups. Smoke tests, performing basic validation of the overall MySQL Cluster, belong to one of such groups. Examples of other groups are upgrade/downgrade tests or tests validating specific bugs. This segmentation not only helps to identify coverage gaps but also to support test selection through the decision of which tests should run more often. We’ve started this process for upgrade/downgrade tests by documenting them, identifying missing scenarios, and fixing infrastructure shortcomings.

Complementing manual exploratory testing

As mentioned before, manual exploratory testing is an invaluable activity that helps uncover many issues and clarify expectations about the product. However, the quality of this testing is tightly coupled to the skils of the individuals doing it which are hard to find. To scale this kind of testing, we’re considering the usage of Chaos Engineering tools. Tests that inject failures and modify the environment (e.g. introduce loss/delay in network links) exist meaning that basic functionality is already in place. Hence, the natural step is to further run combinations of failures/scenarios-changes to verify of a larger number of scenarios.

Performance testing

Ensuring the lack of performance regressions is essential in a database product. For MySQL Cluster this is critical as small variations in the responses can have a big impact on our users. Traditionally, performance testing has been done in an exploratory fashion. This means that sporadically a performance regression could be introduced.

In 2017, a project was started to develop a fully automated performance test suite. The initial specification of these test scenarios was developed in partnership with one of our customers providing us valuable information on which parts to focus on. Since then we have developed a MySQL Cluster traffic simulator (using the C++ NdbAPI) and added many load and performance test cases. Although the test suite is still not fully automated — requiring some manual monitoring of the results — this has been proved successful in identifying important bugs. Because some tests are executed for several days straight some effort is still required to use them as part of change validation.

Conclusion

The testing of a database product poses many different challenges. While the specifics of testing are tailored for the product under test, the testing challenges are common to many other software systems. In summary our lessons have been: automated testing is paramount to ensure a large number of scenarios are covered but they still leave space for manual exploratory testing; there’s constant need to develop and maintain testing tools and infrastructure which is most effective when handled by a dedicated team; a large number of tools/techniques to ensure we balance between adding new tests and keeping the existent tests under control.

MySQL Cluster source code and binaries are available from https://www.mysql.com/products/cluster

Watch Out for Disk I/O Performance Issues when Running EXT4

$
0
0
Performance Issues When Running EXT4

Recently, at Percona Live Europe 2019, Dimitri Kravchuk from Oracle mentioned that he observed some unclear drop in performance for MySQL on an ext4 filesystem with the latest Linux kernels. I decided to check this case out on my side and found out that indeed, starting from linux kernel 4.9, there are some cases with notable (up to 2x) performance drops for ext4 filesystem in direct i/o mode.

So what’s wrong with ext4? It started in 2016 from the patch that was pushed to kernel 4.9: “ext4: Allow parallel DIO reads”. The purpose of that patch was to help to improve read scalability in direct i/o mode. However, along with improvements in pure read workloads, it also introduced regression in intense mixed random read/write scenarios. And it’s quite weird, but this issue had not been noticed for 3 years. Only this summer was performance regression reported and discussed in LKML. As a result of this discussion, there is an attempt to fix it, but from my current understanding that fix will be pushed only to upcoming 5.4/5.5 kernels. Below I will describe what this regression looks like, how it affects MySQL workloads, and what workarounds we can apply to mitigate this issue.

ext4 Performance Regression

Let’s start by defining the scope of this ext4 performance regression. It will only have an impact if the setup/workload meets following conditions:
– fast ssd/nvme
– linux kernel>=4.9
– files resides on ext4 file system
– files opened with O_DIRECT flag
– at least some I/O should be synchronous

In the original report to LKML, the issue was observed/reproduced with a mixed random read/write scenario with sync I/O and O_DIRECT. But how do these factors relate to MySQL? The only files opened by InnoDB in O_DIRECT mode are tablespaces (*.ibd files), and I/O pattern for tablespaces consists of following operations:

– reads ibd data in synchronous mode
– writes ibd data in asynchronous mode
– posix_allocate to extend tablespace file followed by a synchronous write
– fsync

There are also extra I/O from WAL log files:

– writes data to log files in synchronous mode
– fsync

So in the case of InnoDB tablespaces that are opened with O_DIRECT, we have a mix of sync reads and async writes and it turned out that such a combination along with sync writes to innodb log file is enough to cause notable performance regression as well. I have sketched the workload for fio tool (see below) that simulates the I/O access pattern for InnoDB and have run it for SSD and NVMe drives for linux kernels 4.4.0, 5.3.0, and 5.3.0 with ext4 scalability fix.

[global]
filename=tablespace1.ibd:tablespace2.ibd:tablespace3.ibd:tablespace4.ibd:tablespace5.ibd
direct=1
bs=16k
iodepth=1

#read data from *.ibd tablespaces
[ibd_sync_read]
rw=randread
ioengine=psync

#write data to *.ibd tavlespaces
[ibd_async_write]
rw=randwrite
ioengine=libaio

#write data to ib* log file
[ib_log_sync_write]
rw=write
bs=8k
direct=0
ioengine=psync
fsync=1
filename=log.ib
numjobs=1

fio results on the chart:

Observations:

– for SATA/SSD drive there is almost no difference in throughtput, and only at 16 threads do we see a drop in reads for ext4/kernel-5.3.0. For ext4/kernel-5.3.0 mounted with dioread_nolock (that enables scalability fixes), we see that IOPS back and even look better.
– for NVMe drive the situation looks quite different – until 8 i/o threads IOPS for both reads and writes are more/less similar but after increasing pressure on i/o we see a notable spike for writes and similar drop for reads. And again mounting ext4 with dioread_nolock helps to get the same throughput as and for kernels < 4.9.

The similar performance data for the original issue reported to LKML (with more details and analysis) can be found in the patch itself.

How it Affects MySQL

O_DIRECT

Now let’s check the impact of this issue on an IO-bound sysbench/OLTP_RW workload in O_DIRECT mode. I ran a test for the following setup:

– filesystem: xfs, ext4/default, ext4/dioread_nolock
– drives: SATA/SSD and NVMe
– kernels: 4.4.0, 5.3.0, 5.3.0+ilock_fix

Observations

– in the case of SATA/SSD, the ext4 scalability issue has an impact on tps rate after 256 threads and drop is 10-15%
– in the case of NVMe and regular ext4 with kernel 5.3.0 causes performance drop in ~30-80%. If we apply a fix by mounting ext4 with dioread_nolock or use xfs,  throughput looks good.

O_DSYNC

As ext4 regression affects O_DIRECT, let’s replace O_DIRECT with O_DSYNC and look at results of the same sysbench/OLTP_RW workload on kernel 5.3.0:

Note: In order to make results between O_DIRECT and O_DSYNC comparable, I have limited available memory for MySQL instance by cgroup.

Observations:

In the case of O_DSYNC and regular ext4, the performance is just 10% less than for O_DIRECT/ext4/dioread_nolock and O_DIRECT/xfs and ~35% better than for O_DIRECT/ext4. That means that O_DSYNC can be used as a workaround for cases when you have fast storage and ext4 as filesystem but can’t switch to xfs or upgrade kernel.

Conclusions/workarounds

If your workload/setup is affected, there are the following options that you may consider as a workaround:

– downgrade linux kernel to 4.8
– install kernel 5.3.0 with fix and mount ext4 with dioread_nolock option
– if O_DIRECT is important, switch to xfs filesystem
– if changing filesystem is not an option,  replace O_DIRECT with O_DSYNC+cgroup

Viewing all 18798 articles
Browse latest View live


<script src="https://jsc.adskeeper.com/r/s/rssing.com.1596347.js" async> </script>