Quantcast
Channel: Planet MySQL
Viewing all 18800 articles
Browse latest View live

FromDual.en: FromDual Performance Monitor for MySQL and MariaDB 0.10.4 has been released

$
0
0

FromDual has the pleasure to announce the release of the new version 0.10.4 of its popular Database Performance Monitor for MySQL, MariaDB, Galera Cluster and Percona Server fpmmm.

You can download fpmmm from here.

In the inconceivable case that you find a bug in fpmmm please report it to our Bug-tracker.

Any feedback, statements and testimonials are welcome as well! Please send them to feedback@fromdual.com.

This release contains various minor bug fixes and improvements.

New installation of fpmmm v0.10.4

Please follow our mpm installation guide. A specific fpmmm installation guide will follow with the next version.

Prerequisites

CentOS 6

# yum install php-cli php-process php-mysqli

# cat << _EOF >/etc/php.d/fpmmm.ini
variables_order = "EGPCS"
date.timezone = 'Europe/Zurich'
_EOF

rpm -Uvh http://repo.zabbix.com/zabbix/2.2/rhel/6/x86_64/zabbix-release-2.2-1.el6.noarch.rpm
yum update
yum install zabbix-sender

CentOS 7

# yum install php-cli php-process php-mysqli

# cat << _EOF >/etc/php.d/fpmmm.ini
variables_order = "EGPCS"
date.timezone = 'Europe/Zurich'
_EOF

rpm -Uvh http://repo.zabbix.com/zabbix/2.2/rhel/7/x86_64/zabbix-release-2.2-1.el7.noarch.rpm
yum update
yum install zabbix-sender

Ubuntu 14.04

# apt-get install php5-cli php5-mysqlnd

# cat << _EOF >/etc/php5/cli/conf.d/fpmmm.ini
variables_order = "EGPCS"
date.timezone = 'Europe/Zurich'
_EOF

apt-get install zabbix-agent

OpenSuSE 13.1

# zypper install php5 php5-posix php5-mysql php5-pcntl php5-curl

#cat << _EOF >/etc/php5/conf.d/fpmmm.ini
variables_order = "EGPCS"
date.timezone = 'Europe/Zurich'
_EOF

zypper addrepo http://download.opensuse.org/repositories/server:/monitoring/openSUSE_13.1 server_monitoring
zypper update
zypper install zabbix-agent

Upgrade from fpmmm 0.10.x to fpmmm 0.10.4

# cd /opt
# tar xf /download/fpmmm-0.10.4.tar.gz
# rm -f fpmmm
# ln -s fpmmm-0.10.4 fpmmm

Changes in fpmmm v0.10.4

Security module

  • Privilege problem in security module caught and error message written.

Changes in fpmmm v0.10.3

fpmmm agent

  • preg_replace error fixed (FromDualMySQLagent.inc).

Master module

  • Bug in master module fixed.

InnoDB module

  • Deadlock and foreign key error files move from /tmp to cacheBase.
  • Deadlock and foreign key error catching fixed (bug #162).

Changes in fpmmm v0.10.2

fpmmm agent

  • fpmmm version check added in template.
  • fpmmm templates upgrade to Zabbix version 2.0.9. This means, they do not work with Zabix 1.8 any more!
  • zabbix_sender return code 0 caught correctly now.
  • Minor bug fixes and typos fixed.
  • Bug in caching data fixed.

For subscriptions of commercial use of fpmmm please get in contact with us.


PlanetMySQL Voting: Vote UP / Vote DOWN

Bash Arrays & MySQL

$
0
0

Student questions are always interesting! They get me to think and to write. The question this time is: “How do I write a Bash Shell script to process multiple MySQL script files?” This post builds the following model (courtesy of MySQL Workbench) by using a bash shell script and MySQL script files, but there’s a disclaimer on this post. It shows both insecure and secure approaches and you should avoid the insecure ones.

LittleERDModel

It seems a quick refresher on how to use arrays in bash shell may be helpful. While it’s essential in a Linux environment, it’s seems not everyone masters the bash shell.

Especially, since I checked my Learning the Bash Shell (2nd Edition) and found a typo on how you handle arrays in the bash shell, and it’s a mistake that could hang newbies up (on page 161). Perhaps I should update my copy because I bought it in 1998. <br/>PlanetMySQL Voting: <a href=Vote UP / Vote DOWN

5 Performance tips for running Galera Cluster for MySQL or MariaDB on AWS Cloud

$
0
0

Amazon Web Services is one of the most popular cloud environments. Galera Cluster is one of the most popular MySQL clustering solutions. This is exactly why you’ll see many Galera clusters running on EC2 instances. In this blog post, we’ll go over five performance tips that you need to take under consideration while deploying and running Galera Cluster on EC2. If you want to run regular MySQL on EC2, you’ll find these tips still useful because, well, Galera is built on top of MySQL after all. Hopefully, these tips will help you save time, money, and achieve better Galera/MySQL performance within AWS.

Choosing a good instance size

When you take a look at the instance chart in the AWS documentation, you’ll see that there are so many instances to choose from. Obviously, you will pick an instance depending on your application needs (therefore you have to do some benchmarking first to understand those needs), but there are couple of things to consider.

CPU and memory - rather obvious. More = better. You want to have some headroom in terms of free CPU, to handle any unexpected spikes of traffic - we’d aim for ~50% of CPU utilization max, leaving the rest of it free.

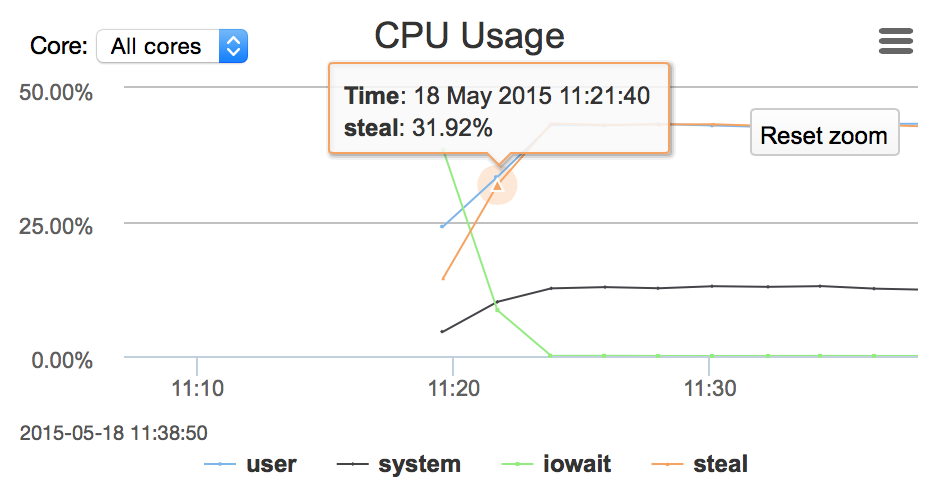
We are talking about virtualized environment thus we should mention CPU steal utilization. Virtualization offers the ability to over-subscribe the CPU between multiple instances because not all instances need CPU at the same time. Sometimes an instance cannot get the CPU cycles it wants. It can be caused by over allocation on the host’s side when there are no additional CPU cycles to share (you can prevent it from happening by using dedicated instances - “Dedicated Tenancy” can be chosen when you create new instance inside of VPC, additional charges apply) or it can also happen when the load on the instance is too high and the hypervisor throttled it down to its limits.

Network and I/O capacity - by default, on non-EBS-optimized instances, network is shared for regular traffic and EBS traffic. It means that your reads and writes will have to compete for the same resource with the replication traffic. You need to measure your network utilization to make sure it is within your instance’s capacity. You can give some free resources to EBS traffic by enabling ‘EBS-optimized’ flag for instance, but again, network capacity differs between instance types - you have to pick something which will handle your traffic.

If you have a large cluster and you feel brave, you can use ephemeral SSD storage on instances as a data directory - it will reduce expenses on pIOPS EBS volumes. On the other hand, instance crash will end in data being wiped out. Galera can recover from such state using SST, but you would have to have a large cluster spanning multiple AWS regions to even consider this setup as an option. Even in such a case, you may consider using at least one EBS-based node per region, to be able to survive crashes and have data locally for SST.

If you choose EBS as your storage, you have to remember that EBS should be warmed up before putting it into production. EBS allocates only those blocks which are actually used. If you didn’t write on a given block, it will have to be allocated once you do this. Allocation process adds overhead (per Amazon it may be up to 50% of the performance) so it is a very good practice to perform the warmup. It can be done in several ways.
If the volume is new, then you can run:

$ sudo umount /dev/xvdx
$ sudo dd if=/dev/zero of=/dev/xvdx bs=1M

If the volume was created from the snapshot of the warmed up volume, you need just to read all of the blocks by:

$ sudo umount /dev/xvdf
$ sudo dd if=/dev/xvdf of=/dev/null bs=1M

On the other hand, if the original volume has not been warmed up, then the new volume needs a thorough warming by reading each block and writing it back to the volume (no data will get lost in the process):

$ sudo umount /dev/xvdf
$ sudo dd if=/dev/xvdf of=/dev/xvdf conv=notrunc bs=1M


Choosing a deployment architecture

AWS gives you multiple options regarding the way your architecture may look like. We are not going into details of VPC vs. non-VPC, ELB’s or Route53 - it’s really up to you and your needs. What we’d like to discuss are availability zones and regions. In general, more spread cluster = better HA. The catch is that Galera is very latency-bound in terms of performance and long distances do not serve it well. While designing a DR site in a separate region, you need to make sure that your cluster design will still match the required performance.

Availability Zones are a different story - latency is fine here and AZ’s provide some level of protection against infrastructure outages (although it has happened that a whole AWS region went down). What you may want to consider is using Galera segments. Segments, in Galera terms, define groups of nodes that are close to each other in terms of network latency. Which may be the same as datacenters when you are deploying across a few sites. Nodes within a single segment will not talk to the rest of the cluster, with the exception of one single relay node (chosen automatically). Data transfers (both IST and SST) will also happen within nodes from the same segment (only if it is possible). This is somewhat important because of the network transfer fees that apply to connections between multiple AWS regions but also between different AZ’s - using segments you can significantly decrease the amount of data transferred between them.

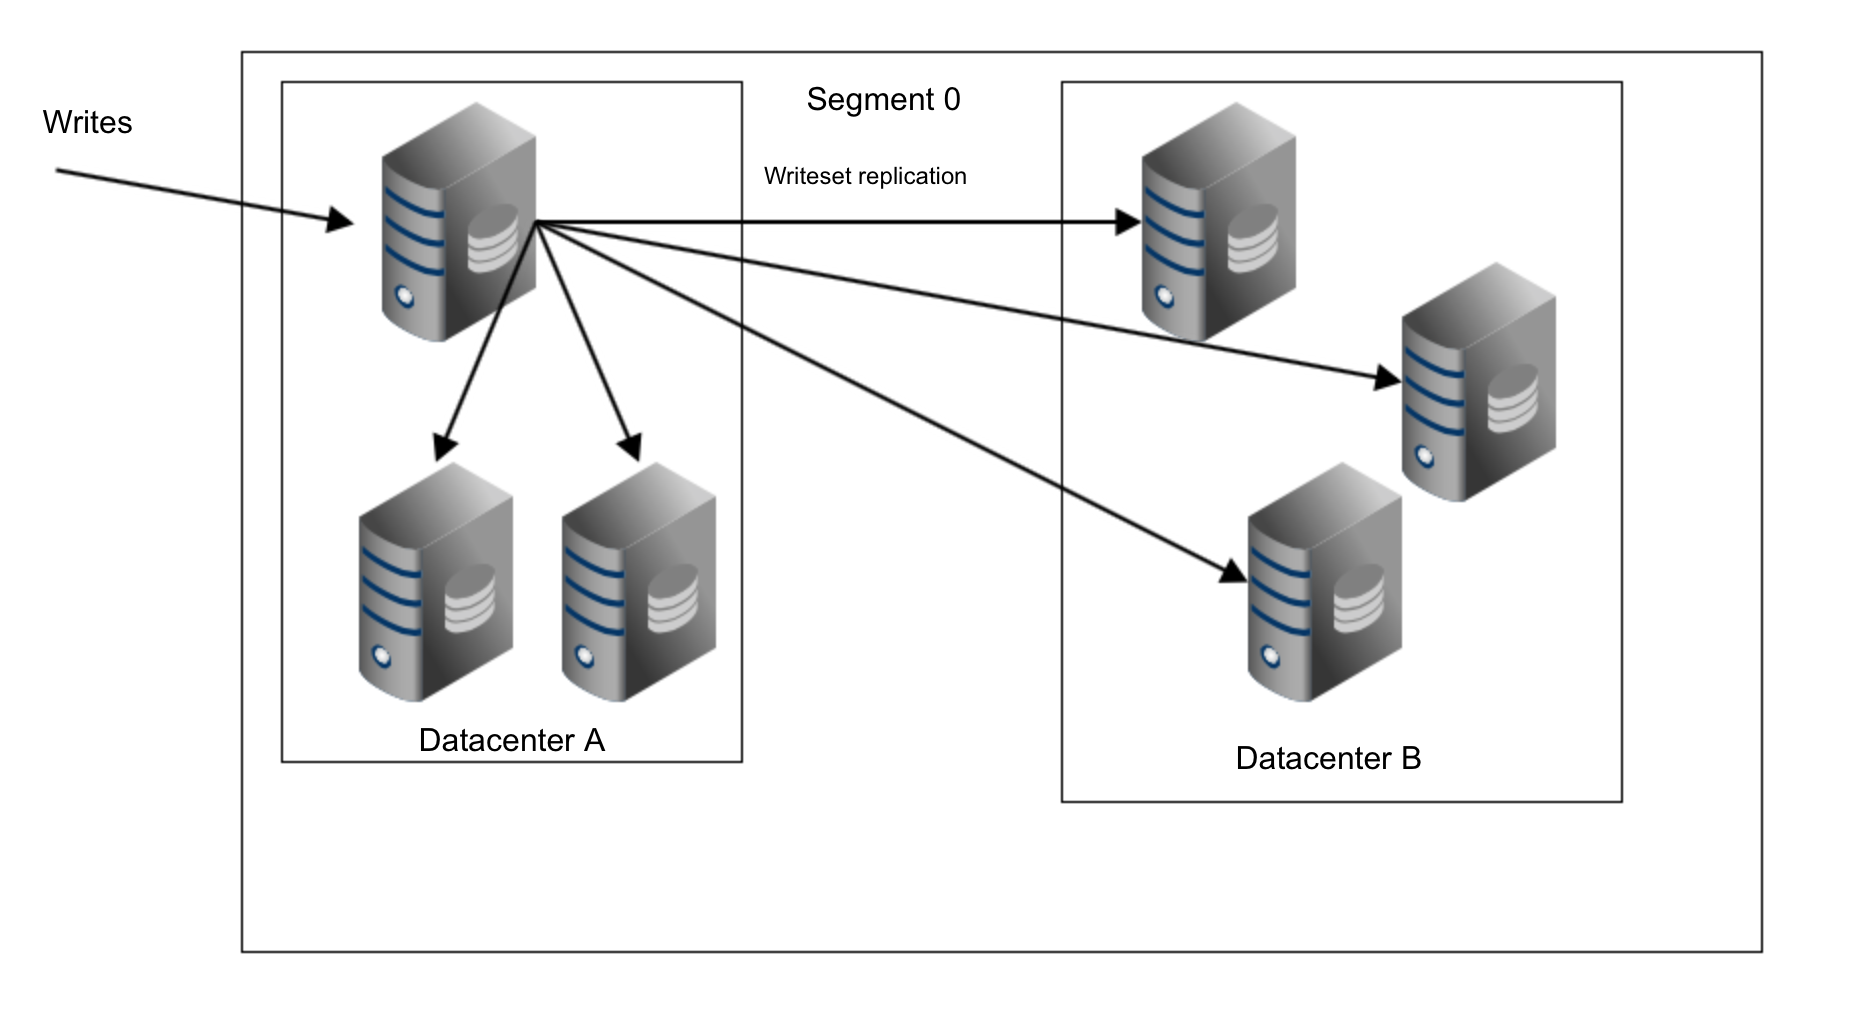
With a single segment, writesets are sent from a host that received DML to all other nodes in the cluster:

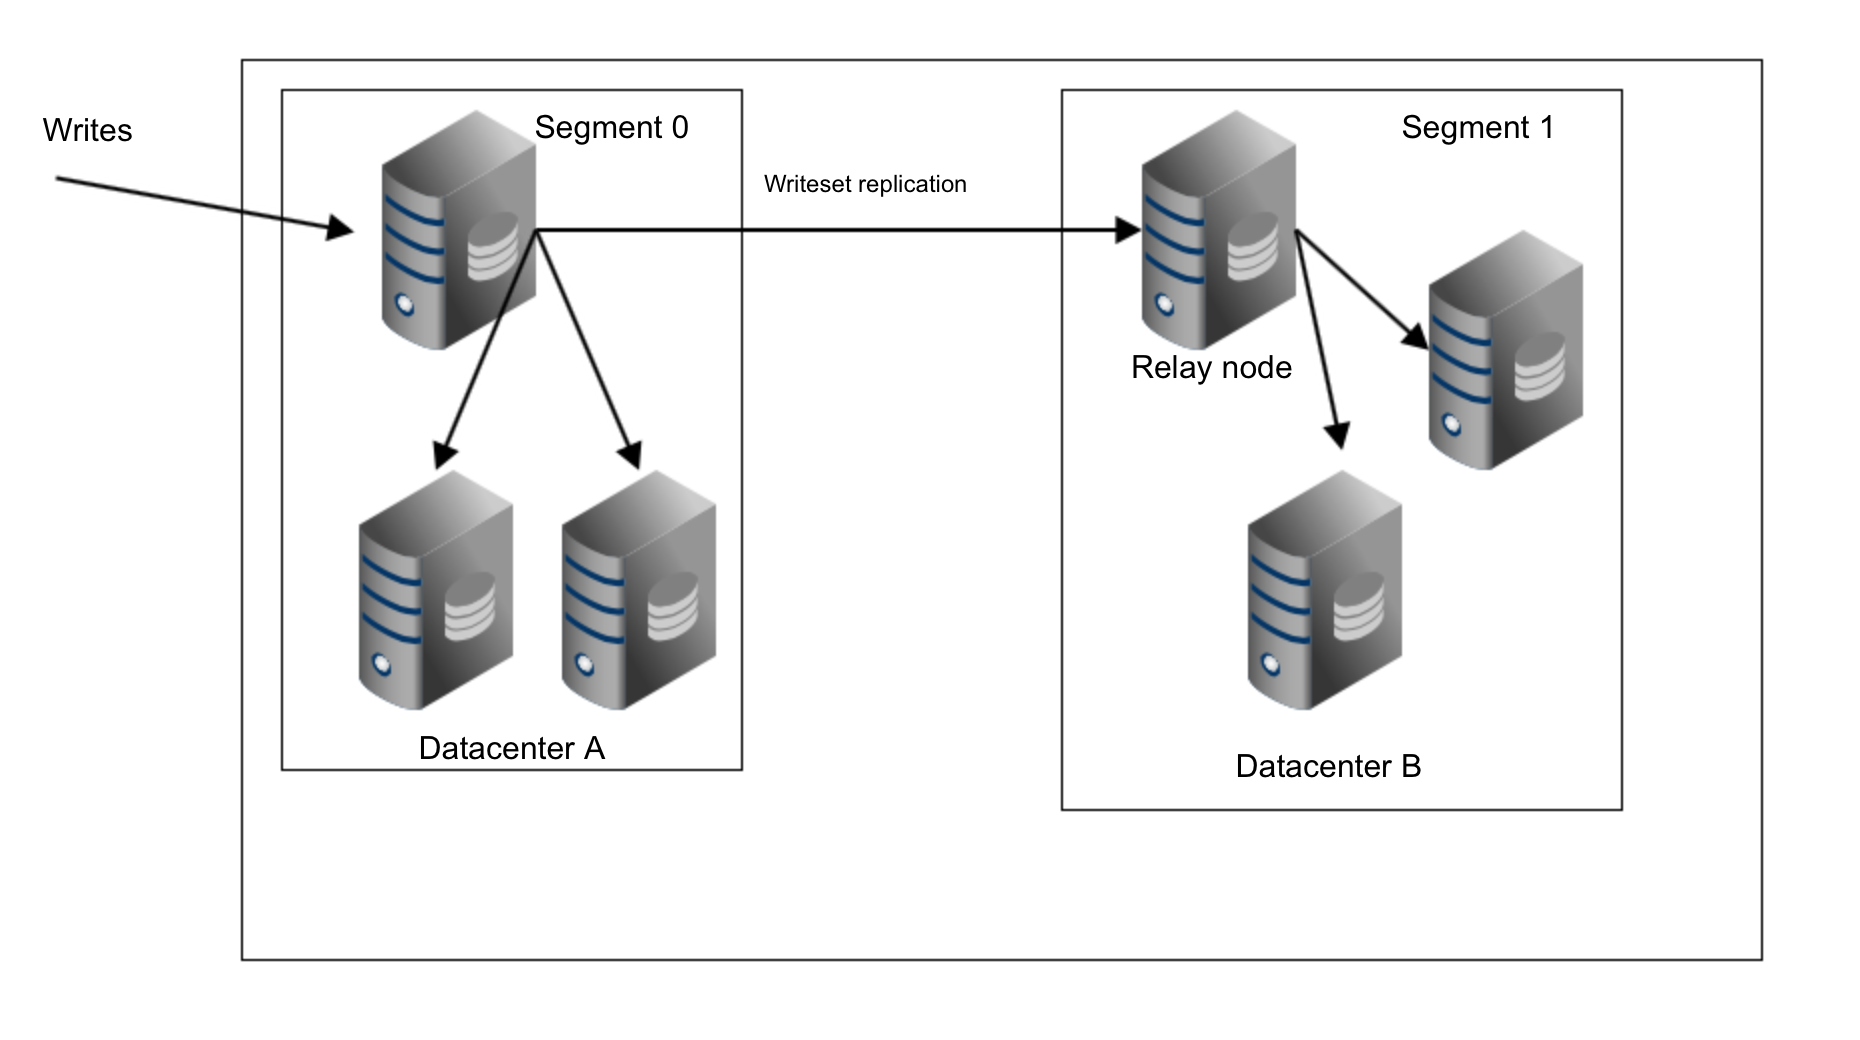
As you can see, we have three copies of replication data sent from the datacenter A to the datacenter B. With segments it’s different. In datacenter B one of the hosts will be picked as a relay node and only this node will get the replication data. If that node fails, another one will be picked automatically.

As you can see, we just removed two thirds of the traffic between our two datacenters.


Operating system configuration

vm.swappiness = 1

Swappiness controls how aggressive the operating system will use swap. It should not be set to zero because in more recent kernels it prevents the OS from using swap at all and it may cause serious performance issues.

/sys/block/*/queue/scheduler = deadline/noop

Scheduler for the block device, which MySQL uses, should be set to either deadline or noop. Exact choice depends on the benchmarks but both settings should deliver similar performance, better than default scheduler, CFQ.

For MySQL, you should consider using EXT4 or XFS, depending on the kernel (performance of those filesystems changes from one kernel version to another). Perform some benchmarks to find the better option for you.


my.cnf configuration

wsrep_provider_options="evs.suspect_timeout=PT5S"
wsrep_provider_options="evs.inactive_timeout=PT15S"

You may want to consider changing the default values of these variables. Both timeouts govern how the cluster evicts failed nodes. Suspect timeout takes place when all of the nodes cannot reach the inactive member. Inactive timeout defines a hard limit of how long a node can stay in the cluster if it’s not responding. Usually you’ll find that the default values work well. But in some cases, especially if you run your Galera cluster over WAN (for example, between AWS regions), increasing those variables may result in more stable performance.

wsrep_provider_options="evs.send_window=4"
wsrep_provider_options="evs.user_send_window=2"

These variables, evs.send_window and evs.user_send_window define how many packets can be sent in the replication at a single time (evs.send_window) and how many of them may contain data (evs.user_send_window). The later should be no more than the half of the former. 
For high latency connections it may be worth increasing those values significantly (512 and 256 for example).

The following variable may also be changed. evs.inactive_check_period, by default, is set to one second, which may be too often for a WAN setup.

wsrep_provider_options="evs.inactive_check_period=PT1S"


Network tuning

Here comes the tricky part. Unfortunately, there is no definitive answer on how to set up both Galera and the OS’s network settings. As a rule of thumb, you may assume that in high latency environments, you would like to increase the amount of data sent at once. You may want to look into variables like gcs.max_packet_size and increase it. Additionally, you will probably want to push the replication traffic as quickly as possible, minimizing the breaks. Having gcs.fc_factor close to 1 and significantly larger than default gcs.fc_limit should help to achieve that.

Apart from Galera settings, you may want to play with the operating system’s TCP settings like net.core.rmem_max, net.core.wmem_max, net.core.rmem_default, net.core.wmem_default, net.ipv4.tcp_tw_reuse, net.ipv4.tcp_slow_start_after_idle, net.ipv4.tcp_max_syn_backlog, net.ipv4.tcp_rmem, net.ipv4.tcp_wmem. As mentioned earlier, it is virtually impossible to give you a simple recipe on how to set those knobs as it depends too many factors - you will have to do your own benchmarks, using data as close to your production data as possible, before you can say your system is tuned.

We will continue this topic in a follow-up blog - in the next part we are going to discuss how you can leverage AWS tools while maintaining your Galera cluster. 

Blog category:


PlanetMySQL Voting: Vote UP / Vote DOWN

MariaDB Galera Cluster 10.0.19 and 5.5.43 now available

$
0
0

Download MariaDB Galera Cluster 10.0.19

Release Notes Changelog What is MariaDB Galera Cluster?

Download MariaDB Galera Cluster 5.5.43

Release Notes Changelog What is MariaDB Galera Cluster?

MariaDB APT and YUM Repository Configuration Generator

mariadb-seal-shaded-browntext-altThe MariaDB project is pleased to announce the immediate availability of MariaDB Galera Cluster 10.0.19 and 5.5.43. These are Stable (GA) releases.

See the Release Notes and Changelogs for detailed information on each release and the What is MariaDB Galera Cluster? page in the MariaDB Knowledge Base for general information about MariaDB Galera Cluster.

Thanks, and enjoy MariaDB!


PlanetMySQL Voting: Vote UP / Vote DOWN

Combining work with MySQL and MongoDB using Python

$
0
0

Recently i have reviewed a simple web application, where problem was with moving “read” count of news from main table to another table in MySQL.
The logic is separating counting “read”s for news from base table.
The way you can accomplish this task, you can create a new “read” table in MySQL, then add necessary code to news admin panel for inserting id,read,date into this new “read” table, while adding new articles.

But for test purposes, i decide to move this functionality to MongoDB.
Overall task is -> Same data must be in MySQL, counting logic must be in MongoDB and data must be synced from MongoDB to MySQL.
Any programming language will be sufficient but, Python is an easy one to use.
You can use Official mysql-connector-python and pymongo.

Firstly you must create empty “read” table in MySQL, insert all necessary data from base table to “read” and there should be after insert trigger for inserting id,read,date into “read” table while adding new articles:

CREATE trigger `read_after_insert` after insert on `content`
 for each row begin
        insert into read(`news_id`,`read`,`date`) values (new.id, new.`read`,new.`date`);
end

Then you should insert all data from MySQL into MongoDB.
Here is sample code for selecting old data from MySQL and importing into MongoDB using Python 2.7.x:

import pymongo
import mysql.connector
from datetime import datetime

try:
	
	client = pymongo.MongoClient('192.168.1.177',27017)
	print "Connected successfully!!!"
except pymongo.errors.ConnectionFailure, e:
    print "Could not connect to MongoDB: %s" % e 

db = client.test


collection = db.read


try:
	
	cnx = mysql.connector.connect(user='test', password='12345',host='192.168.1.144',database='test')

except mysql.connector.Error as err:
  	if err.errno == errorcode.ER_ACCESS_DENIED_ERROR:
		print "Something is wrong with your user name or password"
	elif err.errno == errorcode.ER_BAD_DB_ERROR:
		print "Database does not exist"
	else:
		print(err)


cursor = cnx.cursor()

sql = "select id,`read`, from_unixtime(`date`) from content order by id"

cursor.execute(sql)

for i in cursor:
	print i[0],i[1],i[2]
	doc = {"news_id":int(i[0]),"read":int(i[1]),"date":i[2]}
	collection.insert(doc)
	print "inserted"


cursor.close()
cnx.close()
client.close()

Then there must be code changes, in content admin panel, where id,read,date should be inserted into MongoDB. Also values must be incremented in MongoDB.
Next step is syncing data from MongoDB to MySQL. You can create a cronjob at night, that in daily manner data is updated from MongoDB to MySQL.

Here is a sample Python 3.x code updating data in MySQL from MongoDB:

import pymongo
from pymongo import MongoClient
import mysql.connector


try:
	
	client = pymongo.MongoClient('192.168.1.177',27017)
	print("Connected successfully!!!")
except pymongo.errors.ConnectionFailure as e:
    print("Could not connect to MongoDB: %s" % e)
    

try:
	
	cnx = mysql.connector.connect(user='test', password='12345',host='192.168.1.144',database='test')

except mysql.connector.Error as err:
    if err.errno == errorcode.ER_ACCESS_DENIED_ERROR:
        print("Something is wrong with your user name or password")
    elif err.errno == errorcode.ER_BAD_DB_ERROR:
        print("Database does not exist")
    else:
        print(err)


cursor = cnx.cursor()

sql = "update read set `read` = {} where news_id = {}"
    
db = client.test


collection = db.read

for i in collection.find():
    cursor.execute(sql.format(int(i["read"]),int(i["news_id"])))
    print("Number of affected rows: {}".format(cursor.rowcount))    


cnx.commit()

cursor.close()
cnx.close()

client.close()

Simple path with small web app is done. From now it is working.

The post Combining work with MySQL and MongoDB using Python appeared first on Azerbaijan MySQL UG.


PlanetMySQL Voting: Vote UP / Vote DOWN

Webinar June 2nd: Catena

$
0
0

Join us Tuesday, June 2nd at 2 PM EST (6 PM GMT), as brainiac Preetam Jinka covers the unique characteristics of time series data, time series indexing, and the basics of log-structured merge (LSM) trees and B-trees. After establishing some basic concepts, he will explain how Catena’s design is inspired by many of the existing systems today and why it works much better than its present alternatives.

This webinar will help you understand the unique challenges of high-velocity time-series data in general, and VividCortex’s somewhat unique workload in particular. You’ll leave with an understanding of why commonly used technologies can’t handle even a fraction of VividCortex’s workload, and what we’re exploring as we investigate alternatives to our MySQL-backed time-series database.

Register for the unique opportunity to learn about time series storage here.


PlanetMySQL Voting: Vote UP / Vote DOWN

Workload Analysis with MySQL's Performance Schema

$
0
0

Earlier this spring, we upgraded our database cluster to MySQL 5.6. Along with many other improvements, 5.6 added some exciting new features to the performance schema.

MySQL's performance schema is a set of tables that MySQL maintains to track internal performance metrics. These tables give us a window into what's going on in the database—for example, what queries are running, IO wait statistics, and historical performance data.

One of the tables added to the performance schema in 5.6 is table_io_waits_summary_by_index. It collects statistics per index, on how many rows are accessed via the storage engine handler layer. This table already gives us useful insights into query performance and index use. We also import this data into our metrics system, and displaying it over time has helped us track down sources of replication delay. For example, our top 10 most deviant tables:

top 10 most deviant update queries

MySQL 5.6.5 features another summary table: events_statements_summary_by_digest. This table tracks unique queries, how often they're executed, and how much time is spent executing each one. Instead of SELECT id FROM users WHERE login = 'zerowidth', the queries are stored in a normalized form: SELECT `id` FROM `users` WHERE `login` = ?, so it's easy to group queries by how they look than by the raw queries themselves. These query summaries and counts can answer questions like "what are the most frequent UPDATES?" and "What SELECTs take the most time per query?".

When we started looking at data from this table, several queries stood out. As an example, a single UPDATE was responsible for more than 25% of all updates on one of our larger and most active tables, repositories: UPDATE `repositories` SET `health_status` = ? WHERE `repositories` . `id` = ?. This column was being updated every time a health status check ran on a repository, and the code responsible looked something like this:

class Repository
  def update_health_status(new_status)
    update_column :health_status, new_status
  end
end

Just to be sure, we used scientist to measure how often the column needed to be updated (had the status changed?) versus how often it was currently being touched:

health status update % required

The measurements showed what we had expected: the column needed to be updated less than 5% of the time. With a simple code change:

class Repository
  def update_health_status(new_status)
    if new_status != health_status
      update_column :health_status, new_status
    end
  end
end

The updates from this query now represent less than 2% of all updates to the repositories table. Not bad for a two-line fix. Here's a graph from VividCortex, which shows query count data graphically:

vividcortex screenshot showing drop in update query volume

GitHub is a 7-year-old rails app, and unanticipated hot spots and bottlenecks have appeared as the workload's changed over time. The performance schema has been a valuable tool for us, and we can't encourage you enough to check it out for your app too. You might be surprised at the simple things you can change to reduce the load on your database!

Here's an example query, to show the 10 most frequent UPDATE queries:

SELECT
  digest_text,
  count_star / update_total * 100 as percentage_of_all
FROM events_statements_summary_by_digest,
( SELECT sum(count_star) update_total
  FROM events_statements_summary_by_digest
  WHERE digest_text LIKE 'UPDATE%'
) update_totals
WHERE digest_text LIKE 'UPDATE%'
ORDER BY percentage_of_all DESC
LIMIT 10

PlanetMySQL Voting: Vote UP / Vote DOWN

Creating and Restoring Database Backups With mysqldump and MySQL Enterprise Backup – Part 1 of 2

$
0
0

If you have used MySQL for a while, you have probably used mysqldump to backup your database. In part one of this blog, I am going to show you how to create a simple full and partial backup using mysqldump. In part two, I will show you how to use MySQL Enterprise Backup (which is the successor to the InnoDB Hot Backup product). MySQL Enterprise Backup allows you to backup your database while it is online and it keeps the database available to users during backup operations (you don’t have to take the database offline or lock any databases/tables).

This post will deal with mysqldump. For those of you that aren’t familiar with mysqldump:

The mysqldump client is a utility that performs logical backups, producing a set of SQL statements that can be run to reproduce the original schema objects, table data, or both. It dumps one or more MySQL database for backup or transfer to another SQL server. The mysqldump command can also generate output in CSV, other delimited text, or XML format.

The best feature about mysqldump is that it is easy to use. The main problem with using mysqldump occurs when you need to restore a database. When you execute mysqldump, the database backup (output) is an SQL file that contains all of the necessary SQL statements to restore the database – but restoring requires that you execute these SQL statements to essentially rebuild the database. Since you are recreating your database, the tables and all of your data from this file, the restoration procedure can take a long time to execute if you have a very large database.

There are a lot of features and options with mysqldump – (a complete list is here). I won’t review all of the features, but I will explain some of the ones that I use.

If you have InnoDB tables (InnoDB is the default storage engine as of MySQL 5.5 – replacing MyISAM), when you use mysqldump you will want to use the option –single-transaction or issue the command FLUSH TABLES WITH READ LOCK; in a separate terminal window before you use mysqldump. You will need to release the lock after the dump has completed with the UNLOCK TABLES; command. Either option (–single-transaction or FLUSH TABLES WITH READ LOCK;) acquires a global read lock on all tables at the beginning of the dump. As soon as this lock has been acquired, the binary log coordinates are read and the lock is released. If long-updating statements are running when the FLUSH statement is issued, the MySQL server may get stalled until those statements finish. After that, the dump becomes lock-free and does not disturb reads and writes on the tables. If the update statements that the MySQL server receives are short (in terms of execution time), the initial lock period should not be noticeable, even with many updates.
(from http://dev.mysql.com/doc/refman/5.6/en/mysqldump.html)

Here is the command to use mysqldump to simply backup all of your databases (assuming you have InnoDB tables). This command will create a dump (backup) file named all_databases.sql.

mysqldump --all-databases --single-transaction --user=root --pass &gt; all_databases.sql

After you hit return, you will have to enter your password. You can include the password after the –pass option (example: –pass=my_password), but this is less secure and you will get the following error:

Warning: Using a password on the command line interface can be insecure.

Here is some information about the options that were used:

--all-databases - this dumps all of the tables in all of the databases
--user - The MySQL user name you want to use for the backup
--pass - The password for this user.  You can leave this blank or include the password value (which is less secure)
--single-transaction - for InnoDB tables

If you are using Global Transaction Identifier’s (GTID’s) with InnoDB (GTID’s aren’t available with MyISAM), you will want to use the –set-gtid-purged=OFF option. Then you would issue this command:

mysqldump --all-databases --single-transaction --set-gtid-purged=OFF --user=root --pass &gt; all_databases.sql

Otherwise you will see this error:

Warning: A partial dump from a server that has GTIDs will by default include the GTIDs of all transactions, even those that changed suppressed parts of the database. If you don't want to restore GTIDs, pass --set-gtid-purged=OFF. To make a complete dump, pass --all-databases --triggers --routines --events.

You can also execute a partial backup of all of your databases. This example will be a partial backup because I am not going to backup the default databases for MySQL (which are created during installation) – mysql, test, PERFORMANCE_SCHEMA and INFORMATION_SCHEMA

Note: mysqldump does not dump the INFORMATION_SCHEMA database by default. To dump INFORMATION_SCHEMA, name it explicitly on the command line and also use the –skip-lock-tables option.

mysqldump never dumps the performance_schema database.

mysqldump also does not dump the MySQL Cluster ndbinfo information database.

Before MySQL 5.6.6, mysqldump does not dump the general_log or slow_query_log tables for dumps of the mysql database. As of 5.6.6, the dump includes statements to recreate those tables so that they are not missing after reloading the dump file. Log table contents are not dumped.

If you encounter problems backing up views due to insufficient privileges, see Section E.5, “Restrictions on Views” for a workaround.
(from: http://dev.mysql.com/doc/refman/5.6/en/mysqldump.html)

To do a partial backup, you will need a list of the databases that you want to backup. You may retrieve a list of all of the databases by simply executing the SHOW DATABASES command from a mysql prompt:

mysql&gt; SHOW DATABASES;
+--------------------+
| Database           |
+--------------------+
| information_schema |
| comicbookdb        |
| coupons            |
| mysql              |
| performance_schema |
| scripts            |
| test               |
| watchdb            |
+--------------------+
8 rows in set (0.00 sec)

In this example, since I don’t want to backup the default mysql databases, I am only going to backup the comicbookdb, coupons, scripts and watchdb databases. I am going to use the following options:

--databases - This allows you to specify the databases that you want to backup.  You can also <a href="http://dev.mysql.com/doc/mysql-enterprise-backup/3.6/en/partial.html">specify certain tables</a> that you want to backup.  If you want to do a full backup of all of the databases, then leave out this option
--add-drop-database - This will insert a DROP DATABASE statement before each CREATE DATABASE statement.  This is useful if you need to import the data to an existing MySQL instance where you want to overwrite the existing data.  You can also use this to import your backup onto a new MySQL instance, and it will create the databases and tables for you.
--triggers - this will include the triggers for each dumped table
--routines - this will include the stored routines (procedures and functions) from the dumped databases
--events - this will include any events from the dumped databases
--set-gtid-purged=OFF - since I am using replication on this database (it is the master), I like to include this in case I want to create a new slave using the data that I have dumped.  This option enables control over global transaction identifiers (GTID) information written to the dump file, by indicating whether to add a SET @@global.gtid_purged statement to the output.
--user - The MySQL user name you want to use
--pass - Again, you can add the actual value of the password (ex. --pass=mypassword), but it is less secure than typing in the password manually.  This is useful for when you want to put the backup in a script, in cron or in Windows Task Scheduler.
--single-transaction - Since I am using InnoDB tables, I will want to use this option.

Here is the command that I will run from a prompt:

mysqldump --databases comicbookdb coupons scripts watchdb --single-transaction --set-gtid-purged=OFF --add-drop-database --triggers --routines --events --user=root --pass &gt; partial_database_backup.sql

I will need to enter my password on the command line. After the backup has completed, if your backup file isn’t too large, you can open it and see the actual SQL statements that will be used if you decide that you need to recreate the database(s). If you accidentally dump all of the databases into one file, and you want to separate the dump file into smaller files, see my post on using Perl to split the dump file.

For example, here is the section of the dump file (partial_database_backup.db) for the comicbookdb database (without the table definitions). (I omitted the headers from the dump file.)

--
-- Current Database: `comicbookdb`
--

/*!40000 DROP DATABASE IF EXISTS `comicbookdb`*/;

CREATE DATABASE /*!32312 IF NOT EXISTS*/ `comicbookdb` /*!40100 DEFAULT CHARACTER SET latin1 */;

USE `comicbookdb`;

--
-- Table structure for table `comics`
--

DROP TABLE IF EXISTS `comics`;
/*!40101 SET @saved_cs_client     = @@character_set_client */;
/*!40101 SET character_set_client = utf8 */;
CREATE TABLE `comics` (
  `serial_id` int(7) NOT NULL AUTO_INCREMENT,
  `date_time_added` datetime NOT NULL,
  `publisher_id` int(6) NOT NULL,
....

If you are using the dump file to create a slave server, you can use the –master-data option, which includes the CHANGE MASTER information, which looks like this:

--
-- Position to start replication or point-in-time recovery from
--

CHANGE MASTER TO MASTER_LOG_FILE='mysql-bin.000013', MASTER_LOG_POS=79338;

If you used the –set-gtid-purged=OFF option, you would see the value of the Global Transaction Identifier’s (GTID’s):

--
--GTID state at the beginning of the backup 
--

SET @@GLOBAL.GTID_PURGED='82F20158-5A16-11E2-88F9-C4A801092ABB:1-168523';

You may also test your backup without exporting any data by using the –no-data option. This will show you all of the information for creating the databases and tables, but it will not export any data. This is also useful for recreating a blank database on the same or on another server.

When you export your data, mysqldump will create INSERT INTO statements to import the data into the tables. However, the default is for the INSERT INTO statements to contain multiple-row INSERT syntax that includes several VALUES lists. This allows for a quicker import of the data. But, if you think that your data might be corrupt, and you want to be able to isolate a given row of data – or if you simply want to have one INSERT INTO statement per row of data, then you can use the –skip-extended-insert option. If you use the –skip-extended-insert option, importing the data will take much longer to complete, and the backup file size will be larger.

Importing and restoring the data is easy. To import the backup file into a new, blank instance of MySQL, you can simply use the mysql command to import the data:

mysql -uroot -p &lt; partial_database_backup.sql

Again, you will need to enter your password or you can include the value after the -p option (less secure).

There are many more options that you can use with a href=”http://dev.mysql.com/doc/refman/5.6/en/mysqldump.html”>mysqldump. The main thing to remember is that you should backup your data on a regular basis, and move a copy of the backup file off the MySQL server.

Finally, here is a Perl script that I use in cron to backup my databases. This script allows you to specify which databases you want to backup via the mysql_bak.config file. This config file is simply a list of the databases that you want to backup, with an option to ignore any databases that are commented out with a #. This isn’t a secure script, as you have to embed the MySQL user password in the script.

#!/usr/bin/perl
# Perform a mysqldump on all the databases specified in the dbbackup.config file

use warnings;
use File::Basename;

# set the directory where you will keep the backup files
$backup_folder = '/Users/tonydarnell/mysqlbak';

# the config file is a text file with a list of the databases to backup
# this should be in the same location as this script, but you can modify this
# if you want to put the file somewhere else
my $config_file = dirname($0) . "/mysql_bak.config";

# example config file
# You may use a comment to bypass any database that you don't want to backup
# # Unwanted_DB    (commented - will not be backed up)
# twtr
# cbgc

# retrieve a list of the databases from the config file
my @databases = removeComments(getFileContents($config_file));

# change to the directory of the backup files.
chdir($backup_folder) or die("Cannot go to folder '$backup_folder'");

# grab the local time variables
my ($sec,$min,$hour,$mday,$mon,$year,$wday,$yday,$isdst) = localtime(time);
$year += 1900;
$mon++;
#Zero padding
$mday = '0'.$mday if ($mday&lt;10);
$mon = &#039;0&#039;.$mon if ($mon&lt;10);

$hour = &quot;0$hour&quot; if $hour &lt; 10;
$min = &quot;0$min&quot; if $min  $folder/$file.Z`;

	print "Done\n";
}
print "Done\n\n";

# this subroutine simply creates an array of the list of the databases

sub getFileContents {
	my $file = shift;
	open (FILE,$file) || die("Can't open '$file': $!");
	my @lines=;
	close(FILE);

	return @lines;
}

# remove any commented tables from the @lines array

sub removeComments {
	my @lines = @_;

	@cleaned = grep(!/^\s*#/, @lines); #Remove Comments
	@cleaned = grep(!/^\s*$/, @cleaned); #Remove Empty lines

	return @cleaned;
}


Tony Darnell is a Principal Sales Consultant for MySQL, a division of Oracle, Inc. MySQL is the world’s most popular open-source database program. Tony may be reached at info [at] ScriptingMySQL.com and on LinkedIn.

PlanetMySQL Voting: Vote UP / Vote DOWN

More Cores or Higher Clock Speed?

$
0
0

This is a little quiz (could be a discussion). I know what we tend to prefer (and why), but we’re interested in hearing additional and other opinions!

Given the way MySQL/MariaDB is architected, what would you prefer to see in a new server, more cores or higher clock speed? (presuming other factors such as CPU caches and memory access speed are identical).

For example, you might have a choice between

  • 2x 2.4GHz 6 core, or
  • 2x 3.0GHz 4 core

which option would you pick for a (dedicated) MySQL/MariaDB server, and why?

And, do you regard the “total speed” (N cores * GHz) as relevant in the decision process? If so, when and to what degree?


PlanetMySQL Voting: Vote UP / Vote DOWN

Installing Kubernetes Cluster with 3 minions on CentOS 7 to manage pods and services

$
0
0

Kubernetes is a system for managing containerized applications in a clustered environment. It provides basic mechanisms for deployment, maintenance and scaling of applications on public, private or hybrid setups. It also comes with self-healing features where containers can be auto provisioned, restarted or even replicated. 

Kubernetes is still at an early stage, please expect design and API changes over the coming year. In this blog post, we’ll show you how to install a Kubernetes cluster with three minions on CentOS 7, with an example on how to manage pods and services. 


Kubernetes Components

Kubernetes works in server-client setup, where it has a master providing centralized control for a number of minions. We will be deploying a Kubernetes master with three minions, as illustrated in the diagram further below.

Kubernetes has several components:

  • etcd - A highly available key-value store for shared configuration and service discovery.
  • flannel - An etcd backed network fabric for containers.
  • kube-apiserver - Provides the API for Kubernetes orchestration.
  • kube-controller-manager - Enforces Kubernetes services.
  • kube-scheduler - Schedules containers on hosts.
  • kubelet - Processes a container manifest so the containers are launched according to how they are described.
  • kube-proxy - Provides network proxy services.


Deployment on CentOS 7

We will need 4 servers, running on CentOS 7.1 64 bit with minimal install. All components are available directly from the CentOS extras repository which is enabled by default. The following architecture diagram illustrates where the Kubernetes components should reside:

Prerequisites

1. Disable iptables on each node to avoid conflicts with Docker iptables rules:

$ systemctl stop firewalld
$ systemctl disable firewalld

2. Install NTP and make sure it is enabled and running:

$ yum -y install ntp
$ systemctl start ntpd
$ systemctl enable ntpd

Setting up the Kubernetes Master

The following steps should be performed on the master.

1. Install etcd and Kubernetes through yum:

$ yum -y install etcd kubernetes

2. Configure etcd to listen to all IP addresses inside /etc/etcd/etcd.conf. Ensure the following lines are uncommented, and assign the following values:

ETCD_NAME=default
ETCD_DATA_DIR="/var/lib/etcd/default.etcd"
ETCD_LISTEN_CLIENT_URLS="http://0.0.0.0:4001"

3. Configure Kubernetes API server inside /etc/kubernetes/apiserver. Ensure the following lines are uncommented, and assign the following values:

KUBE_API_ADDRESS="--address=0.0.0.0"
KUBE_API_PORT="--port=8080"
KUBELET_PORT="--kubelet_port=10250"
KUBE_ETCD_SERVERS="--etcd_servers=http://127.0.0.1:4001"
KUBE_SERVICE_ADDRESSES="--portal_net=10.254.0.0/16"
KUBE_ADMISSION_CONTROL="--admission_control=NamespaceAutoProvision,LimitRanger,ResourceQuota"
KUBE_API_ARGS=""

4. Configure the Kubernetes controller manager inside /etc/kubernetes/controller-manager. Define the minion machines’ IP addresses:

KUBELET_ADDRESSES="--machines=192.168.50.131,192.168.50.132,192.168.50.133"

5. Define flannel network configuration in etcd. This configuration will be pulled by flannel service on minions:

$ etcdctl mk /coreos.com/network/config '{"Network":"172.17.0.0/16"}'

6. Start and enable etcd, kube-apiserver, kube-controller-manager and kube-scheduler:

$ for SERVICES in etcd kube-apiserver kube-controller-manager kube-scheduler; do 
    systemctl restart $SERVICES
    systemctl enable $SERVICES
    systemctl status $SERVICES 
done

7. At this point, we should notice that all Minions’ statuses are still unknown because we haven’t started any of them yet:

$ kubectl get minions
NAME             LABELS        STATUS
192.168.50.131   Schedulable   <none>    Unknown
192.168.50.132   Schedulable   <none>    Unknown
192.168.50.133   Schedulable   <none>    Unknown

Setting up Kubernetes Minions

The following steps should be performed on minion1, minion2 and minion3 unless specified otherwise.

1. Install flannel and Kubernetes using yum:

$ yum -y install flannel kubernetes

2. Configure etcd server for flannel service. Update the following line inside /etc/sysconfig/flanneld to connect to the respective master:

FLANNEL_ETCD="http://192.168.50.130:4001"

3. Configure Kubernetes default config at /etc/kubernetes/config, ensure you update the KUBE_MASTER value to connect to the Kubernetes master API server:

KUBE_MASTER="--master=http://192.168.50.130:8080"

4. Configure kubelet service inside /etc/kubernetes/kubelet as below:
minion1:

KUBELET_ADDRESS="--address=0.0.0.0"
KUBELET_PORT="--port=10250"
# change the hostname to this host’s IP address
KUBELET_HOSTNAME="--hostname_override=192.168.50.131"
KUBELET_API_SERVER="--api_servers=http://192.168.50.130:8080"
KUBELET_ARGS=""

minion2:

KUBELET_ADDRESS="--address=0.0.0.0"
KUBELET_PORT="--port=10250"
# change the hostname to this host’s IP address
KUBELET_HOSTNAME="--hostname_override=192.168.50.132"
KUBELET_API_SERVER="--api_servers=http://192.168.50.130:8080"
KUBELET_ARGS=""

minion3:

KUBELET_ADDRESS="--address=0.0.0.0"
KUBELET_PORT="--port=10250"
# change the hostname to this host’s IP address
KUBELET_HOSTNAME="--hostname_override=192.168.50.133"
KUBELET_API_SERVER="--api_servers=http://192.168.50.130:8080"
KUBELET_ARGS=""

5. Start and enable kube-proxy, kubelet, docker and flanneld services:

$ for SERVICES in kube-proxy kubelet docker flanneld; do 
    systemctl restart $SERVICES
    systemctl enable $SERVICES
    systemctl status $SERVICES 
done

6. On each minion, you should notice that you will have two new interfaces added, docker0 and flannel0. You should get different range of IP addresses on flannel0 interface on each minion, similar to below:
minion1:

$ ip a | grep flannel | grep inet
inet 172.17.45.0/16 scope global flannel0

minion2:

$ ip a | grep flannel | grep inet
inet 172.17.38.0/16 scope global flannel0

minion3:

$ ip a | grep flannel | grep inet
inet 172.17.93.0/16 scope global flannel0

6. Now login to Kubernetes master node and verify the minions’ status:

$ kubectl get minions
NAME             LABELS        STATUS
192.168.50.131   Schedulable   <none>    Ready
192.168.50.132   Schedulable   <none>    Ready
192.168.50.133   Schedulable   <none>    Ready

You are now set. The Kubernetes cluster is now configured and running. We can start to play around with pods.


Creating Pods (Containers)

To create a pod, we need to define a yaml file in the Kubernetes master, and use the kubectl command to create it based on the definition. Create a mysql.yaml file: 

$ mkdir pods
$ cd pods
$ vim mysql.yaml

And add the following lines:

apiVersion: v1beta3
kind: Pod
metadata:
  name: mysql
  labels:
    name: mysql
spec:
  containers:
    - resources:
        limits :
          cpu: 1
      image: mysql
      name: mysql
      env:
        - name: MYSQL_ROOT_PASSWORD
          # change this
          value: yourpassword
      ports:
        - containerPort: 3306
          name: mysql

Create the pod:

$ kubectl create -f mysql.yaml

It may take a short period before the new pod reaches the Running state. Verify the pod is created and running:

$ kubectl get pods
POD       IP            CONTAINER(S)   IMAGE(S)   HOST                            LABELS       STATUS    CREATED
mysql     172.17.38.2   mysql          mysql      192.168.50.132/192.168.50.132   name=mysql   Running   3 hours

So, Kubernetes just created a Docker container on 192.168.50.132. We now need to create a Service that lets other pods access the mysql database on a known port and host.


Creating Service

At this point, we have a MySQL pod inside 192.168.50.132. Define a mysql-service.yaml as below:

apiVersion: v1beta3
kind: Service
metadata:
  labels:
    name: mysql
  name: mysql
spec:
  publicIPs:
    - 192.168.50.132
  ports:
    # the port that this service should serve on
    - port: 3306
  # label keys and values that must match in order to receive traffic for this service
  selector:
    name: mysql

Start the service:

$ kubectl create -f mysql-service.yaml

You should get a 10.254.x.x IP range assigned to the mysql service. This is the Kubernetes internal IP address defined in /etc/kubernetes/apiserver. This IP is not routable outside, so we defined the public IP instead (the interface that connected to external network for that minion):

$ kubectl get services
NAME            LABELS                                    SELECTOR     IP               PORT(S)
kubernetes      component=apiserver,provider=kubernetes   <none>       10.254.0.2       443/TCP
kubernetes-ro   component=apiserver,provider=kubernetes   <none>       10.254.0.1       80/TCP
mysql           name=mysql                                name=mysql   10.254.13.156    3306/TCP
                                                                       192.168.50.132

Let’s connect to our database server from outside (we used MariaDB client on CentOS 7):

$ mysql -uroot -p -h192.168.50.132
Welcome to the MariaDB monitor.  Commands end with ; or \g.
Your MySQL connection id is 4
Server version: 5.6.24 MySQL Community Server (GPL)

Copyright (c) 2000, 2014, Oracle, MariaDB Corporation Ab and others.

Type 'help;' or '\h' for help. Type '\c' to clear the current input statement.

MySQL [(none)]> show variables like '%version%';
+-------------------------+------------------------------+
| Variable_name           | Value                        |
+-------------------------+------------------------------+
| innodb_version          | 5.6.24                       |
| protocol_version        | 10                           |
| slave_type_conversions  |                              |
| version                 | 5.6.24                       |
| version_comment         | MySQL Community Server (GPL) |
| version_compile_machine | x86_64                       |
| version_compile_os      | Linux                        |
+-------------------------+------------------------------+
7 rows in set (0.01 sec)

That’s it! You should now be able to connect to the MySQL container that resides on minion2. 

Check out the Kubernetes guestbook example on how to build a simple, multi-tier web application with Redis in master-slave setup. In a follow-up blog post, we are going to play around with Galera cluster containers on Kubernetes. Stay tuned!


References

Blog category:


PlanetMySQL Voting: Vote UP / Vote DOWN

DBA Personalities: DISC and Values Models

$
0
0

What personality characteristics do great DBAs share? What motivates them?

If you’re not sure why you should care, you’re probably not a hiring manager! Hiring and retaining highly skilled people is consistently listed as a top challenge for CIOs. CIOs strongly desire to predict whether someone’s a good fit for a particular role.

Flower

Enter the personality profile assessment. These are quantitative tools used by many companies to try to learn as much as possible about candidates during the recruiting process. I thought it would be interesting to know what drives DBAs, so I reached out to a number of great MySQL and PostgreSQL DBAs I know personally and asked them to fill out a pair of free online assessments.

These assessments rank behavioral tendencies in four dimensions, using the DISC model. They also rank motivators (values) in seven dimensions.

At this point I need to add a disclaimer that everything about this process is biased and unscientific. Everything from the selection of test subjects, to the interpretation of the results, is unscientific. Still, the results are interesting and I believe there are valuable lessons to be learned.

Let’s see what the results indicate.

DISC Model Behavioral Index

The DISC model ranks externally observable behaviors in categories of Dominance, Influence, Steadiness, and Compliance. These range from 0 to 100. Most people are strong in one or two categories and less dominant in others.

I combined the scores of all the respondents and built a heatmap from them. Here’s the result:

DISC

What can we draw from this? The typical DBA is relatively low in the D and I categories, and relatively high in S and C. It might also be useful to look at plots of individual points:

DISC

In this chart, the green line is the average score. DBAs tend to skew towards Steadiness and Compliance.

Values / Motivators

The behaviors are the “what” and the values or motivators are the “why.” The assessment I asked people to use ranked the following motivators: Aesthetic, Economic, Individualistic, Political, Altruistic, Regulatory, Theoretical.

Here’s the heatmap:

Values

And here’s the individual scores and the average:

Values

The results indicate that DBAs care a lot about theory, regulatory, and aesthetics; and they tend not to like politics or care much about money.

Conclusions

If you’re a hiring manager building a DBA team, you might be interested in how good DBAs tend to behave. You might like to know that they tend to be single-taskers who like structure and want to understand the ordering principles in their work and environment. You might also want to know that there are categories within which there’s a wide variation. For example, DBAs can be introverted, but not all of them are.

If you liked this post, there’s a lot more detail in our latest ebook, The Strategic IT Manager’s Guide To Building A Scalable DBA Team. The ebook contains a guide on how to use assessments in the hiring process.

If you’re curious about the personality assessment used, you can find it freely available online at Tony Robbins’s website. Disclosure - I use personality assessments in hiring, but not this one. Read the ebook for more details. And feel free to contribute your results to my collected set, if you’re interested in that. Just contact me through LinkedIn.

Cropped image by vainsang on Flickr.


PlanetMySQL Voting: Vote UP / Vote DOWN

A quick update on our native Data Dictionary

$
0
0

In July 2014, I wrote that we were working on a new native InnoDB data dictionary to replace MySQL's legacy frm files.

This is quite possibly the largest internals change to MySQL in modern history, and will unlock a number of previous limitations, as well as simplify a number of failure states for both replication and crash recovery.

With MySQL 5.7 approaching release candidate (and large changes always coming with risk attached) we decided that the timing to try to merge in a new data dictionary was just too tight. The data dictionary development is still alive and well, but it will not ship as part of MySQL 5.7.

So please stay tuned for updates... and thank you for using MySQL!


PlanetMySQL Voting: Vote UP / Vote DOWN

Percona XtraBackup 2.3.1-beta1 is now available

$
0
0

Percona XtraBackup for MySQL Percona is glad to announce the release of Percona XtraBackup 2.3.1-beta1 on May 20th 2015. Downloads are available from our download site here. This BETA release, will be available in Debian testing and CentOS testing repositories.

This is an BETA quality release and it is not intended for production. If you want a high quality, Generally Available release, the current Stable version should be used (currently 2.2.10 in the 2.2 series at the time of writing).

Percona XtraBackup enables MySQL backups without blocking user queries, making it ideal for companies with large data sets and mission-critical applications that cannot tolerate long periods of downtime. Offered free as an open source solution, Percona XtraBackup drives down backup costs while providing unique features for MySQL backups.

This release contains all of the features and bug fixes in Percona XtraBackup 2.2.10, plus the following:

New Features:

  • innobackupex script has been rewritten in C and it’s set as the symlink for xtrabackup. innobackupex still supports all features and syntax as 2.2 version did, but it is now deprecated and will be removed in next major release. Syntax for new features will not be added to the innobackupex, only to the xtrabackup. xtrabackup now also copies MyISAM tables and supports every feature of innobackupex. Syntax for features previously unique to innobackupex (option names and allowed values) remains the same for xtrabackup.
  • Percona XtraBackup can now read swift parameters from a [xbcloud] section from the .my.cnf file in the users home directory or alternatively from the global configuration file /etc/my.cnf. This makes it more convenient to use and avoids passing the sensitive data, such as --swift-key, on the command line.
  • Percona XtraBackup now supports different authentication options for Swift.
  • Percona XtraBackup now supports partial download of the cloud backup.
  • Options: --lock-wait-query-type, --lock-wait-threshold and --lock-wait-timeout have been renamed to --ftwrl-wait-query-type, --ftwrl-wait-threshold and --ftwrl-wait-timeout respectively.

Bugs Fixed:

  • innobackupex didn’t work correctly when credentials were specified in .mylogin.cnf. Bug fixed #1388122.
  • Options --decrypt and --decompress didn’t work with xtrabackup binary. Bug fixed #1452307.
  • Percona XtraBackup now executes an extra FLUSH TABLES before executing FLUSH TABLES WITH READ LOCK to potentially lower the impact from FLUSH TABLES WITH READ LOCK. Bug fixed #1277403.
  • innobackupex didn’t read user,password options from ~/.my.cnf file. Bug fixed #1092235.
  • innobackupex was always reporting the original version of the innobackup script from InnoDB Hot Backup. Bug fixed #1092380.

Release notes with all the bugfixes for Percona XtraBackup 2.3.1-beta1 are available in our online documentation. Bugs can be reported on the launchpad bug tracker. Percona XtraBackup is an open source, free MySQL hot backup software that performs non-blocking backups for InnoDB and XtraDB databases.

The post Percona XtraBackup 2.3.1-beta1 is now available appeared first on MySQL Performance Blog.


PlanetMySQL Voting: Vote UP / Vote DOWN

Log Buffer #423: A Carnival of the Vanities for DBAs

$
0
0

This Log Buffer edition covers Oracle, SQL Server and MySQL blog posts from all over the blogosphere!


Oracle:

Hey DBAs:  You know you can  install and run Oracle Database 12c on different platforms, but if you install it on an Oracle Solaris 11 zone, you can take additional advantages.

Here is a video with Oracle VP of Global Hardware Systems Harish Venkat talking with Aaron De Los Reyes, Deputy Director at Cognizant about his company’s explosive growth & how they managed business functions, applications, and supporting infrastructure for success.

Oracle Unified Directory is an all-in-one directory solution with storage, proxy, synchronization and virtualization capabilities. While unifying the approach, it provides all the services required for high-performance enterprise and carrier-grade environments. Oracle Unified Directory ensures scalability to billions of entries. It is designed for ease of installation, elastic deployments, enterprise manageability, and effective monitoring.

Understanding Flash: Summary – NAND Flash Is A Royal Pain In The …

Extracting Oracle data & Generating JSON data file using ROracle.

SQL Server:

It is no good doing some or most of the aspects of SQL Server security right. You have to get them all right, because any effective penetration of your security is likely to spell disaster. If you fail in any of the ways that Robert Sheldon lists and describes, then you can’t assume that your data is secure, and things are likely to go horribly wrong.

How does a column store index compare to a (traditional )row store index with regards to performance?

Learn how to use the TOP clause in conjunction with the UPDATE, INSERT and DELETE statements.

Did you know that scalar-valued, user-defined functions can be used in DEFAULT/CHECK CONSTRAINTs and computed columns?

Tim Smith blogs as how to measure a behavioral streak with SQL Server, an important skill for determining ROI and extrapolating trends.

Pilip Horan lets us know as How to run SSIS Project as a SQL Job.

MySQL:

Encryption is important component of secure environments. While being intangible, property security doesn’t get enough attention when it comes to describing various systems. “Encryption support” is often the most of details what you can get asking how secure the system is. Other important details are often omitted, but the devil in details as we know. In this post I will describe how we secure backup copies in TwinDB.

The fsfreeze command, is used to suspend and resume access to a file system. This allows consistent snapshots to be taken of the filesystem. fsfreeze supports Ext3/4, ReiserFS, JFS and XFS.

Shinguz: Controlling worldwide manufacturing plants with MySQL.

MySQL 5.7.7 was recently released (it is the latest MySQL 5.7, and is the first “RC” or “Release Candidate” release of 5.7), and is available for download

Upgrading Directly From MySQL 5.0 to 5.6 With mysqldump.

One of the cool new features in 5.7 Release Candidate is Multi Source Replication.


Learn more about Pythian’s expertise in Oracle , SQL Server and MySQL.


PlanetMySQL Voting: Vote UP / Vote DOWN

Bash Arrays & Oracle

$
0
0

Last week, I wrote about how to use bash arrays and the MySQL database to create unit and integration test scripts. While the MySQL example was nice for some users, there were some others who wanted me to show how to write bash shell scripts for Oracle unit and integration testing. That’s what this blog post does.

If you don’t know much about bash shell, you should start with the prior post to learn about bash arrays, if-statements, and for-loops. In this blog post I only cover how to implement a bash shell script that runs SQL scripts in silent mode and then queries the database in silent mode and writes the output to an external file.

To run the bash shell script, you’ll need the following SQL files, which you can see by clicking not he title below. There are several differences. For example, Oracle doesn’t support a DROP IF EXISTS syntax and requires you to write anonymous blocks in their PL/SQL language; and you must explicitly issue a QUIT; statement even when running in silent mode unlike MySQL, which implicitly issues an exit.

Setup SQL Files

The actor.sql file:

1
2
3
4
5
6
7
8
9
10
11
12
13
14
15
16
17
18
19
20
21
22
23
24
25
26
27
28
29
30
-- Drop actor table and actor_s sequence.
BEGIN
  FOR i IN (SELECT   object_name
            ,        object_type
            FROM     user_objects
            WHERE    object_name IN ('ACTOR','ACTOR_S')) LOOP
    IF    i.object_type = 'TABLE' THEN
      EXECUTE IMMEDIATE 'DROP TABLE ' || i.object_name || ' CASCADE CONSTRAINTS';
    ELSIF i.object_type = 'SEQUENCE' THEN
      EXECUTE IMMEDIATE 'DROP SEQUENCE ' || i.object_name;
    END IF;
  END LOOP;
END;
/
 
-- Create an actor table.
CREATE TABLE actor
( actor_id    NUMBER CONSTRAINT actor_pk PRIMARY KEY
, actor_name  VARCHAR(30)  NOT NULL );
 
-- Create an actor_s sequence.
CREATE SEQUENCE actor_s;
 
-- Insert two rows.
INSERT INTO actor VALUES (actor_s.NEXTVAL,'Chris Hemsworth');
INSERT INTO actor VALUES (actor_s.NEXTVAL,'Chris Pine');
INSERT INTO actor VALUES (actor_s.NEXTVAL,'Chris Pratt');
 
-- Quit session.
QUIT;

The film.sql file:

1
2
3
4
5
6
7
8
9
10
11
12
13
14
15
16
17
18
19
20
21
22
23
24
25
26
27
28
29
30
31
32
-- Drop film table and film_s sequence.
BEGIN
  FOR i IN (SELECT   object_name
            ,        object_type
            FROM     user_objects
            WHERE    object_name IN ('FILM','FILM_S')) LOOP
    IF    i.object_type = 'TABLE' THEN
      EXECUTE IMMEDIATE 'DROP TABLE ' || i.object_name || ' CASCADE CONSTRAINTS';
    ELSIF i.object_type = 'SEQUENCE' THEN
      EXECUTE IMMEDIATE 'DROP SEQUENCE ' || i.object_name;
    END IF;
  END LOOP;
END;
/
 
-- Create a film table.
CREATE TABLE film
( film_id    NUMBER CONSTRAINT film_pk PRIMARY KEY
, film_name  VARCHAR(30)  NOT NULL );
 
-- Create an actor_s sequence.
CREATE SEQUENCE film_s;
 
-- Insert four rows.
INSERT INTO film VALUES (film_s.NEXTVAL,'Thor');
INSERT INTO film VALUES (film_s.NEXTVAL,'Thor: The Dark World');
INSERT INTO film VALUES (film_s.NEXTVAL,'Star Trek');
INSERT INTO film VALUES (film_s.NEXTVAL,'Star Trek into Darkness');
INSERT INTO film VALUES (film_s.NEXTVAL,'Guardians of the Galaxy');
 
-- Quit session.
QUIT;

The movie.sql file:

1
2
3
4
5
6
7
8
9
10
11
12
13
14
15
16
17
18
19
20
21
22
23
24
25
26
27
28
29
30
31
32
33
34
35
36
37
38
39
40
41
42
43
44
45
46
47
48
49
50
51
52
53
54
55
56
57
58
59
60
61
62
63
64
65
66
67
68
69
70
71
72
73
74
75
76
77
78
79
80
81
-- Drop movie table and movie_s sequence.
BEGIN
  FOR i IN (SELECT   object_name
            ,        object_type
            FROM     user_objects
            WHERE    object_name IN ('MOVIE','MOVIE_S')) LOOP
    IF    i.object_type = 'TABLE' THEN
      EXECUTE IMMEDIATE 'DROP TABLE ' || i.object_name || ' CASCADE CONSTRAINTS';
    ELSIF i.object_type = 'SEQUENCE' THEN
      EXECUTE IMMEDIATE 'DROP SEQUENCE ' || i.object_name;
    END IF;
  END LOOP;
END;
/
 
-- Create an movie table.
CREATE TABLE movie
( movie_id   NUMBER  CONSTRAINT movie_pk   PRIMARY KEY
, actor_id   NUMBER  CONSTRAINT movie_nn1  NOT NULL
, film_id    NUMBER  CONSTRAINT movie_nn2  NOT NULL
, CONSTRAINT actor_fk FOREIGN KEY (actor_id)
  REFERENCES actor (actor_id)
, CONSTRAINT film_fk  FOREIGN KEY (film_id)
  REFERENCES film(film_id));
 
-- Create table constraint.
CREATE SEQUENCE movie_s;
 
-- Insert translation rows.
INSERT INTO movie
VALUES
( movie_s.NEXTVAL
,(SELECT   actor_id
  FROM     actor
  WHERE    actor_name = 'Chris Hemsworth')
,(SELECT   film_id
  FROM     film
  WHERE    film_name = 'Thor'));
 
INSERT INTO movie
VALUES
( movie_s.NEXTVAL
,(SELECT   actor_id
  FROM     actor
  WHERE    actor_name = 'Chris Hemsworth')
,(SELECT   film_id
  FROM     film
  WHERE    film_name = 'Thor: The Dark World'));
 
INSERT INTO movie
VALUES
( movie_s.NEXTVAL
,(SELECT   actor_id
  FROM     actor
  WHERE    actor_name = 'Chris Pine')
,(SELECT   film_id
  FROM     film
  WHERE    film_name = 'Star Trek'));
 
INSERT INTO movie
VALUES
( movie_s.NEXTVAL
,(SELECT   actor_id
  FROM     actor
  WHERE    actor_name = 'Chris Pine')
,(SELECT   film_id
  FROM     film
  WHERE    film_name = 'Star Trek into Darkness'));
 
INSERT INTO movie
VALUES
( movie_s.NEXTVAL
,(SELECT   actor_id
  FROM     actor
  WHERE    actor_name = 'Chris Pratt')
,(SELECT   film_id
  FROM     film
  WHERE    film_name = 'Guardians of the Galaxy'));
 
-- Quit session.
QUIT;

The tables.sql file, lets you verify the creation of the actor, film, and movie tables:

1
2
3
4
5
6
7
8
9
-- Set Oracle column width.
COL table_name FORMAT A30 HEADING "Table Name"
 
-- Query the tables.
SELECT   table_name
FROM     user_tables;
 
-- Exit SQL*Plus.
QUIT;

The results.sql file, lets you see join results from actor, film, and movie tables:

1
2
3
4
5
6
7
8
9
10
11
-- Format query.
COL film_actors FORMAT A40 HEADING "Actors in Films"
 
-- Diagnostic query.
SELECT   a.actor_name || ', ' || f.film_name AS film_actors
FROM     actor a INNER JOIN movie m
ON       a.actor_id = m.actor_id INNER JOIN film f
ON       m.film_id = f.film_id;
 
-- Quit the session.
QUIT;

The following list_oracle.sh shell script expects to receive the username, password, and fully qualified path in that specific order. The script names are entered manually in the array because this should be a unit test script.

This is an insecure version of the list_oracle.sh script because you provide the password on the command line. It’s better to provide the password as you run the script.

1
2
3
4
5
6
7
8
9
10
11
12
13
14
15
16
17
18
19
20
21
22
23
24
25
26
27
28
29
30
31
32
33
34
35
36
37
38
39
#!/usr/bin/bash
 
# Assign user and password
username="${1}"
password="${2}"
directory="${3}"
 
echo "User name:" ${username}
echo "Password: " ${password}
echo "Directory:" ${directory}
 
# Define an array.
declare -a cmd
 
# Assign elements to an array.
cmd[0]="actor.sql"
cmd[1]="film.sql"
cmd[2]="movie.sql"
 
# Call the array elements.
for i in ${cmd[*]}; do
  sqlplus -s ${username}"/"${password} "@"${directory}"/"${i} > /dev/null
done
 
# Connect and pipe the query result minus errors and warnings to the while loop.
sqlplus -s ${username}/${password} @${directory}/tables.sql 2>/dev/null |
 
# Read through the piped result until it's empty.
while IFS='\n' read actor_name; do
  echo $actor_name
done
 
# Connect and pipe the query result minus errors and warnings to the while loop.
sqlplus -s ${username}/${password} @${directory}/result.sql 2>/dev/null |
 
# Read through the piped result until it's empty.
while IFS='\n' read actor_name; do
  echo $actor_name
done

You can run the shell script with the following syntax:

./list_oracle.sh sample sample /home/student/Code/bash/oracle > output.txt

You can then display the results from the output.txt file with the following command:

cat output.txt command:

It will display the following output:

User name: sample
Password:  sample
Directory: /home/student/Code/bash/oracle
 
Table Name
------------------------------
MOVIE
FILM
ACTOR
 
Actors in Films
----------------------------------------
Chris Hemsworth, Thor
Chris Hemsworth, Thor: The Dark World
Chris Pine, Star Trek
Chris Pine, Star Trek into Darkness
Chris Pratt, Guardians of the Galaxy

As always, I hope this helps those looking for a solution.


PlanetMySQL Voting: Vote UP / Vote DOWN

Meet Devart ODBC Drivers for Oracle, SQL Server, MySQL, Firebird, InterBase, PostgreSQL, SQLite!

$
0
0

Devart team is proud to introduce a new product line - ODBC Drivers. We believe we can offer the best features, quality, and technical support for database application developers.


PlanetMySQL Voting: Vote UP / Vote DOWN

Updates To Our Fault Detection Algorithm

$
0
0

Unexpected downtime is one of your worst nightmares, but most attempts to find problems before they happen are threshold-based. Thresholds create noise, and alerts create false positives so often you may miss actual problems.

When we began building VividCortex, we introduced Adaptive Fault Detection, a feature to detect problems through a combination of statistical anomaly detection and queueing theory. It’s our patent-pending technique to detect system stalls in the database and disk. These are early indicators of serious problems, so it’s really helpful to find them. (Note: “fault” is kind of an ambiguous term for some people. In the context we’re using here, it means a stall/pause/freeze/lockup).

The initial version of fault detection enabled us to find hidden problems nobody suspected, but as our customer base diversified, we found more situations that could fool it. We’ve released a new version that improves upon it. Let’s see how.

How It Works

The old fault detection algorithm was based on statistics, exponentially weighted moving averages, and queueing theory. The new implementation ties together concepts from queueing theory, time series analysis and forecasting, and statistical machine learning. The addition of machine learning is what enables it to be even more adaptive (i.e. even less hard-coded).

Take a look at the following screenshot of some key metrics on a system during a fault. Notice how much chaos there is in the system overall. For example, the burst of network throughput just before an after the fault. Despite this, we would not have detected a fault if work were still getting done. We’re able to reliably detect single-second problems in systems that a human would struggle to make any sense of.

Features

Adaptive fault detection is not based on simple thresholds on metrics such as threads_running. Rather, its algorithm adapts dynamically to work for time series ranging from fairly stable (such as MySQL Concurrency shown above) to highly variable (such as MySQL Queries in the example above). Note how different those metrics are. What does “typical” even mean in such a system?

At the same time, we clearly identify and highlight both the causes and the effects in the system. For example, a screenshot of a different part of the user interface for the same time period highlights how badly a variety of queries were impacted. The fault stalled them.

Features

If we drill down into the details page for one of those queries, we can see that the average latency around the time of the fault is significantly higher, implying that it’s taking more time to get the same amount of work done.

Features

That’s an example of a very short stall, but long stalls are important too.

Detecting Longer Faults

Some customers had long-building, slow-burn stalls in systems. The new fault detection algorithm is better able to detect such multi-second faults. The chart below shows a multi-second fault.

Features

The algorithm can also detect even longer faults. Sometimes these are subtle unless you “zoom out” to see how things have slowly been getting stuck over time. Trick question: what’s stalling our server here?

Features

Okay, it’s xtrabackup. Not really a trick question :-)

You might think this kind of thing is easy to detect. “Just throw an alarm when threads_running is more than 50,” you say. If you try that, though, you’ll see why we invented Adaptive Fault Detection. It’s not easy to balance sensitivity and specificity.

Other Improvements

In addition to the improvements you’ll see, we’ve made a lot of changes to the code as well. Because the code is better organized and diagnostic tools readily available, we can easily add support for different kinds of faults, and because it is testable, we can make sure we are truly measuring system work, the monitoring metric that matters most.

We occasionally find new and interesting kinds of stalls that we want to capture, and we are now in a position to more generically detect such tricky scenarios.

In summary, the improved fault detection algorithm finds entirely new classes of previously undetectable problems for our customers–bona fide “perfect storms” of complex configuration and query interactions.

If you would like to learn more about Adaptive Fault Detection, read our support docs, and if you are interested in monitoring the work your system does, sign up for a free trial.


PlanetMySQL Voting: Vote UP / Vote DOWN

Creating and Restoring Database Backups With mysqldump and MySQL Enterprise Backup – Part 2 of 2

$
0
0

In part one of this post, I gave you a couple examples of how to backup your MySQL databases using mysqldump. In part two, I will show you how to use the MySQL Enterprise Backup (MEB) to create a full and partial backup.


MySQL Enterprise Backup provides enterprise-grade backup and recovery for MySQL. It delivers hot, online, non-blocking backups on multiple platforms including Linux, Windows, Mac & Solaris. To learn more, you may download a whitepaper on MEB.

MySQL Enterprise Backup delivers:

  • NEW! Continuous monitoring – Monitor the progress and disk space usage
  • “Hot” Online Backups – Backups take place entirely online, without interrupting MySQL transactions
  • High Performance – Save time with faster backup and recovery
  • Incremental Backup – Backup only data that has changed since the last backup
  • Partial Backup – Target particular tables or tablespaces
  • Compression – Cut costs by reducing storage requirements up to 90%
  • Backup to Tape – Stream backup to tape or other media management solutions
  • Fast Recovery – Get servers back online and create replicated servers
  • Point-in-Time Recovery (PITR) – Recover to a specific transaction
  • Partial restore – Recover targeted tables or tablespaces
  • Restore to a separate location – Rapidly create clones for fast replication setup
  • Reduce Failures – Use a proven high quality solution from the developers of MySQL
  • Multi-platform – Backup and Restore on Linux, Windows, Mac & Solaris

(from: http://www.mysql.com/products/enterprise/backup.html)

While mysqldump is free to use, MEB is part of MySQL’s Enterprise Edition (EE) – so you need a license to use it. But if you are using MySQL in a production environment, you might want to look at EE, as:

MySQL Enterprise Edition includes the most comprehensive set of advanced features, management tools and technical support to achieve the highest levels of MySQL scalability, security, reliability, and uptime. It reduces the risk, cost, and complexity in developing, deploying, and managing business-critical MySQL applications.
(from: http://www.mysql.com/products/enterprise/)

Before using MEB and backing up your database for the first time, you will need some information:

Information to gather – Where to Find It – How It Is Used

  • Path to MySQL configuration file – Default system locations, hardcoded application default locations, or from --defaults-file option in mysqld startup script. - This is the preferred way to convey database configuration information to the mysqlbackup command, using the --defaults-file option. When connection and data layout information is available from the configuration file, you can skip most of the other choices listed below.
  • MySQL port – MySQL configuration file or mysqld startup script. Used to connect to the database instance during backup operations. Specified via the --port option of mysqlbackup. --port is not needed if available from MySQL configuration file. Not needed when doing an offline (cold) backup, which works directly on the files using OS-level file permissions.
  • Path to MySQL data directory – MySQL configuration file or mysqld startup script. – Used to retrieve files from the database instance during backup operations, and to copy files back to the database instance during restore operations. Automatically retrieved from database connection for hot and warm backups. Taken from MySQL configuration file for cold backups.
  • ID and password of privileged MySQL user – You record this during installation of your own databases, or get it from the DBA when backing up databases you do not own. Not needed when doing an offline (cold) backup, which works directly on the files using OS-level file permissions. For cold backups, you log in as an administrative user. – Specified via the --password option of the mysqlbackup. Prompted from the terminal if the --password option is present without the password argument.
  • Path under which to store backup data – You choose this. See Section 3.1.3, “Designate a Location for Backup Data” for details. – By default, this directory must be empty for mysqlbackup to write data into it, to avoid overwriting old backups or mixing up data from different backups. Use the --with-timestamp option to automatically create a subdirectory with a unique name, when storing multiple sets of backup data under the same main directory.
  • Owner and permission information for backed-up files (for Linux, Unix, and OS X systems) – In the MySQL data directory. – If you do the backup using a different OS user ID or a different umask setting than applies to the original files, you might need to run commands such as chown and chmod on the backup data. See Section A.1, “Limitations of mysqlbackup Command” for details.
  • Size of InnoDB redo log files – Calculated from the values of the innodb_log_file_size and innodb_log_files_in_group configuration variables. Use the technique explained for the --incremental-with-redo-log-only option. – Only needed if you perform incremental backups using the --incremental-with-redo-log-only option rather than the --incremental option. The size of the InnoDB redo log and the rate of generation for redo data dictate how often you must perform incremental backups.
  • Rate at which redo data is generated – Calculated from the values of the InnoDB logical sequence number at different points in time. Use the technique explained for the --incremental-with-redo-log-only option. – Only needed if you perform incremental backups using the --incremental-with-redo-log-only option rather than the --incremental option. The size of the InnoDB redo log and the rate of generation for redo data dictate how often you must perform incremental backups.

    (from: http://dev.mysql.com/doc/mysql-enterprise-backup/3.8/en/backup-prep-gather.html

    For most backup operations, the mysqlbackup command connects to the MySQL server through --user and --password options. If you aren’t going to use the root user, then you will need to create a separate user. Follow these instructions for setting the proper permissions.

    All backup-related operations either create new files or reference existing files underneath a specified directory that holds backup data. Choose this directory in advance, on a file system with sufficient storage. (It could even be remotely mounted from a different server.) You specify the path to this directory with the --backup-dir option for many invocations of the mysqlbackup command.

    Once you establish a regular backup schedule with automated jobs, it is preferable to keep each backup within a timestamped subdirectory underneath the main backup directory. To make the mysqlbackup command create these subdirectories automatically, specify the --with-timestamp option each time you run mysqlbackup.

    For one-time backup operations, for example when cloning a database to set up a replication slave, you might specify a new directory each time, or specify the --force option of mysqlbackup to overwrite older backup files.
    (from http://dev.mysql.com/doc/mysql-enterprise-backup/3.8/en/backup-prep-storage.html

    If you haven’t downloaded and installed mysqlbackup, you may download it from edelivery.oracle.com (registration is required). Install the MySQL Enterprise Backup product on each database server whose contents you intend to back up. You perform all backup and restore operations locally, by running the mysqlbackup command on the same server as the MySQL instance. Information on installation may be found here.

    Now that we have gathered all of the required information and installed mysqlbackup, let’s run a simple and easy backup of the entire database. I installed MEB in my /usr/local directory, so I am including the full path of mysqlbackup. I am using the backup-and-apply-log option, which combines the --backup and the --apply-log options into one. The --backup option performs the initial phase of a backup. The second phase is performed later by running mysqlbackup again with the --apply-log option, which brings the InnoDB tables in the backup up-to-date, including any changes made to the data while the backup was running.

    $ /usr/local/meb/bin/mysqlbackup --user=root --password --backup-dir=/Users/tonydarnell/hotbackups backup-and-apply-log
    MySQL Enterprise Backup version 3.8.2 [2013/06/18] 
    Copyright (c) 2003, 2012, Oracle and/or its affiliates. All Rights Reserved.
    
     mysqlbackup: INFO: Starting with following command line ...
     /usr/local/meb/bin/mysqlbackup --user=root --password 
            --backup-dir=/Users/tonydarnell/hotbackups backup-and-apply-log 
    
    Enter password: 
     mysqlbackup: INFO: MySQL server version is '5.6.9-rc-log'.
     mysqlbackup: INFO: Got some server configuration information from running server.
    
    IMPORTANT: Please check that mysqlbackup run completes successfully.
               At the end of a successful 'backup-and-apply-log' run mysqlbackup
               prints "mysqlbackup completed OK!".
    
    --------------------------------------------------------------------
                           Server Repository Options:
    --------------------------------------------------------------------
      datadir = /usr/local/mysql/data/
      innodb_data_home_dir = /usr/local/mysql/data
      innodb_data_file_path = ibdata1:40M:autoextend
      innodb_log_group_home_dir = /usr/local/mysql/data
      innodb_log_files_in_group = 2
      innodb_log_file_size = 5242880
      innodb_page_size = 16384
      innodb_checksum_algorithm = innodb
      innodb_undo_directory = /usr/local/mysql/data/
      innodb_undo_tablespaces = 0
      innodb_undo_logs = 128
    
    --------------------------------------------------------------------
                           Backup Config Options:
    --------------------------------------------------------------------
      datadir = /Users/tonydarnell/hotbackups/datadir
      innodb_data_home_dir = /Users/tonydarnell/hotbackups/datadir
      innodb_data_file_path = ibdata1:40M:autoextend
      innodb_log_group_home_dir = /Users/tonydarnell/hotbackups/datadir
      innodb_log_files_in_group = 2
      innodb_log_file_size = 5242880
      innodb_page_size = 16384
      innodb_checksum_algorithm = innodb
      innodb_undo_directory = /Users/tonydarnell/hotbackups/datadir
      innodb_undo_tablespaces = 0
      innodb_undo_logs = 128
    
     mysqlbackup: INFO: Unique generated backup id for this is 13742482113579320
    
     mysqlbackup: INFO: Creating 14 buffers each of size 16777216.
    130719 11:36:53 mysqlbackup: INFO: Full Backup operation starts with following threads
    		1 read-threads    6 process-threads    1 write-threads
    130719 11:36:53 mysqlbackup: INFO: System tablespace file format is Antelope.
    130719 11:36:53 mysqlbackup: INFO: Starting to copy all innodb files...
    130719 11:36:53 mysqlbackup: INFO: Copying /usr/local/mysql/data/ibdata1 (Antelope file format).
    130719 11:36:53 mysqlbackup: INFO: Found checkpoint at lsn 135380756.
    130719 11:36:53 mysqlbackup: INFO: Starting log scan from lsn 135380480.
    130719 11:36:53 mysqlbackup: INFO: Copying log...
    130719 11:36:54 mysqlbackup: INFO: Log copied, lsn 135380756.
    
    <font color="blue"><i>(I have truncated some of the database and table output to save space)</font></i>
    .....
    130719 11:36:56 mysqlbackup: INFO: Copying /usr/local/mysql/data/mysql/innodb_index_stats.ibd (Antelope file format).
    130719 11:36:56 mysqlbackup: INFO: Copying /usr/local/mysql/data/mysql/innodb_table_stats.ibd (Antelope file format).
    130719 11:36:56 mysqlbackup: INFO: Copying /usr/local/mysql/data/mysql/slave_master_info.ibd (Antelope file format).
    130719 11:36:56 mysqlbackup: INFO: Copying /usr/local/mysql/data/mysql/slave_relay_log_info.ibd (Antelope file format).
    130719 11:36:56 mysqlbackup: INFO: Copying /usr/local/mysql/data/mysql/slave_worker_info.ibd (Antelope file format).
    .....
    130719 11:36:56 mysqlbackup: INFO: Copying /usr/local/mysql/data/testcert/t1.ibd (Antelope file format).
    130719 11:36:56 mysqlbackup: INFO: Copying /usr/local/mysql/data/testcert/t3.ibd (Antelope file format).
    .....
    130719 11:36:57 mysqlbackup: INFO: Copying /usr/local/mysql/data/watchdb/watches.ibd (Antelope file format).
    .....
    130719 11:36:57 mysqlbackup: INFO: Completing the copy of innodb files.
    130719 11:36:58 mysqlbackup: INFO: Preparing to lock tables: Connected to mysqld server.
    130719 11:36:58 mysqlbackup: INFO: Starting to lock all the tables...
    130719 11:36:58 mysqlbackup: INFO: All tables are locked and flushed to disk
    130719 11:36:58 mysqlbackup: INFO: Opening backup source directory '/usr/local/mysql/data/'
    130719 11:36:58 mysqlbackup: INFO: Starting to backup all non-innodb files in 
    	subdirectories of '/usr/local/mysql/data/'
    .....
    130719 11:36:58 mysqlbackup: INFO: Copying the database directory 'comicbookdb'
    .....
    130719 11:36:59 mysqlbackup: INFO: Copying the database directory 'mysql'
    130719 11:36:59 mysqlbackup: INFO: Copying the database directory 'performance_schema'
    .....
    130719 11:36:59 mysqlbackup: INFO: Copying the database directory 'test'
    .....
    130719 11:36:59 mysqlbackup: INFO: Copying the database directory 'watchdb'
    130719 11:36:59 mysqlbackup: INFO: Completing the copy of all non-innodb files.
    130719 11:37:00 mysqlbackup: INFO: A copied database page was modified at 135380756.
              (This is the highest lsn found on page)
              Scanned log up to lsn 135384397.
              Was able to parse the log up to lsn 135384397.
              Maximum page number for a log record 375
    130719 11:37:00 mysqlbackup: INFO: All tables unlocked
    130719 11:37:00 mysqlbackup: INFO: All MySQL tables were locked for 1.589 seconds.
    130719 11:37:00 mysqlbackup: INFO: Full Backup operation completed successfully.
    130719 11:37:00 mysqlbackup: INFO: Backup created in directory '/Users/tonydarnell/hotbackups'
    130719 11:37:00 mysqlbackup: INFO: MySQL binlog position: filename mysql-bin.000013, position 85573
    
    -------------------------------------------------------------
       Parameters Summary         
    -------------------------------------------------------------
       Start LSN                  : 135380480
       End LSN                    : 135384397
    -------------------------------------------------------------
    
     mysqlbackup: INFO: Creating 14 buffers each of size 65536.
    130719 11:37:00 mysqlbackup: INFO: Apply-log operation starts with following threads
    		1 read-threads    1 process-threads
    130719 11:37:00 mysqlbackup: INFO: ibbackup_logfile's creation parameters:
              start lsn 135380480, end lsn 135384397,
              start checkpoint 135380756.
     mysqlbackup: INFO: InnoDB: Starting an apply batch of log records to the database...
    InnoDB: Progress in percent: 0 1 .... 99 Setting log file size to 5242880
    Setting log file size to 5242880
    130719 11:37:00 mysqlbackup: INFO: We were able to parse ibbackup_logfile up to
              lsn 135384397.
     mysqlbackup: INFO: Last MySQL binlog file position 0 85573, file name mysql-bin.000013
    130719 11:37:00 mysqlbackup: INFO: The first data file is '/Users/tonydarnell/hotbackups/datadir/ibdata1'
              and the new created log files are at '/Users/tonydarnell/hotbackups/datadir'
    130719 11:37:01 mysqlbackup: INFO: Apply-log operation completed successfully.
    130719 11:37:01 mysqlbackup: INFO: Full backup prepared for recovery successfully.
    
    mysqlbackup completed OK!

    Now, I can take a look at the backup file that was created:

    root@macserver01: $ pwd
    /Users/tonydarnell/hotbackups
    root@macserver01: $ ls -l
    total 8
    -rw-r--r--   1 root  staff  351 Jul 19 11:36 backup-my.cnf
    drwx------  21 root  staff  714 Jul 19 11:37 datadir
    drwx------   6 root  staff  204 Jul 19 11:37 meta
    $ ls -l datadir
    total 102416
    drwx------   5 root  staff       170 Jul 19 11:36 comicbookdb
    -rw-r-----   1 root  staff   5242880 Jul 19 11:37 ib_logfile0
    -rw-r-----   1 root  staff   5242880 Jul 19 11:37 ib_logfile1
    -rw-r--r--   1 root  staff      4608 Jul 19 11:37 ibbackup_logfile
    -rw-r--r--   1 root  staff  41943040 Jul 19 11:37 ibdata1
    drwx------  88 root  staff      2992 Jul 19 11:36 mysql
    drwx------  55 root  staff      1870 Jul 19 11:36 performance_schema
    drwx------   3 root  staff       102 Jul 19 11:36 test
    drwx------  30 root  staff      1020 Jul 19 11:36 testcert
    drwx------  19 root  staff       646 Jul 19 11:36 watchdb
    
    root@macserver01: $ ls -l meta
    total 216
    -rw-r--r--  1 root  staff  90786 Jul 19 11:37 backup_content.xml
    -rw-r--r--  1 root  staff   5746 Jul 19 11:36 backup_create.xml
    -rw-r--r--  1 root  staff    265 Jul 19 11:37 backup_gtid_executed.sql
    -rw-r--r--  1 root  staff    321 Jul 19 11:37 backup_variables.txt

    As you can see, the backup was created in /Users/tonydarnell/hotbackups. If I wanted to have a unique folder for this backup, I can use the --with-timestamp.

    The --with-timestamp option places the backup in a subdirectory created under the directory you specified above. The name of the backup subdirectory is formed from the date and the clock time of the backup run.
    (from: http://dev.mysql.com/doc/mysql-enterprise-backup/3.8/en/mysqlbackup.html)

    I will run the same backup command again, but with the --with-timestamp option:

    (I am not going to duplicate the entire output – but I will only show you the output where it creates the sub-directory under /Users/tonydarnell/hotbackups)

    $ /usr/local/meb/bin/mysqlbackup --user=root --password --backup-dir=/Users/tonydarnell/hotbackups backup-and-apply-log --with-timestamp
    ......
    130719 11:49:54 mysqlbackup: INFO: The first data file is '/Users/tonydarnell/hotbackups/2013-07-19_11-49-48/datadir/ibdata1'
              <font color="blue">and the new created log files are at '/Users/tonydarnell/hotbackups/2013-07-19_11-49-48/datadir'</font>
    130719 11:49:54 mysqlbackup: INFO: Apply-log operation completed successfully.
    130719 11:49:54 mysqlbackup: INFO: Full backup prepared for recovery successfully.
    
    mysqlbackup completed OK!

    So, I ran the backup again to get a unique directory. Instead of the backup files/directories being placed in /Users/tonydarnell/hotbackups, it created a sub-directory with a timestamp for the directory name:

    $ pwd
    /Users/tonydarnell/hotbackups
    root@macserver01: $ ls -l
    total 0
    drwx------  5 root  staff  170 Jul 19 11:49 2013-07-19_11-49-48
    $ ls -l 2013-07-19_11-49-48
    total 8
    -rw-r--r--   1 root  staff  371 Jul 19 11:49 backup-my.cnf
    drwx------  21 root  staff  714 Jul 19 11:49 datadir
    drwx------   6 root  staff  204 Jul 19 11:49 meta

    Note: If you don’t use the --backup-and-apply-log option you will need to read this: Immediately after the backup job completes, the backup files might not be in a consistent state, because data could be inserted, updated, or deleted while the backup is running. These initial backup files are known as the raw backup.

    You must update the backup files so that they reflect the state of the database corresponding to a specific InnoDB log sequence number. (The same kind of operation as crash recovery.) When this step is complete, these final files are known as the prepared backup.

    During the backup, mysqlbackup copies the accumulated InnoDB log to a file called ibbackup_logfile. This log file is used to “roll forward” the backed-up data files, so that every page in the data files corresponds to the same log sequence number of the InnoDB log. This phase also creates new ib_logfiles that correspond to the data files.

    The mysqlbackup option for turning a raw backup into a prepared backup is --apply-log. You can run this step on the same database server where you did the backup, or transfer the raw backup files to a different system first, to limit the CPU and storage overhead on the database server.

    Note: Since the --apply-log operation does not modify any of the original files in the backup, nothing is lost if the operation fails for some reason (for example, insufficient disk space). After fixing the problem, you can safely retry --apply-log and by specifying the --force option, which allows the data and log files created by the failed --apply-log operation to be overwritten.

    For simple backups (without compression or incremental backup), you can combine the initial backup and the --apply-log step using the option --backup-and-apply-log.
    (from: http://dev.mysql.com/doc/mysql-enterprise-backup/3.8/en/backup-apply-log.html)

    One file that was not copied was the my.cnf file. You will want to have a separate script to copy this at regular intervals. If you put the mysqlbackup command in a cron or Windows Task Manager job, you can add a way to copy the my.cnf file as well.

    Now that we have a completed backup, we are going to copy the backup files and the my.cnf file over to a different server to restore the databases. We will be using a server that was setup as a slave server to the server where the backup occurred. If you need to restore the backup to the same server, you will need to refer to this section of the mysqlbackup manual. I copied the backup files as well as the my.cnf file to the new server:

    # pwd
    /Users/tonydarnell/hotbackups
    # ls -l
    total 16
    drwxrwxrwx  5 tonydarnell  staff   170 Jul 19 15:38 2013-07-19_11-49-48

    On the new server (where I will restore the data), I shutdown the mysqld process (mysqladmin -uroot -p shutdown), copied the my.cnf file to the proper directory, and now I can restore the database to the new server, using the copy-back option. The copy-back option requires the database server to be already shut down, then copies the data files, logs, and other backed-up files from the backup directory back to their original locations, and performs any required postprocessing on them.
    (from: http://dev.mysql.com/doc/mysql-enterprise-backup/3.8/en/restore.restore.html)

    # /usr/local/meb/bin/mysqlbackup --defaults-file=/etc/my.cnf --backup-dir=/Users/tonydarnell/hotbackups/2013-07-19_11-49-48 copy-back
    MySQL Enterprise Backup version 3.8.2 [2013/06/18] 
    Copyright (c) 2003, 2012, Oracle and/or its affiliates. All Rights Reserved.
    
     mysqlbackup: INFO: Starting with following command line ...
     /usr/local/meb/bin/mysqlbackup --defaults-file=/etc/my.cnf 
            --backup-dir=/Users/tonydarnell/hotbackups/2013-07-19_11-49-48 
            copy-back 
    
    IMPORTANT: Please check that mysqlbackup run completes successfully.
               At the end of a successful 'copy-back' run mysqlbackup
               prints "mysqlbackup completed OK!".
    
    --------------------------------------------------------------------
                           Server Repository Options:
    --------------------------------------------------------------------
      datadir = /usr/local/mysql/data
      innodb_data_home_dir = /usr/local/mysql/data
      innodb_data_file_path = ibdata1:40M:autoextend
      innodb_log_group_home_dir = /usr/local/mysql/data
      innodb_log_files_in_group = 2
      innodb_log_file_size = 5M
      innodb_page_size = Null
      innodb_checksum_algorithm = innodb
    
    --------------------------------------------------------------------
                           Backup Config Options:
    --------------------------------------------------------------------
      datadir = /Users/tonydarnell/hotbackups/2013-07-19_11-49-48/datadir
      innodb_data_home_dir = /Users/tonydarnell/hotbackups/2013-07-19_11-49-48/datadir
      innodb_data_file_path = ibdata1:40M:autoextend
      innodb_log_group_home_dir = /Users/tonydarnell/hotbackups/2013-07-19_11-49-48/datadir
      innodb_log_files_in_group = 2
      innodb_log_file_size = 5242880
      innodb_page_size = 16384
      innodb_checksum_algorithm = innodb
      innodb_undo_directory = /Users/tonydarnell/hotbackups/2013-07-19_11-49-48/datadir
      innodb_undo_tablespaces = 0
      innodb_undo_logs = 128
    
     mysqlbackup: INFO: Creating 14 buffers each of size 16777216.
    130719 15:54:41 mysqlbackup: INFO: Copy-back operation starts with following threads
    		1 read-threads    1 write-threads
    130719 15:54:41 mysqlbackup: INFO: Copying /Users/tonydarnell/hotbackups/2013-07-19_11-49-48/datadir/ibdata1.
    .....
    130719 15:54:42 mysqlbackup: INFO: Copying /Users/tonydarnell/hotbackups/2013-07-19_11-49-48/datadir/comicbookdb/comics.ibd.
    .....
    130719 15:54:42 mysqlbackup: INFO: Copying /Users/tonydarnell/hotbackups/2013-07-19_11-49-48/datadir/mysql/innodb_index_stats.ibd.
    130719 15:54:42 mysqlbackup: INFO: Copying /Users/tonydarnell/hotbackups/2013-07-19_11-49-48/datadir/mysql/innodb_table_stats.ibd.
    130719 15:54:42 mysqlbackup: INFO: Copying /Users/tonydarnell/hotbackups/2013-07-19_11-49-48/datadir/mysql/slave_master_info.ibd.
    130719 15:54:42 mysqlbackup: INFO: Copying /Users/tonydarnell/hotbackups/2013-07-19_11-49-48/datadir/mysql/slave_relay_log_info.ibd.
    130719 15:54:42 mysqlbackup: INFO: Copying /Users/tonydarnell/hotbackups/2013-07-19_11-49-48/datadir/mysql/slave_worker_info.ibd.
    .....
    130719 15:54:43 mysqlbackup: INFO: Copying /Users/tonydarnell/hotbackups/2013-07-19_11-49-48/datadir/watchdb/watches.ibd.
    .....
    130719 15:54:43 mysqlbackup: INFO: Copying the database directory 'comicbookdb'
    .....
    130719 15:54:43 mysqlbackup: INFO: Copying the database directory 'mysql'
    130719 15:54:43 mysqlbackup: INFO: Copying the database directory 'performance_schema'
    .....
    130719 15:54:43 mysqlbackup: INFO: Copying the database directory 'test'
    .....
    130719 15:54:43 mysqlbackup: INFO: Copying the database directory 'watchdb'
    130719 15:54:43 mysqlbackup: INFO: Completing the copy of all non-innodb files.
    130719 15:54:43 mysqlbackup: INFO: Copying the log file 'ib_logfile0'
    130719 15:54:43 mysqlbackup: INFO: Copying the log file 'ib_logfile1'
    130719 15:54:44 mysqlbackup: INFO: Copy-back operation completed successfully.
    130719 15:54:44 mysqlbackup: INFO: Finished copying backup files to '/usr/local/mysql/data'
    
    mysqlbackup completed OK!

    I can now restart MySQL. I have a very small database (less than 50 megabytes). But it took less than a minute to restore the database. If I had to rebuild my database using mysqldump, it would take a lot longer. If you have a very large database, the different in using mysqlbackup and mysqldump could be in hours. For example, a 32-gig database with 33 tables takes about eight minutes to restore with mysqlbackup. Restoring the same database with a mysqldump file takes over two hours.

    An easy way to check to see if the databases match (assuming that I haven’t added any new records in any of the original databases – which I haven’t), I can use one of the MySQL Utilities – mysqldbcompare. I wrote about how to do this in an earlier blog about using it to test two replicated databases, but it will work here as well – see Using MySQL Utilities Workbench Script mysqldbcompare To Compare Two Databases In Replication.

    The mysqldbcompare utility “compares the objects and data from two databases to find differences. It identifies objects having different definitions in the two databases and presents them in a diff-style format of choice. Differences in the data are shown using a similar diff-style format. Changed or missing rows are shown in a standard format of GRID, CSV, TAB, or VERTICAL.” (from: mysqldbcompare — Compare Two Databases and Identify Differences)

    Some of the syntax may have changed for mysqldbcompare since I wrote that blog, so you will need to reference the help notes for mysqldbcompare. You would need to run this for each of your databases.

    $ mysqldbcompare --server1=scripts:scripts999@192.168.1.2   --server2=scripts:scripts999@192.168.1.123 --run-all-tests --difftype=context comicbookdb:comicbookdb
    # server1 on 192.168.1.2: ... connected.
    # server2 on 192.168.1.123: ... connected.
    # Checking databases comicbookdb on server1 and comicbookdb on server2
    
                                                        Defn    Row     Data   
    Type      Object Name                               Diff    Count   Check  
    --------------------------------------------------------------------------- 
    TABLE     comics                                    pass    pass    pass   
    
    Databases are consistent.
    
    # ...done

    You can try and run this for the mysql database, but you may get a few errors regarding the mysql.backup_history and mysql.backup_progress tables:

    $ mysqldbcompare --server1=scripts:scripts999@192.168.1.2   --server2=scripts:scripts999@192.168.1.123 --run-all-tests --difftype=context mysql:mysql
    # server1 on 192.168.1.2: ... connected.
    # server2 on 192.168.1.123: ... connected.
    # Checking databases mysql on server1 and mysql on server2
    
                                                        Defn    Row     Data   
    Type      Object Name                               Diff    Count   Check  
    --------------------------------------------------------------------------- 
    TABLE     backup_history                            pass    FAIL    SKIP    
    
    Row counts are not the same among mysql.backup_history and mysql.backup_history.
    
    No primary key found.
    
    TABLE     backup_progress                           pass    FAIL    SKIP    
    
    Row counts are not the same among mysql.backup_progress and mysql.backup_progress.
    
    No primary key found.
    
    TABLE     columns_priv                              pass    pass    pass    
    TABLE     db                                        pass    pass    pass    
    TABLE     event                                     pass    pass    pass    
    TABLE     func                                      pass    pass    pass    
    TABLE     general_log                               pass    pass    SKIP    
    
    No primary key found.
    
    TABLE     help_category                             pass    pass    pass    
    TABLE     help_keyword                              pass    pass    pass    
    TABLE     help_relation                             pass    pass    pass    
    TABLE     help_topic                                pass    pass    pass    
    TABLE     innodb_index_stats                        pass    pass    pass    
    TABLE     innodb_table_stats                        pass    pass    pass    
    TABLE     inventory                                 pass    pass    pass    
    TABLE     ndb_binlog_index                          pass    pass    pass    
    TABLE     plugin                                    pass    pass    pass    
    TABLE     proc                                      pass    pass    pass    
    TABLE     procs_priv                                pass    pass    pass    
    TABLE     proxies_priv                              pass    pass    pass    
    TABLE     servers                                   pass    pass    pass    
    TABLE     slave_master_info                         pass    pass    pass    
    TABLE     slave_relay_log_info                      pass    pass    pass    
    TABLE     slave_worker_info                         pass    pass    pass    
    TABLE     slow_log                                  pass    pass    SKIP    
    
    No primary key found.
    
    TABLE     tables_priv                               pass    pass    pass    
    TABLE     time_zone                                 pass    pass    pass    
    TABLE     time_zone_leap_second                     pass    pass    pass    
    TABLE     time_zone_name                            pass    pass    pass    
    TABLE     time_zone_transition                      pass    pass    pass    
    TABLE     time_zone_transition_type                 pass    pass    pass    
    TABLE     user                                      pass    pass    pass   
    
    Database consistency check failed.
    
    # ...done

    For example, when you compare the mysql.backup_history tables, the original database will have two entries – as I ran mysqlbackup twice. But the second backup entry doesn’t get entered until after the backup has occurred, and it isn’t reflected in the backup files.

    Original Server

    mysql&gt; select count(*) from mysql.backup_history;
    +----------+
    | count(*) |
    +----------+
    |        2 |
    +----------+
    1 row in set (0.00 sec)

    Restored Server

    mysql&gt; select count(*) from mysql.backup_history;
    +----------+
    | count(*) |
    +----------+
    |        1 |
    +----------+
    1 row in set (0.00 sec)

    For the mysql.backup_progress tables, the original database has ten rows, while the restored database has seven.

    There are many options for using mysqlbackup, including (but not limited to) incremental backup, partial backup , compression, backup to tape, point-in-time recovery (PITR), partial restore, etc. If you are running MySQL in a production environment, then you should look at MySQL Enterprise Edition, which includes MySQL Enterprise Backup. Of course, you should always have a backup and recovery plan in place. Finally, if and when possible, practice restoring your backup on a regular basis, to make sure that if your server crashes, you can restore your database quickly.


    Tony Darnell is a Principal Sales Consultant for MySQL, a division of Oracle, Inc. MySQL is the world’s most popular open-source database program. Tony may be reached at info [at] ScriptingMySQL.com and on LinkedIn.

    PlanetMySQL Voting: Vote UP / Vote DOWN

Decrypt .mylogin.cnf

$
0
0

General-purpose MySQL applications should read MySQL option files like /etc/my.cnf, ~/.my.cnf, ... and ~/.mylogin.cnf. But ~/.mylogin.cnf is encrypted. That's a problem for our ocelotgui GUI application, and I suppose other writers of Linux applications could face the same problem, so I'll share the code we'll use to solve it.

First some words of defence. I think that encryption (or more correctly obfuscation) is okay as an option: a customer asked for it, and it prevents the most casual snoopers -- rather like a low fence: anyone can get over it, but making it a bit troublesome will make most passersby pass by. I favoured the idea, though other MySQL employees were against it on the old "false sense of security" argument. After all, by design, the data must be accessible without requiring credentials. So just XORing the file contents with a fixed key would have done the job.

Alas, the current implementation does more: the configuration editor not only XORs, it encrypts with AES 128-bit ecb. The Oxford-dictionary word for this is supererogation. This makes reading harder. I've seen only one bug report / feature request touching on the problem, but I've also seen that others have looked into it and provided some solutions. Kolbe Kegel showed how to display the passwords, Serge Frezefond used a different method to display the whole file. Great. However, their solutions require downloading MySQL source code and rebuilding a section. No good for us, because ocelotgui contains no MySQL code and doesn't statically link to it. We need code that accesses a dynamic library at runtime, and unless I missed something big, the necessary stuff isn't exported from the mysql client library.

Which brings us to ... ta-daa ... readmylogin.c. This program will read a .mylogin.cnf file and display the contents. Most of it is a BSD licence, so skip to the end to see the twenty lines of code. Requirements are gcc, and libcrypto.so (the openSSL library which I believe is easily downloadable on most Linux distros). Instructions for building and running are in the comments. Cutters-and-pasters should beware that less-than-sign or greater-than-sign may be represented with HTML entities.

/*
readmylogin.c Decrypt and display a MySQL .mylogin.cnf file.

Uses openSSL libcrypto.so library. Does not use a MySQL library.

Copyright (c) 2015 by Ocelot Computer Services Inc.

All rights reserved.

Redistribution and use in source and binary forms, with or without
modification, are permitted provided that the following conditions are met:
    * Redistributions of source code must retain the above copyright
      notice, this list of conditions and the following disclaimer.
    * Redistributions in binary form must reproduce the above copyright
      notice, this list of conditions and the following disclaimer in the
      documentation and/or other materials provided with the distribution.
    * Neither the name of the  nor the
      names of its contributors may be used to endorse or promote products
      derived from this software without specific prior written permission.

THIS SOFTWARE IS PROVIDED BY THE COPYRIGHT HOLDERS AND CONTRIBUTORS "AS IS" AND
ANY EXPRESS OR IMPLIED WARRANTIES, INCLUDING, BUT NOT LIMITED TO, THE IMPLIED
WARRANTIES OF MERCHANTABILITY AND FITNESS FOR A PARTICULAR PURPOSE ARE
DISCLAIMED. IN NO EVENT SHALL  BE LIABLE FOR ANY
DIRECT, INDIRECT, INCIDENTAL, SPECIAL, EXEMPLARY, OR CONSEQUENTIAL DAMAGES
(INCLUDING, BUT NOT LIMITED TO, PROCUREMENT OF SUBSTITUTE GOODS OR SERVICES;
LOSS OF USE, DATA, OR PROFITS; OR BUSINESS INTERRUPTION) HOWEVER CAUSED AND
ON ANY THEORY OF LIABILITY, WHETHER IN CONTRACT, STRICT LIABILITY, OR TORT
(INCLUDING NEGLIGENCE OR OTHERWISE) ARISING IN ANY WAY OUT OF THE USE OF THIS
SOFTWARE, EVEN IF ADVISED OF THE POSSIBILITY OF SUCH DAMAGE.
  
  To compile and link and run with Linux and gcc:
  1. Install openSSL
  2. If installation puts libcrypto.so in an unusual directory, say
     export LD_LIBRARY_PATH=/unusual-directory
  3. gcc -o readmylogin readmylogin.c -lcrypto
  
  To run, it's compulsory to specify where the file is, for example:
  ./readmylogin .mylogin.cnf

  MySQL may change file formats without notice, but the following is
  true for files produced by mysql_config_editor with MySQL 5.6:
  * First four bytes are unused, probably reserved for version number
  * Next twenty bytes are the basis of the key, to be XORed in a loop
    until a sixteen-byte key is produced.
  * The rest of the file is, repeated as necessary:
      four bytes = length of following cipher chunk, little-endian
      n bytes = cipher chunk
  * Encryption is AES 128-bit ecb.
  * Chunk lengths are always a multiple of 16 bytes (128 bits).
    Therefore there may be padding. We assume that any trailing byte
    containing a value less than '\n' is a padding byte.    

  To make the code easy to understand, all error handling code is
  reduced to "return -1;" and buffers are fixed-size.
  To make the code easy to build, the line
  #include "/usr/include/openssl/aes.h"
  is commented out, but can be uncommented if aes.h is available.
  
  This is version 1, May 21 2015.
  More up-to-date versions of this program may be available
  within the ocelotgui project https://github.com/ocelot-inc/ocelotgui
*/

#include <stdio.h>
#include <fcntl.h>
//#include "/usr/include/openssl/aes.h"

#ifndef HEADER_AES_H
#define AES_BLOCK_SIZE 16
typedef struct aes_key_st { unsigned char x[244]; } AES_KEY;
#endif

unsigned char cipher_chunk[4096], output_buffer[65536];
int fd, cipher_chunk_length, output_length= 0, i;
char key_in_file[20];
char key_after_xor[AES_BLOCK_SIZE] = {0,0,0,0,0,0,0,0,0,0,0,0,0,0,0,0};
AES_KEY key_for_aes;

int main(int argc, char *argv[])
{
  if (argc < 1) return -1;
  if ((fd= open(argv[1], O_RDONLY)) == -1) return -1;
  if (lseek(fd, 4, SEEK_SET) == -1) return -1;
  if (read(fd, key_in_file, 20) != 20) return -1;
  for (i= 0; i < 20; ++i) *(key_after_xor + (i%16))^= *(key_in_file + i);
  AES_set_decrypt_key(key_after_xor, 128, &key_for_aes);
  while (read(fd, &cipher_chunk_length, 4) == 4)
  {
    if (cipher_chunk_length > sizeof(cipher_chunk)) return -1;
    if (read(fd, cipher_chunk, cipher_chunk_length) != cipher_chunk_length) return -1;
    for (i= 0; i < cipher_chunk_length; i+= AES_BLOCK_SIZE)
    {
      AES_decrypt(cipher_chunk+i, output_buffer+output_length, &key_for_aes);
      output_length+= AES_BLOCK_SIZE;
      while (*(output_buffer+(output_length-1)) < '\n') --output_length;
    }
  }
  *(output_buffer + output_length)= '\0';
  printf("%s.\n", output_buffer);
}

PlanetMySQL Voting: Vote UP / Vote DOWN
Viewing all 18800 articles
Browse latest View live


<script src="https://jsc.adskeeper.com/r/s/rssing.com.1596347.js" async> </script>